combining off-camera flash and ambient light
For a semi-guest-post this week, I thought I’d use a photo taken by my friend Josh Lynn, and reverse-engineer the lighting. By scrutinizing the photo, we’ll try and decipher how he set this up. I did of course have the help of double-checking with Josh himself, and by checking the EXIF data.
Josh is a New Jersey wedding photographer – but this photo of our model, Danielle, was taken at a recent photo shootout in Manhattan. Josh led a group of photographers showing some lighting techniques.
So let’s see what we can figure out here …
1. direction of light.
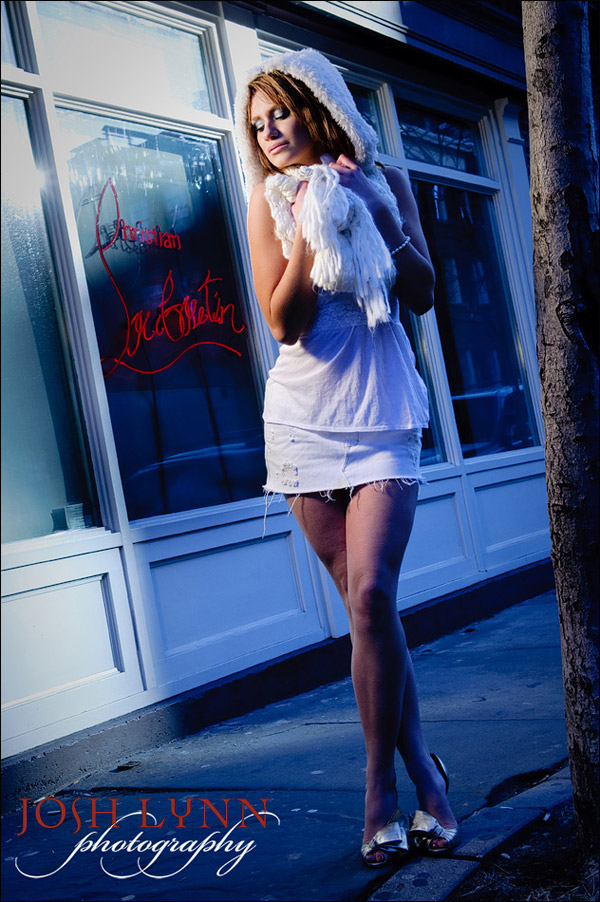
Looking at the photo, the first thing we need to figure out, is the direction of light. It is apparent that Josh had used additional lighting of some kind. The main source of light was set up to camera-left. We can make a pretty good guess at how high the light must have been, by looking at how the shadows are placed. The first place I would look as at our model’s face, and see how the shadow of her nose falls on her face. And from that we have a fairly good idea of the placement of the light.
2. color balance.
Next up, the bold colors should tell us that there were light sources with different color balance. From experience, I would take a guess that we had a tungsten light source on our model, allowing a daylight background to go blue-ish in comparison. This jump in color balance would be explained this way. We have a pleasant warm color on her face, but this sharply changes to blue.
3. gelled flash or video light?
Now that we have a strong idea that our model was lit by some tungsten light source, we have to figure out what exactly Josh used here to light – video light or flash. Video light tends to have a strong fall-off to the edges, giving a spot-lit effect on our subject. The light that falls on Danielle is more widely spread than we’re used to when we use video light for stills photography. So I would take a guess that Josh had used flash here … and he confirmed this, and he also said he had used one of the gels that came with the Nikon speedlight to gel the flash for tungsten.
4. light modifier on the flash?
Next we can try and decipher whether Josh had used a softbox here, or some kind of light modifier. The fall-off to the shadows on her, would indicate that there was no softbox used. I’ve also worked with Josh before, so I know he has a preference for using a bare flash. Checking with him now, he said that he had used direct off-camera flash here. The flash was held up on a monopod by another photographer.
5. Camera and flash settings.
Looking at the photo, it would appear there is a shaft of sunlight that falls behind our model. The sun can also be seen as a reflection in the window. (Josh did confirm the hot spot in the window is the sun, and not a reflection of another flash.) We can therefore guess that the shaft of sunlight was quite bright. Our model is standing in the shade. This had to have been deliberate positioning of our model to have her in even light, and then use additional lighting.
This all implies that we would’ve had to be close to maximum sync speed, with a low ISO and a small aperture. This would’ve under-exposed our model .. who we then light up with off-camera flash.
Here is where a look at the EXIF data comes in handy, to see the specifics:
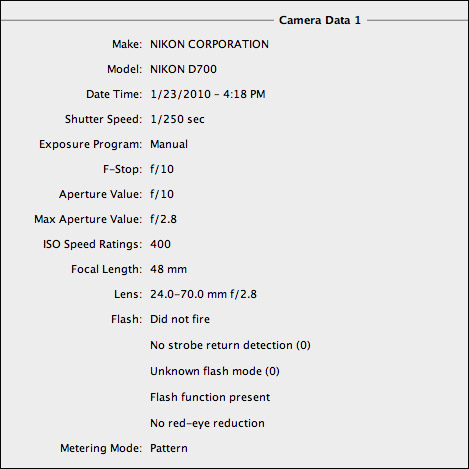
And there we have it … Josh used maximum flash sync speed.
There are good reasons for this choice.
ISO was 400 .. and our aperture was f10 … which is a fairly small aperture. Personally, I would’ve dropped the ISO by a stop, or two stops, to get a medium aperture. But these are choices the individual photographer makes to fit with a specific style.
6. TTL flash or manual flash?
Something else that the EXIF data tells us, is that the camera didn’t detect a flash that fired. This would mean that no TTL flash was used, but that the off-camera flash was fired by a wireless transceiver, such as a PocketWizard Plus II unit. This then would imply that Josh had used manual flash. With the Nikon speedlights, you can use Auto mode quite easily. However, it just made sense to use manual flash here.
And there we have the final image. Exposure for the background (ambient light), we use flash to expose correctly for our subject model in the foreground.
Over the past few weeks there have been several articles re-iterating a method in how to balance flash with available light – and I hope this example helps in showing how this specific method works in a different scenario.
I liked the indirect way in which this article was written, lacking interspersed numbers, a refreshing change to tell you the truth.
Would you share your favorite exif viewer for Mac – thanks.
hello, love the way u interpret it :) its a good learning way of posting :), sorry for my bad english.
i did the same thing before, for a wedding, beach side, using tungsten modifier, i created a blue-ish background which seem like in the wee evening, the couple loves it.
On the Mac, you can view quite a bit of EXIF data in Preview alone … google for EXIF viewer mac, and I’m sure you’ll turn up with a number of good ones … I use Aperture for managing photos, so I just use that for viewing EXIF data, too, usually
With this additional information AND being physically being next to Josh when he shot this did helped me out! Thanks Josh & Neil!
So, Neil typed this all up last night (or was it 5am today) :)
As I have mentioned with this “trick” before. This type of imagery is NOT for shooting all day long. This is the kind of thing you can use on occasion to create different images that others just can’t without remote lighting, practice and specific knowledge of lighting and color temp.
Key things – Look at the timestamp.. this was taken at 4pm and the sun was BRIGHT so you need to use your flash at almost full or full power to compensate for the Sun.
Low ISO + Max Shutter sync + Closed down fstop = an image like this. If I slow the shutter speed down more ambient would come in, killing the effect.
MAX Shutter – I use Pocket wizards for the most part.. TTL is not an option but I have full control over the image.
Model Placement – She is literally directed to stand/hangout in that little strip of “tree shadow”. So the Sun isn’t influencing her exposure as much as the background.
More to come later..
Josh
I’m just curious re the comment that it made sense to use manual flash here, instead of TTL, and why Josh says in his comment that “TTL is not an option”? I would have thought the opposite, that “on location” it would actually be preferable to use TTL flash?
John .. these are fairly static setups.
In other words, the distance between the light and the model remains the same.
Then manual flash is easier to work with since the variables that affect manual flash exposure, remains the same. distance / power / aperture / ISO
You therefore have consistent exposure from frame to frame. TTL flash metering could introduce changes in the flash exposure, thereby not giving consistent exposures. This then slows down your post-processing since you have to adjust individual images for exposure.
And as you adjust the overall exposure in Photoshop or Lightroom, your model will appear brighter / darker … as well as your background. This gives an inconsistent look from frame to frame, if that is an important factor for you on a shoot.
John,
Well, Neil is correct that by going all manual my exposures are consistent.. But what I meant with “TTL is not an option” is I am using the Pocket Wizards that do not offer TTL. (the standard plus II versions)
But the reason I use them is that it takes the complications out of exposure.. I don’t need to adjust exposure comp as my composition changes.. The model – light distance remains the same so the exposure remains the same.
Or rephrased – If I was to use TTL.. my exposure would change if I went for a closeup vs a full length because the camera would be doing the thinking.
As always very interessting article :-)
Hi Neil,
I am always impressed with your work and have learned a lot from your postings. I did a Maternity Photo shoot last week and wanted to get your critique on it.
http://www.ckaophotography.com/p802345910
I used various lens on each shot. The EXIF is listed below of the pics. I used 2 external flash 2 580ex: 1 is on top of the camera and the other one is usually positioned to hit the shadowed areas.
I shot this with a Canon Mark II
Any Critiques will be appreciated! I just want to know what to know what I could do to improve the images.
Thanks in advance!
Cham
Cham .. repost in the Tangents forum. This way there’s a specific thread on your photo session, and we can keep the posts and articles here on the Tangents blog more on-topic. :)
I just love this kind of post, it’s like a photo detective gamed! ;)
Hi Josh,
The image of the sun in de first window of the shop tell me
that it is possible that the time of your photo is n’t 4:18 pm ,but earlier
Is that correct ?
On the left side of the last window, behind danielle, there is a dark long
shadow. I think of the trunk of the tree on the photo.
How is that possible with one light ??
Please, will you explain me the sharp edge of the shadow
on the top of the photo, right above the head of danielle.
Jan
Jan, since Josh is a wedding photographer, I know he would keep his cameras synced to each other and at the correct time. Perhaps he hadn’t adjusted for Daylight Savings Time .. I don’t know. Even if so, it would be one hour we’d be quibbling about then. And ultimately, it wouldn’t really affect the explanation of the setup here,.
As for the placement of the shadows as you question there, I can’t say more than it just is how it appears. The image is pretty much straight out of camera.
So, in bridge I opened the raw folder of that shoot..
Here you can see the sequence, the middle image is the one used for the blog post.
The last one, the flash did not fire because someone else robbed me. :)
So, I cropped it.. and as you can see these are the untouched raw files in bridge. So I added some contract and saturation to that final image. If you look at that shadow in the background.. the SUN is just peeking over the building (or about to drop behind it), so the shadow is the building.
Josh
Josh, thanks for the good explanation !!!!
Jan
Josh,
Fine photo there. I like how there is a bluish neon-like lighting effect on the right, but it is created using color balance changes. :-)
Neil,
Excellent reverse engineering of Josh’s photo. :-)