Wedding photography: Night-time city lights & off-camera flash
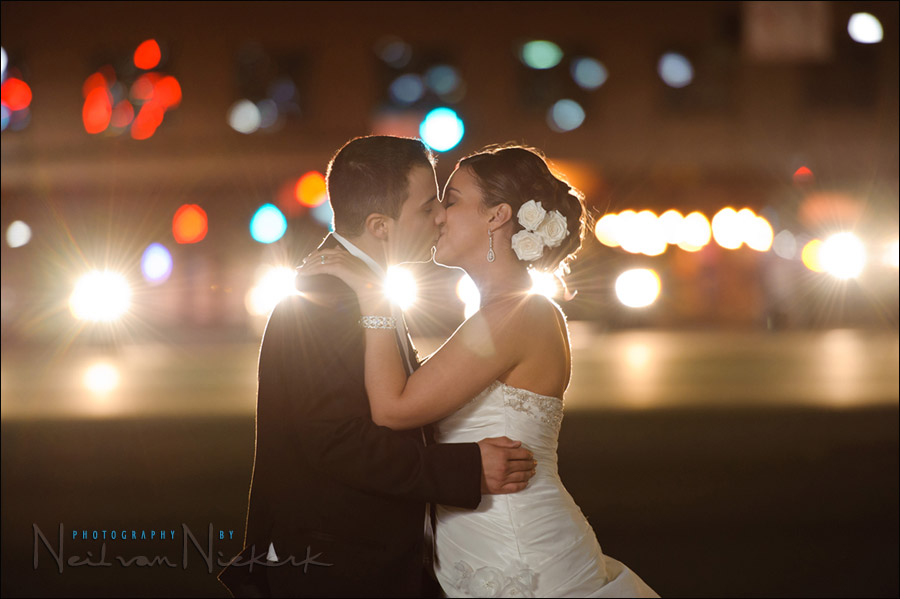
For the romantic portraits, I often take a couple around the venue – the light is just different than during the day. This is where video light comes into its own. Here though, I wanted some of the city lights and light from the traffic outside the venue to appear in the background. The way I envisioned it, was as a stream of cars behind them, but in the first few test images, the cars were too distinct, even at f2.8 and 200mm focal length. Looking at how the approaching cars lined up at the traffic intersection, I decided to use that instead, and let the cars’ headlights flare out.
Then I just needed some light on the couple to complete the image …
Shortly before we went out, I was still photographing a last few family groups that we didn’t get to earlier in the day. So I had a light-stand and white shoot-through umbrella ready. (Exactly the same off-camera lighting setup as shown in this recent post where I photographed band members.) I had my assistant hold it up at camera left. I tried shooting in TTL, but the exposure varied too much as the background lights flared or not. So I settled on low-power manual flash with the speedlight. I didn’t need a lot of power since I was shooting at f3.2 and 1600 ISO. In using the PocketWizard TT5 and AC3, I could easily flip between TTL and manual exposure for the off-camera flash.
The wide aperture was to help separate the couple from the background with the thin depth of field. The high ISO was because I was shooting hand-held. I didn’t have time to fetch and set up a tripod on this cold evening. Even at f3.2 and 1600 ISO, I used 1/25th shutter speed. This is where a stabilized lens is essential.
Proper technique to steadily hand-hold the camera and lens also made the difference.
– lens supported with my left hand under the lens;
– anchoring my elbows in my sides;
– legs apart;
– breathing controlled;
– lightly pressing the shutter release.
Focusing was a problem. The strong back-lighting from the cars’ headlights made it really difficult for the camera to focus. So I had to prefocus before the cars stopped there again with the next light change.
In terms of the chosen exposure – the camera settings are guided by the ambient light. There isn’t a real way to meter for it with your in-camera meter. So it really just depends on a good guesstimate for the initial exposure, and then nudging your shutter speed, aperture & ISO to where you need them to be. But mostly you just change your shutter speed to bring in the ambient light, because f3.2 and 1600ISO are getting close to the ceiling of useful settings. Also, since I was shooting with manual flash, it just made sense to change the shutter speed before I change anything else.
The flash was gelled with a 1/2 CTS gel to bring its color temperature closer to that of the city lights and car headlights.
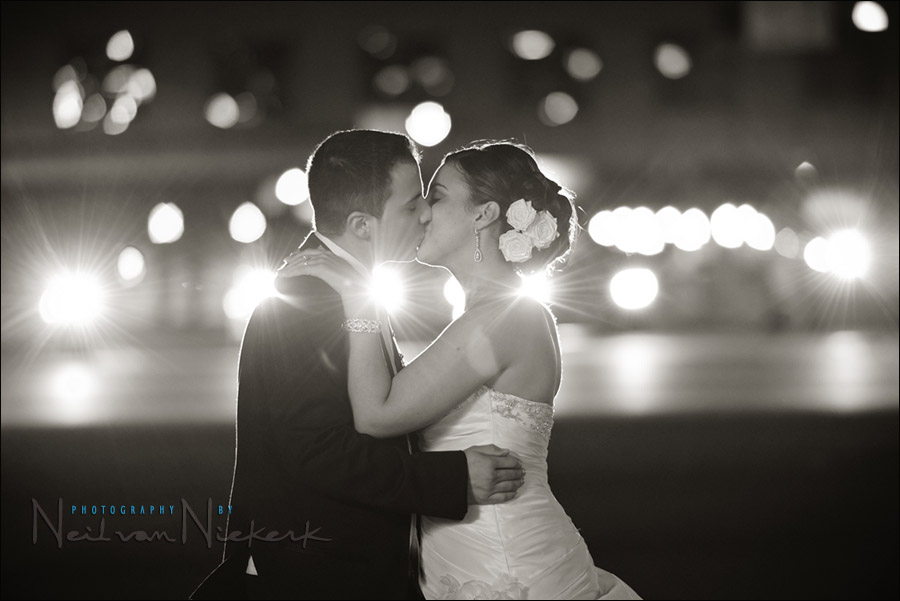
And that is how this image came together. It even works in Black & White:
Related articles
- Gelling flash for Incandescent light / Tungsten light
- More articles on Off-camera flash photography
- Wedding Photography Tutorials
- More images from this wedding on my wedding photography blog
Photo gear (or equivalents) used during this session
- Nikon D3
- Nikon 70-200mm f2.8 AF-S VR II / Canon EF 70-200mm f/2.8L IS II
- Nikon SB-910 Speedlight controlled by PocketWizard FlexTT5 & AC3 Controller
or alternately, the Canon 600EX-RT Speedlite controlled by Canon ST-E3 Transmitter - Manfrotto 1004BAC – tall light-stand
- Westcott 2005 45-Inch White Satin Umbrella

Lovely image. The headlights give it a sort of Hollywood feel.
I love the black & white version – it has a beautiful timeless quality about it. I guess they weren’t too bothered if you had to do a few retakes.
Neil,
With those cars coming at you, don’t you all have to exit the intersection as the cars got too close and then enter the intersection again once the area was clear? It sounds like you got the shot you needed quickly enough with few retakes.
We weren’t in the street. We were on the sidewalk at the intersection. The cars look like they are directly behind because of the compression of the long focal length. i.e. … I’m not ready yet to have my clients play chicken with motorists in Newark on a Saturday night.
Neil,
Sorry for the confusion. It looked you were on something that was not a street (because the color was different at the bottom of the photo), but I couldn’t tell if it was a sidewalk just another part of the street. I know that you would not endanger your clients.
Thank you Neil for the wonderful information that you’ve just shared and indeed what a very nice photo. It’s full of expression and certainly the NvN touch!
More power! Cheers!
I like your idea of ??this picture,something completely different. With an effective video light, results in a perfect light.
Neil:
I’ve been following your work for about a year now. In my opinion, I think this is one of your top ten images to date. Love the romance and shallow depth of field. Using light effectively, especially when the sun goes down separates a good photographer from a great one. Well done.
Thanks-Bryan
Gorgeous photo! I just had a question. Do you also have a flash on top of your camera for fill? I have just been using my tt5 to trigger my off camera flash and wonder if I should also be using my sb 900 on top of the camera for fill?
love this Shot.. Thanks for giving inspiration on chosing locations..
I LOVE this photo! What a creative approach and it looks like you stopped traffic for this!
Great shot! When you shoot this type of shot, do you take the UV filter off the lens? For that matter, do you always have a UV filter on? Different photogs have different ideas on it. I know that it can cause its own light refraction in the lens which some people don’t like. I actually like it.
Thanks. By the way, because of you I’m jumping into the vid light world at my wedding this weekend. Wish me well!
So does that mean that you did take your filter off for this shot? Thanks.
By the way, cool article per the link. And what a beautiful model! Man, your life is tough!
So wonderful, and the couple seems to enjoy the moment too, I can’t imagine how they feel after looking at this wonderful picture,
Félicitations monsieur!
And thanks for the tips!!!
This is the most beautiful image I’ve seen lately. Very, very nice. I wonder if on-camera flash can approach this lighting just a little… You are full of inspiration for us, thank you again for this. This shot has to be tried!
You touched on a topic I’ve been theoretically toying with (gelling a shoot through or reflective umbrella/soft box). Wouldn’t the light match the fabric instead of the gel? Or would it attenuate the original gel strength?
Btw, if you want to see a risky photographer that does put his couples and models in the streets, check out Ryan Brenizer (did my wedding, also fantastic artist).
As always, thanks for the inspiration and education!!!
Hello Neil,
thanks for wonderful information you’ve been sharing. I have a quick question; how come your pictures are crisp, sharp, crystal clear and mine are not. Even when the histogram shows correct exposure, mine still looks foggy (don’t know how to explain it). It is not a camera shake because I used tripod. Did you do any post production to your photos?
Thanks for everything.
thanks for sharing this image and the difficulties behind it, and how it all came together! It’s good to hear the ‘story’ of how it came together and see that these things just don’t happen, there’s a process of experimentation to get it right.
Typical shot from Neil…thoughtful and technically amazing. Thanks again for such great stuff, Neil.
One question: would you have preferred a softbox to the umbrella for wind control? I can just imagine the look on Jessica’s face if the thing caught the breeze and started to misbehave… ;)