Flash photography tutorial – balancing flash and ambient light
An email I received recently from someone explained how she is struggling with flash. The basic building blocks of photography are all there and understood, but it somehow doesn’t gel when she uses flash. She explains how she understands exposure metering, but “the minute I attach my flash, nothing makes sense.” Having read my book and scoured this blog, she admits that at the point where she uses her flash and needs to set aperture and shutter speed, she is completely lost.
I’m sure this is something many many photographers struggle with – just feeling baffled by where to start. So while this stuff at some level is easy once you understand it, flash photography also seems to be one of those subjects where you have to immediately grasp a whole bunch of things for it all to fall into place the first time.
So I’ve been mulling this over in my mind for a few weeks now. I thought of how to break this down in a different manner that would help with that “aha!” moment shining through. I have written a few other articles on how to balance flash with available light, which are all linked in this off camera flash photography page. But it might be that I need to find another approach in my explanation of balancing flash with ambient light. Break things down in a different way. And in breaking things down, we can see where we get stuck. And break that down again. Finally we might get an “oh!?” moment of clarity. And for other regular readers, this might just be a useful reinforcement of the concepts.
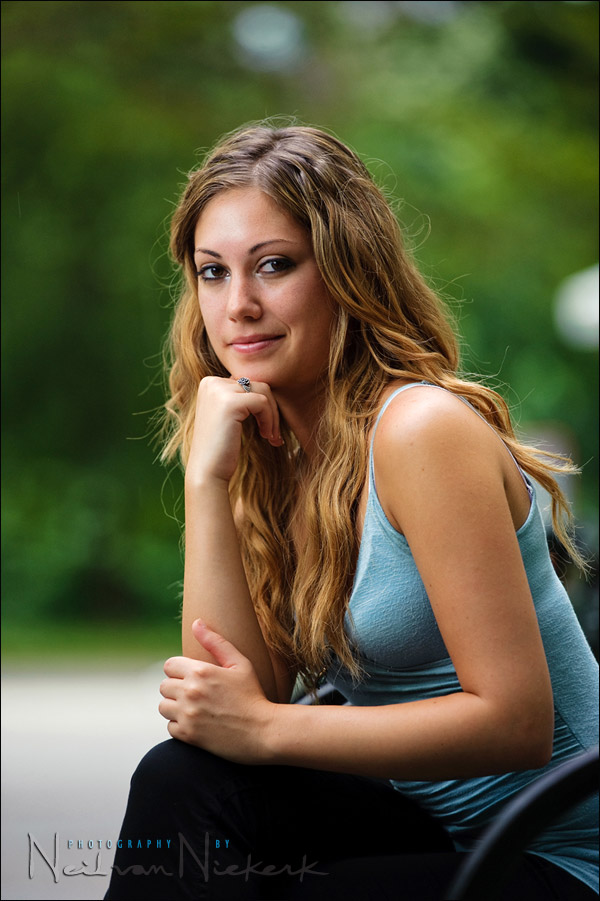
Now, at the very start of this,we have to realize there are two exposures taking place – flash and ambient light. This is the key. Then we have figure out how we’re going to combine them. The ‘how’ then includes exposure metering, but also includes direction of light. For this article, we’re just going to look at balancing flash with ambient light. We’re going to use a few simple portraits of our model, Camille, as illustration here for an understanding of how to add flash to ambient light. We’re purposely going to keep it simple to have things fall into place first.
Let’s see where this leads to …

Direction & Quality of Light
I wanted to distill the essence of what we, as photographers, work with – light! Before we can truly grasp on-camera flash and off-camera flash, and really, any kind of photography, we have to be aware of the direction and quality of light. We need to observe the light that we have, and then decide how best to use it, or enhance it.
With this book, I try my best to share those “aha!” moments with you, and I do believe this book can make a difference to your photography.
The book is available on Amazon USA and Amazon UK, or can be ordered through Barnes & Nobles and other bookstores. The book is also available on the Apple iBook Store, as well as Amazon Kindle.
Balancing flash exposure and ambient light
1. At the heart of this, you absolutely do need to understand how shutter speed, aperture and choice of ISO inter-relate to give us correct exposure. You need to grasp the fundamentals of exposure metering. I’ve written some introductory pages on the topic of exposure metering. I would also highly recommend Bryan Peterson’s book on Understanding Exposure (Amazon). We can’t proceed on understanding flash photography if these essentials are missing or poorly understood. This is the basis on which everything else rests. There is no shortcut. So let’s assume we’re good on this whole shutter speed / aperture / ISO thing, and continue.
2. The key in using flash and available light – consider flash exposure and ambient exposure as two separate events. Two separate things are happening. We have ambient exposure, and we have flash exposure.
3. We have to balance those two things here: flash & ambient light.
4. Natural ambient light is continuous. Flash is (near) instantaneous.
This is very important. The two kinds of light are inherently different.
5. We have 3 exposure controls on our camera – we use shutter speed; aperture and ISO to control our ambient exposure.
6. Because flash is (near) instantaneous, shutter speed has no effect on flash exposure. (This is true while we remain below maximum flash sync speed.) This is explained in a fair amount of detail in the article on high-speed flash sync. But for simplicity of explanation let’s distill this to an essential – shutter speed has no effect on flash exposure.
This is just inherent in how a focal plane shutter works on a DSLR. But we’ll keep in mind for later on, that things change a little when we have high-speed flash sync. For now, we’ll keep to the simpler explanation where flash is that brief burst of light. This is where we need to shoot at, or below, maximum flash sync speed. Follow the link to the explanation on high-speed flash sync, and also the link explaining maximum flash sync speed, if you need more explanation, and need to see the diagram.
I think it is around this point that many photographers unravel when they try to understand the basics of flash photography. This part is essential though in our understanding. We have to have a visual comprehension of how the camera’s shutter works, and how the two curtains are timed in relation to the burst of flash.
7. Since shutter speed (largely) has no effect on flash exposure, it means that of the camera controls that we have, only aperture and ISO affect flash exposure. But this is a little tricky though, for we need to distinguish between manual flash, and TTL controlled flash. They are entirely different in their controls. They are identical though in that they are very brief near-instantaneous bursts of light.
8. Manual flash and TTL flash – they are two entirely different ways of using flash.
Manual flash exposure is controlled by ISO and aperture (the two camera controls), but also by how far your light is placed from your subject. Distance! And then obviously, the actual power of your flashgun also affects manual flash exposure. In other words, the output your flash is capable of, or the power setting that you’ve set it to, will affect how bright the light is from your speedlight .. and hence the manual flash exposure.
TTL controlled flash exposure is where your camera (and flash) work together in automatically controlling your flash’s output (as the camera reads it Through The Lens (TTL). Since your camera is controlling the output to give you correct flash exposure, your choice of aperture and ISO (and the distance) doesn’t have a direct influence on TTL flash exposure. Your flash’s power (ie, output) changes to give you enough light for correct flash exposure.
Manual flash will give you consistency since everything is set; but TTL flash is generally faster and easier to work with to get correct exposure initially. This is of course open to debate, and I’m sure will be debated here … but let’s run with this for now, just for explanation. Manual flash for consistency and control; TTL flash for speed and ease.
Getting to correct exposure settings
9. We need to add those two things: ambient exposure + flash exposure = correct exposure
So there are the building blocks, and now we come to the crux of it … getting to correct exposure.
Broadly speaking, we have a few scenarios:
– If we have correct ambient exposure (or close to correct ambient exposure),then our flash needs to be fill-flash. It needs to be less than what would’ve given us correct flash exposure. We can’t simply add correct ambient exposure to correct flash exposure, for then we’d have over-exposure.
– If we don’t have enough ambient light for correct exposure (at our desired aperture / shutter speed / ISO), then we need to have correct flash exposure. We can now decide what our settings should be, (f4 / f5/6 / f8 etc), and then add flash in such quantity that we have correct exposure for our choice of settings.
– If we need to control the quality and direction of light, then we need to intentionally under-expose our available light somewhat, and then add correct flash exposure.
– If our subject is in shade, and our background is brightly lit, then we can use flash to bring our subject’s exposure up to that of the background. This is actually similar to the previous scenario where we didn’t have enough ambient light and added flash to our under-exposed subject, to get correct exposure for our subject … in relation to our background exposure. Quite often our background exposure can be what WE decide it should be … and then we add flash to that amount.
So this is where we have some flexibility and choice. And it is this last scenario that I’d like to expand on as a specific example.
Let’s step through an example
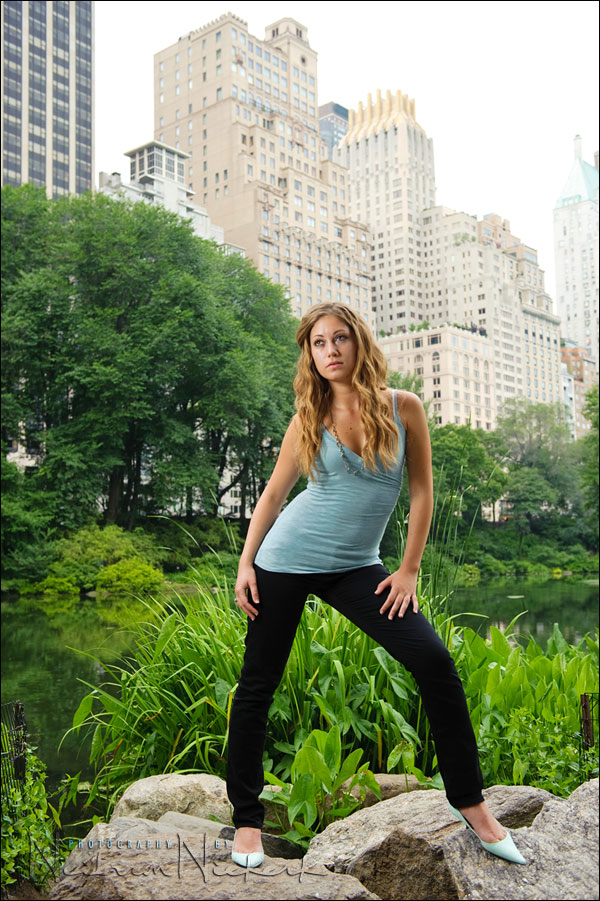
Looking at this setup with Camille on location in Central Park, New York:
Our exposure settings were: 1/250 @ f5.6 @ 400 ISO
Why? Because that is how bright our ambient light was, and THAT was how we decided we want our background to appear. Now it is imperative here that we see there are broadly three areas here in the background in terms of exposure and light:
– the overcast sky (very bright)
– the buildings (quite brightly lit)
– the foliage and rocks (not quite as brightly lit, and somewhat shaded)
Then we also have our model with her back turned to the main source of light – the overcast sky.
We can’t expose correctly for ALL four of those areas – sky, buildings, vegetation and model – in ONE image. It’s just not possible. So we have to decide what we want to do with our background. In this case, I am going to let the sky blow out. I have no in-camera control over that, except perhaps with a graduated filter. However, with the irregular shape of the buildings, a graduated filter effect would be obvious.
I therefore made a decision, that *this* is how I want the background to appear. And 1/250 @ f5.6 @ 400 ISO made it work. At these settings though, our model is completely under-exposed, and I would need flash to bring her up to that of how I want the background to appear.
With flash, I now have two choices:
– TTL flash, which is what I used here (as off-camera flash in a softbox). The camera now controls the flash to give me correct exposure .. or what it deems to be correct exposure. If the flash appears to be under or over, I would simply nudge it up or down via my flash exposure compensation. You can’t really meter for TTL flash, and it would be counter to what TTL flash is about – simplicity and ease of use.
– manual flash. With manual flash, the proper way to do it here would be to hold a hand held meter in the model’s position, and measure how much flash is emitted … and then adjust the power of the flash until you get f5.6 @ 400 ISO for that particular distance. Remember, flash exposure is independent of shutter speed while we remain at or below max sync speed. So we have the 4 controls for manual flash, as you’ll remember: aperture, ISO, distance, power.
Here is the result:
Fine, so I said we have a choice in how we want our background to appear. So as an example, let’s say we wanted more detail in the trees and leaves and rocks, and didn’t mind the buildings appearing brighter, even a little over-exposed. Perhaps this suits us better in how we want the scene to appear. Our choice.
Here is the same setup at these camera settings: 1/250 @ f4 @ 400 ISO
Our model is still under-exposed, but not as much. The extra stop of light by the increase in aperture, gives us a brighter image. And then we add flash. How much flash? I let the camera decide via TTL flash metering:
If I had decided to use manual flash, I would most likely have used a hand held light meter again, and adjusted my flash (in the off-camera softbox) to give me f4 @ 400 ISO for that particular distance.
The method remains the same as before, even though we have different settings. In a similar way, we could’ve used other combinations of settings, and have our background appear different.
Now let’s look at the same setup, but where I had chosen my exposure such that my ambient light is correct for our model.

The general ambient exposure for her is correct here, but the light on her face is a little uneven.
Exposure settings: 1/125 @ f4 @ 500 ISO. (no flash)
Since we have correct ambient exposure here, I can’t simply add f4 @ 500 ISO worth of manual flash. The TTL flash metering might well be pulled down by the camera via the intelligent Matrix / Evaluative TTL flash metering systems built into DSLRs. This then would be the point where we would’ve added some fill-flash instead. Even if I had used TTL flash, I would still have pulled down the FEC down somewhat. How much? That would depend on taste or feel.
When I shot this sequence, I had a different tutorial in mind, and didn’t shoot a fill-flash example, but the explanation should be clear enough. The shadow areas on her face would lift with a touch of fill-flash.
Summary
In re-reading this article after having written completed it, I see now that what I had initially visualized as a concise and immediately insightful article, has sped up into a longer rambling piece. Hopefully though, this article will help those who struggle with the basic idea of combining flash with ambient light. The thought-process here is just as true if you use other additional light, such as video light. There is a method here, and it is flexible. It allows you choice in what you want to achieve.
Related articles
- Off-camera TTL flash
- Bounce flash photography
- Manual flash vs. TTL flash – (model: Aleona)
- Off-camera flash: short lighting vs. broad lighting – (model: Anelisa)
- Controlling bright daylight w/ direct off-camera flash – (model: Molly K)
- Flash photography tip – Adding flash to ambient light (model: Elizabeth)
- Will flash freeze motion at slow shutter speeds? – (model: Oktavia)
- Flash photography basics
- More articles on off-camera flash
Great and valuable article Neil…
tks for sharing.
Hadi
Indonesia
Hi Neil,
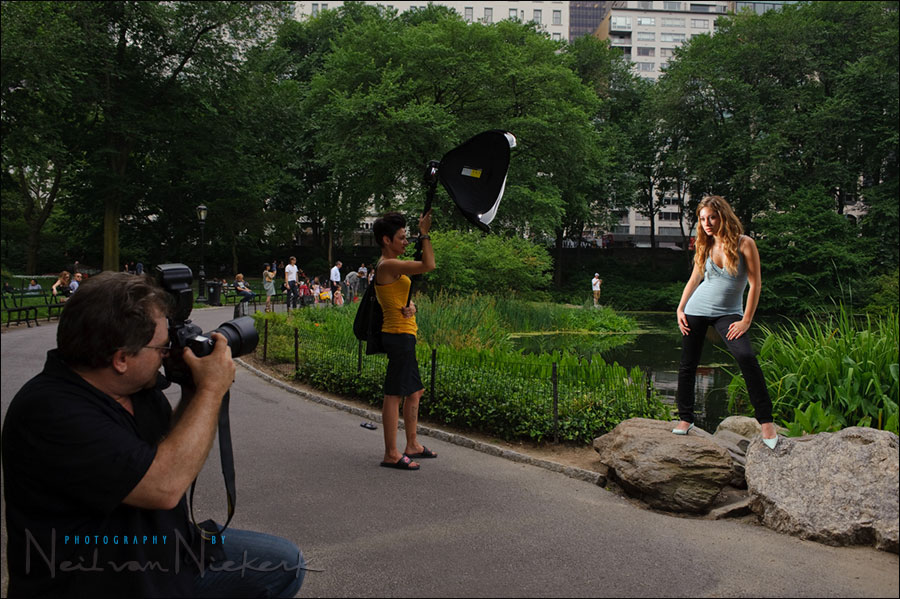
Thanks for another great article. I love the pull back shot at the end. Your assistants really have to work hard for you! :)
One question from the pull back shot, is on your camera is that a flashgun pointing away to the left as if it is going to bounce back from your left? Or is that the radio control trigger for the flashgun in the softbox?
Regards,
Gary
Gary … it”s a very simple setup. I am using wireless TTL flash control here, with the on-camera speedlight set to Master (but with its output disabled), which then fires the speedlight in the softbox (which is set to Slave / Remote).
Great article. One quick question though: If I am using my flash off-camera (in CLS), will the flash power adjust for the new distance from where the flash is or will it consider the distance from the camera to the subject as the distance to calculate the power value. I never have had luck with getting a good shot when im shooting off camera using TTL. The photos are generally overblown. I know i can use FEC to bring that down, but was wondering if the reason was that the flash was outputting the same amount of light as it would if it were on-camera. This is why i generally switch to Manual Flash and just tweak the distance on the flash (depending on how i want the light to spread) and power settings on the camera (commander mode).
Daa .. you need to distinguish that CLS isn’t TTL, CLS is just the technology to control the remote speedlights. And you can use Manual flash, or TTL flash.
So if you had your Master set to control the Remote / Slave flash as a manual flash, then your change in distance would affect exposure. However, it does sound like you are in TTL mode.
In my experience, I have to set a different level of FEC if I take the flash off-camera and use the wireless control, ie CLS. It’s just a quirk that I work around.
Excellent article as always Neil. I am going to re-read until it sinks in, and then the key is practice what we are learning. Thank you.
Great tutorial – as usual. I have one question. I have tried this many times – settings adjusted for the background then add flash for my subject. I take a lot of fairly closeup photos (like head shots)using my 50mm lens. It seems like even at -3EV my subject gets blown out. Should I move back?? or just start using my flash in manual instead of ETTL?
Oh I know…. get the flash off the camera!! Then I can adjust my flash distance
Barb, I do think your problem is that you’re simply too close to your subject, and that you’re working outside the range the flash and camera is capable of. Have a look what the display on the back of your flash says about the range. Dialing back the FEC in this case won’t do much, since the camera is just not capable of controlling the flash output.
Neil,
I’ve been reading your aticles for a while! My first post here however. As always, your article is to the point and very clear.
One question I have about background choice is the Camera metering mode you chose to get proper exposure background in image.
Also on flash I would think you used Evaluative vs Average metering?
Do you ever use FEL? If so in what type of situations?
My 5DII and 580EX II setup is sometimes hit or miss outdoors and I think it may be related to this paticular combo. It sometimes doesn’t expose the subject properly.
I’ve used the original 5D along with 580/580 II with no problems (outdoors and indoors).
Thanks for the great article!
Bobby
Bobby, I pretty much only use Evaluative / Matrix metering on my cameras.
And here’s my take on Canon’s Evaluative vs Average TTL flash metering.
I haven’t really explored Canon’s FEL or Nikon’s FVL to any real extent. I use TTL flash in a fairly simplistic way in this regard.
Great article Neil. My take-away from this really distils to – take the photo without flash and evaluate what’s happening. This gives you immediate feedback how the camera sees the scene. From that one image you can dial up or down the ambient to your taste then add flash again depepnding upon how you imagine the subject looking.
Manual flash without a flash meter is just as easy, perhaps a touch slower, but 1’s and 0’s now only cost time so chimp away and play with your settings until you arrive at the look you’re after. It’s much faster to get there now than ever before.
All the best.
Paul, absolutely. The best starting point when shooting with flash on location (ie, outside of the studio), is to start with the ambient exposure. Even if only to decide that the ambient light levels are so low, or the ambient light so ugly and uneven, that we want to over-ride it completely with flash. But the best starting point is inevitably the ambient light … and then deciding where to go from there.
Very helpful. I am exactly where Camille is. This helps.
Quick question Neil. How reliable do you find CLS when used outdoors on a bright day? I usually use cybersync triggers with my flashes set to manual because I get really frustrated with CLS not working all of the time outdoors. One big difference is that I’ve used the pop-up flash to control the external flash and it looks like you’re using an SB-800 or SB-900. I only have one SB-900 so I haven’t been able to test whether it would be alot more reliable using it the way you are. Anyway, that’s alot of rambling to say…is CLS very reliable for you outdoors using a speedlight as the master?
Stephen .. I’ve had problems with CLS in bright sunshine .. which is why I carry old school PocketWizards with me anyway.
Thanks for your efforts Neil.
Do you prefer using an SB-XX flash rather than SU-800 as the master commander due to the swivel head of a flash? (despite the size and weight issues).
Have you considered using the new SB-700 as a master. I know it’s slightly less capable than the 900 in the number of flash groups it can control (or something like that), but it is lighter/smaller.
I understand setting the ambient exposure in manual first… fine. But when then shooting in TTL for the flash component of the exposure do I have to make sure I spot meter on the models face for the appropriate amount of fill flash? or do you generally matrix meter and let Nikon’s trickery guess the right amount of light for the face.
Cheers!
K.
I have two SU-800 units, (and two ST-E2 units), but I prefer working with a speedlight because I turn the Master’s flash-head to point towards the Remove / Slave flashgun. And with five SB-900 speedlights, I’m unlikely to get an SB-700 soon. But it does look like a very nice flashgun.
I normally let the Matrix metering figure out the flash exposure, and then by looking at the camera’s preview, decide whether to pull the flash exposure up or down with the FEC.
Neil,
This is NOT a rambling piece. This is well-written. You have broken down the problem into smaller scenarios. For each scenario, you have an example picture and an explanation.
This article, like your recent ambient light only exposure article
https://neilvn.com/tangents/exposure-metering-bride-and-brides-dress/
is really an instructional piece that avoids talking about the “f-stop” numbers but provides a process that people can evaluate and repeat.
I think the “aha!” moment for me is that this applies indoors as well with bounce flash.
Great piece Neil, thanks a lot.
I don’t know why you are helping me like this ;)
Hari
Great article Neil. It really explains the concept of balancing ambient light with flash to produce a great shot. Thanks again Neil.
Neil,
Two questions that I think are one. Does TTL use whatever metering system I choose on my camera, matrix, spot, etc. or does it use the expsosure through the whole lens? And if I get a proper exposure for available light through the camera meter on the subject does the TTL flash consider this exposure for the amount of light is produces or does TTL use a seperate reading independent of ambient light only considering distance, aperature and ISO? Would these two light sources be additive or two seperate animals from each other?
Thanks is advance,
Steve
Steven, as far as I can figure out, the TTL flash metering is dependent on whether you select TTL / TTL BL (with Nikon), or Evaluative / Average TTL flash metering (with Canon). More so than the metering pattern.
I haven’t detected the cameras that I am using now, or have used in the past, that spot-metering affects their TTL flash metering systems. But I am sure that other photographers with more rigorous testing might show some cameras actually using the spot-meter to affect the TTL flash metering.
If you use TTL BL (Nikon) or Evaluative TTL Flash metering (Canon), then the camera will reduce the TTL flash to some extent, dependent on the available light. There are algorithms the camera will use to decide how much. To quantify this from the user’s point, would be near impossible. Best to get used to how your camera responds by shooting a lot, and playing a lot.
Hi Neil , great as always, but I have to ask you
Why is that you refer to to say that you use ttl setting when ttl only work with film
Cameras and with DSLR works like manual flash I just want to make sure you mean E-ttl . Thanks!
Jorge, throughout this website and my book, I refer to TTL flash when I mean i-TTL / D-TTL / E-TTL / E-TTL II / Q-TTL / P-TTL … or whatever manufacturer adds another digit to the ‘TTL’ description. So I use it as a generic description. Just interpret it for whatever camera you are using.
btw … digital cameras most definitely meter the flash through the lens .. ie, TTL flash metering.
Hi Neil
I am a great fan of your very informative articles and this one is no exception. I wonder if you can perhaps assist me with the setup to use a SB800 on a Nikon D90 as a master to trigger another flash. The output of the master should be disabled similar to the way you have done in your article. Thanks!
Wikus .. it is on pages 82-83 of the Nikon SB-800 user’s manual. (download the PDF)
You need to set your flash so that it shows:
M —
this means the output from your Master (ie, on-camera speedlight) is disabled.
Hi Neil,
Great article as always – and well explained.
Just one question about using a light meter with speedlights and CLS – if I’m using the camera’s built in flash as a remote trigger, does this affect the metering?
Cheers David
David, I wouldn’t use the built-in flash for anything else than just to trigger the Slave / Remote flash. As such, you need to disable its output … and then it won’t affect the flash metering anyway.
Great writeup. Two questions…..
1. Just curious why you had an on camera flash on your camera…was it used?
2. Do you find the lastolite to be sufficient size for full length images, how is the light falloff on the legs?
BillyM,
There is a physical switch on the SB-900 that you can set to “Master.” Likewise, the SB-900 on the softbox is set to “Remote”. The SB-900 on Neil’s camera is set as a Master flash, with its flash output set to “–.”
In other words, the LCD display for the Master SB-900 mounted on the camera, your settings look like this (for a one flash off-camera):
M: —
A: TTL
B: —
C: —
M is your master. A is Group A off-camera flash.
With this setup, you point on-camera Master SB-900 at the remote trigger sensor on the SB-900 used in the softbox. The Master SB-900 generates a very short burst of light which contains the instructions for the remote flash. This short burst of light will not add to the flash output in the final image, because you set the Master flash output to –.
Billy, Stephen replied to your first question.
Regarding the coverage of the Lastolite 24×24 softbox, it most definitely works for full-length images. I’ve even successfully used it for small groups at wedding formals.
Neil,
In the shot above, Camille takes up a relatively small part of the overall frame. But she is centered in the frame. For TTL to properly expose, must she be centered like this? What if you are using TTL and want her off-center? Would FEV lock work in this case, or would you be forced into using manual flash?
Thanks!
Les, you’re quite right in thinking that off-center framing could very well affect the TTL flash metering. Using FVL / FEL is probably the best option. I just adjust my FEC though, depending on how the image looks on the preview of my camera.
@Les
First, I am a Canon shooter and have no deep technical knowledge of the Nikon system.
The E-TTL II on Canon systems base the flash exposure on the focus point selected to allow for correct exposure on off-centered subjects. So if you want your model at either side of the frame, you can choose an appropriate off-center focus point and flash exposure will bias to it.
You can also use FEL (flash exposure lock) with the center focus point and then recompose the scene… my only concern with this would be loss of focus if using very shallow DOF, in that case I usually prefer to use an off-center focus point to allow for more accurate focus and flash exposure… is simpler.
Cheers.
BTW, I believe the above also applies to the Nikon system. E-TTL II uses the same reflected light meter on your camera to meter the pre-flash exposure and compute correct power level just prior to the actual exposure (there is no separate flash meter as in the original TTL system).
What that means is that choosing evaluative vs. center weighted flash metering will produce some differences in the way flash exposure happens. Neil has made comments about his experiences and preferences of each for different situations elsewhere on the blog.
If I understand your approach to the above scene, you basically need to decide FIRST if you want to expose the ambient light based on the background or the subject. That is, you can forget about what exposure the bg is and just expose for the subject or expose for the bg to your taste and then add flash on the subject to balance …right? Second, while deciding on your ambient exposure, does the flash gun (if on TTL) need to be off or will it screw things up if it is on as it would alter your ambient reading? Or am i totally confused here?
Lastly, if you get to your correct ambient exposure and then switch to manual exposure mode on your camera, does it make a difference at this point where you focus on the subject as far as flash level is concerned. For ex., shirt vs. her head in the above scene would the flash amount be different or same?
Mike .. it is that easy and flexible indeed.
I usually keep the flashgun switched on when it is on my camera. SInce I shoot in Manual metering mode, it doesn’t dramatically affect my camera’s metering display. In my experience it just bumps the meter reading up by 1/3rd stop. Well within the margins of what a RAW file can handle.
As for the focusing point .. it does affect the TTL flash metering, depending on camera settings, and which camera you use.
Check Carlos’s comment #35 for more.
Personally, I’d uncouple the flash metering from the AF sensor being used. But then, I don’t shoot images that often which are dramatically off-center.
For those still struggling…
While it is true that shutter speed will have no material effect on your flash exposure, it will have a definitive effect on the amount of TTL flash power at your disposal to get said flash exposure at a given ISO/Apertue/Distance.
First, ambient light exposure is ALWAYS controlled by the combination of ISO/Aperture/Shutter speed selected, regardless of the use of flash (manual or TTL).
When you add manual flash to the mixure, you can change the balance of ambient to flash by manipulating the shutter speed; in this situation shutter speed will ONLY affect ambient light exposure, while aperture/ISO will affect BOTH ambient and flash exposure simultaneously.
When using TTL flash however, manipulation of any of the three exposure controls will ONLY affect ambient exposure, what the camera will do here is automatically adjust the power output of your flash to maintain adequate flash exposure regardless of the ambient exposure selected. The only way to alter the flash exposure is by using Flash Exposure Compensation (FEC), here we can alter the flash output by +/- 2 stops (with Canon equipment) to suit our creative needs.
When using TTL flash, shutter speed has an indirect effect on flash exposure; by selecting the highest possible speed for flash synchronization (the sync speed), we can dial the widest aperture for any given ambient exposure. This will allow the camera to get a correct flash exposure with minimal flash output, lower power comsumption/better battery life, and faster between flash recycle time. If you use max sync speed, you have more flash power available to get your FEC all the way to max if needed.
Cheers.
One more thing…
When you set your ambient light exposure by use of ISO/Shutter/Aperture, you usually select these parameters based on the camera meter reading. If the scene is neutral, a straight meter reading with zero compensation may be appropriate. When mettering overly bright or dark scenes, we often need to apply over or under exposure compensation respectively to account for the camera’s reflected light meter limitations.
The same principles apply to TTL flash exposure. When your camera fires the pre-flash it reads the refelcted light and calculates the power needed to expose the scene using the same camera light meter. The same way you can alter the ambient light reading to accomodate brighter/darker scenes that fool the meter, you can also alter the flash exposure for the same reason. If the flash is too bright, dial down FEC, if the flash is low dark, dial up FEC. How much to dial is dependent on the particular subject/scene and your artistic taste.
What you need to is understand that ambient light and flash exposure are INDEPENDENT of each other and are controlled separetely by exposure biasing of the meter. How much biasing is needed on each is dictated by the subject/scene and ultimately by the photographer’s taste and objectives.
Cheers.
For those of you using Canon camera/flash, there is a great reference on web that will help you understand all the technical aspects of Canon flash system. If you are serious about photography, this is a must read.
He also published this info in book form, very well written in-depth technical discussion about the Canon flash system. Again, a MUST read for anyone with any serious amateur/professional interest in Canon flash photography.
Cheers.
Thanks so much Neil, I’ve read all your posts, and each one is helpful but this really captured things for me in a crystal clear way that I haven’t “got” before. And it really elucidates what TTL is and how it works. Thank you.
To re-iterate much of what has already been posted here, thanks again Neil for a wonderfully concise and explanatory refresher of ambient/flash technique.
many thanks too to Carlos for his useful pointer regarding the AF selection point and the TTL flash exposure correlation.
A great learning repository!
Neil,
Thanks for sharing your knowhow, yet again! I was wondering is there any particular reason you chose / prefer a softbox instead of a shoot-thro umbrella?
Rgds – josh
Josh, I find a softbox easier to control, esp if there is a bit of wind. And I also find it is slightly more efficient than a shoot-through umbrella. But ultimately, the differences are fairly subtle.
Neil, with the assistance of your website and experience, I have been learning more about the way the camera and flash work. Thanks!
TTL flash exposure is calculated with a pre-flash signal that the flashgun emits before the main burst of light. The main burst of light is what gives you (hopefully) correct exposure. But the camera needs some way of determining what the correct flash exposure should be. In order to do that, the camera measures the amount of light returned from that pre-flash. Note that the shutter and the sensor of the camera have no involvement in this part of the equation- the shutter is closed. The light bouncing back from the scene enters the lens of the camera (through the lens). The light is then read by the light meter within the camera. Remember, the light meter and the sensor are not the same. The light meter is in front of the shutter, the sensor is behind the shutter.
The first flash is the preflash that goes off before the shutter opens. The second flash is for the proper flash exposure, while the shutter is open. The light reflects back from the scene and “burns” an image onto the sensor.
If you are using camera manual mode, you are responsible for choosing the camera settings for the exposure of the photographs. When you are using aperture priority mode, when you half press the shutter button, the camera tries to calculate the settings for exposure, based on where you are pointing the lens. When you half press the shutter, the exposure settings are locked, if you have exposure lock & focus lock enabled in your camera’s menu, then you can recompose your photo, and fully press the shutter button.
A question might be “when using the flash on my camera, when is the exposure calculated for my flash? Is it when I half press the shutter button, or when I fully press the button?” The flash exposure calculation begins when I fully press the shutter button. Because the preflash is nearly instantaneous, this process is really nearly instantaneous. The direction that your flash is pointing when you fully press the button dictates the scene which will reflect back the preflash. The flash is instantaneous, so it has a tendency to bounce instantaneously off all nearby surfaces. This fast speed of the flash allows the dedicated photographer to rotate the flashhead and bounce the flash off a nearby source, so that the light hitting the subject is large, diffused and soft.
The preflash is almost imperceptible as a distinctly separate flash of light because it occurs so closely in time to the real full flash of light that it uses for the flash exposure. They seem to occur as just one flash. But really the preflash sends out this flash of light which hits the subject and scene, and bounces back through the lens of the camera, thereby giving the camera information about the intensity of light reflecting back. A subject that is closer to the camera will reflect back more light than a subject that is further away. Now the flash/camera sends out a second flash burst to light the scene for what it calculates is a correct flash exposure. Often the calculated exposure is not what you had in mind, so just dial in flash exposure compensation (FEC). Just like when you are not using the flash, backlit scenes often fool the camera.
Flash exposure is achieved when the flash utilizes duration of its output. A longer duration (or a longer flash of light) will give a brighter flash exposure.
We can use aperture and ISO and shutter speed – all three controls – to control ambient light exposure, without having an influence on our flash exposure. Raising or lowering the iso & aperture will not make the flash exposure brighter or dimmer. In manual camera mode, if you lower the ambient light level by lowering the iso, decreasing the aperture opening, or speeding up the shutter, the camera will compensate for this by increasing the output (duration) of the flash. With manual flash, however, the opposite is true. The camera does not tell the flash to make this compensation. Of course it doesn’t, manual flash does not utilize information through the lens…it doesn’t even use the preflash system.
When you change the iso or aperture on your camera, the range of the flash is affected, but, in ttl, that does not make a difference to exposure unless the subject is out of range of the flash. The iso & aperture & shutter speed settings of the camera control the ambient light exposure of the photo, but in ttl, these settings have very little bearing on the flash exposure of the photo. The camera will adjust the output of the flash so that the flash exposure will be the same for the scene regardless of the ambient settings of the camera. Note, the flash exposure will be the same, the flash output will be different every time you change your iso or aperture or speed. This is really the brilliance of ttl flash mode. As stated, the iso & aperture only affect the workable range of the flash, when using ttl flash.Using a shutter speed that is above max. sync speed reduces the efficiency of the flash. If these settings are not used effectively, then the flash may not have enough power to reach your subject, especially depending on if it is a sunny day, and your subject is not close. A sunny day often forces you to use a faster shutter speed to control the exposure of the background of the scene, while you use the flash for your subject. It is especially challenging to use a large aperture to blur out the background without forcing your camera to use high sync. shutter speeds to control the exposure of the sky. I use high sync. shutter speeds sometimes so that I can use a narrow depth of field, but I always pay close attention to the distance between my flash and the subject, otherwise the flash will not be captured in my photo. Remember, you can use a more than just 1 combination of ambient light camera controls to attain the same exposure.
The preflash does not seem to occur as 1 flash when you set your flash mode to rear sync flash, or 2nd curtain, and set the camera to manual mode with a (eg)5 second shutter speed. But If you are set to front sync, or 1’st curtain flash mode, then it will occur as 1 flash even if you are at 5 second speed. The first flash is the preflash that goes off before the shutter or curtain opens. The second flash is for the proper flash exposure while the shutter is open.
In manual camera mode, if you lower your iso or aperture, the ttl flash will increase it’s duration to achieve proper flash exposure. The ambient light exposure may for example get darker, but your flash exposure, in ttl flash mode, should remain properly exposed. It’s a good experiment. One late evening at the beach, set the camera to manual mode, and take about 7 or 8 test shots…start with 1/2 stop underexposed ambient light according to your on-camera meter, and turn your camera to ttl flash mode. Take a photo of your friend/ volunteer. Then vary your ambient exposure down by 1/2 stops or 1 full stop for each photo, according to the camera’s meter. If theory is correct, the background light level should change, but the flash exposure should be the same on your friend (as long as your friend is not too far away from the flash, and out of range. As you vary your iso or aperture for the ambient light, it also affects the range of the flash).
This is also a good opportunity to play with shutter speed and see how it affects ambient light at night time. Notice As you lower your speed, and when you are using your flash, there won’t be a dark black background…sometimes the speed has to be fairly slow, like 1/20 or 1/10 of a second. It all depends on your level of light, and the iso and aperture you are using. This experiment is best with a tripod.
Shutter speed never affects the flash exposure, unless you are using a shutter speed that is high sync speed, then the efficiency of the flash is greatly reduced.
Shutter speed always affects the ambient exposure.
Have a good week!
… it”s a very simple setup. I am using wireless TTL flash control here, with the on-camera speedlight set to Master (but with its output disabled), which then fires the speedlight in the softbox (which is set to Slave / Remote).
Can anyone explain a simple and cost effective off-camera lighting set up for a beginner? I have a D200 and SB-600. It seems like I can either buy another flash or buy transmitters (e.g. radiopopper). What is the difference and is one method better than the other? Thanks if someone can help.
-Mike
Mike,
Route 1 – Buying a second SB-XXX unit
One SB-XXX unit is mounted in the hot shoe of your camera and set to Master with no additional flash output. In this mode, the Master will fire a “pre-flash” to tell the Remote flash what to do and will not add flash to the final exposure. The second SB-XXX unit is your remote off-camera flash.
SB-XXX flash units operate on line-of-sight. There is an small, round optical on the side of the flash unit. Your Master flash head must point to this sensor, or the Remote will not fire.
While the pop-up flash on the D200 can be used as a Master, you can’t point it off the to side or at angles.
Route 2 – Buying Radiopopppers
The Radiopoppers transmit over an RF signal, so these will work when you don’t have line-of-sight. These will work with Nikon’s iTTL.
You need to buy a transmitter and receiver. Unfortunately, I have not used these, so I cannot say anything more about this system.
PocketWizard is supposed to release their iTTL unit soon.
I am currently using Route 1, and it’s working fine for me.
Extremely helpful article Neil – thanks for sharing. I am now a little less afraid of flash and practise makes perfect!
@Mike
Agree with the options as expressed by Stephen above. If cost effectiveness is your main consideration, I would suggest getting a second SB-XXX unit that can be used a master from your camera. The rational for this is you get a 100% Nikon compatible solution, only one piece of additional equipment to learn (if not the same model of flash you already own) providing off-camera TTL flash photography for the least cash outlay.
The main reason I feel this to be the best way to upgrade (as opposed to buying a dedicated commander unit) is that you will end up with two full flash units that will also allow you to experiment with two off-camera light setups triggered by your pop-up flash. Also, if you decide later to get PocketWizard iTTL system, you will already own two capable flashes to allow for most off-camera photography needs.
If you want maximum flexibility for your off-camera work, I will strongly advise getting a flash stand, an umbrella and umbrella adapter. These additional items are actually inexpensive and will help expand your photographic setup options.
I would recommend these as a starter kit:
Manfrotto 3330 6′ Basic Lightstand (~ $50)
Photoflex Shoe Mount Multiclamp with Umbrella Holder (~$25)
Westcott 43 or 45 inch White Satin Umbrella with Removable Black Cover (~ $30)
And while shopping, get some flash gels to convert flash light temperature for better results. You can get a the Rosco Strobist kit very cheap on most photogrpahic outfits; get it from B&H here…
http://www.bhphotovideo.com/c/product/634658-REG/Rosco_1100STROBKIT.html
Cheers.
Just to sum up imho
– Ambient light in manual mode: shutter speed, aperture, and ISO.
– Manual flash: aperture, ISO, power, and distance.
– TTL flash below or equal max sync: FEC, selected focusing point, and mode (Nikon TTL-BL/TTL, Canon Evaluative-TTL/Average-TTL).
May I also add that shutter speed would bias the ambient/flash mix %, and color temperature, in certain scenarios?
When you choose TTL flash, it does not use any distance information from the camera to assist with flash exposure calculations. When you focus on a subject, the camera knows how far away it is, but ttl does not consider this information.
TTL only uses 1 criteria to establish correct exposure…that’s the preflash information. In any flash mode, ttl or ttl-bl, the flash meters for the center weighted portion of the photo. The center of the photo is where the flash will calculate proper flash exposure for.
In ttl flash, the on-camera light metering mode that you choose will not make any difference to the flash exposure. It will make a difference to the flash duration, but ttl flash will make the exposure the same by altering the flash duration depending upon whether you choose matrix metering, centerweighted metering, or spot metering. The metering mode only determines the ambient light portion of the photo. If you correctly expose your ambient light in the photo, then try to add flash exposure to this, you will of course have an overexposed photo. Having said this, if you are trying to use the flash for just a bit of fill flash, then the ambient light settings will be very close to proper exposure, and the flash will be added just to lift the shadows a bit.
Which focus point you choose never makes a difference to the finished flash exposure. It does however make a difference to the ambient light exposure. Say you choose spot metering and focus on someone’s face, the camera should meter for that person’s face exposure, before the flash goes off. If you use matrix metering, it will choose the correct exposure for the whole scene. So choosing the metering mode will determine the ambient light exposure, before the flash fires.
Often when taking a photo of a person, you will choose to underexpose your ambient light settings, maybe for example, to get the correct exposure for the background sky. Perhaps this will leave your subject underexposed, before the flash fires.
When the preflash fires, the camera’s flash metering computer (which is located in the camera and not in the flash) will look at the center portion of the photo and see how much light is returning TTL (through the lens). Remember, ttl, and ttl-bl, are only concerned about getting the center portion of the photo correctly exposed.
A subject that is closer to the camera will return more light through the lens from the preflash than one that is further away. If your subject is wearing a full length white dress, it will reflect back much more light than if she was wearing a black dress.
The preflash intensity is analyzed by the camera’s flash computer, and the duration of the actual flash is set according to the center portion of the scene. Flash exposure is achieved by varying the duration of the flash. If the center of the scene is underexposed, the flash will fire for a longer duration. Actually, when you use flash exposure compensation (FEC), it just changes the flash duration to either a longer or shorter duration.
There was a question that was asked: If I get a proper exposure reading for the available light using the camera’s meter, does TTL flash consider this exposure for the amount of light it produces?
If I am using camera manual mode, and I meter correctly for my subject for the available light, then I turn on my flash and take a photo, the photo will likely be overexposed. In this situation, the flash’s computer will analyze the preflash. The flash computer sees the photo as 1 photo, where the ambient light and the preflash are mixed together as one photo, in the center portion of the scene. So, if I have correct ambient light(available light) exposure set on my camera, then adding more light to this with my flash will cause overexposure. If you have your flash turned on, it will always fire. It does not override you when it recognizes that the photo will be overexposed, it will choose to fire for it’s shortest possible duration because it sees that the photo is already correctly exposed.
Aparently, in one of the automatic metering modes, like aperture priority for example, the camera does choose a faster shutter speed to try and remedy this, if your camera is a newer model. The old cameras won’t assist in this way.
TTL flash does not consider any settings that I have set on my camera for available light exposure. It does not consider aperture or iso or shutter speed settings. The flash meter only measures the intensity of light returning from the preflash. This is the only thing that ttl cares about. However, aperture & iso settings on the camera do, of course, change the intensity of the light returning from the preflash. If the hole in the lens is larger, then there will be more light entering the camera through the lens, and the flash meter will see that there is more light being returned from the scene. TTL only measures the light returning from the center portion of the scene, it does not care about aperture, or iso, or speed.
This is for ttl flash. TTL-bl is different.
Hope this helps.
More accurately, I should say ” TTL flash mode measures the light returning from the scene, and gives priority to analyzing the center weighted portion of the scene.” It gives far less consideration to the outer edges of the scene. If your subject is in the center of the photo, the reliablitiy of the flash exposure results will be high, depending upon if the scene is of average reflectance and tonality. If the subject is slightly off center, then the flash exposure results will still likely be good, but with less reliable exposure.
Of course for composition, many photographers have the subject slightly, or more, off center. It’s important to keep the subject atleast partially centered for accurate flash metering results.
Once you practise with your flash, you will know what exposure compensation to add or subtract from your flash to account for the way that flash analyzes the scene.
This would be the perfect scenario to set up for a photo in order to get the camera’s flash computer to give reliable correct exposure:
-the subjects are centered in the photo, because the reflected energy from the monitor preflash is metered by the camera in the center weighted frame. The camera flash meter primarily uses the exposure of what is positioned in the center of the scene to calculate flash exposure.
-When the people are in the center of the scene, it is best if their clothes are “18 percent” gray (joke!)…but it is really true isn’t it? If they are wearing all black, they are underexposed according to 18 percent gray, and the flash will try to increase their brightness level with a longer flash duration. The result will actually be an overexposed photo. If they are wearing all white, the opposite is true.
-The subjects fill the frame of the photo wearing 18% gray. Say I framed the photo so that they did not fill the frame, and lots of the background showed, it would be best if the background were also average tones, aka 18% gray. If the background were dark and the subjects were small in the frame, both the background (which is considered underexposed), and the subjects, would be considered by the camera to be “center weighted”. The flash exposure calculation would try to lighten then scene to an average tone (18% gray) because the background is not that. Really, the camera is fooled. The result would be that the subjects are overexposed by the flash.
-Also, the reflectivity of the scene alters the flash exposure. It would be best if the subjects were wearing 18% grey, and also that this grey was of average reflectance. If it was a shiny relective grey, it would bounce back a lot of light from the preflash into the lens. I guess in this case, it couldn’t actually be considered 18% grey?
I assume that when any of these ideal situations for the camera’s flash light meter are off, the photographer would just dial in flash exposure compensation on the flash. The further away from ideal, the more compensation is required.
Hi. I’d just like to clarify something Carlos A mentioned on November 5th. If you own a pre-2004 Canon DSLR with the original E-TTL flash metering system, the flash metering is linked to the active autofocus point (as per the photonotes.org website). However, if you own a model manufactured after 2004 (E-TTL II), metering and focusing are no longer linked and the Flash Exposure Lock is linked to the spot metering circle (or partial metering area depending on model). This info is from Canon Digital Learning Centre:
http://www.learn.usa.canon.com/home/home.shtml
Thank you Allen.
If I may further clarify (or obfuscate) some points put forth by Carlos and Bj that may affect how we shoot. These comments are specific to Canon E-TTL II:
1) There is NO relation between Auto-Focus point selection and Flash Exposure.
2) There is no emphasis on the central area of the frame in the FE calculation.
The way this works is a two step process. Firstly, when the shutter button is fully pressed two sets of exposure readings are taken, one with and one without the preflash. Each set measures 35 separate zones (63 for the 1D.) An algorithm then decides where it thinks the subject is, anywhere in the frame.
Secondly, there is an algorithm to blend these two sets of readings using an appropriate amount of flash. It may also consider the shooting mode and distance info from the already focused lens. (The distance info is ignored as soon as you twist the Speedlite for bounce or use it off-camera.) All this happens before the shutter opens. This stuff does a damn good job, but as we know it can often be fooled and we must use FE Compensation to adjust.
Note that if you use FE Lock, it does look at the center and the center only for the subject exposure.
Note also that Average TTL Flash Metering (as opposed to Evaluative) is for use when you have a busy (but worthwhile) background and you want the algorithm to consider all of the frame out to the edges. It has nothing to do with center-weighted average. Canon folk recommend you use Average when you have to do a lot of “quick” shooting. I take this to mean that you are all over the place and don’t have time to redo FEC for each shot. Neil is good enough that he always has enough time, so he would never need Average. But beware that Average is easily fooled by large dark or light areas in the background. Comparisons of Average and Evaluative often may be using wrong examples.
Caveat: Everything I know about flash I learned since I went to hear Neil speak in NY this past Monday, plus a little help from the Canon guy next day. Sorry for getting long-winded. Thanks again Neil.
-Paul
Thanks for the great info, Neil. I struggle with TTL using a Nikon D3 with a SB-800 strobe. I shoot a lot of events that have people inside and outside. I have no time for test shots and must get the photo on the first try! I always make certain my TTL exposure is based upon where my focusing point is set to which is usually their face. In general the images tend to be overexposed, but not always. I try to bounce when possible and I use flash diffusers at different times, usually inside. A good example of my challenge is photographing a subject leaning on a tree in the shade, but their hair was backlit by the late afternoon sun. My flash set on TTL overexposed the shot and when I quickly set it to underexpose by one stop or more, it still overexposed it. Your thoughts on this challenge would be greatly appreciated.
Robert
Great article as usual Neil!!
I usually fire my flash with a pocket wizard on my camera and one connceted to the flash on a stand and softbox. Then meter with my sekonic and it triggers the flash. I use whatever reading I get if the flash % shows me 40% to 50%. I adjust the manual power on the flash or move it further or closer to get that. Do you think this is an acceptable way to do it?? And do you think 40-50 % is a good typical amount of fill?? I’ve had pretty good results but not quite amazing as yours!!
Thanks for all your help you give us all!!
Bill
Neil,
When you are getting the ambient exposure (first), do you use a light meter, or do you use the camera’s meter, and then work from that exposure (adjusting up or down to slightly underexpose), and then add ttl flash from your speedlite?
Just really curious how you BEGIN getting your ambient exposure…by using a light meter, or your camera meter (& adjusting)?
Would it work well to use a meter to get ambient exposure first, then slightly underexpose, and then add your ttl flash. I’m learning about flash outside w/portraits (usually do studio that can be set much easier w/strobes), but this would seem like an easy aproach to adding flash to ambient (using a light meter)?
Please forgive my somewhat rambling question (questions);~) Thank you!
P.S. Was very dissapointed your class filled up so quicky for WPPI 2011..first time attending ever & was so hoping to take your Flash class…darn!!
kb,
If it’s TTL flash Neil is using, he typically just uses the camera’s built-in meter for measuring ambient exposure. If he is using manual flash, he often uses a lightmeter, especially in a studio setup.
However, he is experienced enough that if he is using manual flash, he can also use the camera’s built-in meter to get an initial ambient exposure reading and then adjust his manual flash power on his speedlights.
–Stephen
kb .. it’s a combination of techniques to get to the ambient exposure settings I want.
I mostly use my camera’s built-in meter, and meter selectively. Then I under-expose to a certain extent, and add flash. Usually it is TTL flash. The idea of under-exposing your ambient light works if you want your flash as more than just a mere fill-flash .. because then your flash becomes a more dominant light source. If you want to use only fill-flash, then your available light exposure needs to be correct.
Also check these two articles:
balancing flash with ambient light – where do we even start?
balancing your flash exposure with the ambient exposure
Hopefully there will be WPPI 2012. If you see me around, come say hi.
I am trying to describe the sequence of actions that occur when the camera communicates with the flash, in an almost instantaneous achievement.
Say I am using a SB900 flash mounted into a softbox. Of course this is an off camera remote flash set up.
Using my camera set to manual mode, I can then adjust my ambient light controls (aperture, iso, shutter speed) on the camera for the exposure of my ambient light in the scene.
On my Nikon D700, I then set the menu of my camera to Commander mode, and choose TTL (through the lens) as the flash mode. I think the D90 and D300 will allow this commander function also, and probably the newer Nikons too.
I must pop up the flash on my camera for the communication of the camera to the remote softbox flash to work.
You can use a SB900 flash attached to the camera’s hotshoe, instead of the camera’s pop up flash, to transfer the signals.
I usually set the menu so that the on camera flash does not fire a normal flash. I want it only to transmit signals to the remote flash. I usually don’t want it to add light to my subject, because it would be direct flash.
I half press the shutter, and focus on my subject. I fully press the shutter, the shutter does not open yet. While the shutter is closed, the preflash fires on my camera’s pop up flash. Actually, it’s not really a preflash, it’s sort of a Morris Code signal telling the off camera remote flash to fire. The off camera softbox flash does not fire its regular flash yet…it fires its preflash.
The preflash is emitted through the softbox, and strikes the subject, and bounces the light off in various directions. Some of the light is reflected in the direction of the camera so it enters through the lens.
The camera’s flash meter measures the intensity of light returning from the preflash of the remote softbox flash. Then the camera’s flash computer decides what duration the flash should fire for in order to achieve correct flash exposure. Remember, the shutter is still closed.
The camera begins to open its first shutter blade. When the first shutter blade fully opens and exposes the sensor to light, this is the perfect moment for the flash to fire!
The camera tells the on camera flash to fire another Morris Code style of signal telling the off camera remote softbox flash to fire its real flash at the duration the flash computer chose. Side note: the flash computer is located within the camera, not in the flash.
The flash fires, and the light makes the model beautiful, and bounces back through the lens of the camera, and strikes the sensor behind the shutter curtains. The second shutter blade closes, and the exposure is done like dinner.
If you are just learning this sequence of events, I find it helpful to visualize this process by drawing a picture of the camera’s location, the subject, and the remote flash.
Of course, very often, Pocket Wizard transmitters are used instead of an on camera flash. Their benefit is that they are not “line of sight.” The problem with the old Pocket Wizards is that they are not able to provide TTL flash communication. Apparently there is a new design Pocket Wizard coming out soon that will allow TTL flash communication.
Note also that for shutter speeds which involve high sync flash, the “preflash” communication process is the same, but the real flash timing and duration is different.
There’s one common question about flash photography…
When I have my flash turned on, does the camera add the amount of light from the flash to the ambient light readings of the meter in camera manual mode? You know the little light meter readout that is displayed when I’m using camera manual mode?
No, the camera does not add the flash to the meter readout. The camera does not know the intensity of light it needs to add to the scene for proper flash exposure until after the preflash has been fired.
The camera uses the preflash to calculate the amount of light it will add to the scene. The preflash feedback system isn’t initiated until after I fully press the shutter button. Half pressing the shutter button will choose the focus and display the light meter, but the preflash does not fire until I fully press the shutter button. Then the photo is made in the blink of an eye, unless of course you are doing long exposure photography.
The camera does not know the intensity of light it needs to add to the scene for proper flash exposure until after the preflash has been fired.
Having said this though, the automatic camera modes do try to assist you with exposure when the flash is turned on, if your camera is a newer model. The camera will choose a faster shutter speed if you are in Aperture priority.
Try it for yourself…set your camera down on the table and half press the shutter button and focus on something in Aperture mode. Note the shutter speed the camera chooses for exposure. Flip up the on camera flash, and with out moving the camera’s position, half press the shutter and notice the change in shutter speed. If your camera doesn’t display the speed on the screen on the top of your camera, then fully press the shutter and take 2 photos, then review the photo statistics in the photo review.
I quite enjoyed seeing the proof with my own eyes, because really I had just been ‘told’ this by reading it online.
The change in shutter speed depends upon the brightness of the ambient light in the scene. But again, the amount of light from the flash is not added to the light meter. Actually, none of the automatic metering modes even display a light meter the way manual mode does.
The following is for TTL-BL flash, not for TTL flash:
Please note however that ttl-bl flash does, sometimes, add the amount of light from the flash to the ambient light readings of the meter in camera manual mode. This is possible because the aperture/shutter/iso have been set on the camera by the photographer, so the camera believes that this is the proper background exposure for the subject. The camera has some idea of what flash exposure to add to the subject in order to match the exposure of the background. It is really not a very accurate guess because the camera will not know the reflectance of the subject until after the preflash occurs.
The amount of light that it adds to the light meter depends upon the discrepancy between the exposure of the subject in the foreground, and the exposure of the background. TTL-bl flash also uses the distance information from the camera when it focuses on the subject, as a parameter for calculating flash exposure. It will only use this distance information if the flash head is pointing forward.
S’later
Thank you Stephen & Neil, and thanks Neil for the Links..appreciate it! Have read your On Camera Flash book…awesome book, read through once, plan to go slower & read again!
Yes I will usually be using fill flash, so if I need to get ambient reading right on, then when I add the flash…wont it be overexposed? Maybe that is typically what happens…and then you just take exposure down with FEC till it looks right??
Thank you & guess I’ll just have to wait for WPPI 2012 :( to take your class…this time I will register extra early seeing how it filled up so quickly!
kb
With fill-flash, you are adding only a touch of fill light. It will be 2 or 3 stops under, whether you are using manual flash or TTL flash. In adding such a small amount of light to the ambient light, you run no risk of over exposure.
Besides, you are shooting in RAW, which will easily allow you to take up any slack in the exposure.
hi neil, it seems that you explained it very well but maybe the terms you are using are still strange to my ears. i want to know if i take a pict of a group in the low light condition and i get the right exposure for my ambient light but my speed become very slow coz i used f/8 to make sure sharp pict on every face, if i crank up the iso, i am worry about the noise. my questions are, how do i set my cam and my flash or should i get the reading from the face to get the right output of the flash and is it ok in order to get the fast shutter i set the shutter above 1/30 even though the metering says under expose? coz i always ended up with dark BG. i am using 50d and 580exII. thanks so much.
Yohan .. the scenario you describe has a few details missing.
When you say you are getting the right exposure for the ambient .. is that for your background or for your subject?
Is your subject getting the same amount of light as the background, or under-exposed compared to background?
And you have to figure out whether your flash is just fill-flash, or the actual correct exposure you’re giving your subject.
You say that your meter tells you you are under-exposing. However, you have to distinguish that there are two exposures taking place. So your camera’s meter might be telling you that you have under-exposure, but your flash can give you correct exposure.
You’ve saved my life!
I was looking for some good information about correct metering, as i’m new with this flash ‘thing’.
Thank you so much!
Can’t wait to read all your articles, now!
Neil, that you for all the hard work you put into this blog, its very helpful.
One thing that keeps stumping me, you often talk about “under exposing for the ambient light” I think I understand what you mean by this but was hoping you can give me a yay or ney.
I take this to mean that if you were to expose correctly for your subject that the background would be too bright/washed out/over exposed, so instead you set your settings such that you have a “nice” background image but fill in your subject correctly with the flash. Hope I’m right so far?
If so next point, the actual underexposing…you are using a combination of all Aperture, Shutter Speed, and ISO? You don’t actually use exposure compensation until you’ve actually taken the shot with the Flash and feel its a little too bright/dim correct?
You’re right on track there.
Regarding the questions in your last paragraph:
Think of it as two exposures again:
– available light
– (TTL) flash
You control the available light by the usual three controls:
– shutter speed,
– aperture,
– ISO
So you underexpose the ambient light by either of these controls, or a combination of.
Then the flash exposure takes up the slack, and you use the flash to finally give you correct exposure.
With TTL flash, you would control the flash exposure by FEC. WIth TTL this is mostly a check-and-see-and-adjust procedure. But you need to do this without it breaking the rhythm of the shoot, or have you disconnect from your subject or clients.
Hi Neil, when you say: “I am using wireless TTL flash control here, with the on-camera speedlight set to Master (but with its output disabled), which then fires the speedlight in the softbox (which is set to Slave / Remote).
Is my Quest. right if I say: Why it isn’t (Master/for the speedlight in the softbox) and (Slave-Remote/for on-camera speedlight) since you want to trigger the softbox light only.. in other way.. Why should you “put it master then disabling it” and twist it around the way you did?
Don’t confuse the word ‘Master’ with ‘Main light’. The Master is the controller. It controls the Slave flash which is mounted on the softbox.
Since I don’t want the speedlight on the camera … (which is just there (as the Master) to control the (Slaved) flash on the softbox) … to add any light to the final image, I have disabled its output.
The slaved flash in the softbox is the main light.
Hi Neil,
Which lens you used for the first image?
Alfredo
Canon EF 70-200mm f/2.8L IS II
Nikon 70-200mm f2.8G VR II
finally i found great tutorial about how to combine ambinat expose and flash expose in outdoor photography, but i still didn”t understand these question:
1) after point camera in back of the subject i find aprerture,… and try to get picture, my subject is over-exposed or under-expoused, how do i know how much should i increase flash power?
can i see the camera expose metering and see the level? or something else?
i do have pocketwizard flex tt1 and 2 tt5 with 2 speedlight 580exll with canon 7d,
i hope response to my questions; really appreciated,
Hi there Manual … If you are using Manual flash, then check your light-meter for a near-definitive answer as to how you should adjust the power of your flash.
If you’re using TTL flash, then it is a matter of making an educated guess, going by the display on the screen; the histogram; and the blinking highlights.
thanks for your response, is there any link or more information about my question in your website or book? again thanks
Hi Neil.
Fantastic, very informative article. Thank you. I am new to off camera flash photography and have 1 question based on your article. If the first step is to choose the ISO, apperture and shutter speed settings to achieve ambient background exposure, then I am assuming that the philosophy here is that the flash does not effect the background exposure, only the subject exposure. But if the flash metering is done through the lens, then the lens will see the entire scene, including the background. So the flash chooses the power based on the entire scene. If this is the case, wouldn’t this leave the subject underexposed because of not enough light. I’m sure the camera is not smart enough to determine which part of the scene is the subject, and set the flash power to get the subject exposure correct only.
Thanks in advance
Tony
Tony, you’re not giving enough details in your hypothetical scenario … is the background lighter or darker than your subject.
Ultimately, the method works, since the results are there, and thousands upon thousands of photographers use similar technique.
But give more details to your hypothetical scenario, and we can step through it.
Hi Neil, thanks for your response and thanks for openly sharing your knowledge on your blog. I have learnt so much from it. In my previous post, I am talking about a scenario where the background is too far away for the flash to make any difference. Your example in this tangent is perfect. The flash has no impact on the background building and sky. So you want the correct ambient exposure for lets say the building. Then you use the flash to expose the model correctly. The flash is not powerful enough to change the exposure of the building though. But when the camera uses the TTL flash metering, it looks at the complete scene through the lens, which is made up of the building in the background, and the subject, the model, and the sky. I assume the TTL metering system averages the total amount of light hitting the sensor to calculate what the flash power should be. But the camera can’t know how much of the scene is within the range of the flash. So how does the camera know how much power to send out of the flash, when you are just trying to use it to fill flash your foreground, and that its not going to effect the background.
I understand that if you are indoors for example, you should slightly underexpose the background because the flash will fill it in. But this doesn’t make sense in your example above.
Maybe I’m over complicating the issue. Or expecting the camera to be to smart. I should just take the shot, check the result and then adjust the FEC accordingly.
Tony
The flash metering is evaluative (unless disabled.) It reads the entire scene, and weighs certain areas. As far as I know, it favors the center portion of the frame more, but I am sure other algorithms kick in depending on the relative brightness of the various areas.
The camera and flash sends out a pre-flash, and depending on the amount of light that is returned, will control the actual output of the flash.
So if your subject is small in the frame, or off-center, your camera will over-expose for your subject when you use TTL flash (as the dominant light source.)
This is where the LCD preview of digital cameras as invaluable … you check, and if you see it over-exposes, you go, “ooops! it must be because my subject is off-center”, and then you adjust your FEC.
It’s just one of those things you do as part of the rhythm of the shoot, to make sure you get (close to) correct exposure.
I do think you’re over-complicating things here. Let the TTL flash technology help you out … and when it fails for certain reasons such as strong back-lighting, or predominantly darker / brighter tones, or off-center subjects … then just ride the FEC, and keep on creating wonderful images.
Thanks for your informative response. This clears things up for me very well.
Tony
You’re the best guy to explain Flash in all its aspects
This has helped a lot. This is the first tutorial I’ve read on how to use a flash, and it makes sense.
thank u so much for the time and energy u have put into ur tutorials. i can not wait to continue reading and playing with my gear.
Hi Neil,
I’ve been reading so many of your writings these days that I have come to my own conclusions regarding TTL vs. manual flash. This is what I have:
TTL Flash:
1.) Shutter speed, aperture, and ISO all control ambient light. The flash itself is the only determining factor in how much flash output is given (so adjust FEC accordingly to taste)
2.) The wider the aperture, the more range the flash has. Similarly, the higher the ISO, the wider the range of flash. Shutter speed in TTL flash doesn’t have any DIRECT influence on the RANGE of flash as long as you remain under maximum sync speed. Slowing the shutter speed might introduce more ambient light and hence INDIRECTLY affect flash, but the flash RANGE itself doesn’t increase/decrease because of a change in shutter speed.
Manual Flash:
1.) ISO, aperture, flash power, and flash distance all affect flash power.
2.) ISO and aperture affect ambient light to flash ratio proportionally.
3.) Shutter speed is the only independent factor of ambient light.
Please feel free to add to it if necessary, and point out any mistakes if present. Thanks again in advance!!!
Eva .. that’s it. Full marks!
AHA!!! This is it!!! a very simple and direct explanation of flash photography! you are THE teacher par excellence! Thank you Niel!!!!
Superb article.
I have to disagree about the fact that it is rambling. Any less and it would have been sub-comprehensive.
Exceptional balance of being concise and to the point, yet comprehensive and sufficiently clear even for beginners.
Hi Neil
Thanks very much for sharing your experience and techniques. It is very interesting to read you and it help me to learn.
I have one question about this topic, at the beginning you mention the following:
– If we have correct ambient exposure (or close to correct ambient exposure),then our flash needs to be fill-flash. It needs to be less than what would’ve given us correct flash exposure. We can’t simply add correct ambient exposure to correct flash exposure, for then we’d have over-exposure.
– If we don’t have enough ambient light for correct exposure (at our desired aperture / shutter speed / ISO), then we need to have correct flash exposure.
I am not sure to understand the second statement. I mean, let say the ambient exposure is at -1/3 stop (not enough ambient light)…do we still need to have a correct flash exposure in the same manner as if the ambient is at -1 stop (not enough ambient light)? Because if we have the same amount of flash in both situations, I assume the final exposure won’t be the same in both situation. Am i miss something?
Thanks
A third stop under-exposure? You’re just picking at minute details now, but to answer your question – at this point neither the flash, nor the ambient are “fill” or “main” sources of light, but about equal. How equal? I dunno … the goal should be to take awesome photos and not stress the tiniest details.
Neil,
I’ve read several of Brian Petersons books. This article and your off camera flash book made SO much more sense to me. You are not rambling in this article at all. I believe I have found my new favorite instructor!! Bravo!!
Thanks a lot for sharing all your knowledge.
This makes a really great person.
:) from Brazil!
Please allow me to try:
1. Meter the background, example: f11@ 1/250
2. Meter the subject, example: f5.6 @ 1/250
3. We need to set the flash to supply f8.5 light on the subject
4. f8.5 from the flash “PLUS” f5.6 metered ambient at the subject equals f11 ( f8.5 flash ) + ( f5.6 ambient ) = f11
6. The subject is now balanced with the background.
Marco
Nice example
But I am confused how f8.5 + f5.6 = f11
What is the math behind that
Is it related to the number of stops or what
thanks
I have no idea either where f8.5 comes from.
Neil, Joe,
Recall light is additive and the unit of measure of light is f-stop.
Each time you add +1 stop you actually double the amount (quantity) of light. So, f11 light (if you will) is twice as bright as f8.0 light. So, it stands to reason that each time you reduce your aperture you decrease or cut the amount (quantity) of light by one half.
In the example above the subject already has f5.6 light on her. We have to take this light into consideration. If we merely want to balance for the brighter background (f11 in this case) we must figure out how much more light is needed. Well, the math tells us that f8.0 + f8.0 = f11.0 and we know that f5.6 + f5.6 = f8.0. So, it must be that f5.6 +f5.6 +f5.6 +f5.6 = f11.0. So, the only question left is what is f5.6+f.56+f5.6? The answer is f8.5! I hope this helps.
Marco, you are over-thinking it.
At the settings given, 1/250 @ f/5.6 @ 400 ISO, she is quite under-exposed.
She isn’t correctly exposed at f/5.6 … but under-exposed. So the ambient light on her is negligible.
Hello Neil,
Yes, indeed she is “under-exposed” with only 1/4 of the light falling on her compared to the background. However, we should not discount 1/4 of the light falling on her if we desire accurate exposures for our clients.
We may choose to use our creative abilities and allow the background to be under-exposed or even over-exposed thereby making our subject standout from the background. However, our subject should always be properly exposed to best of our ability and in this case f5.6 makes up 1/4 of the total light available.
I enjoy your website and learn from you and others as well. My intention is only to answer Joe’s question and hopefully make it somewhat easy to understand. Adding and subtracting f-stops is important. When it becomes second nature you can worry less on the mechanics and more on the artistic.
How do you figure “a 1/4 of the light”? You’re assuming a precision that just isn’t there, either now in analyzing it, or at the time of shooting.
You mentioned f/8.5 … that is about 1/6th of a stop difference from f/8
It truly is a negligible difference.
So while I appreciate your willingness to help explain and reverse-engineer this, it just confuses when you make it overly mathematical … especially when this article was written for clarity and explanation.
In other words, I can do *this*, over and over, under varying lighting conditions and and make it work, without resorting to this fine a degree of analysis.
Hi Neil,
This is the best tutorial for off camera flash I have ever read, many thanks.
I would like propose a situation where I need some advice please.
I am going to shoot off camera flash with the ambient about 2 stops under exposed.
The ambient light is varying rapidly but I want to use a fixed Manual exposure of 1/200 @ f4 for example and Auto ISO for the ambient exposure, to compensate for the changing light.
The problem is how to use the flash. In TTL mode will the flash automatically provide a decent flash exposure on the model even when the Auto ISO changes the ambient ISO without the need to change the Flash Exposure Compensation
In theory, that’s how it is intended to work — that the TTL flash exposure keeps up and helps balance your flash and ambient light.
Hi Neil, hope you don’t mind me asking a related question regarding OCF.
Using Sony A7 series cameras with Godox flash, if I have HSS set on my OCF
and I then use a shutter speed equal or lower than my max sync speed (1/200 for example),
will my flash automatically revert to standard sync or remain in HSS.
Hi there Michael
Yes, that is exactly what will happen. Your camera & flash will be in normal flash sync whenever you are at max sync speed or lower. So you can keep HSS enabled.