lighting and photographing the wedding formals
With this, the first in a loose series on lighting and photographing the family formals at weddings, I would like to show that with a simple approach it is possible to get clean results that work every time.
In lighting the formals, I don’t try to get all Rembrandt, but prefer a fairly flat way of lighting everyone. I keep the lighting static for all the images, whether I am photographing one person or twenty. With time usually being a real constraint during the wedding day, there simply isn’t the opportunity to play around too much with the lighting .. and I find a simple predictable way of lighting works best.
Before we get to the actual gear I use, let’s start off with exposure metering for flash.
Because I work with off-camera lighting, and everyone is static in relation to the lights, it is much much simpler to work with manual flash. With TTL flash there is the chance (or risk, if you will), of exposure varying from image to image. This will slow your post-production workflow down as you now have to correct exposure for individual images. In the end it is just simpler to work with manual flash in this instance.
You can work with a flash meter, however, I use the histogram with as much accuracy by metering for the brightest relevant tone – the white dress. Since the lighting setup is straight-forward and the lighting pattern quite even, metering for the flash exposure is pretty simple as well.
The flash exposure is chosen for a specific aperture and ISO – we need enough depth-of-field, and f5.6 is good for a small group of people in line with each other. For our ISO setting, we need as low as possible to get the best results – the best color reproduction and contrast, and as little amount of digital noise as we can tolerate .. and on modern D-SLRs an ISO of 400 gives very good results indeed, and can even be considered a low ISO setting.
But these settings also need to be chosen in relation to our available light .. and for the image above, here is the available light only shot:
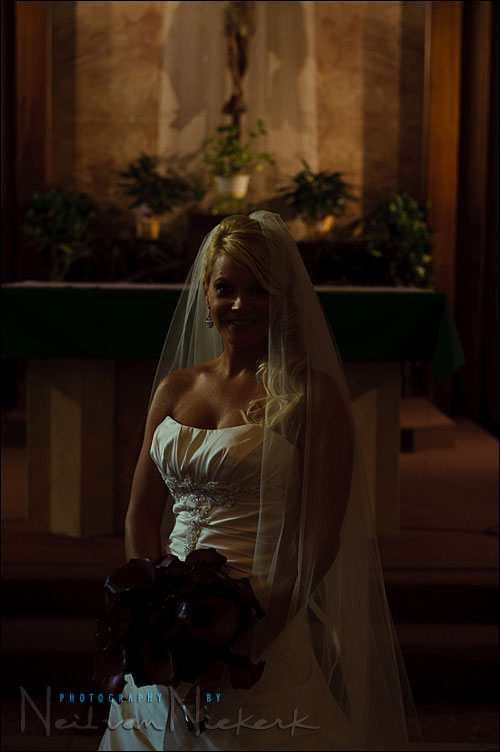
With this image you can see how much light there was in the background .. and also that there was a slight amount of available light coming from a window somewhere. So we’ll choose a shutter speed where enough of the background registers, but the amount of light falling on our bride from the window doesn’t cause an uneven lighting pattern on her.
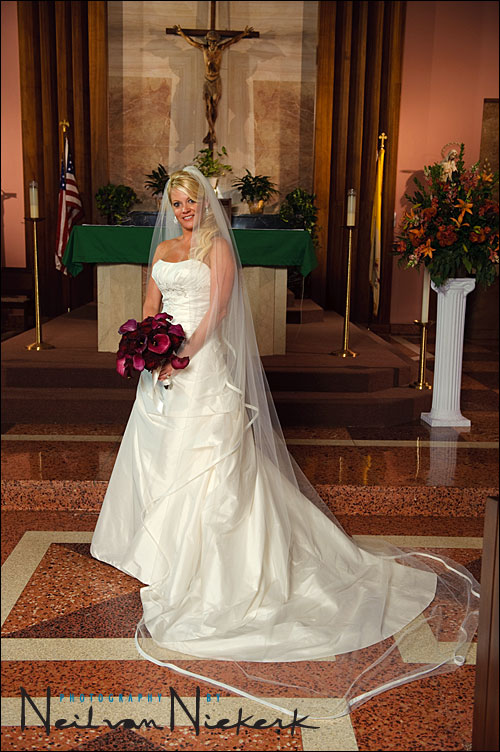
For the image at the top, the final choice of settings were 1/100th @ f5.6 @ 400 ISO.
Normally I would consider 1/100th of a second shutter speed to be fairly low when working with available light. However, the risk of camera shake is nearly eliminated here because the flash completely dominates as the light source. This allows me to comfortably work without a tripod.
gelling your flash for Tungsten / Incandescent light
Since the lighting in churches are predominantly Tungsten, I usually gel my flash either with a full CTS or a 1/2 CTS as in the example above. This helps bring my flash’s white balance to match the existing light, and not give a discordant color cast. I use these gels that I cut up and tape to the top of my speedlight’s head. One of these sheets (which aren’t expensive), will give you a lifetime supply of these filters. If you use flash indoors where Tungsten lighting dominates, then these filters are an invaluable part of flash photography.

The Full CTS will bring your flash WB down to around 2900K, more or less neutralizing the look of the Tungsten light. The 1/2 CTS will bring your flash WB to around 3800K, which will leave your backgrounds still with a touch of the warmth of Tungsten lighting.
The equipment:
For the portrait above, and for small groups of up to 8 or 9 people, I most often just use one flashgun with a 60″ umbrella. This large light source gives me even enough coverage for a small group. When just using the one light (and 60″ umbrella), I keep the light off-center from my position, but not by much since I want even coverage for everyone in the group. With larger groups I use two of these set-ups, evenly spaced.
You will also notice that lighting with regard to short lighting / broad lighting, isn’t a specific concern here.
I prefer using the Quantum flashguns here, since they are workhorses with which I’ve never experienced over-heating. I can just keep on shooting without a thought to my flashguns. You can certainly achieve similar results with a speedlight, but you might have to fire at a slower more steady rate. Since a speedlight would most likely work at (or close to) full power here, there is a chance of over-heating the speedlight. And you would also have to fire slower to make sure that the flash recycles properly between shots.
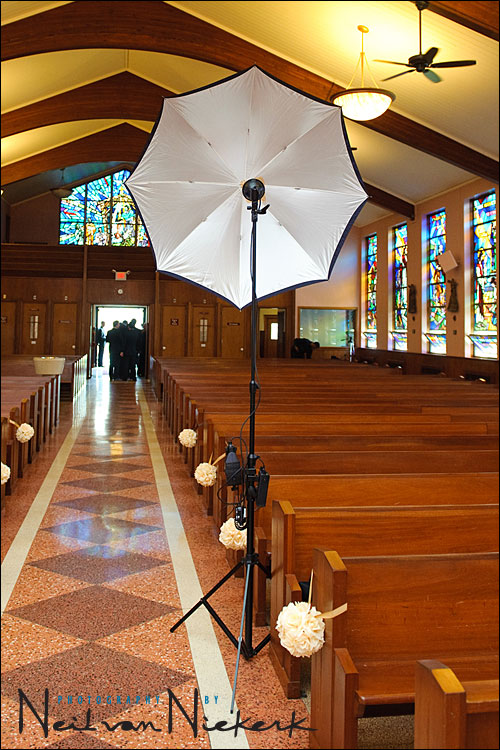
The radio transmitter is the industry standard Pocket Wizard – in this case the Plus II. As mentioned earlier, I don’t need TTL metering here, and actually don’t want it. I need the simplicity and predictability of manual flash.
A close-up of the Quantum flash and battery pack, as shown in a previous thread.

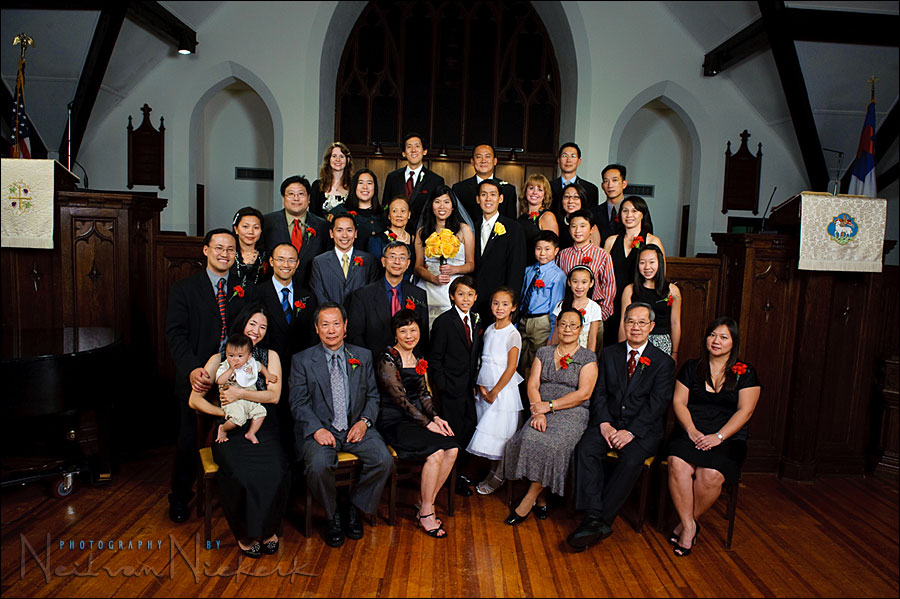
And to end off this section, here’s an example of a group as photographed using two of the Q-flashes, each with a 60″ umbrella.
What I wanted to achieve with this article, is show the simplicity of it all – the equipment is set up in a straight-forward way, and used in a straight-forward manner – and giving pleasant results that will please clients .. with a minimum of post-production work.
related articles
- a simple lighting setup for photographing the wedding formals
- wedding photography: positioning your flash for the formals
- wedding photography – lighting large groups with a large light
neil, Thx for sharing this but i have one question. when you’re using two umbrellas to lighting a large group. will the umbrella on each side create the double nose shadow? what is your setting of this and what is the best way to handle this?
Neil, love your site and really appreciate all the great info on it! I have a question, how do you go about setting your flash power when doing these group formals? You said you look at the histogram and I know how to use the histogram but what I mean is, do you set your flash at a specific value (say 1/4), have the group come in, take a shot, and then adjust? Or do you get it set up perfectly before hand? I ask this because I don’t currently have the luxury of an assistant to stand in for me so that I can set up my lighting before I call in the bridal party. Any help would be greatly appreciated! Thanks.
Exactly what I do :-) No time to be all fancy with lights on the family formals.
Hello Neil,
I can see that you are using the umbrella as a kind of reflector and not as a shoot-through system, although it’s being said, that “shoot through” creates softer light. Is it due to the fact that you were going to shoot a group of people?
I do almost exactly this also. I typically gel with a CTO, can you touch on the difference between CTO and CTS for this situation and why you prefer the CTS?
Hi Neil,
I too am interested in your 2-light setup. Are both brollies on the same side, or one either side of camera? Would love to see a shot of the 2-light setup.
Thanks,
Brian
Thank you!
I hope you’ll cover lighting the dancing, particularly when it is too dark to focus. :(
Awesome stuff as always, Neil!
Pardon my ignorance in these things, but what is the reason for shooting the group formals in the church in this case?
Would this simply be because there was no suitable place outdoors at the location?
Regards,
Andrew Westran
Hi Neil, you said in your above article that 5.6 Fstop is good enough for a small group inline with each other.what would you use if they were not in line and say 4 or 5 or total of say 8 but not next to each other.
Michael
Neil
thanks for the concept, and nice shots.
Is the umbrella in front of you or behind you and are you using a 70-200 2.8
thanks for all your teachings .
I am waiting for you to come to San Diego!
John
Great Article,,,,
For some reason, this article made a lot more sense.
When you use 1 umbrella, is it also just 8ft to your left or right?
When you metered the scene, were you -2 stops before the flash?
Dear Neil
Great tutorial subject,I have been looking for a tutorial that covers this subject for month.Now I am really looking foreward to the rest of it.Here in the UK we can get some really dark and damp days were it is essential to shoot indoors.Neil I have the book and it is brilliant,is there any chance of a DVD in the future….Many thanks Paul
I’ve been making an effort this season to light my group formals, and I’m also shooting with a longer lens (when the groups as are small enough and the space is long enough for me to get away with it). The uniform lighting and the focal length perspective change are, I suspect, the reason for an increase in my print sales to Moms.
Great post. Worth it to set up the strobes!
Neil,
Would you please explain how you maintained such even illumination from front to back in this group photo? I struggle properly illuminating the back row without over-illuminating the people in the front row. Thank you in advance for your advice.
Best regards,
Matt
I notice that you often work at ISO 400 and sometime even will above that. Using a higher ISO gives me a faster shutter and more power/faster recycle or my flashes. Shooting with a Nikon D90 and a set of SB600s, I’m always fighting the fringes of ISO and flash power.
How do you determine how high is too high for you ISO? If you are shooting with a D3/D700, you’re getting about a stop better ISO performance that my D90. I know I can shoot at ISO 400 and get constantly clear shots but I really concerned about pushing beyond that because I can’t be sure (from the LCD) while shooting that I have a clear enough shot or at least one that can be effectively managed with NR software.
<< Sarah … aside from the lighting, why not use an on-camera speedlight (or wireless TTL transmitter), that will give you an infra-red beam to help your camera focus in the dark?>>
I feel like an idiot. The flash (580ex2) was on camera (40d), and there was no infra-red beam. Could I have disabled it?
I’ve been waiting for my local bookstore to have your book in stock. Off to go order from amazon instead…
Very nice information, Neil! Thanks for sharing!
Can you explain what you do for white balance, especially when using the gels?
Are you using Tungsten or K settings?
With regards to your histogram metering, are you just using the highlight levels as your guide?
Neil,
Do you have a page on shooting groups like this with the T2 in churches or schools with florescent lighting?
“Because I work with 0ff-camera lighting, and everyone is static in relation to the lights, it is much much simpler to work with manual flash. With TTL flash there is the chance (or risk, if you will), of exposure varying from image to image. This will slow your post-production workflow down as you now have to correct exposure for individual images. In the end it is just simpler to work with manual flash in this instance.”
Neil, elsewhere you state that you prefer TTL flash, and I realize that it is for situations when you need to run around – but what concerns me, is your reference to “exposure varying from image to image” in the case of TTL. Is that what you experience with your non-static photographs – a lot of variation in exposure?
“So with me setting the flashguns to 1/2+ power (ie, 2/3rds stops under full power), every time I start with the formal portraits in the church or at the venue, I have become accustomed to approximate settings when I set the flashgun (with 60? umbrella) at a certain distance from where I will pose the groups.
And with experience, I know I will get around f5.6 @ 400 ISO for that working distance.”
1 Neil, flashguns are not a possiblity for me at this stage – I need to get by with 2 speedlights and 2 umbrellas – could you please indicate what the power setting would be for speedlights, and more or less where one would start with the aperture, ISO and shutter speed for the family group, and then the bride alone.
2 Does one get battery packs for speedlights, something longer lasting and more powerful than 4 rechargeables and the 5th piggyback battery clicked onto the speedlight?
Many thanks
Hi Neil,
your articles are fantastics. I improved my photographs a lot by reading, trying, and making mines many of your explanations.
For some articles (like this one), I think that a little drawing of the flashs/ subject/photographer disposition would really be a plus.
Thanks again for all that you share. I will buy your book as soon as available in french.
Claude
P.S: excuse me for my approximative english
Neil have you had a chance to try out the trios? If you have what are your thoughts
?
Thanks
Jim
Dear Neil
Do you or any members of the forum know were you can purchase Rosco Cingel 3441 and 3442 in the United Kingdom Thanks Paul
Neil
As always you are the master when it comes to lighting and exposure. My question is with the large group formals, where in the group is your point of focus? Often when I shoot a large group with a TTL flash such as the Canon 580, I have to double check to make sure that the image is not blurred. Also the image isn’t sharp. is this happening because of my point of focus or the F/stop i am using
Thank You
Neil
The lens I usually use is the canon 17-40. What would of been the best lens to use for a shot with a large group?
Hi Neil..
Appreciate you putting yourself out there for comments and for passing on the knowledge.. but one thing I’d like to ask is if you would consider straighting your photos. Many of the examples posted are off. All of these on this page are tilted. Maybe a pet peeve of mine, but it’s one of the first things that I noticed..
brad
Neil, just bought your book, “On-Camera Flash”, and have been experimenting with the black foamie thing. Excellent.
My question here is something that most lighting experts forget to tell us. . . what is your flash to subject distance in your single and double, static, setup?
Neil,
I find myself working in places with florescent lighting a lot. It’s difficult to get good color tones. With the formals I can use studio lights and turn off the florescent lights. But during the ceremony I am using my D700 with the SB-900. Any suggestions as to how to get good WB using this equipment? This last week I used the Stoffen diffuser, pointed it at the ceiling but still got horrible color. My wife was able to salvage the images with Lt. II and CS3. Any suggestions?
Dwayne … fluorescent lights are notoriously difficult to work with. Their color temperature varies with age, brand and type.
Normally I resort to under-exposing the ambient, and letting the flash dominate.
I do intend writing an article on using flash with fluorescent, but the one time I did set out to do that, the fluorescent lighting turned out to be really good!
Hi Neil,
in the picture where you see the umbrella in the third pew row:
-How many umbrellas as this you placed in the church?
-As it appears that the light of the umbrella comes the bride and groom from behind, you use ON-CAMERA FLASH directly in front of the couple?
Best regards,
Alfredo
Neil your site is a treasure trove. I love the articles. I have a question about the bridal formal at the top of this post. What do you do when you encounter a church that has a marble wall or highly reflective surface behind the altar? How do you avoid the reflective glare from your umbrellas? Thanks again for sharing.
Jim
Hi Neil,
My question is what settings or changes would you make at an aperture of F8 in the scenerio above. I was getting confused on whether to change the flash output or the ISO or all 4 settings (shutter speed, iso, flash output, aperture). And thanks again for sharing your knowledge.
Hi – I am excited by all this helpful info – just writing this comment to checout that I’m on the forum and it’s working ok! I am just realising that I need a sekonic flash meter. I can see that after using it for a while it may not take too long to set up exposures corectly , and of course once they’re set up you casn do a whole batch of sghots withy that one correct exposure.