Mixing TTL flash with manual flash – wedding receptions
A common technique used in photographing wedding receptions, is to use additional lighting to lift the general light levels in large reception rooms. The additional lights can be wirelessly controlled TTL flash – but more often the additional lighting would be manual flash. Then you can use an on-camera flash, either in manual or in TTL.
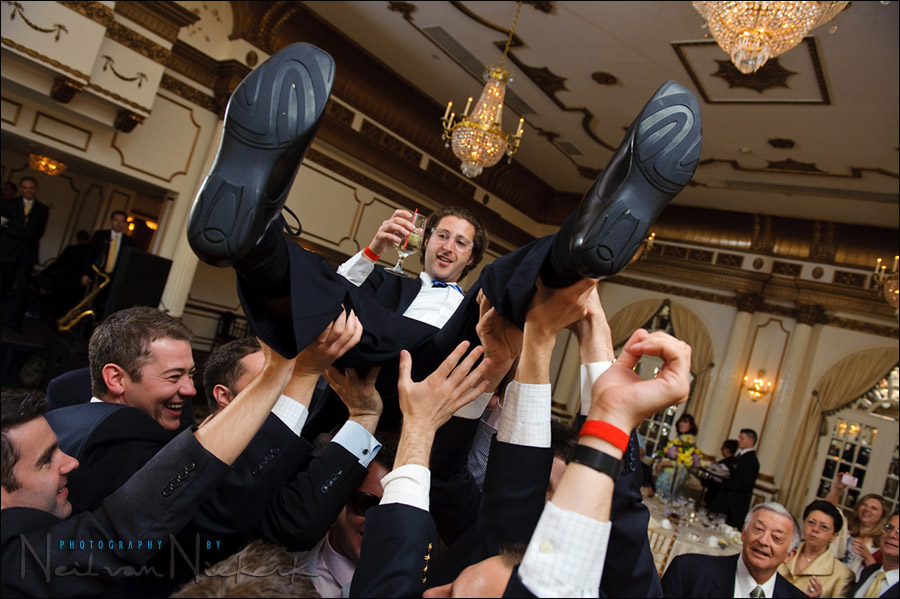
My preference when working like this, is for my on-camera flash to be used in TTL mode, and the additional light(s) to be in manual. In the photograph above, taken during a wedding reception with a large boxy room that has a high ceiling. The ceiling is too high to easily good results easily by just bouncing an on-camera flash, although by going to a high ISO, it is entirely possible to just use on-camera bounce flash as the only light source. This is the same venue in this article – Bounce flash photography & The Inverse Square Law. So the choice is there if you’re willing to go to higher ISO settings – or alternately, you can use additional off-camera lighting.
I have posted an example before where I used a few additional lights in manual, with on-camera flash in TTL. The question invariably comes up about how you control the manual flash. The answer is that with manual flash, you usually don’t. You set it up before the time to give just a touch of light to the background, and then use the on-camera flash to do the rest of the work. The additional lights here were triggered by PocketWizard Plus II units. With wireless TTL setups, you obviously control the off-camera flashes from the camera itself.
Here is how I had set up the additional light in this case:

As you can see, without the on-camera flash firing, the image is about 2 or 3 stops under-exposed. This then is how you decide on the exposure for the additional lights. You add juuust enough that it makes a difference to the overall light as it appears … in comparison to the settings YOU decide on. The settings YOU decide on, are guided by how bright it is, and by how hard you can, and would want to, work your on-camera speedlight.
Traditionally, you would meter around the room to figure out the exposure of the additional lights, and then add your on-camera flash’s exposure to that. With digital, the simplest really is to take a few test shots and see if the additional lights make a difference. The beauty of digital photography’s immediate feedback.
The additional light helps bring up detail in the background, without the background fading into black. I prefer these to be diffused with a white shoot-through umbrella. There are other ways of doing it. Some photographers prefer barebulb flash or flashes used directly pointed at the dance floor, to give dimensional light.
With this venue, I prefer putting up two lights, symmetrically on either side of the stage. The lights go as high as I can. (About 11′ with these stands.) Then I add a white-shoot-through umbrella to each. I point the umbrella slightly inwards, but there is no real precision needed here.
This evening however, I couldn’t safely place the second additional light. So I worked with just one T2 Q-flash set to 1/4 of full power, and pointed to the middle of the dance floor.

Here you can see where I placed the off-camera additional light – off to one side of the stage. It really does make that much difference to the overall light, as seen in the photo at the top. The trick here obviously is not to include the additional light in the photo, or the hot-spot. I’ve found that shooting at approximately a 90 degree angle to the light helps give me dimension to the light.
My camera settings for the photo at the top: 1/125 @ f4 @ 1600 ISO
Why such a high shutter speed indoors? This is because of the videographer who lit up the entire place with a powerful video light. This forced me in turn to use a higher shutter speed so I don’t get subject smear while people dance. The light levels from the video light is so high, that the flash wouldn’t effectively freeze the action, and I would get a double image – partly the flash exposure, and partly the video ambient light.
The criticism might be that the image at the top doesn’t show the event as it actually did at the time, with so much light added .. and this is partially true. But only partially. With so much video light added, the ambiance of the room was fairly bright, and evenly lit. I just took it a step further to ensure that my images worked.
Mostly these days I prefer the results from using wider apertures and a high ISO, and just bounce flash. But I will mix up the technique to get the best results.
Related articles
- More articles on off-camera flash
- More articles on wedding photography
Hello, Neil, reading that post and re-scanning the linked posts brought a question to mind. You partially answered it already: siting of the manual flash. You said where you put the flash in this post and showed it in both this post and the one with the Indian wedding. You also said that you have to try to keep it out of the shot. I have found that sometimes I see something happening and the flash on a stand is out of shot but still creates a hotspot at the edge of a frame (or worse it or its stand is in the frame). I would love to see a post from you running through your thought process of why you choose to position one or more flashes on stand(s) in a particular spot in a few different rooms.
I usually position the additional lights behind the DJ’s speakers. Or someplace safe where no one can knock it over. This concern overrides the need to make the light look better. It really is as simple as that.
I also usually don’t put up additional lights if the ceilings are low. That creates those hot spots. A big boxy room always works better.
I am using these kinds of lights less and less nowadays with more reception rooms using uplighting.
Mostly I just use simple bounce-flash in the reception room.
I have a big problem using this technique, and I’ve used it many, many times. I will have a 580EX II on-camera, bounced using TTL to give my foreground subject proper lighting, and they look great.
But to light the background in a dark hall, I will typically set another bare 580EX II along a wall in a corner and trigger it with a PWII in manual mode. The problem I have is one of directional light and hot spots.
If I point the flash towards the wall/ceiling, it does very little to help around the hall, it simply blasts the local area. If I point it to the crowd it is very difficult to keep it out of the shot and it often overpowers the TTL flash on the camera.
I end up setting it to 1/8 or even 1/16 power just to be sure it adds a little light but doesn’t interfere too much if I get too close. I might even gel it warmer, or sometimes even blue for effect.
Without stepping up to Q flashes, what can you recommend? Move it as high as possible and shoot through an umbrella? At half-power? I’m thinking it’s just not powerful enough and the umbrella will just steal more light.
Dave, you don’t need the Q-flashes if you’re running your speedlights at only 1/8 full power. So the issue isn’t one of not having enough power.
It’s a problem with positioning of these lights.
Whenever I’ve pointed the additional lights directly onto the dance floor, I risk getting weird cross-shadows and uneven light. For me, it is just simpler to hoist one or two additional lights as high as I can. Then I either bounce into the ceiling, or use a shoot-through umbrella to disperse the light.
And I shoot at an angle to the additional light when photographing people on the dance-floor. However, when I am photographing the couple at their table, or the best man / maid of honour delivering their speeches .. then I’m shooting WITH the direction of the additional light. It just adds more light to what my on-camera speedlight is delivering.
Definitely crank up the power of the flash to overcome the shoot-through light.
What ISO are you shooting at? And what is your typical aperture range?
Hi Neil,
Great post!
You are talking about not having the lights in the photos. I was wondering if you could give your opinion regarding a set up I did this weekend.
In weddings I try to bounce the strobes of the ceiling and put umbrellas to make the light soft, However, in parties like this one I actually wanted them in the photos every now and then to give a hard party look (since we are dealing with teens). I use 2-160ws bear lights on minimum power (I would guess minimum is like 30ws) and usually they just tilted toward the dance floor.
I wonder if you could give me your opinion. By the way, you are using Q-Flashes, do you think that using 2 SB-900 would do the trick or are they too weak?
Thank you,
Motti
Motti … it’s a matter of taste, but I don’t like that hard flash look. However, it’s a question of what your clients like and signed up for.
I do notice some wild jumps in your White Balance in the images, with green skin tones.
I do like the group shot. Nicely set up!
The Q-flash (with a diffuser disc over the head), isn’t much more powerful than a speedlight. You barely gain a stop of light, but the spread of light is more even. The Q-flash can also just keep on firing away with little chance of over-heating like a speedlight would.
Hi Neil. When I use my 580exii on my 5dmarkii or 40D, whether in TTL or manual, it disables the pc port. Because of that I am unables to use my Pocket Wizard II’s to trigger my off camera strobes. I spoke to the Canon customer service rep and he confirmed that the canon bodies disables the pc port when it detects on camera flash. I also tried connecting the PWII to the the pc port of the on camera 580exII but it doesn’t solve the problem. Any suggestions? Thanks.
To Nayeem above asking about the pc port: This does work. If you take your 5D2 and place a 580EX II in the hot shoe, the camera’s pc port will still fire a pcket wizard. I do this all the time… set the flash to TTL or manual, it doesn’t matter. Just plug the pc port to the pocket wizard and it will trigger the remote flash. Maybe you just need the right cable — check out flashzebra.com, he can help you.
Nayeem, I have to agree with David. Your camera’s PC port should work. In fact, it HAS to work, otherwise it isn’t a PC port. ;)
Did you have flash compensation dialed in on the on-camera flash? You must have worked super quick to balance the on camera flash’s brightness levels before the groom landed on the floor. These moments don’t last a long time. Great post! Thanks!
Deryl, I have to change the FEC to adjust the on-camera flash since it is in TTL mode.
There’s no wild crazy finger-work necessary though. Especially with a group of people where no specific dark or light tonal values dominate. So for the entire sequence there, and for much of the night in fact, I barely changed the FEC.
I haven’t had much luck with off camera speedlights in these situations either. Depending on where I am shooting I end up getting over exposed heads of those who are closer to the off camera light or other hot spots in the images. I wonder if the trick is to just limit your shooting area to the areas that work within the given light set up to avoid those problems. Kinda sucks having to be relegated to a confined area though. I do use Radiopoppers so I suppose I could set up two lights each on a different channel and control them from a master flash on camera. I could then switch flashes as I move around.
Mac .. that’s exactly what I do – I limit my range of areas that I shoot in; and I limit the range of directions that I shoot in. Whenever I have to shoot towards an area where there will be a pronounced hot-spot, I disable the pocket-wizard.
If you’re getting over-exposed heads of people, then your positioning of the lights isn’t good.
Hi Neil
Thanks for a great post again. I am so glad you touched on this topic, I recently bought Qflash T5D-R.
One thing that baffles me – When this flash is in manual mode (like your said 1/4th power for ambience) do we still need to dial the ISO and f number on flash.on the flash back screen this number shows. Not sure when being used in manual mode, if we still need to dial in these figures.
Will appreciate your help on this.
-MP
In this situation, my on-camera flash was in TTL mode, and hence controlled by the FEC.
The additional lighting (off-camera flashes) were set to manual. So while the ISO and aperture setting will definitely influence how bright the effect is of the additional lighting .. the display on the back of the flashgun (on camera) and the flashguns off-camera have NO correlation to what you’re doing.
The questions relating to overexposure of people nearby and hotspots.
I would have thought that because of its already far distance (11′ above the ground for a start) that by the time the light reaches anyone its rate of falloff is very shallow across the distance of where people are in the room, and most of it will be bouncing around the room to “raise the ambient” partly in thanks to the shoot-through umbrella as that’s all it is really intended to do – as opposed to adding a kicker or actual fill on a subject.
As neil said he’d normally use two, this would certainly allow you to raise the ambient almost uniformly across the room with negligible hotspots – one flash would of course make a gradient from one side to the other but I can’t imagine it would make too much of an issue unless the room really was very tiny or extremely vast.
Disclaimer: I’m still learning so I may be wrong, but this what I understand to be the case.
Adrian, you’re spot-on.
Hi Neil,
Thank you for your respond. The green cast is actually a light Cross Process I added in Lightroom. I do find that the new SB-900 is tricky because it heats up fast (very fast). I disconnected the heat sensor and let it rip. Nothing happened. However, the light is much more even than the older SB-600 (I find)
Cannot afford the Q-guns so I think I will go for some older Metz or a couple of Sunpak 622’s.
Thanks again,
BTW Your book is great and easy to read and understand.
Motti
Motti .. thanks!
Neil,
quick question about the use of umbrella in such a large room, you mentioned in a previous reply how you use them to “disperse the light”. Does the umbrella still help in achieving a softer light even if the distance between the source and the subject(s) can be significantly larger than the size of the umbrella itself ?
I am also referring to your older post about the Indian wedding when the distance between the umbrellas and the subjects seems to be very very significant.
Thanks again for your help
Francesco
Francesco .. how does it look in the images? :)
You need to keep in mind, that the light also bounces off the ceiling and walls. This does create a much wider spread of the light.
Neil —
Regarding your questions above — usually I’m at ISO 1600 and around 1/125 or so. That will give me a little below par on the ambient then I fill it with bounced on-camera TTL. Sometimes I’ll go around +2/3 on the FEC because I know the 580/Canon combination will underexpose fair skin.
I just want more ambient and I can’t get the hang of the off-camera manual flash somewhere in the room, it’s never right… too low, bounced wrong and the wall is all white, shot into the crowd and everyone is hot, etc.
-Dave
Dave .. then it sounds like you might want to pull back on the power of the additional lights, (less flash in the background),
and drop your shutter speed .. which will allow more available light in.
The rest is up to placement of the lights, and your own positioning.
Neil,
How do you decide where to put manual strobes in a room in general ?. Diagonally or the same side ?. Do you look how the current available lights positioned or maybe windows ?.
TIA,
John
John .. I usually place the additional lights next to the DJ / band’s speakers. It’s the safest place.
The corners of the room is usually jam-packed with people.
And I do use the available light coming in through windows, though most venues that I know of pull down blinds to make the place dark even during the day.
Hi Neil.
I would like to ask if there is any combination to use 580EXII as master on ETTL and 550EX as slave on manual mode wireless without Pocket Wizard or any other trigers. I think that A:B C ratios are on ETTL for the three groups or on manual again on the tree groups . Is there any posibility to have A group on ETTL and B group or C on Manual ;
Thanks!
You could do that .. but you’d have to keep line-of-sight in mind, and still risk not firing your slaved speedlights. Working with radio poppers or pocket wizards are still the easiest way around.
Hi Neil,
I’m wondering about the firing of manual flash along with TTL. I use Nikon and have Cybersync radio trigger/receivers. Won’t the signal the Cybersync gets through the pc port be in sync with the pre-flash rather than the actual flash? Or does the D300s know to fire the pc port along with the actual flash from the SB-900 rather than the pre-flash? Or will I need to do a FV lock first then fire?
Thanks for this great topic.
Mic
Mic .. the additional lights will trigger at the proper point. Since it isn’t an optical trigger, but rather the camera giving an electrical pulse, (as designed by the camera makers), it will trigger with the main flash burst. No need to do an FV lock for this purpose.
Neil,
Awsome site, thanks for all your insite! If you had to choose between pocket wizards or radio poppers for canon equipment which would you choose? I’m looking to utilize ettl with ocf. I just can’t figure which one will work best for me.
thanks, rod
Hi Neil
I have a question regarding real life situation during the mass. A bride and a groom are about to make a vow so they approach a priest and they stand like this.
Where do you bounce your flash off to take a good picture of the bride?
1. you can’t bounce the light to your left because the priest will block the returning light
2. you can’t bounce the light behind you because the groom will screen it
3. bouncing the light off the ceiling is pointless. Besides it’s 15 m above your head
4. my favourite technique: bouncing the light off the point where the ceiling meets two walls also doesn’t work in a church
What do you do?
Bartosz
Of course there are. Usually there is a wall 5-10 m behind a priest and a wall behind a photographer (also 5-10 m). Every church is different but let’s talk about really dark one: ISO 1600 or even 3200 and f2 is a must. I can live with ISO up to 3200.
Hi Neil,
I found your post in 2012 because I have the same problem as one of your readers above. I like to do the same setup as you, but every time I attach a flash to the 5dMII’s hot shoe, my remote flash will not flash. As the other reader about mentioned, for some reason the pc ports seems disabled. I’m using the cables that came with the PWII so I don’t know what could be the problem. Any ideas?
From Nayeem, post 7.
“Hi Neil. When I use my 580exii on my 5dmarkii or 40D, whether in TTL or manual, it disables the pc port. Because of that I am unables to use my Pocket Wizard II’s to trigger my off camera strobes. I spoke to the Canon customer service rep and he confirmed that the canon bodies disables the pc port when it detects on camera flash. I also tried connecting the PWII to the the pc port of the on camera 580exII but it doesn’t solve the problem. Any suggestions? Thanks.”
Hi Neil. First off,your pictures and work are a huge inspiration for me to better my photography. Second, without this website, I would have thought some of the techniques and setups were only for the most schooled and educated pros. Thank you for your easy and understandable choice of words. Ok, enough of the flattery already, so here are my questions. Do you always gel your on and off camera flash? Also, how do you get your blacks so black but still have texture and life!? ;)
Neil, thank you for all the great info. I shot my first wedding last week using your techniques and it turned out perfectly thanks to you!
Here’s a question for you… I’ve been using my SB-700 bounced in ttl. It has been powerful enough so far. But if I needed more power in a darker location, I was planning on using two of my manual Yongnuo 560’s on stands which are very powerful. I can set them to S2 mode to ignore the ttl pre flash of my SB-700, but that would also mean my SB-700’s ttl is not taking the manual flashes into account when metering since they don’t go off at the pre flash.
Is that the way it works with any mix of ttl and manual? Or in your setup with pocket wizards, is your on-camera flash actually accounting for the manual flashes when metering its ttl exposure? I’m concerned with overexposure since the ttl is not expecting more power from the manuals. Or do you just turn down the manual’s power enough that it just gives a kiss of extra light and hope it doesn’t overexpose the ttl?
You could work that way, and adjust the FEC of your SB-700 to give you the amount of TTL flash you need from your SB-700 for proper exposure.
Neil when using TTL can the strobe be in a softbox or does the strobe need to see the flash to work?
That will depend on whether your flashes are optically triggered or with radio signals.
I’m curious as to your setup, as I need to do something similar. I want to shoot with my SB-910 on camera in TTL mode, but also want to trigger a manual flash on stand with my YN-603 radio triggers. Problem is, with my flash on camera, I can’t mount the hot shoe of the trigger. The triggers have a hot shoe pass through on top, but they are not TTL pass through, so my on-camera flash would lose TTL.
Curious if this would work… Could I buy a PC sync cable and connect it OUT from my SB-910 and connect to my trigger? Would that make my trigger pop every time my SB-910 goes off, therefore sending the signal to my remote flash?
Not sure if flashes OUTPUT signals through PC or just receive.
Thanks
I should add that I have a D750 with no on-body PC sync port, so that’s why I was curious if the flash’s PC port could be used instead. I know I could by a PC hotshoe adapter and stack, but wanted to know if the flash is capable.
Also not sure if my YN-603 triggers can receive a signal from PC or if they just output to the connected flash.
Yes, you could use the PC outlet on the SB-900 / 910 … that would be the simplest.
Alternately, if you could find a hotshoe adapter that has all the pins to allow TTL communication, and has a connector to allow the additional light to be triggered, that would work too. I searched on B&H and Amazon for something like that, but came up empty-handed … but something like that has to exist.
Hi Neil, My question to you is this..I thought that when we use flash at a lower shutter speed our moving subjects would freeze…but I now got confuse whe you mention tge The light levels from the video light were to high, that the flash wouldn’t effectively freeze the action..so Now I got confuse. So if there is to much light and I use a flash on a moving subject it wount freeze? only in dark situations?
Yesenia – with flash photography, you have to think of the two exposures that happen simultaneously when you take the shot:
– the flash burst,
– the ambient light.
If the ambient light is enough to show up in the photograph, then it can be a problem with slow shutter speeds. The flash WILL freeze the action, but you will get a smear of movement from the ambient light.
This is discussed in depth in this article: Will flash freeze action at slow shutter speeds?