Bounce flash off a dark ceiling
A recurring topic on Tangents is how to bounce flash in pretty extreme situations. With a related article – bounce flash outdoors with a reflector – I showed some images from an event at a New York restaurant.
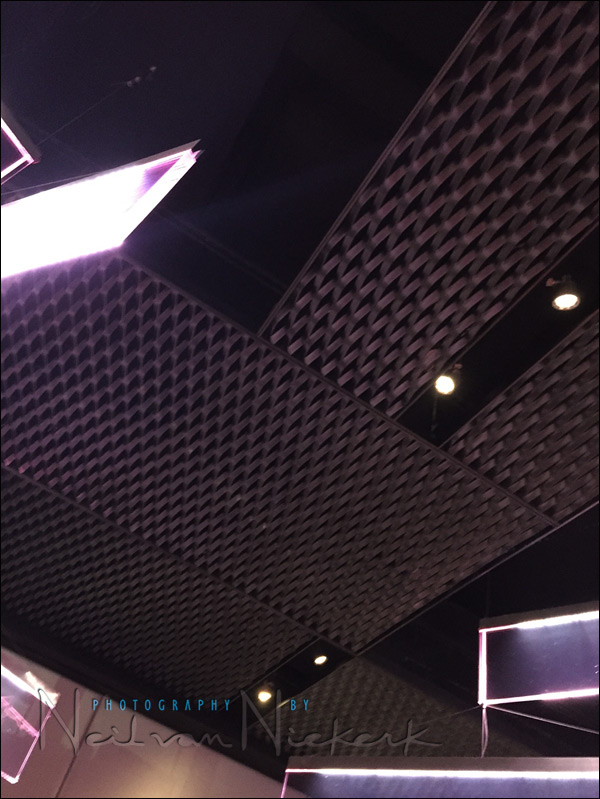
I intensely dislike direct, hard on-camera flash. Yet, this venue had all kinds of corners, and no place to effectively place off-camera flashes on light-stands. The venue had an interesting ceiling. And with “interesting”, I mean tough. The ceiling was dark, with black panels at different angles. Here are photos of the ceiling and walls, to give you an idea. Still, I wanted to see it it was possible to get great results, bouncing flash off a dark ceiling:

So I tried on-camera bounce flash anyway, listening to my own advice to just be bold! And it worked (for the most part). I had to push the ISO to 3200 ISO for most of the duration of the party, to have enough light return from that tough bounce surface.
The key to having great light from on-camera bounce flash, is in this simple idea: bounce flash into the direction that you want the light to come from.
Here are several images to show the results. For more, check out: John’s birthday party.
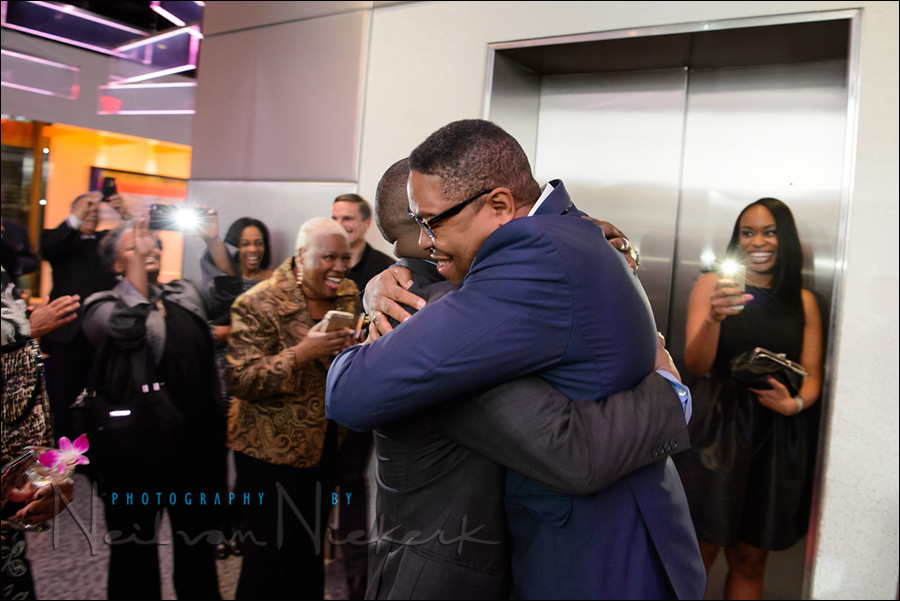
John, as he stepped out of the elevator into the arms of friends and family waiting for him.
Camera settings: 1/50 @ f/4 @ 3200 ISO
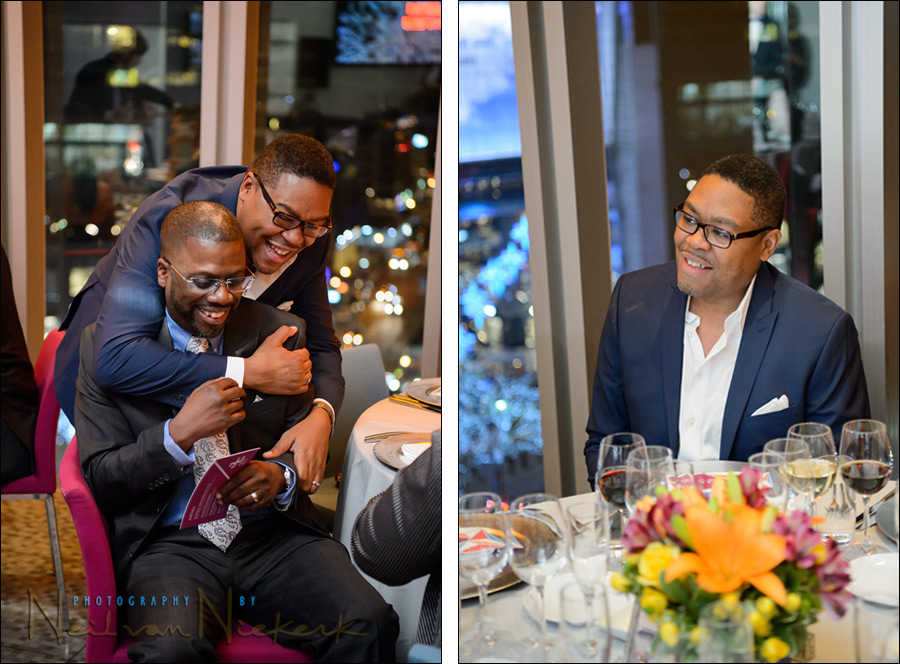
Camera settings for both images: 1/100 @ f/3.2 @ 2500 ISO

Guests listening to the toasts. Here I bounced off the wall and window to the my right, to get this type of directional light.
Camera settings: 1/60 @ f/4.5 @ 2500 ISO

For detail photos of the food for example, the black foamie thing came in ever-handy. With this I was able to let the light skim in from the opposite direction than what I am shooting from. This article explains a similar example: wedding details & bounce flash.
Summary
Hopefully these few examples will help push the idea that when you’re stuck with what appears to be a tough location, to try it anyway. Raise your ISO and open your aperture a bit, and try it.
Don’t under-expose though. To see what your flash is capable of, do test shots at full manual power. Then you will have a better idea of your struggle, rather than by guessing if your TTL bounce flash is giving you all the juice it can.
Part 1: Bounce flash outdoors with a reflector
Photo gear (or equivalents) used during this photo shoot
- camera settings for main photo: 1/50 @ f/4.5 @ 1600 ISO
- Nikon D4
- Nikon 24-70mm f/2.8E VR /equivalent Canon 24-70mm f/2.8L II
- Nikon SB-910 Speedlight /equivalent Canon 600EX-RT Speedlite
Related articles
- Bounce flash photography – be bold!
- Wedding reception lighting with one flash
- How far can you bounce your flash?
- Photographing the wedding processional with extreme bounce flash
- Various scenarios: balancing flash with ambient light
- book: On-Camera Flash (revised edition)
- Other articles on Bounce Flash Photography
- John’s birthday party – Robert Restaurant, NYC
Hi, Neil – Thanks for this, as I have been in a couple of similar situations. How much did you have to play with the exposure in post-processing? An example of an “easy” one (great in camera), and a “toughie” would be very helpful.
Dave
Great article, Neil! In your mentioning about testing your flash in full manual power to see what it’s capable of in that situation, I’m wondering if you set your flash to TTL instead of manual for the shots you posted. Assuming that’s the case, did you find that TTL gave you consistently good results? Or was it a little unpredictable because the room was somewhat challenging for bouncing flash?
Patti … for most of the night I was working around Full – 1/2 manual power on my flash.
But I changed it a few times to TTL. And lower manual power.
That venue was so inconsistent, that I had to change up what I was doing.
As always, great article Neil! This is a great example of what I love about wedding photography, you just don’t know until you try it!
Thanks Neil. That high black ceiling is scary looking for sure! What was your white balance set to for that?
Great photos.
I had a 1/2 CTS gel on my flash, so my WB was around 3700K.
Well, I learned something just now. I have been using 1/2 CTS in rooms with Tungsten lighting, but my WB has been set to Tungsten. Now I will be setting it to 3800 and see what happens.
*gasp!* You’ve not been shooting in RAW all this time!?
Oh yes, I always shoot in RAW, but I try and get as much right in the camera. I mistakenly thought 1/2 CTS brought the WB closer to Tungsten. I looked it up when I saw your post, and there it was at 3700 K. I’ve tried CTO, but after reading one of your older articles, I started using CTS.
Thank you Neil.
I have bounced my flash off a very dark grey ceiling while shooting a musician in a separate part of the venue she was playing at. I took the flash off camera and had it on a stand. Used Odin triggers. I did not have my full kit and used a white towel as a diffuser even while bouncing. It was what I had. Still only need 3/4 power out of an SB-910. At 3200 ISO….it’s amazing what you can bounce light off of.
I had a particular issue I wonder if you could help with. In a dark hall the ceilings were very high and were lined with mirror tiles. In testing the bounce I got a dark grid what was from the spaces between the mirrors.
I ended up not using flash because of that.
Black ceilings (if they are not very high) are better than colour ceilings, imho – a lot less work with colour correction in post.
Hi Neil. I see that you highly recommend bounce flash in most circumstances (with a BF of course). But what about the situations where you don’t have any ceilings or walls to bounce off of? I’m mainly asking about the “event” photography scenario where you are moving around quite a bit, keeping up with the action as it occurs. Seems to me you have less control and can’t always ask your subjects to move close to a wall, or move to another room, etc. Is there an on-camera flash diffuser that you recommend/prefer in those circumstances? When you obviously have to use something other than direct flash, and you have no nearby bounce surfaces?
Mark, have a look at the articles listed there underRelated Articles, for examples of some surprising scenarios where bounce flash worked. But there are times where it just isn’t possible – What if there is nothing to bounce flash off?
OK. Got it. Thank you.
I shot an event with white ceilings. I had my OCF pointed back most of the night with my BFT. A woman who I photographed told me the flash was in the wrong direction. I showed her the picture and she was impressed. Thank you for the education. Making something that can be and at times is overwhelming, simple.
Hi, Neil – I would be interested in knowing what your in-camera light meter was reading when taking these indoor photos. Was it correctly exposed for the ambient light, and you added flash for fill, or were you under-exposing the ambient and having the flash do more work?
David … I don’t really meter for the ambient light, and when I use flash in low-light situations, I rarely expose correctly for the ambient. In that case, I purposely under-expose by selecting camera settings which suit me (ie, enough DoF) … and I let the flash pick up the difference in exposure.
This article will explain it further: Metering for TTL flash and ambient light