Bounce flash comparison: With & without the black foamie thing
One of the presentations that I gave at the After Dark event in St Louis, was (perhaps inevitably by now), about bounce flash photography. Part of this was a sequence explaining how the direction that you bounce your flash into, will define the light pattern on your subject. The black foamie thing helps in directing the light from your flash, especially if you want short lighting on your subject.
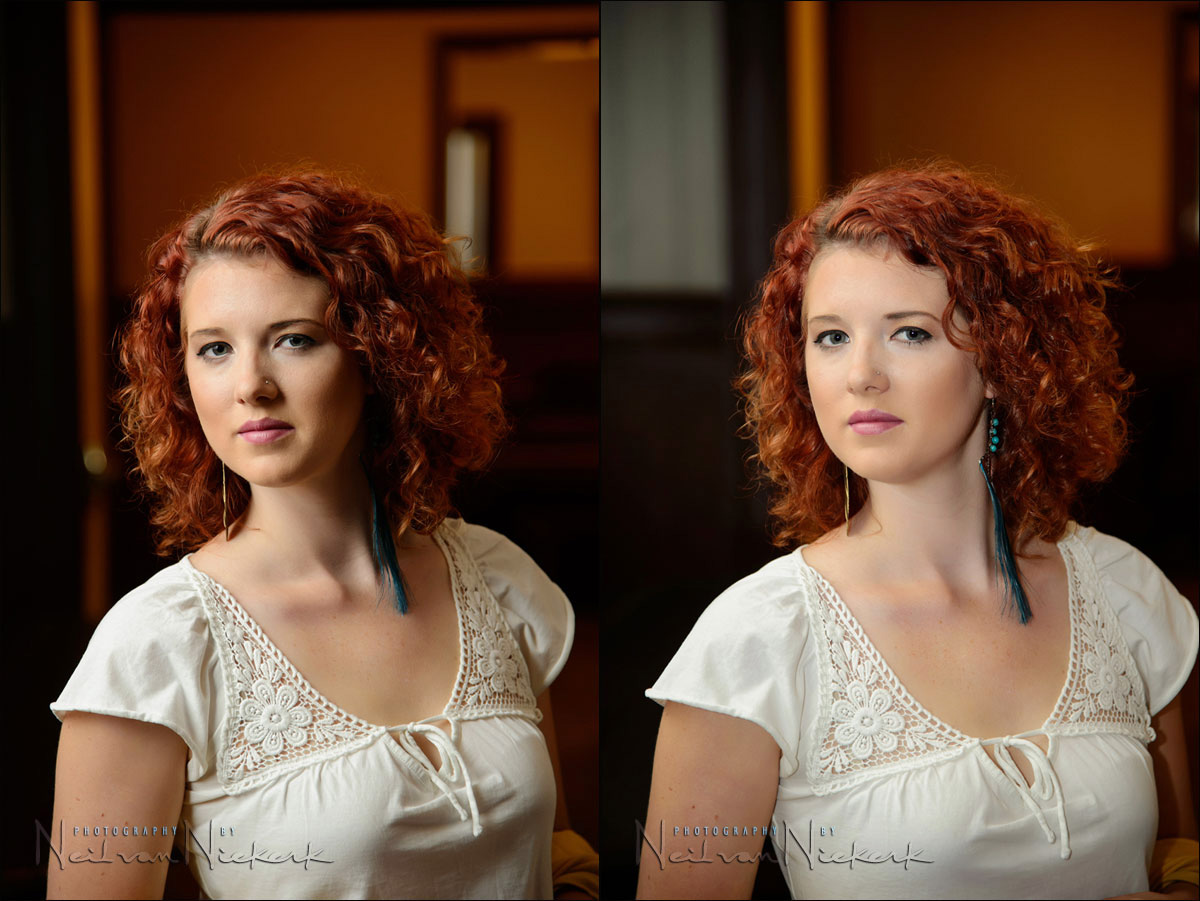
And here is the comparison – with the black foamie thing, and without. Without flagging the flash, there is direct flash. Then the light is flat and specular and there is a distinct hard shadow that isn’t flattering.
camera settings for both images: 1/200 @ f/4 @ 800 ISO
I had our model stand close to a wall (with wooden trim). She was about 6 or 8 feet away from the wall.
On-camera flash modifier – the black foamie thing

The BFT is held in position by two hair bands (Amazon), and the BFT is usually placed on the under-side of the flash-head.
The linked articles will give clearer instruction, especially the video clip on using the black foamie thing.
Related articles
- Black foamie thing
- Video clip – Using the black foamie thing
- Bounce flash portrait – a consistent technique
- Bounce flash – short lighting
- Flash photography basics
- After Dark Edu – Dallas, TX – Feb 2012
Photo gear (or equivalents) used for these images
- Nikon D4
- Nikon 24-120mm f/4 VR /equivalent Canon EF 24-105mm f/4L IS
- Nikon SB-910 Speedlight /equivalent Canon 600EX-RT Speedlite
- the BFT (black foamie thing)
Neil, I now have two of your books (not the off camera book) and love them. I have read them perhaps twice. I nevertheless like getting some help with the angles you use. (In your book, you mentioned 45 degrees away from the subject and 30 degrees above horizontal, as one of your settings and I have used this.)
When bouncing the flash to the left of your subject as you did in the above examples, where did you aim? Was it 45 degrees to the left and 30 degrees up?
Thanks.
Peter F.
I aimed my flash towards the area where I wanted my light to come from.
In this instance, it was about half-way towards my subject, and about 30 degrees higher.
Wow, huge difference. Thanks for the comparison.
If you don’t want flat lighting, why did you let any direct flash fall on the subject? With a swivel head it’s pretty easy to avoid the flat light example you gave. Regular bounced flash without any foamy goodness is still decent, although it is prone to blinding the person behind you.
Here is the explanation why it might be necessary to bounce “towards” your subject sometimes: Short Lighting.
Read the article linked there, and connect it to this explanation here about why the black foamie thing is necessary for short lighting. And if you don’t use the BFT then … you get the less-than-exciting result.
And for good measure, watch the video clip about the BFT.
This is a great comparison. I’m generally not a fan of flat lighting and actually prefer the top image for contouring the body and giving the picture dimension — and esp given her white shirt, the shadow slims her a bit — but prefer the non specular light on her head.
Thanks for posting this though!
the comparison makes a great point, I certainly appreciate the directional light much more :)
Excellent article, thanks Neil
Nice post, Neil. I think a number of your readers (well, me, at least) would benefit from a quick lighting sketch in these instances. Not only a diagram of photographer, light, and subject, but also something like a dashed line showing the direction that the light is leaving your flash, where it is bouncing on and the angle that it then comes from as it hits your subject. I would have loved to see something like this in your latest (and excellent) book. I think there is too much room to misinterpret your words, otherwise, despite your using great example photos.
Thanks!
Neil,
This post really kind of brought it together for me. For some reason I had not recalled you were bouncing your light forward when you needed to get the direction for short lighting. What a difference the directional light makes between the two photos. I will bring out my BFT and practice with it some more this week working on attaining the short lighting on the subject.
Thanks,
I know you use some Quantum flash units with a off camera stick, have you used the black foamie thing on one of these units. If so with the reflector or just the bare tube?
The Quantum barebulb enhancer would do the trick.
Much better than the BFT in this instance.
Great article Neil. When would you recommend aiming the flash “toward” the subject or bounce it on the back.
What do you want (or need) to achieve with your light? There’s the decision.
MJ,
Another sample here: https://neilvn.com/tangents/on-camera-bounce-flash-to-create-soft-window-light/
Flash directed slightly towards subject to mimic ‘window’ lighting with the BFT as a flag between flash and subject so no light fell directly onto her.
ciao neil come al solito belle foto . avrei una richiesta da farti se non chiedo troppo, di realizzare una foto ad una delle tue stupende modelle con la tecnica di luce ambiente- luce flasc- e luce continua in una sola immagine con relativa spiegazione ti ringrazio
How do you like the 24 120? I am thinking about buying it or the 17 55. What I dont like about the 17 55 is that it is not full frame, and I cant afford the 24 to 70.
I prefer the top portrait.
This is a bit new to me which one was used with the black foamie thing and which one is with out ??
You’re going to have to figure this one out, and see what makes sense. Figure out what result is consistent with the technique.
Hint: Follow the links.
Probably the comments won’t be read by now (1 year on…) but i tried to do similar shots for a set of photos at my work — just a who’s who…
I did two types of shots, flat frontal lighting and also window-emulated short style lighting.
Without exception, everyone who chose their own photos, chose the flat front lit image.
I wonder sometimes, who are photographers shooting for? Themselves or their clients?
Interesting. I’ve never considered that aspect.
I wonder if it is because flat lighting is more forgiving of skin blemishes?
i think that’s why those ring-flashes were so popular for so long :), and thanks for replying.
I’d wondered similarly about images for weddings. A great picture is always that, but when my wife and i chose our own photos, there was a clear distinction between our choices, and when i’ve shot for other people, I leave far more of the ’emotional but technically not great’ images in the folder than I would otherwise have chosen. The happy couple choose more of those than i would…
The trick is to reach your level, Neil, when all the images are emotive/expressive and technically excellent and tell a story too.
I think, just my opinion, that the vast majority of women would choose the ‘flatter’ lighting while the men would choose the ‘technical sculptured’ lighting, but if you were to ask why, probably both could not tell you exactly why.
The guys in my experience certainly gravitate towards the darker shot as they instinctively without realising it want that ‘tougher’ feel to their image.
Sometimes, when showing clients a ‘top shot’ I was very pleased with, they would say ‘oh that’s nice’, but, when I then showed an ‘OK’ shot they would ohhh and aaahhh over it while I am thinking to myself, man, that’s like an average shot.
So yes, people’s emotions certainly play a large part in when it comes to liking something personal and let’s face it, having a photo of yourself is very personal indeed. Photography, like art, is subjective to anyone’s tastes.
Indeed Geoff brought up a great point.
okay so your saying that fake looking picture on the right is more acceptable?
i think now we are in a region of personal taste because I feel the image on the right makes the model look fat and processed. the image on the right with the distinct shadow slims her facial features and gives a sexier out on the town” evening look which the background supports. but hey thats me, and for me that over filled lighting on the right is a fail.
You clearly missed the point of this article. Entirely. Scroll back and quietly go through it again, and click through some of the links.