Under-exposure / Over-exposure vs. exposing correctly
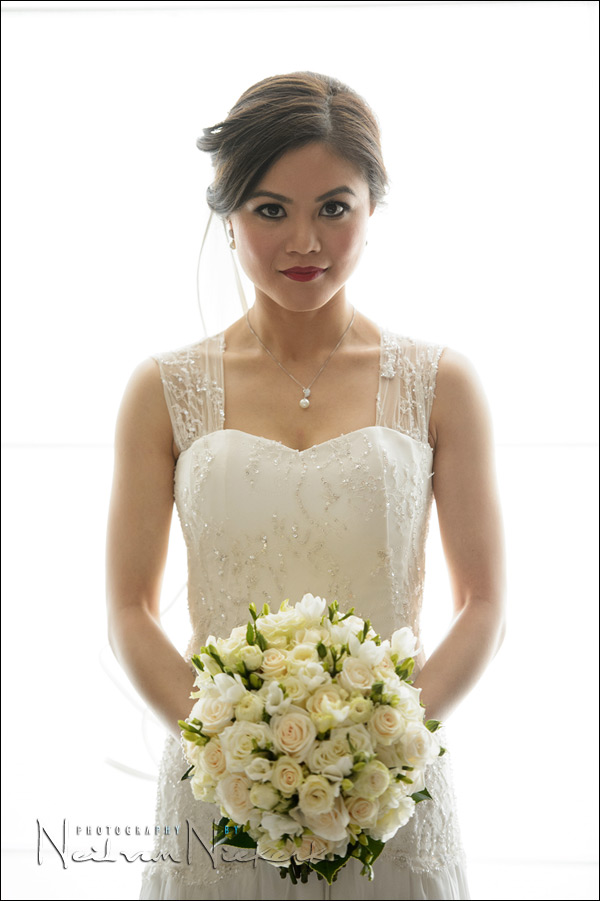
When I posted this photograph of Peiwen & Eric’s wedding in Melbourne, Australia, on Facebook, someone asked the question: how much did I over-expose this photo by?
We have to be very clear with our terminology regarding over-exposure and under-exposure. This photograph is not over-exposed. It is exposed correctly! Did my camera’s light-meter jump all the way to the right-hand side? Yes, it surely did. Does it matter? No, it does not. Why not? Because I exposed correctly. Not under, not over, but correctly.
This photograph (which is ambient light only), is exposed correctly … because my subject, the bride, is exposed correctly. This is a key concept – we have to expose correctly for our subjects. Even if you decide to turn your subject into a silhouette, the decision was still very specific about how you wanted to expose for your subject.
If you are a landscape photographer, then most likely your entire scene is your subject. If you are a portrait photographer, then invariably, your subject is what you need to expose for correctly.
However, if you want to balance your subject which is shaded, in relation to a much brighter background, then you’re going to have to use additional lighting to expose correctly for your subject. But working with just the available light, you will invariably aim to expose correctly for your subject.

If I had metered off the bride’s white dress and just zero’d my camera’s metering needle, then … ok, let’s do this home-work style and step through some questions.
- If I had metered off the bride’s white dress, and just zero’d my camera’s needle, what would the image be like?
- if I had used center-weighted or evaluative metering while my camera is in an Auto mode such as Aperture Priority or Program mode, what would the image look like directly out of the camera?
How would I meter correctly for this?
Well, here’s the tutorial: exposure metering for the bride’s dress
But they key here is that we are not “over-exposing” the dress. We are exposing correctly. We are definitely pulling the exposure up from what the camera is telling us, but this is not over-exposure. This is exposing correctly.
It seems like pedantic insistence on how the words are used, but it isn’t mere semantics. Using the correct phrasing / wording here, is key to understanding this.
We are exposing correctly when we pull the exposure up for the white dress. By pulling the exposure up to where it needs to be, we are exposing correctly. It’s not the same as over-exposing.
The same thought-process holds true for darker toned subjects. But in reverse, of course.

Direction & Quality of Light
I wanted to distill the essence of what we, as photographers, work with – light! Before we can truly grasp on-camera flash and off-camera flash, and really, any kind of photography, we have to be aware of the direction and quality of light. We need to observe the light that we have, and then decide how best to use it, or enhance it.
With this book, I try my best to share those “aha!” moments with you, and I do believe this book can make a difference to your photography.
The book is available on Amazon USA and Amazon UK, or can be ordered through Barnes & Nobles and other bookstores. The book is also available on the Apple iBook Store, as well as Amazon Kindle.
Getting it right in camera
Now, as much as I like to get it “right in camera” – the reality is that we are shooting in an uncontrolled environment the moment we step out of a studio. This “getting it right in camera” thing – I am slightly purist about this, but only slightly because the real world kicks in. There’s only so far you can go in camera towards what is correct and looks great.
Here is the straight-out-of-camera version.
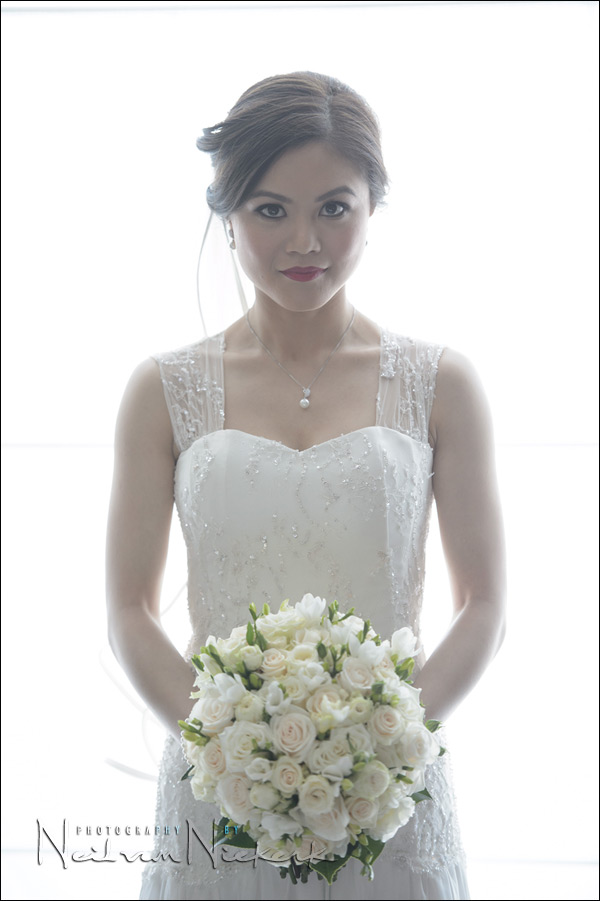
The essential adjustments I made to the RAW file:
– change the White Balance,
– increase the Contrast,
– adjust the Black Point, pulling it down to expand the tonal range.

Because of lens flare – which is inevitable to some extent because of the strong back-lighting – the image is more flat than I really like. The contrast is too low and the image appears desaturated. This isn’t something we could really get right while taking the photo. The best we can aim for is “pretty damn close”, and then we finesse it as part of our general RAW workflow. Yes, RAW. Why RAW? Because: RAW vs JPG – the final discussion.
So while my White Balance is admittedly off, it isn’t of much concern, because fussing over exactly correct color balance at the time would’ve been a waste of time – I could just as well finesse the WB / color balance as part of my workflow, while adjusting the image. I’d rather not waste time with this while shooting, but rather concentrate on ideas and moments. The important stuff.
So really, as with this instance, and so many others we deal with daily, there isn’t a chance of nailing it perfectly in camera. It has nothing to do with the photographer’s ability. It has everything to do with real world limitations.
Related articles
- Exposure metering – expose for your subject! (Anelisa / Fuji X100)
- Exposure metering for the bride’s dress (bride: Jill)
- What should I meter off with the in-camera light meter? (model: Anelisa)
- Which exposure metering mode for outdoor photos?
- Exposure metering for a backlit subject (model: Olena)
- Exposure metering tutorials
- A wedding in Melbourne, Australia
So, if it’s exposed correctly, what makes it high key? How do you define high key Neil? If a photo is naturally light and white? It makes sense that the subject needs to be correctly exposed. I wonder if some photographers who go for high key believe the correct exposure is an overexposure and, if so, why not since it may be correct for that photo for the airy look they’re going for.
The photographers I know who do “high key”, underexpose the background by two stops and add flash to the subject which makes them really bright and somewhat over and that makes the background really dark.
It may not be the correct way but that is how they do it. The famous Sports Illustrated photographer Dave Black, that is how he does it.
Jennifer and Charles, I’m not sure that you’ve understood Neil’s point here. Typically, in a high key image you have the correctly exposed subject surrounded by white or near white…but the subject remains correctly exposed….as is the case with Neil’s image. The correct exposure, surely, is one that correctly exposes the subject….reproducing the tones and colours as desired (or which can then be enhanced in Photoshop). And if the background – as Charles says – is ‘really dark’ – surely that fits the definition of a ‘low key’ image.
Thank you.
High key is defined as bright, diffused and low contrast lighting specifically in technical terms the lighting ratio between key and fill light are equal aka 1:1. It doesn’t mean it is overexposed or has to be, it only means there are almost no shadow (absence of umbra,penumbra) and contrast and yes an image could be high key and have a dark black background :)
Thanks Arnold. That is how Dave Black defines high key and he has videos to show how he does it and all his backgrounds are dark and that makes his subjects while correctly exposed by flash, really pop and he calls it high key. Who am I to argue with him.
Neil, I have a question about what metering mode to use. Some photographers use spot metering while others use area or multi-metering. It seems to me that if you are metering up on her wedding dress to get correct exposure, you would do so with spot metering. What would have happened if you used multi-metering on this shot? My guess is that the camera would not blow out the background. When you shoot weddings, do you always use spot metering and is the metering mode you recommend? Thanks.
It doesn’t matter all that much which metering mode you use.
The thought-process in how you meter, is what is important.
Which exposure metering mode to use?
I totally appreciate the openness about sharing the pre-color-balanced version. I’ve had interactions with some photographers who seem to have as their goal a resultant photo that can be returned to the client with no editing. I think that that goal is a fine one, but only if it doesn’t mean wasting time and missing moments futzing with manual color balances on what is an important day for your clients.
Christopher, I’ve encountered those sorts of photographers as well. For me, the image I capture in the camera is nothing but raw material from which I create in post-processing the image I deliver to the client. Different strokes for different folks…
To answer your two points Neil,
1. If you metered off of the dress and centred the needle then the dress would have been grey – or mid-tone as is the camera’s desire to turn a metered subject to that (18%) grey… (‘gray’ in the US!). Therefore, and I use this term guardedly – ‘overexposing’ the dress by approx 1 to 1.5 stops turns the dress white or to a *correctly* exposed white. The same works in reverse for black. The meter will want to turn the black Tux to grey so counter-intuitively you have to under-expose from what the meter is telling you to return it to black.
2. if you had used evaluative metering then the camera metering system would have taken into account the brightly lit background and it is quite likely that your subject would have been in silhouette – or at least very dark.
@Charles… Dave Black uses his own definition for High Key which is outside the norm. I challenge you to search “High Key” in an image search… you won’t see many of his pop up (or out :) )
Spot on. There’s little merit in a centered histogram if your subject isn’t exposed properly. Depending on the subject’s coloring, for lighter skinned people, I generally try to expose the brightest parts of the cheekbone at +1EV. Subjectively, I might have bumped the exposure of your shot here up even higher, maybe another 1/3-1/2 stop and then worked on saving the white highlights pouring around her face and rescued any lost detail in her dress with an adjustment brush. In any case – you make a great point. Thanks!
@Jon lloyd
I am sure that Neil perfectly knows what ‘tonal placement’ (and Zone System) is which is exactly what you are saying. The unprocessed image above does show that Neil did tonal placement by capturing the most important tone that he did not want to lose meaning the ‘textured highlights’ on the dress (Zone VII-VIII) and let the middle tone fall where they did and recover this in post due to the excellent dynamic range of his D4. The shadow areas are on the middle gray anyway of the H&D curve so that is on a sliding scale and easily recovered.
And I have never seen ‘High Key’ defined as having a white or bright background and it has always been defined as diffused lighting with a 1:1 lighting ratio. It seems that most people associate ‘Low Key’ lighting with Film Noir hence the inverse of that which is ‘High Key’ should be all white and bright which should not always be the case.
At the risk of getting shot at, high key or low key images can be over exposed or under exposed. The key point in this post is the correct use of terminology when referring to exposure being correct vs over. If your subject makes up 5% of the frame and the rest is blown, the image can still be correctly exposed as the ‘subject’ is exposed correctly for the use of the image. If the background had been a sunset and the bride in silhouette this still would have been a correct exposure….for the sunset!
The thought process is:
Determine subject (whatever that is)
Expose correctly for subject
The rest then falls into place…….. It has to!
What I really like is the difference between the raw and the final…great example of thinking ahead in terms of the whole process….
Thanks for the explaining the photo,It was good to meet you and your wife in Melbourne, I had a great time! Cheers Stephan
Hey Neil! Quick question, how far from the window do you usually pose the person?
Thank you!
Thank you!!!