Headshot photography lighting on location
Shooting headshots on location needs a different tack than working in the studio. Here I want to show some examples of lighting setups that I have used while shooting headshots indoors, on location. Since these examples are all from indoor sessions, the gear used might be different than when the session is outdoors. The logistics will also likely be different. So this discussion is contained within that framework – the lighting used when shooting headshots on location, indoors. There is a companion article that discusses some lighting setups in the studio.
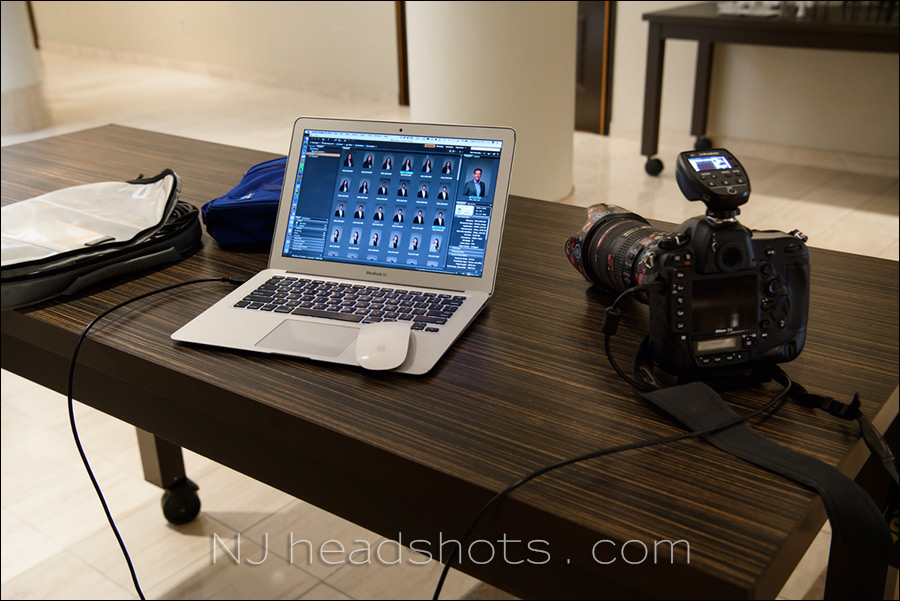
The lighting setups I use might change depending on the specific scenario, but the workflow and shooting logistics remain fairly similar. Most importantly, I shoot tethered. That’s an essential part of the workflow. My client and the people I photograph, need to see the results immediately. I will shoot a sequence of 8-10 photos, and then show them. I do want my subjects to be happy about how they are portrayed, and their expressions and any other minute detail.
They then also select their favorite image (or two or three, depending on the arrangement with my client). This side-steps potential hiccups afterwards where someone isn’t happy about the photographs when they see them later on in an online gallery.
While that part of the photo sessions’s workflow remains a constant, the lighting configuration will change depending on where I am shooting. How much space I have for the flashes, will dictate the lighting setup.
Another important aspect here – I often have to mimic existing headshots that the company may have on their website. Then I have to reverse-engineer the lighting, and come up with something that would give the company new headshots that remain consistent with the previous look, and consistent with their branding.
I have used speedlights for headshots, such as in this example: On-location corporate headshots – Efficiency and speed. Also check out the article on a home-studio setup with speedlites. However, with the ease of use and power that the Profoto B1 flashes (B&H / Amazon) have, they are now make up my main lights that I use for headshots and business portraits.
Let’s look at a few setups. And of course, they all are centered around Profoto flashes – the Profoto B1 and sometimes the Profoto D1 studio flashes. Please note, with these I don’t want to show any client images, so you can see results with only a few of these setups.
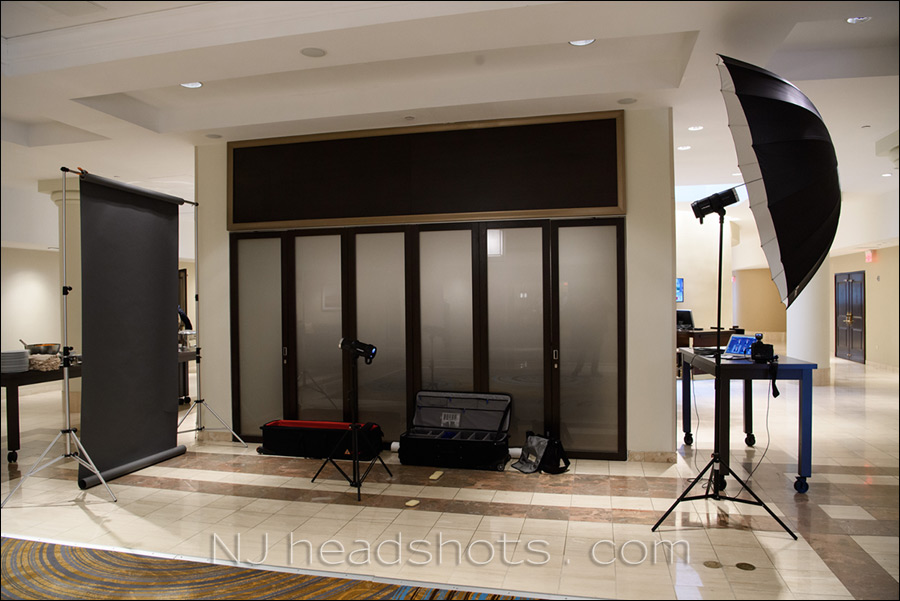
Here I had to do about 16 headshots during a team’s lunch break during a conference in a hotel. There wasn’t much space to set up multiple lights, and I had to make sure that my setup didn’t expand into the main areas where people passed by. So I set up behind these glass doors behind which the hotel hid some extra chair and tables. I used two lights – one to light up the grey background to the extent they liked. And then a single large main light source – the Profoto B1 flash (affiliate) and the massive Westcott 7′ Parabolic Umbrella (B&H / Amazon).
A simple, yet effective setup. My client loved the photos. This was quick and easy to setup, even as the solo photographer. I rolled everything in via the two roller cases shown in the photo. They are also shown in more detail here: Photo gear & logistics: Corporate headshots. It is essential to set up fast without struggling, and shoot efficiently.
Lighting gear used during this photo session
- (2x) Profoto B1 flashes (B&H / Amazon)
- Westcott 7′ Parabolic Umbrella (B&H / Amazon)
- (1x) medium-sized Manfrotto 1052BAC
- (1x) tall Manfrotto 1004BAC
- Savage seamless background paper (Amazon)
- Manfrotto 2983 Adjustable Background Crossbar (B&H / Amazon)
- Any two light-stands would work to hold up the backdrop. I use Manfrotto.
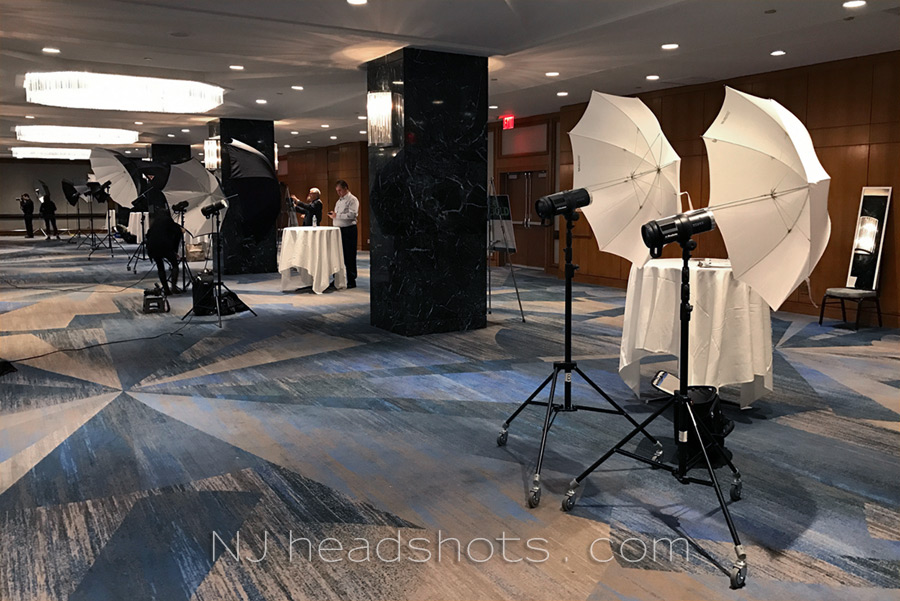
Still busy setting up 5 identical stations for 5 photographers to shoot groups photos within an hour during a huge medical conference. While not headshot specific, I thought it might be of interest here. Ten nightstands, and ten lights. Three of the stations were my lighting gear that I brought in – (2x) Profoto B1 flashes (affiliate) that are my usual portable lighting setup; and (4x) Profoto D1 studio flash (500 Ws) (affiliate) that I brought in from my studio.
Straight-forward and efficient. And also importantly, the results from ll 5 stations needed to look very similar, shot at the same settings.
Lighting gear used during this photo session
- (2x) Profoto B1 flashes (B&H / Amazon)
- (4x) Profoto D1 studio flash (500 Ws) (B&H / Amazon)
- variety of umbrellas
- variety of light stands
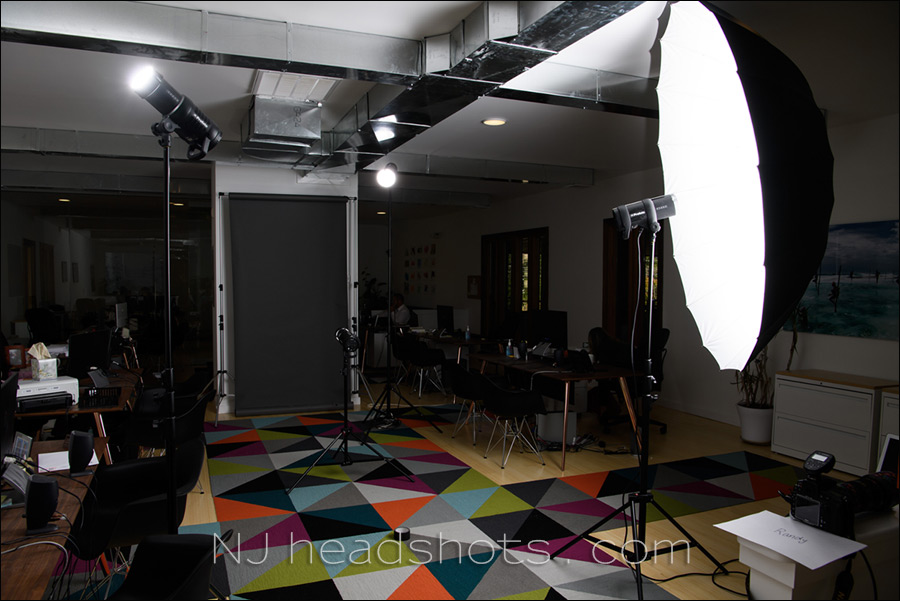
This specific setup has already appeared here on the Tangents blog – Headshot photography lighting setup – along with a photo of me to show what the lighting looked like. as mentioned above, with these lighting setups, I don’t want to show any client images.
This was specifically set up to mimic the lighting that they had on existing headshots on their website. Here I used 4 lights. One light for the background. One light as rim-light from above, slightly to the right. The light on the left is just fill light that I bounced into the office. The main light source was again the large Westcott 7′ Parabolic Umbrella (B&H / Amazon) that I scooped a little bit to the side to feather the light.
Again, as the solo photographer, I rolled in everything in the two large roller cases. I set everything up as quickly and quietly as I could, and then had people in the office just step in for their headshots. You can see the marker on the floor there – the roll of gaffer tape. That’s where they had to place their toes for me to be sure to have consistent light and exposure.
For more detail about this setup: Headshot photography lighting setup.
Lighting gear used during this photo session
- (2x) Profoto B1 flashes (B&H / Amazon)
- (2x) Profoto D1 studio flash (500 Ws) (B&H / Amazon)
- Westcott 7′ Parabolic Umbrella (B&H / Amazon)
- (1x) medium-sized Manfrotto 1052BAC
- (3x) tall Manfrotto 1004BAC
- Savage seamless background paper (Amazon)
- Manfrotto 2983 Adjustable Background Crossbar (B&H / Amazon)
- Any two light-stands would work to hold up the backdrop. I use Manfrotto.
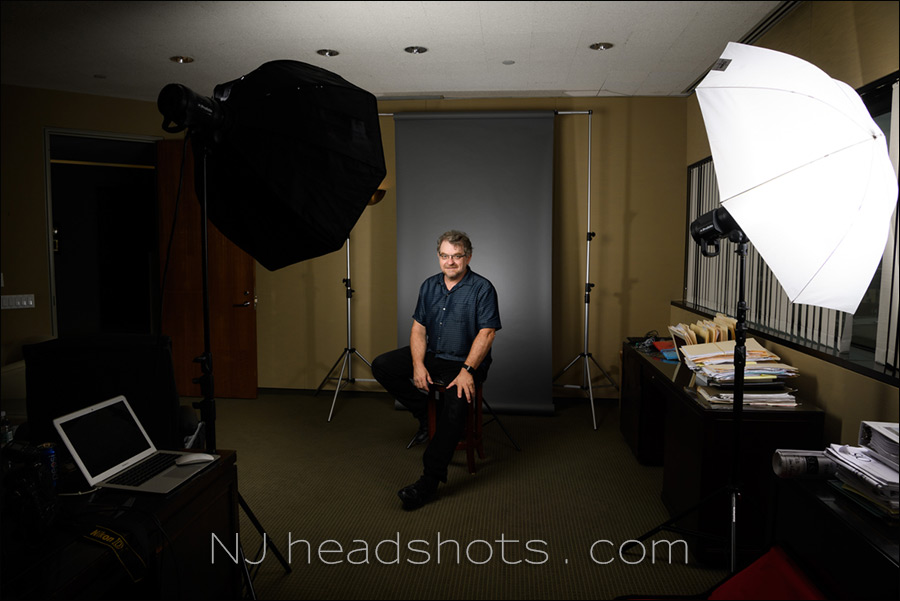
Another straight-forward setup, and this time also to reverse-engineer the look they have with existing headshots on their website.
Two Profoto B1 flashes (affiliate) – the main light with the Westcott Rapid Box 36″ Octabox (affiliate), and the other with the Profoto Umbrella 41″ Shallow Translucent (affiliate), as a fill light. I had to set this up in senior partner’s office, because that’s the only space they had available that day. The light on the background was pushed closer to the backdrop so that it created more of a halo, instead of a flat grey background.
Lighting gear used during this photo session
- (2x) Profoto B1 flashes (B&H / Amazon)
- Westcott Rapid Box 36″ Octabox (B&H / Amazon)
- Profoto Umbrella 41″Shallow Translucent (B&H / Amazon)
- (2x) tall Manfrotto 1004BAC
- Savage seamless background paper (Amazon)
- Manfrotto 2983 Adjustable Background Crossbar (B&H / Amazon)
- Any two light-stands would work to hold up the backdrop. I use Manfrotto.
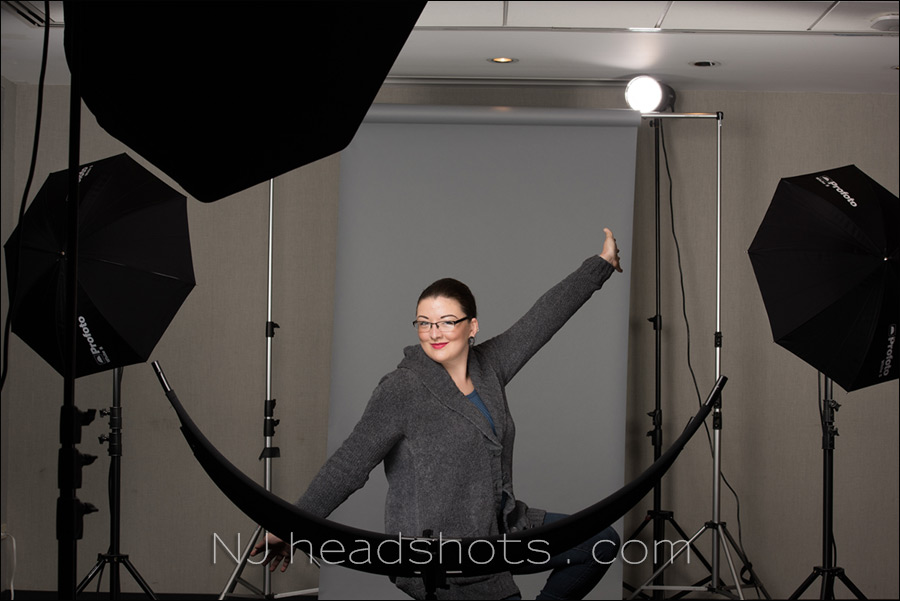
This setup has been described previously: Photo gear & logistics: Corporate headshots. Four lights again – two on the background, (via the two bounce umbrellas), and a hair light. As you can see, this one is a bit of a squeeze in terms of ceiling height.
In this photo the main light is diffused with a Westcott Rapid Box 36″ Octabox (B&H / Amazon), but because of the low ceiling height, with subsequent headshot sessions here (after this photo was taken), I used a rectangular umbrella in this location: Angler Parsail 60″ Umbrella (affiliate). More info here: Best photo umbrella for a home-studio & indoor headshots.
The reflector in the foreground is the Eye-lighter (B&H / Amazon).
Lighting gear used during this photo session
- (4x) Profoto B1 flashes (B&H / Amazon)
- Westcott Rapid Box 36″ Octabox (B&H / Amazon) /or Angler Parsail 60″ Umbrella
- Eye-lighter (B&H / Amazon)
- (1x) medium-sized Manfrotto 1052BAC
- (3x) tall Manfrotto 1004BAC
- Savage seamless background paper (Amazon)
- Manfrotto 2983 Adjustable Background Crossbar (B&H / Amazon)
- Any two light-stands would work to hold up the backdrop. I use Manfrotto.
Summary
As you can see, my approach varies. I do bring more gear than I would use, just in case. And it just makes sense to have backup lights, and flexible options. Ultimately, the end results matter the most … along with looking professional because everything runs smoothly.
Related articles
- On-location headshots
- Best photo umbrella for a home-studio & indoor headshots
- Easy lighting setup for headshot photography
- Headshot photography lighting setup
- Photo gear & logistics: Corporate headshots
- On-location corporate headshots – Efficiency and speed
- A home-studio setup with speedlites
- More articles on Headshot Photography
- NJ headshots / NJ headshot photographer
Great article, Neil. I have been doing on location lighting for headshots and small groups with 3 Nikon SB800 Speedlights and the Pocket Wizard Flex system with some success. This lacks the power I would like to get a smaller f-stop without boosting the ISO. What you are showing here is exactly what I would like to do more of. Now just to come up with the necessary funds to get what is needed!
Neil – This is one for me to print out and put in my book. Thanks for the great – and for me, very timely – article on this. I also use Speedlites, and don’t do enough with this part of the business to invest heavily. But I will be setting up and trying out all these configurations with what I have for equipment.
Again, many thanks for this article, and the time you put into it for us – Dave
Hi Neil.
I have 2 questions:
First one : with the relatively narrow background of the 1st and third setting, and with the subject relatively far from the background (judging from the gaffer tape position on the third set up), what focal lenght did you use and how far were you from you subject to be sure that you didn’t see past the left and right border of the backdrop ?
Second question : on the fourth setup (with you sitting on the bench), you seem to be using a shoot trough umbrella but as a bounce light setting. Any particular reason why you put the umbrella that way ?
As always, you have very instructive articles. Thank you!
Hi there Claude
I am usually work around the 135mm focal length, or even a little bit tighter. If I shoot wider, I then crop it in post as necessary.
That shoot-through umbrella was an alternative decision since I didn’t have a medium-sized black-backing bounce umbrella with me. Only two smaller ones. An oversight. But I had the shoot-through, so I used that as a bounce umbrella.
Hi Neil,
Thanks for this informative post.
Query – what setup do you use for tethering…?
Thanks
SB
I use Nikon’s Camera Control Pro as the tethering software.
Simple as that. Then I have the necessary tethering cable which depends on the camera model.
Hi Neil,
Thanks for the informative post. I guess, you used umbrella instead of softbox b/c of easy to transport and easy to setup and tear down. If have a choice, softbox will yield better results, right?
Thanks,
-Dustin Hoang
I prefer a softbox for the slightly better control, compared to an umbrella. I bring a variety of light modifiers with me to these photo shoots … but sometimes I skip something, as explained in one of the comments above.