Profoto: How to use gridded strip boxes as the main light
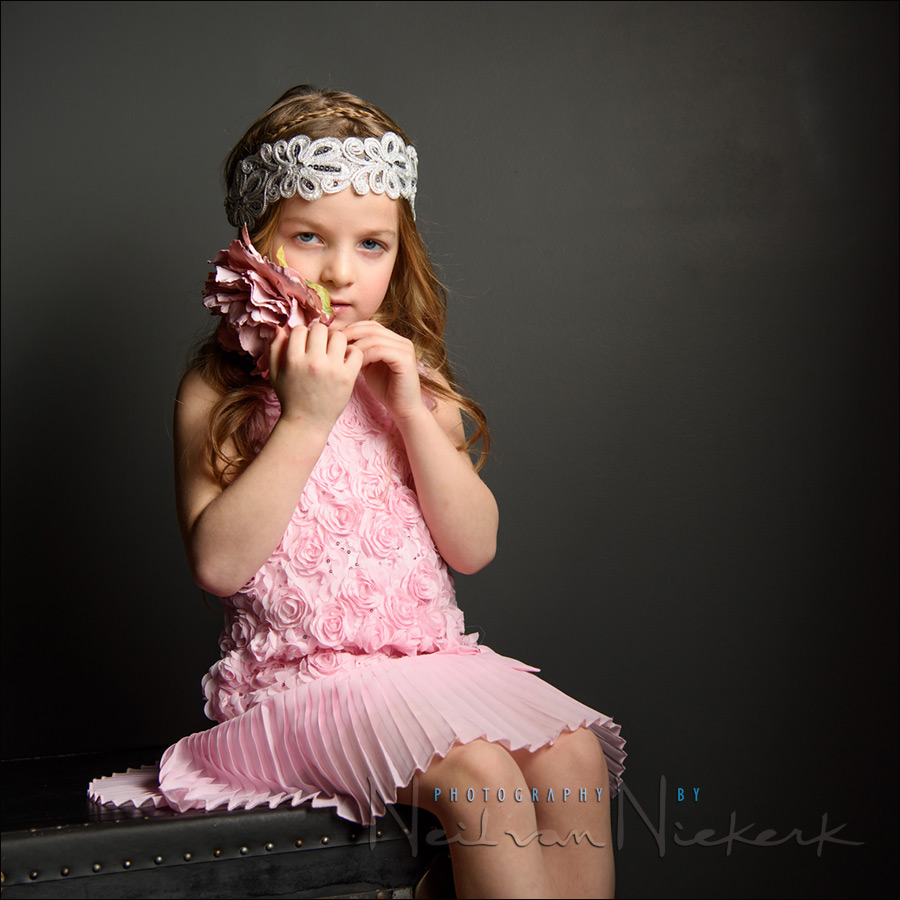
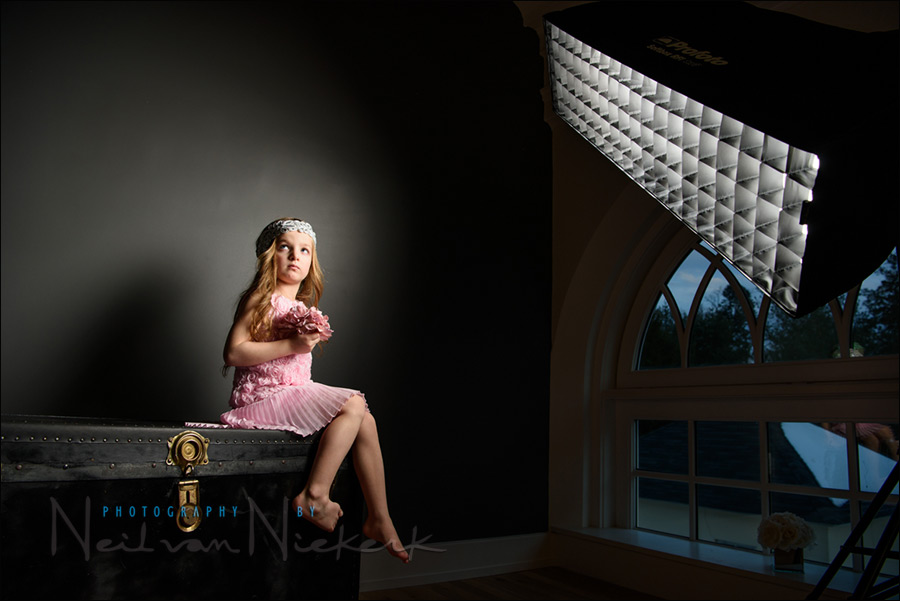
My favorite light modifiers when working with studio-type flashes like the Profoto B1 and D1, are gridded stripboxes. In the studio where I have space, I tend to prefer the larger Profoto 1’x6’ strip-box (affiliate). When I have to travel with gear, or work with kids, then the Profoto 1’x4’ strip-box (affiliate), is my preference. Both of them with a grid on them. That egg-crate grid on the front helps control how the light spills.
This video explains how I use them as the main light, and what makes gridded stripboxes such powerful light-shaping tools. The video is a recording of my presentation at Profoto’s platform at WPPI last year. Of course, it was a huge honor to be invited to appear on stage.
One thing I noticed when I watched this clip now, I understand why my 30-minute presentation was over in 20 minutes. From sheer nervousness, I motor-mouthed my way through it. At times I even sound breathless as I speak. You’d think I would be used to speaking in front of an audience by now! Oh, my pronounciation of ‘muscles’ as ‘muskles’ is a joke that I often make. So, it’s not a South African pronounciation. (I was asked about that.)
I do hope you find this presentation informative. This video is part of the Tiny Talks series that Profoto just released which are condensed versions of our presentations. Catch the others as well – there is always something to pick up and learn from.
The specific details about how I shoot with stripboxes, are further explained in the linked articles listed at the bottom. Check them out too.
Camera gear (or equivalents), and lighting gear used
In previous articles (listed in the Related Articles link below), I show how it is possible to swing and rotate a gridded stripbox for fine control over how the light falls on your subject and background. The long shape of the softbox, as well as the grid on the softbox, create a unique light fall-off – giving soft, but dramatic light.
- Nikon D810
- Nikon 24-70mm f/2.8E VR /equivalent Canon 24-70mm f/2.8L II
- Profoto B1 flash (B&H / Amazon)
- Profoto RFi 1’×6’ gridded stripbox
- Profoto 1’x4’ gridded strip-box (B&H / Amazon)
Summary
In controlling our light in how it spreads, and how our light falls on our subject, we can intentionally enhance the mood we want to create. As simple as that, and as dramatic as that.
Studio lighting workshops
If you are interested in learning more about studio lighting, including lighting for headshots, I offer workshops on studio lighting. The workshops will be held at my studio space in NJ, and it has a wide range of studio lighting gear to play with!

Related articles
- Dramatic portraits of kids – Lighting and intent
- Lighting an on-location photo session (Home Free)
- Lighting an on-location Fashion photo shoot
- Portrait lighting setup – Chiaroscuro (model: Frankie)
- Intimate male portraiture photo session (model: Nick)
- Using a gridded stripbox as the main light (model: Claudia)
- Using a big gridded strip-box / soft-box (model: Anita DeBauch)
- Studio Photography Workshops
- More articles on Studio lighting and Photography
- For more videos, follow me on Vimeo / YouTube
Neil, the close up the girl is just gorgeous! – any parent would love to have an image like that – absolutely timeless!
Neil do you prop and style the clients yourself or ask the parents to take care of that side?
Dude … usually the parents. The three kids shown at the start of the video, are my friend Cate’s kids. I shot this in her studio with costumes she had for the kids. I just wish I was that slick.
Neil, thank you! This is a great tutorial.
Mercy sakes, very nice images!
Great video! Good addition to your articles.
Do you use continous lighting in these boxes? Could you please add som info about the B1 settings?
Thank you. Love your work.
These are used with the Profoto flashes.
Check the ‘Related Links’ for all the info you need.
Great video. At 0.57 you say “Here I moved it even further away so the background is really dark”. If inverse square law applies wouldnt it be the opposite? Not sure if you meant further to the side where its not hitting the wall perhaps. Maybe thats what you are saying that the grid counteracts this law. Sorry if I misunderstood. PS I always keep a black foamie with me :)
Sam … I see what you mean. No, this doesn’t really have anything to do with the Inverse Square Law. What I did there was to angle the light further away from the wall. So now there is less direct light on the wall. I hope this makes more sense now.
thanks for the explanation Neil! Appreciate it.
Very striking images Neil. I’ll have my first opportunity to work with a gridded strip box at the studio next month and this is very helpful.
Great video. Thanks for this.
Thanks for the article, very interesting to read!
04:17 “You cannot light somebody and not pose them. You cannot pose somebody without…” so true.
Hi Neil, great presentation. I often use my strip light in my headshot and portrait work, often horizontally. I was wondering if you notice any difference in the quality of light between the 1×4 and the larger 1×6 (apart from the extended reach vertically). Are there any benefits to either one, or just practicalities whilst travelling? I ask because the strip that I tend to use is 30cm x 140cm (roughly 1×4.5). Also, do you tend to use it gridded or without mostly? If you’re interested I created a blog post about shooting with a strip light as a main light, and came across your post whilst doing some research: https://www.gerainttodd.com/strip-light-as-main-light.
All the best,
Geraint
Hi there Geraint … lovely work on your website!
I only use the 1×6 stripbox in the studio. It’s just too unwieldy to use anywhere else without huge effort.
For on-location work I usually go with the 1×4 gridded stripbox if a stripbox is the better choice. Sos it comes down to the smaller size being more practical to use.
Thoughts on a 1×3
I’m trying to find a good modifier to be my go to when traveling.
Hi there Joshua
Check this related article, where the Profoto 1×3 stripbox was the light modifier that I used out on location. The slender size of this softbox makes it easy to maneuver and carry around.
https://neilvn.com/tangents/location-headshots-promotional-portraits/
Wonderful explanation of how to use strip soft boxes. I started using them and I was wondering about it, so many people pushing for the rounded shaped soft boxes but I like the control you can get with this long shaped modifiers.