Light modifiers for on-camera flash
Event photography, and specifically weddings, can be a rushed and fast-moving, with some of the worst lighting conditions. But that doesn’t mean you can’t have great light from just an on-camera speedlight. By bouncing your on-camera flash with specific intent, you can achieve just that – beautiful, soft directional light.
Light modifiers for on-camera speedlights all generally do the same thing – they spread a lot of light around, and but also throw some light directly forward. In a way, this gives a bare-bulb effect to the light from the flashgun .. as opposed to the kind of light you get when you entirely bounce your flash. As can be seen in this comparison video, when bouncing flash indoors, the various light modifiers all do the same thing with greater or lesser efficiency.
I want to control the direction of my bounce flash. The generic light modifiers work counter to that … they flood the room with light from the camera’s position. But what I’m after is directional light from my flashgun, and for that I need to bounce my flash in specific ways and the generic flash modifiers won’t help. For this, I mostly use the The Black Foamie Thing.
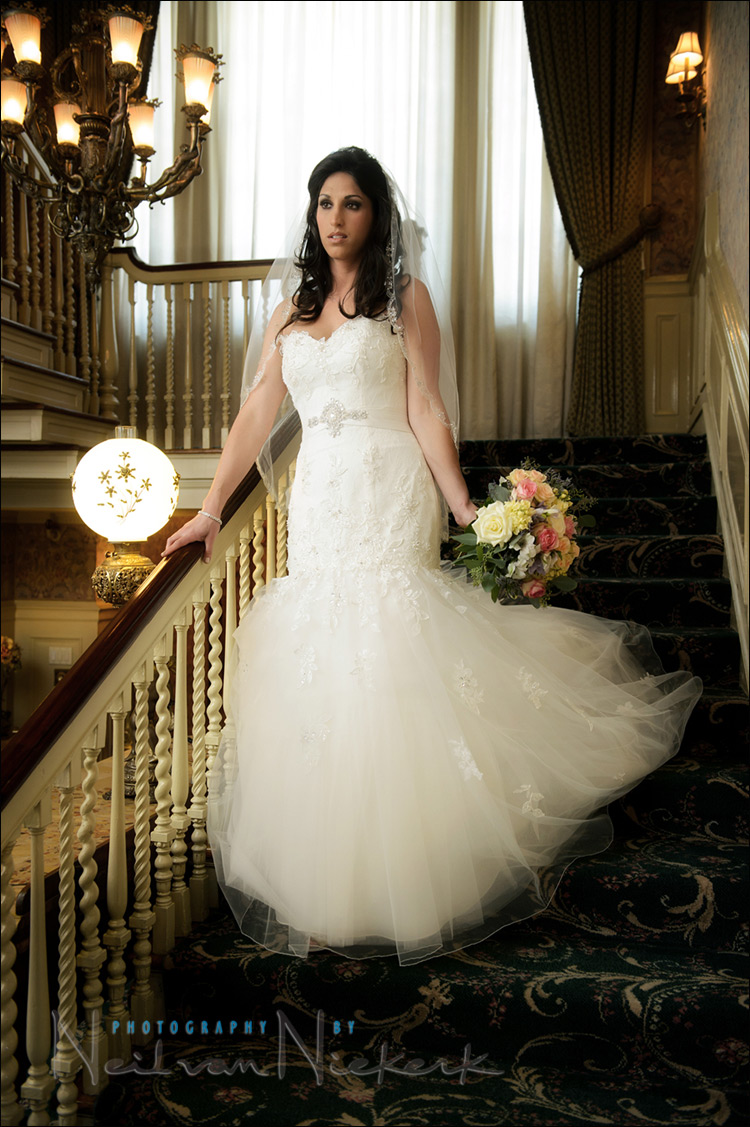
The light in the photo above, is a combination of ambient light, and carefully bounced flash – all blended in such a way to look natural, with no hard flash shadow to be seen.
- camera settings: 1/80 @ f/3.5 @ 125o ISO
- Nikon D4
- Nikon 24-70mm f/2.8G /equivalent Canon 24-70mm f/2.8L II
- Nikon SB-910 Speedlight /equivalent Canon 600EX-RT Speedlite
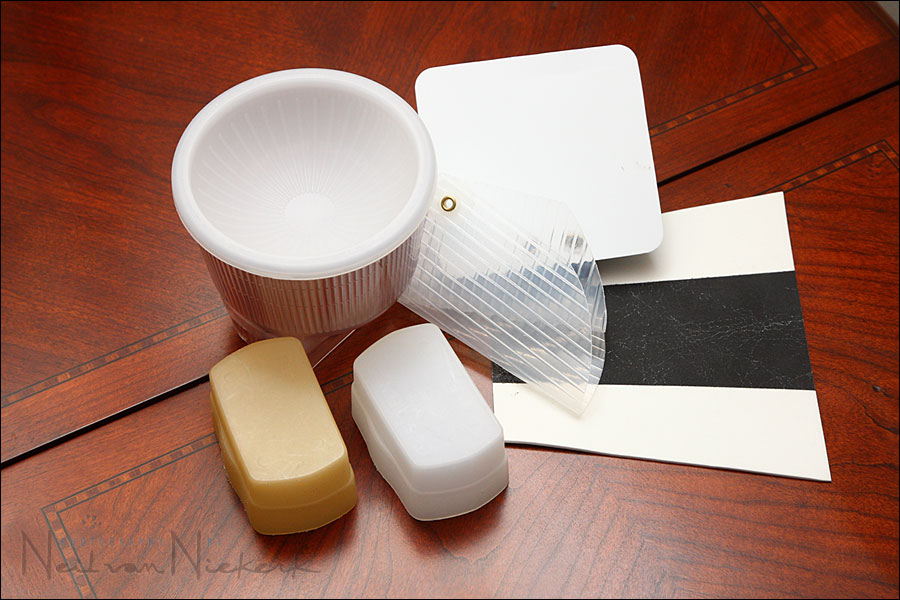
What I mostly dislike about the generic light modifiers is that they are advertised as a kind of magic bullet to make flash photography easier and better. This then allow most photographers to NOT put any thought into what they want to achieve with light, but instead reach for that advertised quick fix. And therein lies the problem. There is so much more to be done with light than just plonking a diffuser on top of your flash. For more about this: Remove the plastic diffuser cup!
The on-camera flash modifier I use most often, is The Black Foamie Thing. But there are times though that I do need to disperse light directly from my speedlight, and for this I either use the Stofen (because it is cheap and small and fits in my pocket), or a white bounce card (because it is inexpensive and light and works as efficiently as any of the other light modifiers). Some light modifiers are so heavy, that they risk damaging the speedlight’s rotating flash-head through constant use.
On-camera flash modifier – the black foamie thing

The BFT is held in position by two hair bands (Amazon), and the BFT is usually placed on the under-side of the flash-head.
The linked articles will give clearer instruction, especially the video clip on using the black foamie thing.
So there it is .. the light modifier I use 95% of the time when I’m indoors – a piece of cheap black foam to flag the light from my speedlight. There are also two other light modifiers I would recommend to disperse light when it isn’t entirely possible to bounce flash entirely off other surfaces. I’ve tried numerous of the light modifiers on the market, but I feel that I simply don’t need them … and I think the results I achieve weekend after weekend, consistently prove me true on this.
Regarding any light modifier – we need to figure out first why we think you need a light modifier, and then why that specific light modifier. And putting a little thought into what it is we want to achieve with on-camera speedlights, it might even become apparent that the advertising hype for these items won’t help us nearly as much as a clear understanding of flash photography and light.
You’re so right. I often see “event-photographers” with a diffuser right on the flash. Or they use the direct light … or only the available light. But that’s nonsense when they photograph the artists on the stage.
But what I actually want to say is that i never got the right start using the flash. Sometimes I tried to bounce is off the wall and it was even not seen. Or when I started photographing I often used the “direct way”. But I was never lucky with it…
Then my Dad mentioned your site and I began to read – and to learn. With my mate we “recreated” your “Black Foamie Thing ™” and soon we both began to learn what “using flash” really means.
Thanks a lot for your side and all your advice!
~Alex~
(Germany – hope my english is not too bad ;) )
Yes I actually have the black foam cut out electrical taped to my Speedlight. Makes a lot of sense when bouncing flash not to blind everyone in the path of the bounced speedlight!! ;-)
Harry
Thank you for sharing your knowledge, I thoroughly enjoy your blog.
You indicate that you “can’t argue with the results you get weekend after weekend” and link to the engagement photos. My question is, which of these were “flash assisted” shots and which were natural light? They all appear to be natural light, or at least a very good matching of ambient with the flash. And outdoors there most likely wasn’t much to bounce off of with a speedlight. If you are bouncing, are you bouncing off a reflector? Or do you use the BBC more often for these shots?
Hi there Drew ..
The link is to my blog showing my work as a NY / NJ wedding photographer. It’s not a link to just that engagement shoot, but 45+ pages of entries of images from numerous weddings, portrait sessions and other photo shoots.
The point is that it is hopefully not that easy to tell where flash was used, aside from the obvious ones such as where you can safely assume flash must have been used because the images were taken in a reception venue.
For specific info about how I use flash … there is this website. : )
If there are specific images that you’re curious about,
join us in the Flickr group on flash photography.
As to which light modifiers I use .. follow the links in this posting. It’s all there.
Neil,
How do you feel about this product the HonlPhoto Speed Snoot?: https://david-honl.myshopify.com
It looks well made.
Tom K.
Many thanks Neil. I found some for .89 cents here: https://www.createforless.com/darice-foamies-foam-sheet-12-x-18-in.-2-mm.-black/pid9575.aspx
Tom K,
for $29, it looks too short, but I’ve always wondered why you wouldn’t foil the inside of your black foam.
They look like the same class as gary fong’s $60 pieces of plastic. If you’re rich and want to show off with ‘brand name’ items. I’d go for the $2 bit of foam.
I think the HonlPhoto website for the 8″ snoot is showing the 5″ snoot in the demo picture. The 8″ snoot looks longer. However, I have to agree that for $30 is a bit much for a a piece of ballistic nylon with a velcro surface. The inside of the HonlPhoto snoot is silver, so if you needed a different color, you would still have to rig something up. Using the foam and hairband system is cheaper and probably more effective and flexible.
Ya know, I thought I saw sth like that snoot before. thermos warmer! Maybe if you go to the markets you’ll find sth suitable with little modification.
Neil,
when do you use the stofen? it’s no good outside since there’s nothing to bounce off right?
diffusers try to increase the effective size of the ‘source’ light. but the stofen is exactly the same size as the flash head anyway.
as for diffusing, well why not just FEV -1 or? light is light, there’s not ‘soft’ or ‘hard’ light, just how much and where from? So in theory it just cut some light out?
Val, I would use a generic light modifier like the Stofen whenever I want more of a bare-bulb effect spreading light all around, and throwing some light directly forward.
A typical example would be if I am in a room with very high ceilings, and can’t add additional lights. When bouncing the flash behind me wouldn’t work because of the size of the room, and bouncing upwards would produce dark eye sockets … then it makes sense to throw light directly forward from the camera’s point of view by using a Stofen or ABBC.
That’s interesting. I thought you were bouncing the flash behind in huge churches and such.
btw, do you use a black snoot or one with a small white bounce card inside it? The ABBC site has so many variations of the black snoot, and now he has the ‘ultimate’ version too..
As mentioned above, I pretty much just use the Black Foamie Thing when I’m indoors. It’s a piece of black foam that I cut myself.
But .. you need to adapt and improvise depending on the situation you find yourself in, and the type of lighting that would be most pleasing (and accessible).
Thank you so much for the lessons in making flash look natural. I have read all kinds of information on this but what you say seemed to ring that bell for me. Your explanations are simple, real life, and practical. The black foam thing was something I was looking for. I have tried it a number of times and am still working to perfect it but it seems already to be superior to the other product I was using.
I am sure the book will do well. Thanks again.
Neil – I have a question for you.
I have been using the black foam modifier for a few weeks.
It works like a charm as long as there are walls or a ceiling to bounce off.
When do you use the stofen with the hole cut in it?
I have a family reception coming up and the room we will be in has 60 foot ceilings with dark walls.
The only equipment I have is my 580 ex II – 50mm f/1.4 and my kit lens of 28-135 on my 40D.
I have read and re-read all of your posts. Just amazing.
Thank you for adding so much to world of photography.
Much appreciated.
Mike
The details about the stofen-with-a-hole-in-it appears on the page about The Black Foamie Thing ™
Hi Neil,
I love your blog, there’s so much good information.
I was wondering if you’ve had experience using a modifier such as stofen or gary fong outdoors on the master unit in order to trigger wireless ttl. As you mention it would not soften the light at all, but it would send the light in all directions. I was thinking that it would help when multiple slave units are placed in different locations (ie camera left/right or camera back left and a kicker light). Each slave has to “see” the light from the master in order to trigger which would be tough to do if you have to send the light in more than one direction.
So do you know if the benefit gained by spreading the light in all directions would outweigh the loss of light caused by the modifier? Any suggestions to optically trigger slaves that are in different directions relative to the master when shooting outdoors?
Thanks.
Mike, I suspect (without having done tests), that the use of a light modifier like that with wireless TTL is going to prove problematic in two ways:
The pre-flash sequence might very well be cut down to the point where the camera can’t meter the TTL flash output properly.
And then of course, the signal train could be lost which fires the slaved flashes.
I’m not sure that using a light modifier over your master slave when outdoors in bright light, is going to be useful.
Neil,
When you have nothing good to bounce off of, like colored walls far away, you wont use your black foamie thing for on camera flash modifier correct?
You would use some form of white bounce card to throw light forward (like at processionals) correct?
Do you use the white bounce card (like the BBC) often in these types of situations?
And when do you prefer the black striped white card over the no stripe white card?
Thanks much,
Mark
Hi there Mark,
You’re right .. that piece of black foam is only useful in directing and flagging the light from the flash. You need to do something else when you have no surface to bounce off.
However, you’d be surprised to see what you can actually bounce your flash off.
– So here I think some photographers just aren’t imaginative enough, or are too scared to try out bouncing off unusual or far-away surfaces.
– Conversely though, I think some photographers (out of inexperience maybe?), are too ambitious in what they think they can bounce flash off.
Therefore my advice here would be to make sure you can get the results you want. It needs testing and trying out though to figure this out.
When I am stuck in a situation where I can’t bounce flash at all, I have to use something else. Ideally, off-camera lighting. If I can only use on-camera flash, then I have to settle for a plastic light diffuser such as the Stofen, or the better bounce card.
Neil, when forced to use a Stofen at an event, what position would you place the flash in? In terms of “bounce” and “swivel” what would be your starting point? I have seen many photographers setting their flashes to 45 degrees bounce with 0 degree swivel. I have favored 60 degrees bounce with 180 degrees swivel. Depending on the ceiling I have found that this keeps some light from going forward but not all. Any suggestions? And many thanks as always.
If there is a ceiling, I wouldn’t use the Stofen.
If there is no other recourse to bouncing the flash, then I would use the Stofen, and most likely only outside – then I would use it in a 45 degree bounce angle to force light fall-off to the foreground so the foreground isn’t overly bright.
I don’t want to “bounce” at a 60 degree angle when indoors, because it would most likely cause an uneven light on my subjects, especially when I get closer to them.