On-location corporate headshots – Efficiency and speed
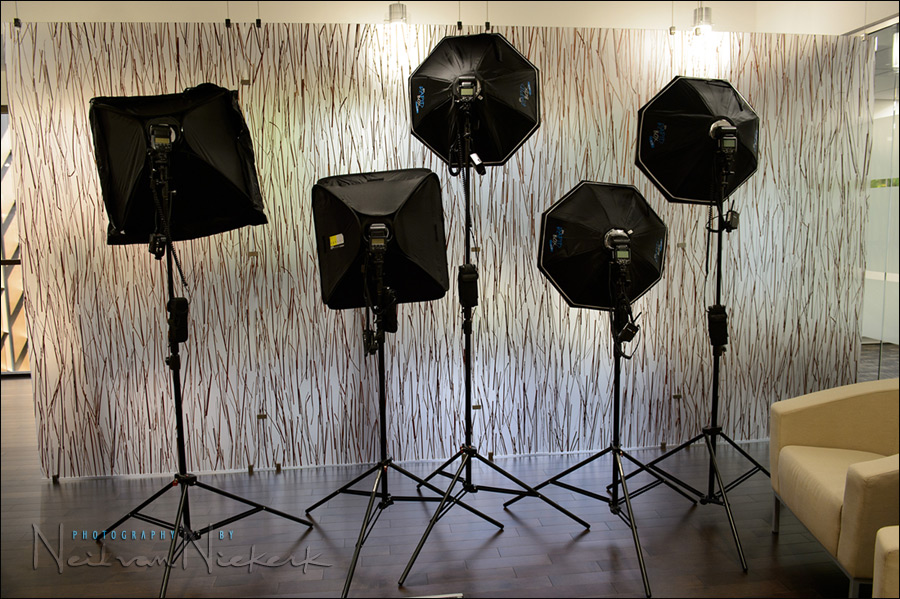
That’s me, all set up for on-location corporate headshots last week. Five speed light & Softbox set ups, to be placed in a different area each, to efficiently give 5 different looks. My client wanted head-shots of a list of people, with varying backgrounds around their offices. And also with different sets of clothes. We decided that 5 different looks would work best, and give them variety.
I considered the options I had. Two of them amounted to too much disruption:
– dragging one light around, and setting it up every time for each person, or
– setting up in one spot, and then having everyone file past. And then setting up again, and having everyone file past me.
The best and most elegant option immediately seemed to be to set up lighting in 5 different spots, with pre-determined exposure settings and flash settings … and then walking each person to each spot. This sounds like a mission, until you realize that 3 of the spots were within 20 yards of each other in the main lobby area.
Instead of moving a light-stand around, I would walk up to the already set up light-stand & speedlight, and switch on the radio trigger for that spot. All setting up and testing done before-hand. Fast and efficient. Then, at 30 minute intervals, the next person would join us.
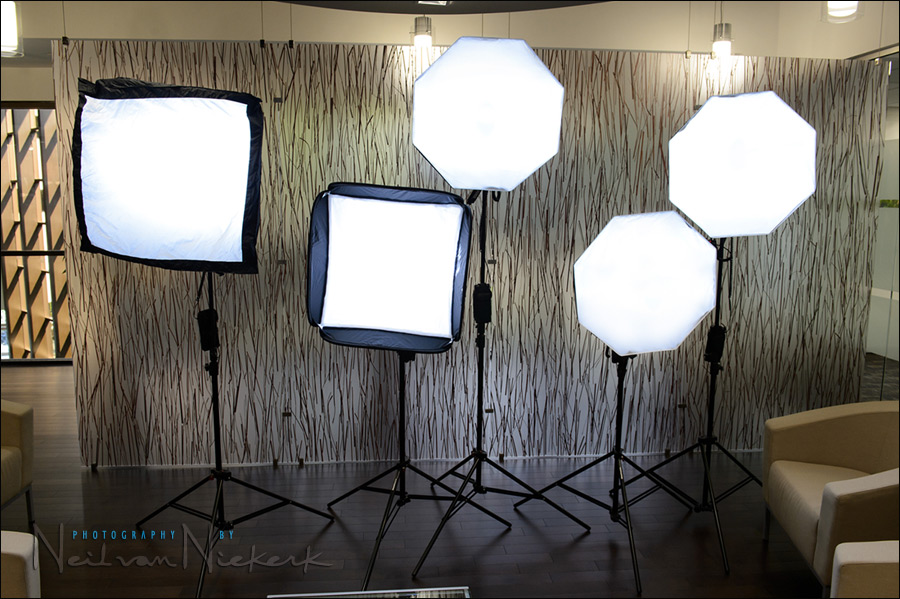
Here is a close-up shot of one of those setups:

A medium sized softbox, a speedlight, and a battery pack and a radio trigger. Simplicity.
Deciding on the gear I needed
There was no need for a lot of flash, since the light had to match the ambient light of the offices. For 4 of the 5 setups, I used the out-of-focus backgrounds around the offices to give a corporate-looking background. So there was no need to blast studio-levels of light. The speedlights in the medium-sized soft boxes were sufficient. In fact, at the levels the manual flash outputs were set, the battery packs were nearly redundant. (I say “nearly” because I didn’t want to take chances that a flash would run out of juice at some stage.)
Since I only had three Nikon SD-9 battery pack (affiliate), I used my two Canon CP-E4 battery pack (affiliate) with two 580EX speed lights. This brought the tally up to 5 speedlights. I recently changed from the Lastolite 24×24 Ezybox to the Westcott Rapidbox – 26″ Octa Softbox (affiliate), as explained in my review of the Westcott Rapid Box – 26″ Octa Softbox. So I just had to buy one more OctaBox. Spendy? Not really. The Octabox (and an extra light-stand) wasn’t more expensive than an assistant would’ve been.
By carefully working out what equipment I needed, and how to carry it in roller bags, it was just two trips to my car to get everything.
What helped a lot, was the medium-sized Manfrotto 1052BAC – medium light-stand (affiliate) that I used. As described in the review of Manfrotto lightstands, they clip together as a group. So I was able to carry 5 of these lightstands over a shoulder, all neatly stacked together as a group.
I initially thought of bringing my Profoto D1 kit when the company approached me, but when I scouted the location with the two PR ladies, I realized that at the camera settings that I’d be using, that speedlights would be sufficient. In the end, most of the speedlights were set to around 1/8 power, and I was shooting around the 800 ISO @ f/4 @ 1/100 mark. So the Profotos would’ve been overkill.
The lighting in office complex is fairly uniform, so my camera settings remained nearly the same, from location to location. I memorized what each set-up needed in terms of my camera settings.
Photo gear (or equivalents) used during this photo session
- Nikon D4
- Nikon 70-200mm f2.8 AF-S VR II / Canon EF 70-200mm f/2.8L IS II
- Nikon SB-910 Speedlight / Canon 600EX-RT Speedlite
- Westcott Rapidbox – 26″ Octa Softbox (B&H / Amazon)
- Lastolite EZYBOX 24×24″ softbox (B&H / Amazon)
- Manfrotto 1052BAC – medium light-stand
Examples of the results
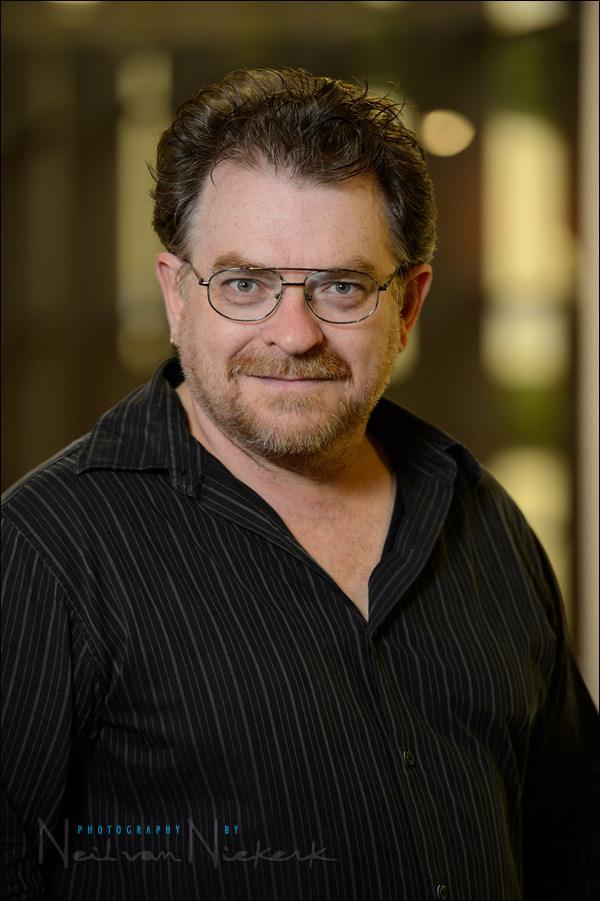
Keep in mind that I worked in a fairly simplistic way here – the background would be colorful and naturally lit, and then I simply balanced my subject against that with the softbox flash. I don’t want to post examples of corporate clients, so I asked the PR lady who helped me on the day, to take a few photos of me where we had set up.
I used the 70-200mm f/2.8 zoom to give me a pleasant perspective, and a tight composition for the headshots.
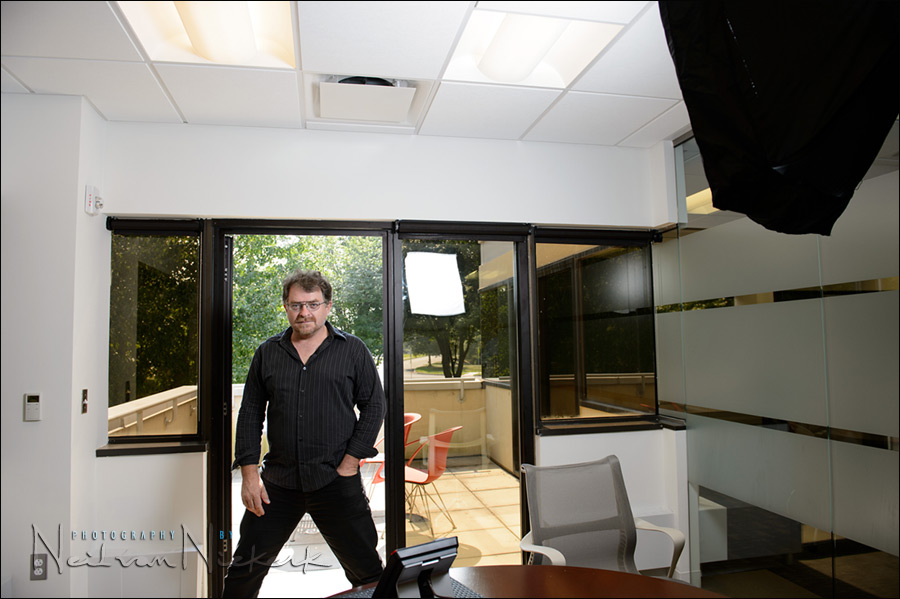
For the one setup, they wanted an outdoors-y look. So I used the one door leading to a balcony. Here is the pull-back shot to show the actual setting.

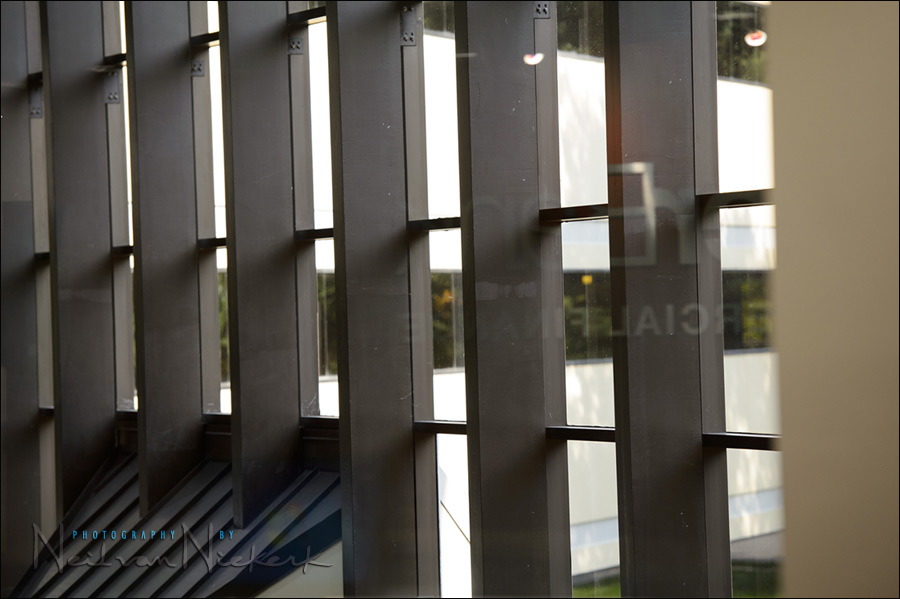
Here is one of the backgrounds that I used in another setup. When it is in focus, it is a mess. But when it is out of focus, and my camera settings chosen accordingly, it gives quite a surprisingly interesting background.
Just excuse the goofy looking expression. The PR lady was struggling with the heavy D4 and 70-200 combination, and I pulled a face … and she caught the last vestige of my expression. In other words, look at the awesome background instead! Keep in mind also that this is an approximate composition, but it will give you an idea of one set of results.
Looking at the softboxes all set up in the morning before I started, I felt like this guy that The Onion reported was seen using two computer screens. Yup, I wasn’t messing around either!
Related articles
- review: Westcott Rapid Box – 26″ Octa Softbox
- review: Lastolite Ezybox 24×24 softbox
- Camera & flash settings: what do you want to achieve?
- On-location headshots and promotional portraits
- Best softbox for on-location headshot photography
A little bit of homework
- What would be typical settings for the outdoors-y shot?
- If I used my flash here at full manual output to balance the off-camera speedlight (in a softbox) with bright daylight, how did I get to correct flash exposure then for the different settings?
Neil, have you found that your full-frame camera body has significant advantage over a crop body in your ability to create those smooth soft backgrounds?
A full-frame sensor (35mm equivalent) will effectively give you a stop shallower depth-of-field than a 1.5 crop sensor. It’s something that is incremental .. ie, it isn’t a huge jump, but ultimately, it does help. It gives me that little bit more control.
Great post Neil. I really like the way you explain your shooting scenarios and ALL of the factors involded in your decision making process. How many folks completed the 5 shot circuit?
I photographed a sequential group of 6 people on one day, and another group of 6 a few weeks later.
OK Neil…you made me laugh…and thanks for providing great info
For the Homework question I’d set my D800 to ISO 100 f/11 and 1/250 s. Take the inner baffle off the soft box and control the strobe through distance to subject. To finesse the image and get a shorter dof I’d start putting ND filters onto the lens and opening up on the aperture.
This post totally made me look so bad!! I do corporate headshots w/3 speed lights but not near the options and imaginative direction as you. WOW—You’ve inspired me to up my game. Fantastic post
Great ‘selflies’ Neil!
Thanks for such insightful posts — & truly wonderful images!
home work reply: lowest iso (100), highest sync speed (1/250), and play with the aperture to get the right background exposure.
To get the right flash exposure for the subject, play with the distance from the subject and the softbox.
According to the Sunny 16 rule, a typical setting would be ISO 100, 1/100 sec, and F/16. But since you are battling with bright daylight, going immediately to max sync speed is a better idea. Thus ISO 100, 1/250, and F/10 (I opened the aperture to compensate).
You would then fine tune the exposure as follows:
With those settings dialed in, you play around with ISO and aperture to control flash output. Increasing either will give the flash more range and reveal more ambient light. Since the flash was used at full manual output, the last variable is flash-to-subject distance, which you would adjust according to the intensity of light you are looking for.
So three variables to play with (since full manual output on the flash is a given), each having their own compromises.
I’m going with distance to subject. Final answer.
With manual flash, there are the 4 controls for manual flash exposure:
– distance from your light source to your subject
– power of your flash (including diffusion of your light)
– aperture
– ISO
Because the backgrounds of these corporate photos out out of focus, that implies a shallow depth-of-field. This means your aperture is anywhere between f2.8 to f5.6. So, I would think that you can’t play with the aperture too much to get your flash exposure. Shutter speed only affects ambient exposure, not flash output. But you would have to play with shutter speed to influence the background exposure. ISO probably is set at the lowest setting.
Each station probably has various lighting situations. If one wanted to keep things simple and shoot quickly, then the only variable of the four above that you can change very quickly is the subject distance to the manual flash. (ISO, aperture, and manual flash power are “fixed,” so the photographer isn’t changing the camera settings constantly at each station, which can break the flow.)
1st Expose for the ambient which is a sunny 16 exposure. In my case the equivalent is 1/250 @ f10 and 100 ISO. This setting gives me the largest aperture which helps my flash power.
2nd My flash guide number is 114, therefore 114/ 10 = 11 feet for flash to subject distance in order to get f10 worth of light on my subject except in this case the soft box will cost me about 2 stops of light so i will have to move closer by half the distance or 5.5 feet from the subject. Take a shot and adjust as necessary.
Thank you so much Neal for all your blogging. You have been a great help in teaching me to understand my lighting options. I have your books and hope that helps repaying you in some small way .
What do you do about the green shadows that you get from the ambient lights (like on your indoor shot)? Do you use a reflector or a black flag to get rid of them, or do you fix them in post?
I would fix those in post-processing for the images they select.
So you used a Canon speed light with the D4, or with a Canon body? If with the D4, how did you do this?
Manual flash, triggered by (manual only) pocket-wizards .. hence, the camera body / flash combination doesn’t matter.
I’ve done this(corporate headshots)at work with my beloved Quantum Qflashes. I so enjoy reading and visiting your website and blog. Best regards.
I love reading you blog. Learned so much so far. For homework question, would it be easier to go high speed sync such as ISO 100 f4 1/500 at 200 mm. To get right exposure,changing flash output and distance to the subject.
Hi Neil,
Please be so kind as to tell me if there is any way to use battery pack cp-e4 with canon 600ex-rt.
Thank you very much!!!!
Andreea
You most definitely can!
The typical settings for an outdoors shot would probably require a 3 stop ND filter to bring down the ambient (while retaining a wide aperture for a narrow DOF) while remaining at max flash sync speed to get the most output out of your flash.
You’d also be utilizing the inverse square law (keeping your light source as close as possible to your subjects) to get as much light as possible out of your speed lights so you’d have to move them in closer than you showed in some of your test shots.
Your best bet if shooting both indoors & outdoors (you already know all of this information, I’m just answering the questions for the fun of it :P) would be to have two camera body’s or lenses on you.
One with an ND filter on it to be utilized outside with the narrow aperture and the speed light at full power, the other to be used indoors where an ND filter is not used.
Cheers!
For the outdoors shot shot it looks like a aperture of f2.8-f4.0 with a ISO of 100-200 and max sync speed. Also looks like your flash contrabution to ambient is at about 40-50% to me. Softbox I’m guessing is at about six to eight feet away as the light does not look like it has a smaller source look when it is pulled to far away. Possibly a ND filter at about a 1-2 stop difference to help balance things out.
Hi Neil
Just a quick question re the above shoot… could you have used bounced on-camera flash and got a similar result given the white walls of the office (I presume) and the somewhat predictable nature of the ambient light? I ask, because I have a corporate headshot shoot coming up and if can get by without using the softbox I will…
Roy … I wouldn’t get the consistency I need between the different people I am photographing, especially since I am shooting on multiple days.
Bounce flash would be an easy way for a quick portrait or two, but would make for a tough post-production workflow with the variation in TTL exposure. These softboxes all set up in different places, makes it much easier on the day, in in post.
Hi Neil, you chose a 70-200 lens so I would be interested to know what focal length you used? I typically use my 24-105 for portraits but you now have me thinking on using my 70-200!
Thanks
Mark
I usually work around the 135mm mark on my 70-200mm zoom.
Neil, you only used the one light for each portrait, no fill on the other side?
Theresa, I didn’t use fill light here – there is enough ambient light around to help lift the contrast. So this is different than shooting in a studio where the main light might have been the only light.