
Outdoor photo session with kids, using off-camera flash
When I posted photos from this session on FB, there were questions about the lighting (and whether I had used off-camera flash), as well as camera settings. There were also questions about which lens I had used for this sequence – whether it was perhaps an 85mm lens. The surprise perhaps might be that this isn’t out of the ordinary from how I usually approach a photo session – Checklist for portrait photography on location. A systematic way to make sure I get images that look really good.
With kids being their usual rambunctious selves, I need to be able to concentrate on them, and their expressions … rather than be overly concerned with camera settings.
My camera settings were fairly conservative for this sequence:
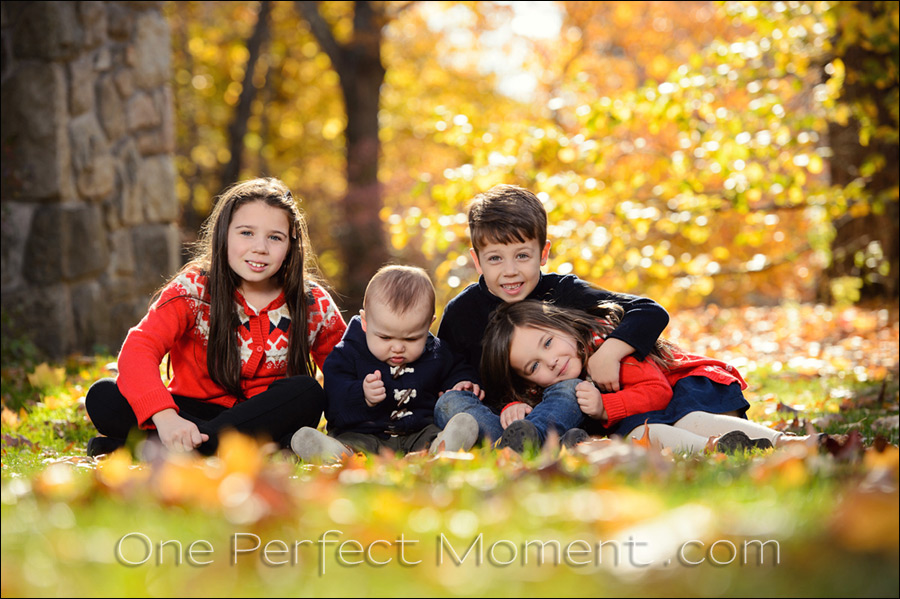
1/250 @ f/4.5 @ 125 ISO
The f/4.5 aperture was still shallow enough for the 135mm focal length to give me separation from the autumn foliage in the background. The 135mm focal length (on my 70-200mm lens) was tight enough to fill the background with colors. Had the patch of color in the background been smaller, I would’ve zoomed to a longer focal length – that would have “enlarged” the background because of the perspective compression with me moving even further back. This is a topic touched on in a related article – Using tele-converters: Extra lens compression for tighter portraits.
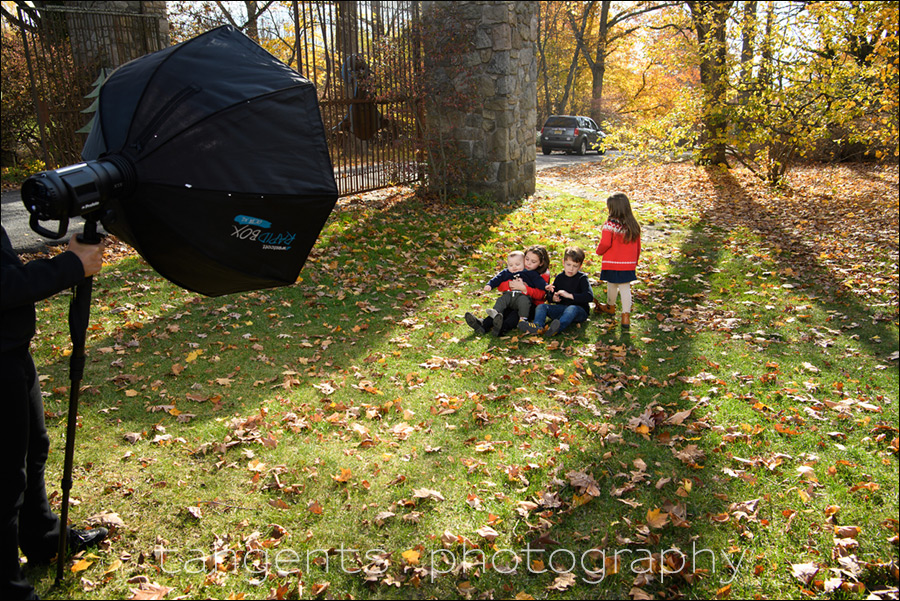
Lighting was done with my workhorse Profoto B1 battery powered flash (B&H / Amazon). The softbox was the Westcott Rapid Box 36″ Octabox (B&H / Amazon), because it is so easy to set up and collapse. I used TTL mode here (with negative FEC) to get to the initial exposure, and then locked it in manual flash mode via the Profoto controller on my camera. Elegance … while laying flat on my stomach on the ground. The reason for shooting from so low down … a better perspective.
In a sense then, there is nothing new here about shooting like this. It’s an accumulation of a few essential techniques, applied again. It works every time.
Camera settings, and photo gear (or equivalents) used for these photos
- 1/250 @ f/4.5 @ 125 ISO
- Nikon D4
- Nikon 70-200mm f2.8 AF-S VR II /equivalent Canon EF 70-200mm f/2.8L IS II
- Westcott Rapid Box 36″ Octabox (B&H / Amazon)
- 75″ tall Gitzo monopod to hold up the light
This pull-back shot will place everything into context and give you a better sense of where we were shooting.
And two more photos from this sequence:

A little bit of homework
I used a powerful flash here. Would these results shown here be possible with a single speedlight and a softbox?
Related links
- Checklist for portrait photography on location
- More spontaneous portrait photography
- more articles about Off-camera Flash Photography
- Dramatic portraits of kids – Lighting and intent
- Using tele-converters: Extra lens compression for tighter portraits
- More from this Family & kids photo session, NJ
Nice to see your simple setup, keeping plenty of flexibility for light coverage and depth of field to capture active kids! Did you put the diffuser on the front of the octobox, or run it uncovered in order to get a brighter punch of light?
Patti .. it was with the double diffusion that the octabox came with.
I think it would have been possible with a single speedlight and a softbox because you were shooting at max synch speed, and f4.5 should allow sufficient reach for a speedlight for fill.
^^^ exactly that!
This is all within the reach of any photographer who has a speedlight and a medium softbox, and some understanding of balancing flash and ambient light. Nothing extraordinary here.
Thank you so much for sharing. I saw the post of FB but didn’t want to be asking for all the techo stuff.
Neil, probably would have to move a bit closer with a flash & softbox
Maybe, but only slightly perhaps.
f/4 @ 100 ISO is do-able with a speedlight and a softbox.
Thanks for sharing. I was wondering about the speedlight option, too; thanks to Jason for making the connection my slow brain wasn’t able to.
That is exactly what I was hoping to underline with the “homework” – the insight that f/4 @ 100 ISO is do-able with a speedlight and a softbox. Its within any photographer’s capability.
A few years ago, I was able to accomplish something like this at f2.8 using a 3-stop ND filter at max sync and dumping the SB-900 flash in TTL mode at about 6 feet from the subject (not even the top of the line flash model either). I wanted the f2.8 to blur out the background even more.
In retrospect, I should have gone full manual flash — at the time, I didn’t have my “A-ha!” epiphany regarding manual flash — but Neil is absolutely correct: this stuff is totally doable with a single speedlight and softbox.
Neil, why do not you shoot using Profoto B1 in TTL mode?
Alfredo, He did state that he started in TTL, found a negative FEC setting that worked for him, and then switched the ProFoto light over to manual (at that setting). Once you are in manual, your flash exposures will be more consistent.
Brian, thanks for your explanation, I already knew that, but actually what I want to know is if Neil never uses the Profoto B1 in TTL mode and, if so, why.
Alfredo, I do shoot in TTL mode with the Profoto B1 when:
1. When we are shooting on the move, or the subject moves a lot. This is the advantage of TTL over manual flash – the change in brightness due to the change in subject-to-light distance is taken care of automatically.
2. When the flash is merely a blip of fill-flash, then I often just keep to TTL flash even if the distance remains the same. The FEC is of course turned down for this.
What I like about the B1, is that I can get an initial flash exposure in TTL mode, and then immediately lock it into manual mode with a button on the trigger mounted on the camera.
Neil,
Great site, great imparting of your knowledge and experience – thank you.
I have a general question, having started using my speedlights in manual more and more I wondered if you ever adjust the speed light zoom settings? And if so, in what circumstance would you?
Thanks Neil.
I don’t take particular care about how I zoom my flash:
1.) With a softbox, I usually zoom to 24mm or thereabouts.
2.) For bounce flash, I zoom tighter, and then leave it there. With the light from my flash being spread wider through bouncing, there’s no need to match the zoom setting of the flash to my actual focal length.
3.) I rarely shoot direct flash … and then I let the camera and flash automatically take care of my flash head’s zoom setting.
Thanks for sharing Neil, I didn’t catch the facebook post, so I’m glad I came across this article :)
All the good stuff still takes place here on the Tangents blog. I don’t favor FB over this.
Seems like you’re almost far enough back that the modifier wouldn’t be necessary if using a zoom flash. I’ve heard that if the subject is 4 times the distance of the modifiers diameter then it won’t effect the outcome very much; 3ft octobox would be 12ft away. Do you find this to be true?
Mike, I don’t keep to any such formula.
Obviously, the further back the light source, the smaller it will be relative to our subjects. But just like depth-of-field (and other things to do with photography), there is no ON / OFF or YES / NO point here where at a specific distance the light will be soft, and a short step further away, it will be a hard light source.
It’s a gradual change. As we move further back, the light will progressively become more contrasty. But you’d have to be a fair distance away before the light source (with a softbox) is as hard as a bare light source.
With that then, I use a softbox where possible, and I change the distance as is necessary to get the composition I want … in other words, ideally I don’t want to clone out part of the softbox out of the corner of the images.
Hello Neil,
Two years ago I was saving to buy a Canon 600 EX-RT Flash gun, when I discovered the Yongnuo YN600EX-RT flash for sale. I bought one for $165.00. Are these Yougnuo flash guns as good as the Canon originals? I have read about overheating problems and missed flashes. I have not used my flash long enough for it to overheat. I have enjoyed reading your article here.
They are nice and cheap compared to Canon but I wouldn’t trust them enough to carry on a shoot. The one I purchased misfired a lot and the connection with the hot shoe wasn’t the most convincing. Overall they look the same but build quality and reliability not the same. Just my experience.
Hi there Greg … I’m not familiar with Yongnuo, so can’t give you any answer there.
Did you gel the flash?
No gel needed here.