Photographing the wedding processional with extreme bounce flash
As mentioned in the article on photographing the wedding processional, in my opinion, the wedding processional in the church is likely the most challenging part of the day in terms of our technique. People are moving towards you – admittedly at slow pace, unless the bridesmaids are nervous. Then they can easily just zip right up to the front! The light levels are low, and the light is most likely uneven. Adding flash to this is a reliable way to get clean open light on your subjects, but bounce flash can be a bit of a challenge.
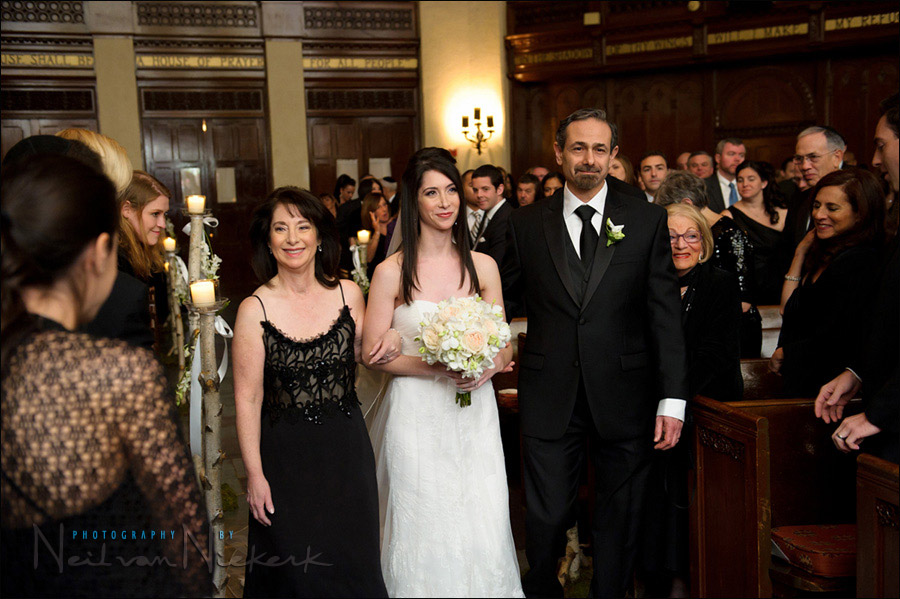
As an example, with this wedding in Temple Israel of Lawrence, in New York, the light was really low. Not just that, the temple itself was cavernously huge. Yet, a few test shots showed that I could get the kind of light that I like, using just on-camera bounce flash.

This photo will show where I stood (the arrow),
and roughly where I bounced my flash (the circle) for the processional.
I found that I got the most consistent results going to manual flash. I also had to go to full power to get enough light since bouncing off those non-white surfaces, killed a further amount of the bounced light.
Camera settings & photo gear used (or equivalents)
- My settings: 1/80 @ f3.2 @ 3200 ISO
- Nikon D3S
- Nikon 24-70mm f2.8G AF-S / Canon 24-70mm f/2.8L II
- Nikon SB-910 Speedlight / Canon 600EX-RT Speedlite
- Nikon SD-9 battery pack / Canon CP-E4 battery pack
It did help that I had the Nikon D3s at the time. A low-light / high-ISO champion.
If I hadn’t been able to rely on the camera giving me excellent results at this high ISO, I would’ve had to change how I use my flash. At a lower ISO, I would’ve had to use a plastic diffuser on the flash to throw some light forward, or just shoot with the flash pointed straight ahead.
My focusing mode: AF-S
In Canon-speak, that would be Single.
I didn’t want to go to a continuous / servo focusing mode, because then the flash doesn’t emit the red autofocus assist beam.
Also, in continuous / servo mode, the camera generally becomes Release Priority. In other words, the shutter can be tripped whether the subject is in focus or not. A valid argument can be made that you’d be better off with a slightly out-of-focus mode than no shot (because the camera refused to focus.) But I do swing the odds heavily in my favor by using a camera of the calibre of the Nikon D3. I now use the Nikon D4.
At some level, you really do need the serious toys to be able to bring back images which look quite natural. High-ISO capable cameras allow you to blend the flash more seamlessly with the available light. And this of course ties in with the idea of a more photojournalistic approach. I don’t have the couples stop and pose a second or two for the shot, as they proceed down the aisle. That would be the traditional way of shooting, and was necessary because of a generation of cameras where the digital sensor, or the film, would not really accommodate high ISO settings. Or, alternately, it could also mean the photographer didn’t quite understand zone focusing. But that’s another topic.
So with the idea of giving a more natural look to the images, the wider apertures and high ISO settings are necessary for situations like this.
If you don’t have a high-ISO capable camera, then I do have good news for you – you’re going shopping!
And you may well still ask,
– What if bounce flash isn’t strong enough? and
– What if there is nothing to bounce your flash off?
More examples from the same wedding, to show the consistency of the light from the flash bounced this way. Even if the couples aren’t in exactly the same position, the light levels look the same, because the inverse square law works in our favor with bounce flash.


And finally, after the ceremony, the second processional. Then I switch the flash on again, with similar results. Again, the flash was bounced in the same way as before, but off the opposite wall where I had now positioned myself.

The final idea with this article, is to show that with a bit of thought – and the right gear – you can get amazing results with the processional, using only one on-camera flash that you bounce.
Related articles
- Photographing the wedding processional
- Bouncing on-camera flash in manual mode (Julie)
- Bounce flash photography at wedding receptions (Juana)
- Bounce flash examples – wedding receptions
- More articles on wedding photography
- Alli & Scott – their wedding day – Temple Israel of Lawrence, NY
Neil,
You said you used manual flash at full power.
From your past posts, exposure of the subject with manual flash is governed by 4 factors:
– the actual output level from the flashgun, (ie the ratio of the full power),
– distance from our light source to the subject,
– aperture,
– ISO.
Flash output, aperture, and ISO are fixed in this scenario, but the people in the processional moving towards you will change the distance between light source and subject. Are you taking your shot when the processional reaches approximately the same spot in the aisle to keep subject exposure about the same?
“The images have consistent light on them, even if the couples aren’t in exactly the same position, because the inverse square law works in our favor with bounce flash.”
Mull this over for a bit. :)
Neil vN
Neil,
I agree about your comments on the D3s as I’ve run mine up to ISO 5000 and still get acceptable results. I do, however, take care of the noise in Lightroom. Just wondering if you do the same?
Regarding your comment on zone focus, could you speak further on what this technique is?
I think I understand why you would choose AF-S here as my D3s seems to hunt focus in low light. It can be very frustrating when the shot is right in front of you and the camera just won’t take the shot.
As always.. lovely images.
David
Zone Focusing is where you pre-focus on a spot, and then use enough depth-of-field to cover yourself.
In other words, you focus on a certain spot. Keep your camera in manual focus. Then you fire the shutter as soon as someone steps into position. Depth of field covers any slight error in your timing.
Neil,
Alright, I think I get it now.
Since the light falloff is greatest near the light source and tapers off the further the subject is from the source, these people were far enough away form the light source such that the amount of light on them at that far distance was about even. (i.e. you see a dramatic difference in light intensity with subjects between 1 to 2 feet away from the light source, but a marginal difference with subjects between 25 to 26 feet from the light source)
This is the idea demonstrated from Mark Wallace’s video.
Hey Neil,
Do you ever find yourself taking less photos than you would with no flash? I sometimes, but rarely use flash, during a processional with regards to it being a distraction… which lends itself to fast apertures and very narrow depth of fields…. Some shots are too thin, but I find I’m able to shoot more frames, capturing more of those natural moments than I would if using a flash…
I guess what I’m saying is, how do you get around the idea of having a flash go off every few seconds during a ceremony? I understand it lends towards sharper, consistent exposures, but do you ever fight against the idea?
And… thats not to say you shoot ever ceremony with flash… but the ones you do is the ones I’m curious about.
I usually only use flash during the processional and the second processional. Rarely during the ceremony.
So keep in mind that the flash isn’t intrusive.
With this wedding – the groom was the guy who assisted me on the shoot for the review of the Fuji X100s. Since I used some images of their wedding for my book, Direction of Light, I mentioned that I wanted to write this article about photographing the processional. He was surprised – he hadn’t realized I had used flash. And he had stood there under the chuppah while I was bouncing my flash!
Bouncing my flash behind me, with the black foamie thing makes the flash an indistinct blip of light against the wall. It really is as unobtrusive as flash can be. And as I said, the groom didn’t even realize.
For the processional, I shot 2 – 3 images of each couple. I would say about 9 out of 10 images were crisply in focus. So my success rate was quite high.
I do use battery packs with my flashes, so they can keep up with the fast rate of firing.
Hi Neil,
If I may ask, what were your white balance setting for these shots? Could you please show us an SOOC image just for comparison? :)
Regards
Here is the SOOC version – the embedded JPG that I pulled from a RAW file via Photo Mechanic.
and for comparison, the JPG from an edited RAW file:
Here is the next frame, straight out of camera. This will show the exposure is fairly consistent.
Looking at the EXIF data and the settings for the RAW file:
It was shot at 3850K .. which means I had the 1/2 CTS gel on.
But because I was bouncing off warm surfaces, there is that yellow color cast that you see.
The RAW file’s WB was set to 3150K for the edited image you see here.
Neil vN
I shot a graduation ceremony under very similar lighting: f3.5 1/80 @ ISO3200 and bounce flash off a really high roof using the BFT. All i can say is that if it wasnt for this technique i would be sweating. I am only limited by my gear now and hope to one day have a camera that can push out cleaner higher ISO’s. I also always use an on camera speedlight in low light conditions weather i use the flash or not because the AF assist beam ensures a much higher keeper rate. Thanks Neil i learnt alot from you and also as you add to these bounce flash articles with tidbits here and there, i find that i already picked those things up via my own experience which means i am gaining experience and knowledge.
Greetings Neil: Quick question about the BFT… In reading and watching your video’s on how to use the BFT I don’t recall you talking about the “reflectivity” of the BFT, Does the BFT absorb any of the light being that it’s bouncing off a black non reflective surface? Have you tried with a white or silver reflective surface using the same technique? Thanks, and thank you for such informative information and your willingness to share, it’s much appreciated!
The BFT does absorb the light that hits it. That’s inspired me to go try a WFT – a White Foamy Thing. Maybe two layers – a WFT with a BFT on the outside in case the WFT passes some light through it.
Experiment – I found the foam sheets at my local Walmart for about 50-cents each. At prices like that, I can afford to experiment! Cheaper than trying Gary Fong’s products, and finding them wanting to fall off at inoportune times!
The black foam most definitely eats up light – hence, it is just a short lip to block or direct the light from my flash as is necessary. It certainly isn’t this honking big black thing stuck to my flash.
Thank you for that response Neil. I think that is a fantastic approach. Nothing worse than a bunch of f2 or 1.8 out of focus shots. Sometimes I took an all or nothing flash approach to ceremonies, but I think a balance of both would be spot on. Thanks again.
Hi Neil,
Brilliant article, as always. I shoot a number of events in very simlar light/situations. Curently running a D300 – I don’t think I could get as good result as the D3s did here at that ISO. So with that in mind, I know I gotta shop…so here’s the question; Would a D700, or a D800 been able to deliver a simlar shot or really only the D3s?
The Nikon D700 is about a stop less wonderful at high ISO settings than the Nikon D3s.
The Nikon D800 I’m not sure about. The massive file might hide the noise when you resize the image. But I am guessing here, and I have no real idea how it would compare at 12 megapixels resize, to the Nikon D3s.
Neil vN
Thanks again for another great blog post. Your blog has been one of the most useful things for me, and whenever I have a question I always refer back here.
As always, a very well written and helpful article. Thanks Neil :))
Hi Neil,
Would you consider the Canon 7D a high ISO camera? Would I be able to achieve this with that camera?
I have played with the Canon 7D and the 1600 ISO performance seemed quite good. I would happily use it at that high ISO.
Neil vN
@Lloyd: i use a 60D which uses the same sensor as the 7D and i am comfortable using it right up to the maximum ISO of 6400 but obtaining good image quality at that ISO depends on several key factors:
– you need good and sharp optics. L glass is a must.
– you need the focus assist beam of an on camera speedlight at those low light levels and the speedlight can double its function as on camera bounce light
– you need to expose the histogram as far to the right as you can take it then pull the exposure back down of the RAW file during PP
Without following any of the above rules, the 7D/60D will suffer in image quality over ISO1600. But with those rules, i have been able to take clean images all the way up to ISO6400 that i wont hesitate to use even for paid work. Its no 6D,5Diii or 1Dx but it can get the job done.
Hi Neil,
First time poster here. Love your books on off-camera and on-camera flash by the way. I am still a little confused about the zone focusing you used in these shots. You said that you prefocused in an area and when the couple reached that area, you took the shot. But you also said that you took two to three shots of each couple. Could you explain how you zone-focus multiple shots like this? Especially with an aperture like 3.2. Thank you very much for all of your teachings. They have made a big impact in my business and the quality of my work.
With cameras like the Nikon D3 / D3s and D4, I don’t really need to use the zone-focus system for events like these. I need really responsive AF to nail the focus at wide apertures in low light when the subject moves.
Zone Focusing is a technique used a lot with manual focus cameras, when you had to photograph a moving subject. Instead of trying to follow-focus manually, you pre-focused on a spot, and waited for your subject to step into range … and then using enough depth-of-field would cover any slight focusing error.
Neil vN
Question Neil, why did you shoot the processional in horizontal? I noticed a few other photographers always shoot them that way and very few still shoot them in vertical. I always shoot them vertical to get the entire body in the shot of them coming at me. Shooting horizontal you are off to the side a little and they about all get cut off at the knees, not getting the entire body – or do they care about that?
For the bride, I switch it between the two cameras if possible. So I do get full-length shots of her as she first comes down the aisle. It is important with the bride, but less important for other people.
First, the 70-200mm f/2.8
and then for closer up, the 24-70mm f/2.8
The reason why I don’t shoot vertical when people are closer to me in the aisle, is because of the spatial distortion when shooting full-length portraits close up with a wide-angle lens.
Very nice. Thanks. That is something I’ll have to start doing as I have both those lenses also. Do you usually have a flash on both cameras or just the 24-70 and shoot available light with the 70-200?
Hi Neil!
This is my first time posting something! Ever since I found your website I can’t stop reading it. Thank you so much for the wonderful tutorials.
At the moment I’m not shooting anything for money just for practice.
I shoot with a Canon 70D and I’m terrified of the noise. Do you have any experience with the noise performance on this camera?
Thank you so much!
Ana … you’ll have to figure out a few things first.
But before that, the most important thing to do to avoid digital noise, is to expose correctly. The moment you start pulling up the Exposure while shooting with high ISO settings, you’re worsening the problem.
If that is under control, then you have to figure out how large the images would be used in the album or in prints. For a wedding ceremony, probably not that large. The smaller size print hides some of the noise.
Also keep in mind that digital noise prints differently than you see on the screen.
So with that, do a few test prints of correctly exposed high-ISO photos, and print them to the usual sized they might appear as in an album. Then see if the digital noise is as bad as you expect.