Use light & lighting to add dramatic impact to your portraits
Simplifying your composition is generally a really good way to add impact to your photos – remove visual clutter, and draw the viewer’s eye to what’s essential. But there’s a converse challenge to this – when you have a location that isn’t necessarily that interesting , how do you add more impact? Light and Lighting is an obvious way to do this.
Create impact and drama in how you add light to the scene, and light your subjects. A recent article discussed this in relation to off-camera flash: using off-camera flash for that extra bit of drama.
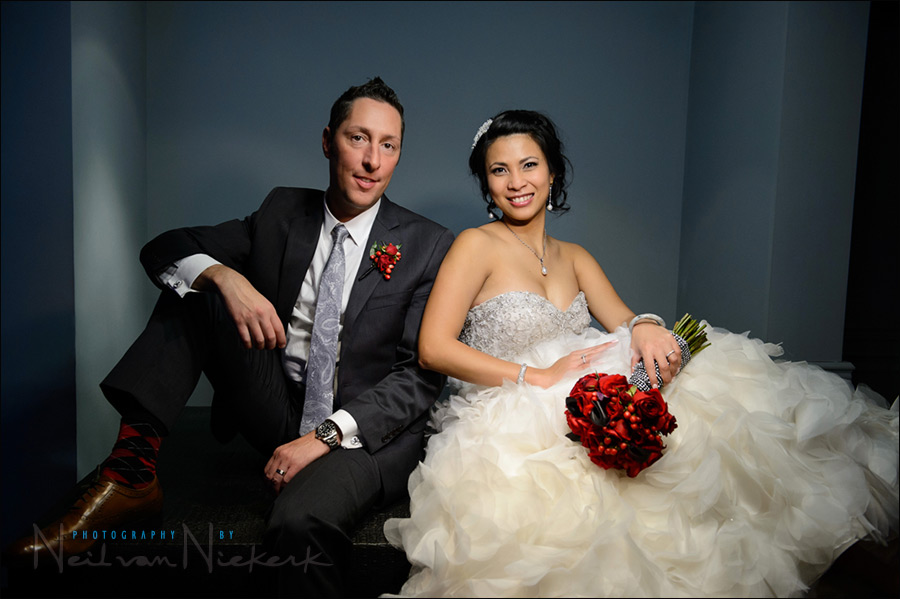
For the romantic wedding portraits of Grace and Joseph, we were landlocked to a few rooms inside the venue because of the snow storm outside. Then it becomes a challenge to come up with ideas and use nooks and crannies, and make it all count! For the image at the top, we were in the room where they serve pre-dinner cocktail snacks and drinks. Nothing much there. But I came up with the idea of having Joseph sit on this table against this wall, and then adding Grace.
Posing tip: In terms of posing a couple, it is nearly always easier to start with one person, and then adding the other. Use the first person to anchor the pose. And I usually physically show them where to sit or stand or lean when I pose someone.
The pose works, now we just had to add dramatic light. Bounce flash would’ve flattened out everyone. Well lit, but too evenly lit. Off-camera flash with a gridded soft box would’ve worked like a charm as well – but as I most often do with the romantic portraits of a couple, I went with video light. This time around, I had more toys to play with, thanks to Ryan, the other photographer shooting alongside me, who had brought his video lights along as well.
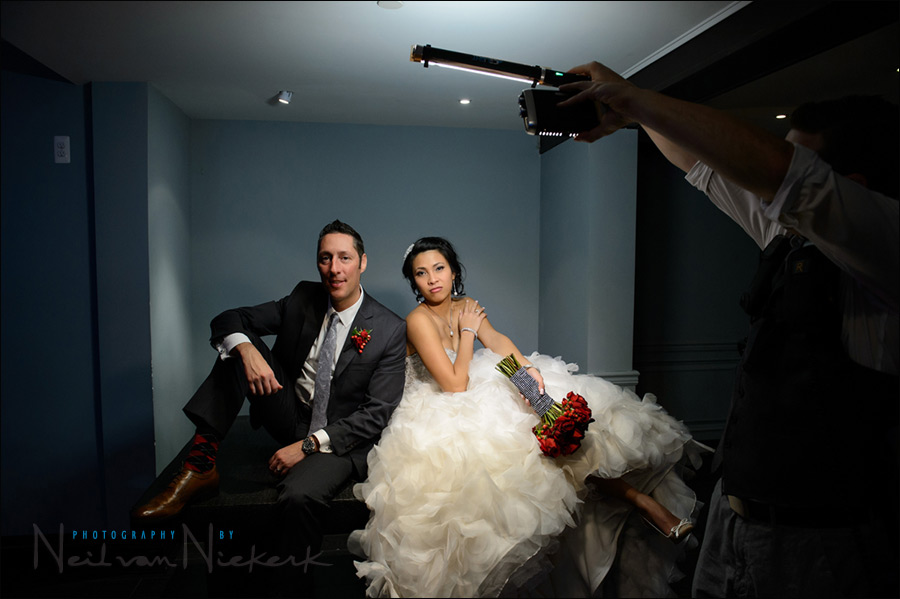
Ryan had brought along his Westcott Ice Light (affiliate). It is daylight balanced, but in gelling the light for Incandescent light, it wasn’t powerful enough for the distance at which I needed it to be held.
So I had Ryan add my own video light, the Litepanels Croma LED video light (affiliate). I dialed the color balance of the Croma video light, to Incandescent. I wanted Incandescent light because I didn’t want to risk the hot-spots in the ceiling adding a weird yellow color cast. The two hand-held continuous lights together, offered enough light.
camera settings: 1/125 @ f/4 @ 1600 ISO
Using the Lowel GL-1 Power LED light
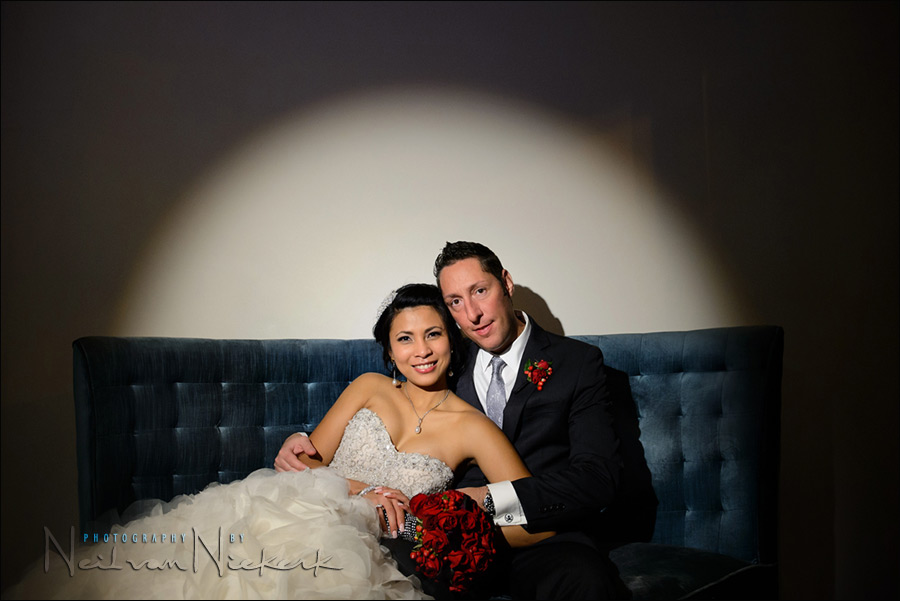
I had brought my usual Lowel ID-Light 100W Video Light (affiliate) along as well, but since Ryan had a brand-new Lowel GL-1 Power LED light (affiliate) there, we just had to try this. What is nice about the GL-1, is that it is more ergonomic than the ID-light. Dimming the light, or zooming the light in and out, is easily controlled.
For this image, I wanted a wide beam on them, but with a distinct edge. I wanted to edge of the light to fall with the edges of the couch. This was easily controlled with the GL-1 with the way the GL-1 focuses the beam.
In this way we can bring variety to our images – mix & matching lighting gear for better effect and a different effect. Investigate new tools and new ways of using them. Improvise.
Lighting equipment used
- Litepanels Croma LED video light
- Westcott Ice Light
- Lowel GL-1 Power LED light
- Lowel ID-Light 100W Video Light
Related articles
- Grace & Joseph – wedding photography at The Gramercy, NJ
- review: Litepanels Croma – variable color temperature LED video light
- Romantic wedding portraits with video light – Allison & Scott
- More articles on using video light for photography
- Photographing couples – Posing and composition
- Posing normal, everyday people for portraits
- NJ / NYC wedding photographer
Neil, I am a true fan, sincerely thank you for always sharing your thoughts and ideas.
when i saw these images on your facebook i was stunned by how darn good these images were. i thought you used a beuty dish, but now that i see it was video lights, im serioisly considering getting some as well. i love the fall off of this lighting because it really draws attention to the subject.
I feel that I have to put my two cents here. If comment is removed, fine.
Westcott Ice Light $500
Litepanels Croma $584
So basically you need $1,100 worth of constant light to create this image. ..
By the way, I looked at B&H site (and Westcott site) and the output is nowhere to be found. I wonder how weak it is if it’s not enough for this shot. My video light is 800 lux (126 led) and I can easily light up two people from about 10 feet at f4 100/s 2000 ISO with the gell on it. That is very close to your numbers. My light is a $34 toy but does the job when needed. If I need more light I can attach another $34 LED to it. Everybody is worrying about flickering but I did not experience any with this cheap plastic toy (two years old).
Than there is the Lowel GL-1 Power LED. This one takes the cake with a whooping $700 price tag. Seriously?
By the way, just about every time I used constant video light I had the subject looking uncomfortable. Putting that much light (even 800 lux) on them from 8-10 feet is not pleasant. I once tried to use it on my wife, calling her a wimp when she was covering her eyes. She grabbed it from my hand and pointed it at me to make a point. I got the point, it is strong! And unpleasant.
But seriously, Is it necessary to spend so many hundreds of dollars to just look cool?
As always, these are beautiful images… Thanks for much for sharing your works and your thought, Neil. I’ve learn a lot from your site ever since I followed your tangents.
I always agreed with Neil that if you are a well profited business, why not invest in good high quality equipments that make your job easier and produce such high quality images. With that said, you have more chance to expand your business so ROI is not an issue for your expenses. If you are just like me, whether doing photography as hobby or for charity works or not making enough profit for your living, just learn from here and stop insulting Neil sharing knowledge and technical and equipment usage for you to learn for free !!!
Forgot to say thank you Neil again for sharing your experience. Regardless of what I think of this expensive equipment, it is great to learn how others use light creatively. Cheers
At this same wedding, the videographers had a big LED video light … with the ugliest green color cast. It was supposed to be Incandescent WB, but clearly was not.
This is where the difference comes in between units like the Litepanels and some of the cheaper LED lights.
So why do I use LED lights like the LitePanels Croma? Because I don’t have the time nor the resources to do comparative testing and figure out which is the lowest cost LED light that doesn’t flicker, and offers variable WB, and a relatively neutral Daylight WB. Then it is the simplest (and in effect the cheapest) way, to just buy a good brand with a good reputation. Then I can get on with my work and just use the light.
So yes, there are cheaper alternatives than the LitePanels Croma (and other such lights), but it is easier for me to buy and use what I know will give me great results, without me fighting things like weird WB shifts or a flickering output.
I have no idea what this means? Is the implication that myself and other photographers are spending money on equipment *because* the items are expensive? To show off? Somehow it comes off as an insult. Either way, I have a definite budget, and there’s little frivolous spending with my photography, (aside from my Fuji X100s that I indulged myself in.)
And while we are on that topic …
Care to criticize that I shot this with a $6,000 Nikon D4 instead of a $2,000 Nikon D610?
But to answer your question directly. No it isn’t necessary to spend that much money for this image. I could’ve used other lighting options. But since we had both lights handy there, courtesy of the photographer who helped me, I decided to use both lights. Makes sense? i.e., why not? I had them on hand.
And to continue with this line of thought – no, I don’t spend that much money on ONE image. Not even one event. I spend money on my business and for all the shoots and projects that I do. I use the equipment regularly. I have to, to get as much of a return on my investment as possible.
The light can be quite strong in dim available light indoors, when your subject looks into the light. That said, you don’t have to blast your subject with the full amount of light. You can adjust the power to match that of the available light. Also, there’s a way of gliding the light into position, as described in this article – positioning the hand-held video light. The other articles listed on the page, using video light for photography, have detailed descriptions of working with video light.
Neil — beautiful images as always! Here and in other posts you’ve mentioned how video light has dramatic fall-off. Why is that? Is it because the video light is held close to the subjects and via the inverse square law there may be a significant change in light intensity across the subject? Or, is it because the light can be focused on specific parts of a scene? I think I’m missing something. Thanks for any additional explanation you can provide.
Regards,
Justin
It has to do with both those aspects, as you had figured out.
– the closer distance to the subject, as you figured out.
– the way the video light can be focused, or be used with barn doors.
As always, these are beautiful images… Thanks for much for sharing your works and your thought, Neil. I’ve learn a lot from your site ever since I followed your tangents.
I always agreed with Neil that if you are a well profited business, why not invest in good high quality equipments that make your job easier and produce such high quality images. With that said, you have more chance to expand your business so ROI is not an issue for your expenses. If you are just like me, whether doing photography as hobby or for charity works or not making enough profit for your living, just learn from here and stop insulting Neil sharing knowledge and technical and equipment usage for you to learn for free !!!
Hello Neil,
Thanks again for sharing new ideias on how to shoot great portraits with a inovative lighting techniques.
Sincerely
Rafael
Why bounced on-camera flash is not good for this image ?
Clear now. Thanks.
So I wondered if LED lights were used in photography, and this answers the question. So here’s the follow-up: do you ever use the LED ability to change colors (not just temperature, but to different hues), or is that not useful / hokey at your level of photography? What kind of instances might that be appropriate in for a professional photographer?
If you have to choose between icelight and litecroma
Wich one you got?
I trying to like “led lights” ( i rather prefer flas light ) for the instant light they give to you
But i’m affraid about ice light distance. Every wedding i shoot full body with my umbrella + off camera flash (grooms and best men, etc)
I know one ICE will not give me that but will the Litepanels Croma?
Thanks
The Litepanels Croma is more versatile than the Ice Light.
Could you please elaborate on this point. Why would you say the Croma is more versatile? I ask because I have no video light experience and would like to get one and LOVE your video light images. I’ve read wonderful things about the ice light, but also secretly wonder how much of that is propaganda/Jerry envy.
You can change the WB of the Croma. It is variable from Daylight to Incandescent.
The Icelight isn’t directional enough in how it throws light. And by the time you add a gel to have it match Incandescent light, the output is reduced a lot.
Thanks for the reply Neil! Ya I was reading specs somewhere and recall the ice light showing more light output on paper, but the difference in how the two lights throw the light isn’t something I considered especially with respect to gelling. Quick follow up question, which video light currently goes with you to weddings? Is it still the light panels or do you go with the higher power options like the lowel ID I’ve seen you mention in other posts?
The Litepanels Croma LED light. It doesn’t take up much space in my camera bag.
Awesome! Thanks for the help!
These are beautiful pictures. Thank you for sharing these helpful tips on how lighting can make a dramatic difference in photos.