“Using the available light” is not a random decision
Since I often use flash or additional light, there was some surprise in the (favorable) comments in the Facebook album when I mentioned this photo was shot without any flash. Not even fill-flash. Just the available light. But where I posed the bride, was a specific decision. It wasn’t just random.
Now, I often get the feeling that when someone boasts they only use available light, that it is meant to disguise that they don’t know how to use additional lighting. My thought here is that unless you find yourself in great light, or alternately position your subject so that the light works in your favor … you’re very likely to find that the available light just isn’t as flattering as it could be. Ultimately, this comes down to the point that using light – whether found (ambient) light, or light added by the photographer – is best as a conscious decision by the photographer.
Of course, for many genres of photography, (sport, news, theater, and so on), these choices are out of our control. We then just best deal with whatever the situation throws at us. So there are those times where we really don’t have any say in it. But when we do have control over the shooting scenario and our subject … then, how light is used, is best as a conscious choice by us as photographers.
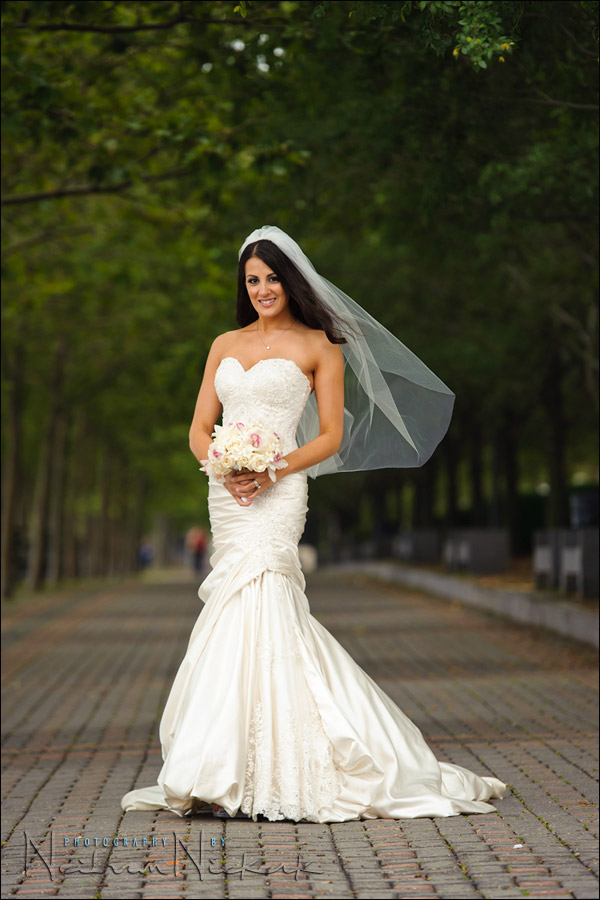
Back to the image at the top. This was taken during the romantic portrait session of the couple after their wedding. I have photographed in this area quite often, so I knew that this photograph would work. Especially so for someone with such natural elegance as Jen, our bride here. You may remember Jen from the rainy day photo-session with her fiance, Chris. The article was also used in my book on off-camera flash. Oh, and while we’re busy with these flashbacks, Jen and Chris were also the couple in the photograph used in the article on using on-camera bounce flash outdoors at night.
But I digress … back to the image at the top. The composition is supremely simple. Uncluttered. The receding lines lead your eye right into the middle, towards Jen. (For a final edit for an album, I’d still clone out the out-of-focus people in the background.) So the composition is straight-forward.
The way I had her pose, is also straight-forward, yet elegant. The one thing to note here, is how I had her pop her front knee towards the side. This creates a slimming effect on any one … versus popping the rear knee forward, which visually creates a larger shape.
Now, where I positioned Jen, was quite specific. I had her stand right at the entrance of the row of trees, just past the first tree. This diagram might explain it better:
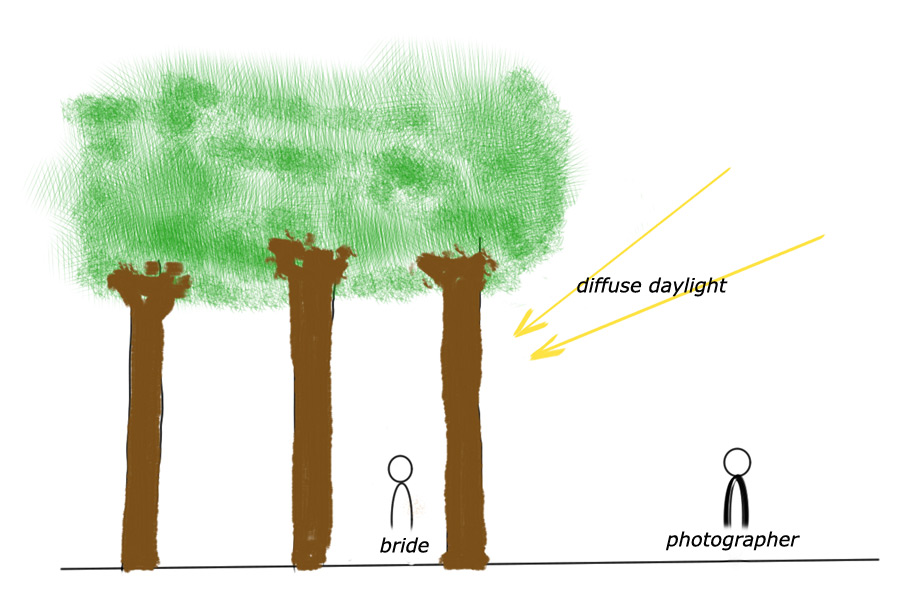
In positioning her here, the light is now coming from a specific direction, and very soft. The light isn’t coming from over-head like it would’ve if we’d worked elsewhere. By having her stand there, we are in a way mimicking the effect of a massive softbox in the studio, placed 45 degrees or so, above our subject. Immediately we reduce the chance of heavy shadows under the eyes. The light is now coming from a specific angle.
I could have, if there were backgrounds that would’ve complemented this, moved to the side, and had more of a directional effect to the light. Remember, if you change your position in relation to the light and your subject, the light changes completely! It is important that the connection is seen between the way that Ulorin Vex was lit by flash in that image, and how the light in this instance would’ve changed if I had changed my position. It’s all connected. It’s all about the direction of light.
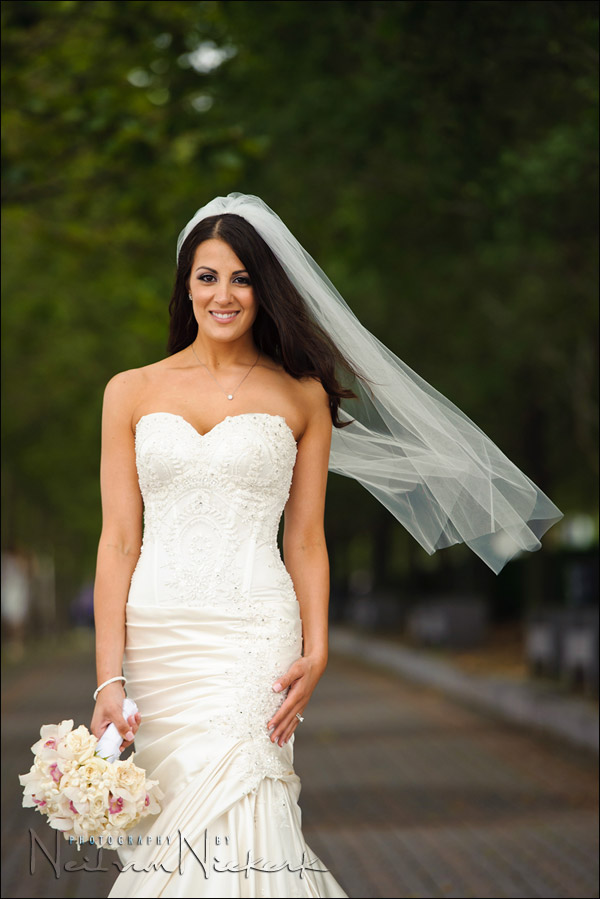
So, relating all this to the topic here – I used the available light. But it wasn’t just a random thing. It was specific, but it was also a quick decision. I knew that by positioning her there, I’d control the direction most of the light would come in from. The same idea would work by posing your subject within a doorway, for example.
Camera settings & photo gear (or equivalents) used during this photo session
- 1/250 @ f3.5 @ 400 ISO
- Nikon D3
- Nikon 70-200mm f2.8 AF-S VR II /equivalent Canon EF 70-200mm f/2.8L IS II

Direction & Quality of Light
I wanted to distill the essence of what we, as photographers, work with – light! Before we can truly grasp on-camera flash and off-camera flash, and really, any kind of photography, we have to be aware of the direction and quality of light. We need to observe the light that we have, and then decide how best to use it, or enhance it.
With this book, I try my best to share those “aha!” moments with you, and I do believe this book can make a difference to your photography.
The book is available on Amazon USA and Amazon UK, or can be ordered through Barnes & Nobles and other bookstores. The book is also available on the Apple iBook Store, as well as Amazon Kindle.
Related articles
- Direction of the light – using available light (model – Shawna)
- Off-camera flash – bringing sparkle on a rainy day (Jen & Chris)
- Tips on posing people / working with a model
- Photographic composition – look at your background!
- Direction of light & choice of background (model: Catherine)
- Jen & Chris – Wedding photography, The Venetian, NJ
Love the pictures as usual Neil but just wonder what type of metering was used here. You’ve often mentioned that, when using flash, you meter the background and set the camera according to what you want it to look like, and then use the flash (with compensation) for your subject. Did you use evaluative metering in this instance and render your subject (the model) as just part of the overall scene, or did you meter for background and then tweak it to correctly expose the dress? Would spot metering have been useful in this instance – for the dress?
Regards
Roy
I don’t like the term “available light”. I think that if you have lighting equipment available, “available light” includes it. When you are creating a photograph, you have to use whatever’s at your hand to get the desired result.
Neil,
Wanted to stop by and tell you that I see these pics in Google Reader, but didn’t see any pics in the couple of posts about the rss problem. Hope this means you fixed it.
Steve
Neil,
You have a good eye for composition.
MikMik,
I’m used to seeing “ambient light,” but “available light” is the same term in the industry, from what I can tell. Just another piece of jargon to remember. :-)
Are there any wedding pictures of yours where the bride is not pretty ? :).
John
Lovely portraits!
Was it an overcast day? Would this work if the sun were high up and bright?
Neil, was this session on an overcast day? I ask only because there are no harsh traces of light coming through the leaves in the background. So either you live near the rainforest with such a rich canopy or was there no direct sunlight onto the trees either?
Thanks Neil!
Yes, it was an overcast day. In fact, it had rained earlier on. You can see more photos on the blog post about the wedding day.
My approach would be similar if the sun had been shining over-head … but with the added proviso that I need to make sure that any dappled light doesn’t fall on her face.
Thanks Neil. Basically the area you’re putting her in becomes a giant softbox even if there is full sun above (with no dappled light), similar to window light correct?
Neil, as always the photos are beautiful. You are such a talent!!!
I always wonder if using exposure compensation and graduated filters in light room is a cheating? Many times it is hard to get the exposure right all over the photo, so I help it a little bit with a graduated filter combined with the exposure compensation. My RAW process is simple: correct white balance, add little color, contrast , add a graduated filter if needed, clone out some stuff and crop. I always find out that all those corrections make huge difference and my photos start to pop. But without them they would be flat!!! But,I wonder, am I cheating? Should not I get that right from the camera? I justify that by saying, that the most important part is the composition and rest can be helped with a little help of light room. Am I justified?
Bart,
You are not *cheating*, simply because the RAW file is by itself a flat, lifeless, useless file until it’s been ‘cheated’ on, the reason RAW is used is so it retains ALL the information in a file where jpeg throws out lots of information.
You cannot compare RAW to a jpeg in getting the best information possible. Just isn’t any. Like film days, comparing a Medium format neg to a 35mm neg for details, ain’t no comparison, especially the 6x7s I used to use, wow.
Remember, we are talking digital and I bet 95% of people in here have never seen a darkroom let alone worked in one, and since when we used film, people thought they were “brilliant” photographers, but, the darkroom/lab guys did all the magic in-house, not you [apart from composition and very near close exposure], film negatives retained all the information and had lots of latitude to work with, like a RAW and it was processed as such.
Processing film still required ‘white balance’ [enriching colours or taking out certain colours], density [exposure – highlights/shadows] and if in a darkroom manually doing dodging and burning with their hands or bits of black paper, lots of work, so being in Lightroom/ACR is very similar but with loads more features and oh soooo simple.
Like comparing the cars of today as opposed to 50 years ago, you would only use an old car for nostalga or its ‘classic’ style, but I bet you would miss power steering, ABS braking, air-cond, etc. etc.
Obviously these days digital RAWs have fantastic resolution/detail retaining qualities hence getting the best out of them.
I would love to be around in 30-40 years, but I won’t be, cannot imagine the techy stuff then, even in 5-10 years it will be awesome.
Cheating. Nope! As Neil says, “run with it!”
Trev
I the macro shot of the rings to be impressive (in the link to the external photoset of the wedding pictures). Was that the 105mm 2.8 VR or the 70-180 4.5-5.6 for that shot Neil?
I know you proclaim your fathers steady hands but that photo is particularly sharp, any tripod or monopod involved in the rings macro photo?
Stunning. Simple… stunning. And the diagram, even a blind man could understand it perfectly. Thank you.
That is quite the sharp image for handheld. I’ve never tried using my 105mm 2.8 hand held, always use tripod for detail shots. But your hands are likely far more steady than my own. Maybe at next weekends wedding I’ll try some handheld detail shots with it to test out just how good the VR is, but still take the tripod ones too.
Clients often don’t know what it is like to shoot something like this. We’re in the sunny side shooting into the shaded area. If one goes for a full set of formals (like I did two weeks ago), at the end of the session you’re done even if you wear effective sunblock.
Kudos to you Neil, these pictures are not easy to take.
Cheers!
Bogdan
You’re right – most people who try and assert the chauvinism of “available light” are usually masking the fact that they don’t know how to light, or how it works, in my experience. If anything, I like to take pride in the idea that people can’t tell that my shots are “lit” with a bounced flash – they look “natural” in terms of how people remember the scene, not understanding that the camera sees it differently and requires additional light. It’s the irony of shooting well with the strobe – it looks so natural that people have no idea that it actually required some thought to execute.
can u explain what u mean by having her pop her knee out
Hi Neil,
I was shooting a wedding at the weekend (in fact I shot two in two days!) but this one in particular my 2nd photographer and I were sat about waiting for the couple to come back from a river cruise (it was a small boat so I couldn’t get on it) and the time of day was getting on to early evening (about 7pm) and the light was magical.
The question I would like to ask (assuming you still get notification of an old post being commented on) is do you explain to your couples about the quality of light late in the day, and then schedule part of the wedding shoot to include that time of day? Or are you like me and don’t want to infringe on their enjoyment and socialising too much?
Best wishes,
Gary