Wedding photography lighting – Shooting in partial sunlight & shade
I strongly believe that when you have the ability to control a photo session, that you pick your battles. You don’t have to try and make everything work. Set up portrait shots in light that favors you. Of course, off-camera flash really helps you in being able to pick where you want that light that favors you.
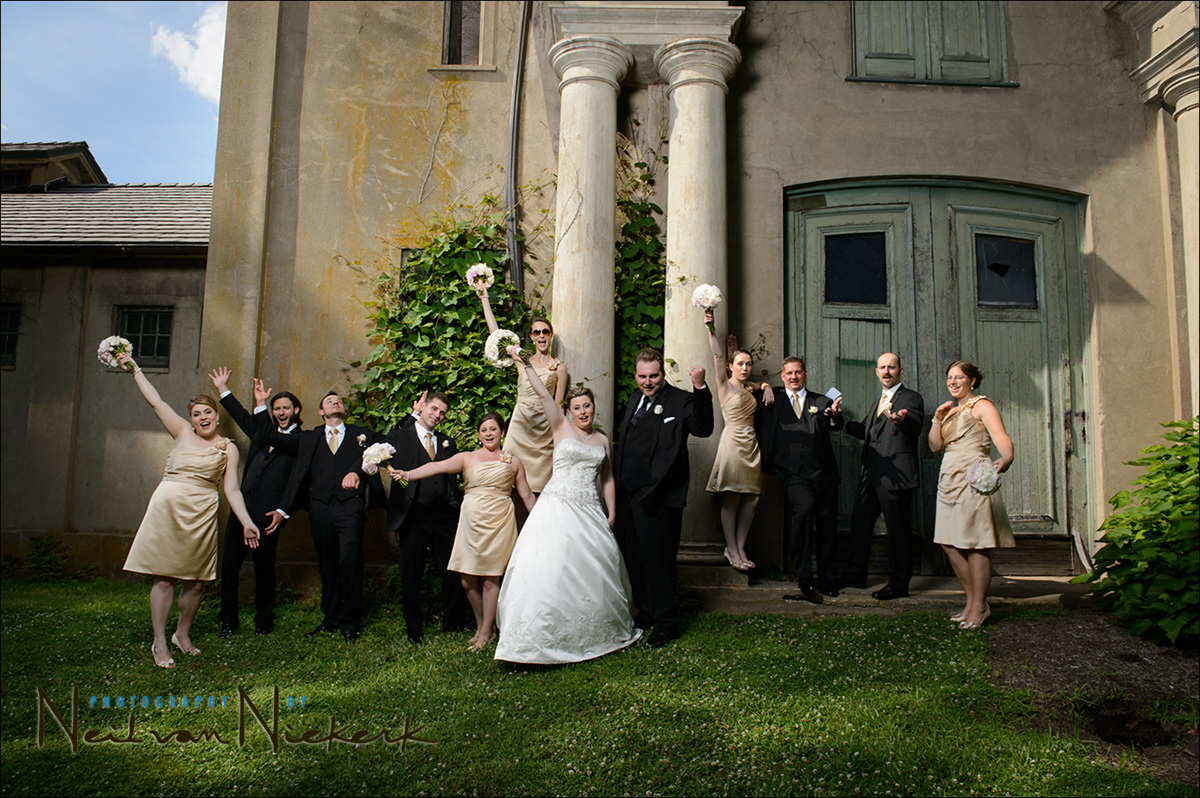
Solid advice that I adhere to, is to not have a person or a group of people half in the sun, half in shade. It’s a recipe for disaster, or a tough battle to fight, lighting wise. But then, slightly amneding Sean Connery’s immortal words in The Untouchables, “Don’t bring a knife to a gun-fight.” When you have enough light to match the sun, then it is possible to pull something out of that challenging situation!
I like using speedlights for additional light, but I also have my Profoto AcuteB2 600R Power Pack (affiliate), in the trunk of my car … just in case I need something more than a knife. But really, if the Profoto B1 flash (review article), had been available for Nikon at the time, it would’ve been the Profoto B1 that I would’ve pulled out for 500 Ws of easily portable light!
I really liked this building as a backdrop, but at this time of the day, half the facade was in sun, and half in shade. And this is where having a really powerful flash on location, is very very handy. I can dump sunlight levels of light (through a softbox!) to match the sunlit areas, and match the exposure levels.
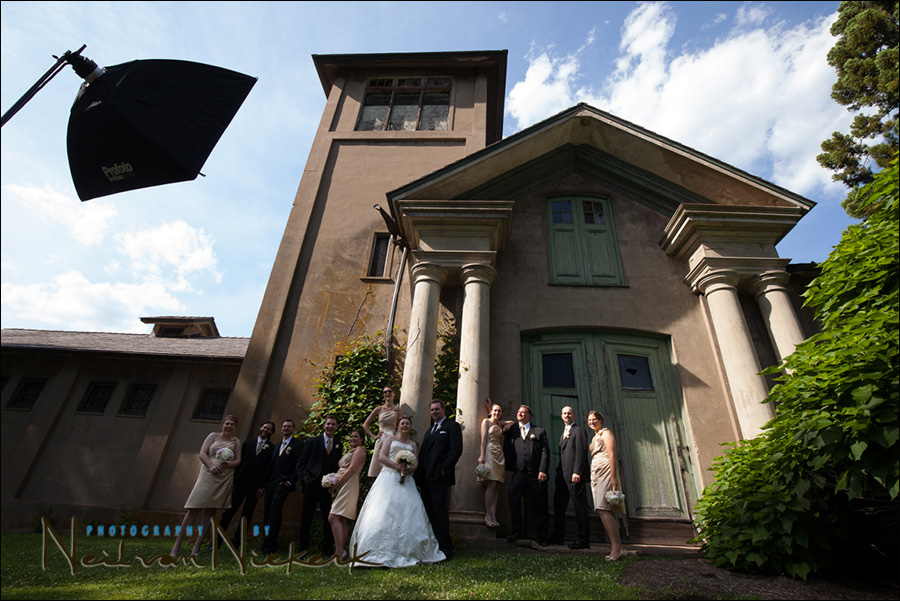
The pull-back shot shows how the light was positioned. The softbox is a fairly unwieldy (for location), Profoto 3′ x 4′ RFi Softbox (affiliate). I use it with just the outer baffle in situations like this where I need to dump a lot of light, but still want it to look soft. (The dappled light in the foreground is from the sunlight filtering through the trees.)
In the final image (at the top), the light on the left-hand side does look different than the hard sunlight on the right-hand side. With more time (and an infinitely patient bridal party), it would be possible to match the quality in light more exactly, but I am happy with this compromise – it looks great!

Direction & Quality of Light
I wanted to distill the essence of what we, as photographers, work with – light! Before we can truly grasp on-camera flash and off-camera flash, and really, any kind of photography, we have to be aware of the direction and quality of light. We need to observe the light that we have, and then decide how best to use it, or enhance it.
With this book, I try my best to share those “aha!” moments with you, and I do believe this book can make a difference to your photography.
The book is available on Amazon USA and Amazon UK, or can be ordered through Barnes & Nobles and other bookstores. The book is also available on the Apple iBook Store, as well as Amazon Kindle.
Photo gear & equivalents used (& what I should’ve been using)
- Nikon D4
- Nikon 24-70mm f2.8G AF-S / Canon 24-70mm f/2.8L II
- Profoto Acute B2 600 Ws power pack
or alternately, the Profoto B1 portable flash - Profoto RFi 3’x4′ softbox
Related articles
- review: Profoto B1 flash
- Camera & flash settings: what do you want to achieve? (model: Ulorin Vex)
- Controlling bright daylight w/ direct off-camera flash (model: Molly K)
- Shooting wedding photos in the mid-day sun (Clarence & Aluanda)
- Wedding photography – big bounce flash
- Photo session – Modern Gypsies – golden birds
- Comparing output: studio lights vs. speedlites / speedlights
- Overpowering the sun with flash (models: Sarah & Mark)
A little bit of homework
My camera settings were: 1/250 @ f/8 @ 100 ISO
If you regularly visit the Tangents blog, then you know the recipe off by heart by now – how did I get to these settings? And what was my Profoto flash set to?
Neil, Great post, thanks! It seems like it would take some planning to set this shot up in terms of assembling that large softbox. Were you anticipating this exact scenario in this exact location? Did you have the Profoto kit pre-assembled for an unanticipated scenario such as this (meaning, half the group in sunlight)?
This was the 3rd or 4th setup we shot with the bridal party, so we just carried the 4×3 softbox with us. It isn’t heavy. It is also fairly quick to set up, and the Profoto speeding is superbly fast to attach.
Neil,
It is very difficult to discern between the flash and the sun and you know it is there because you shot it. Overall, the lighting effect is pretty much kick a@#.
Rudy
PS: When I clicked on the picture, it opened up. Did you do this on purpose?
It is a larger version at 1200px width instead of the 900px shown on this page.
Neil, in addition to the on-location auxiliary lighting, I find the latitude I have in post-processing RAW files (I use ACR) also helps considerably in situations like this. The gradient and spot adjustment tools can be very effective at evening out the light when used properly.
Hi Neil, Profoto B1 500 Air for Nikon coming soon! Check Joe McNally’s blog, Profoto At The Opera. Great photo by the way!
Eric
great tutorial
Could you have acheived the same by ganging up 3 speedlights? I dont have the cash for the profoto, but do have 3 speedlights (plus a vivitar speedlight thats not ettl). So i was wondering if ina bind i could gang up what i have to achieve something similar??
I suppose it all depends on the intensity of the sunlight on the day…
settings are the sunny 16 rule, adjusted for max sync speed
Sunny 16 = 1/100 @ F16 @ ISO100
F16 would have made the flash work hard and the shutterspeed may have allowed too much ambient.
F8 works as its enough DOF. Going to F8 also allows the flash to not have to work hard enabling faster recycle.
Going to F8 would require going to 1/250 to maintain correct ambient exposure without going into HSS.
No need to change ISO
rgds
flash was set to manual and adjusted to according to taste!!
The Profoto was set to full manual output. It was through a 4×3 softbox in fairly bright sunlight. So it had to be full power. Then the distance was the only other factor that was controlled to get correct flash exposure.
Great work and instruction as always. Just curious if you have ANY insight when the Profoto B1 500 Air WILL become available FOR NIKON? It’s a real game changer as far as portability and ease of use. I’ll be one of the first in line :)
No idea yet, but I hope it is soon.
I love these locations & there partial sunlight shades which only using for wedding photography, thanks for sharing keep it continue.
You can use your Nikon right now with the Profoto B1 using the Profoto Air Remote. The only thing it will need to use it in full manual mode with no TTL. When the TTL-N remote comes out you will be able to use that. The two new features for the Profoto B1 is the TTL-N remote and the ability to use high speed sync.
Very nice image :) The B1 is a really game changer and I can’t wait for the Nikon remote. I expect they introduce it in the coming Photokina. I am just hoping that when they introduce the HSS it wouldn’t be only for Canon and hence we’ll have to wait another year.
Have been having a look at the B1 Air specifications:
https://www.wexphotovideo.com/profoto-b1-500-airttl-twin-head-location-kit-1553139/
May be I’m being a bit thick here (or have misunderstood the units it is measured in), but with a guide number of 45 (as quoted) shouldn’t this be less powerful than most regular speed lights?
Studio lights are usually mentioned by power in Watts/second, and speedlights via a Guide Number.
1.) Two things to keep in mind … sometimes the GN is given in meters, and sometimes in feet. So make sure you are comparing in equal units.
2.) Also, with speedlights, unless they list the angle to which the flash-head was zoomed, assume the maximum zoom length, because this inflates the actual GN.
A studio light generally has a wider cone of light that it spreads.
For example, as mentioned in this article on How to use the Guide Number of your flash,
the GN for the Canon 600EX-RT, is given as: GN 197′ (60 m) @ ISO100
the GN for the Nikon SB-910, is given as: Guide No. 111.5′ (34 m) at 35mm
In the case of the Nikon, the zoom angle is mentioned. With the Canon it is not. Since these two speedlights have similar power, we can only assume that the Canon was zoomed to max to get that value. So yes, make sure you compare equal values.
Now, back to your observation. The B1 info sheet says:
Guide number @ 2m / 100 ISO with Magnum Reflector: 45 2/10
And I have to admit that the values there don’t make sense to me at all, compared to the speedlights.
I will have to do some tests in the studio with multiple speedlights compared to a single D1 / B1 unit to see how they actually compare.
Neil – you have really very good blog where you provide lot of useful and good information (easy to understand).
I bought your “OnCamera Flash” book – which was a great kick-start reference for me.
Guide Numbers = GN; I can give a hint (for Canon speedlites) – which I realized when I made my first baby steps starting to use Canon speedlites.
The GN number is present in the model name itself (for Canon speedlites); the first two digits in the model name is the GN (units = m). Easy to remember!
Ex: (concentrate the first two digits of the model name)
1) Canon 600 EX / EX-RT – the GN is 60 meters.
2) Canon 430 EX II – the GN is 43 meters.
3) Canon 320 EX – the GN is 32 meters.
4) Canon 270 Ex – the GN is 27 meters.
and so on….
Hope this information helps.
if you go on to http://www.usa.canon.com –> only here you can find the GN info provided both in feet / meters.
Thank you! I didn’t know about that correlation before.
To me, the lack of a standardized method for displaying light output is a problem. It makes it difficult to compare the output from different types of flash (say speedlights vs studio heads or power pack systems). Wattage on studio heads is not a good one to go of since it varies from manufacturer to manufacturer, exactly how much of that power goes into light output.
Displaying the guide number on all types of flash would get round this to a degree, but very few manufacturers seem to do it for the larger “head” type flash units.
Hi,
How did you manage that the flash did not over-light the people that were already in the sun ?
Did you have to bring down the luminosity on these people with ACR or other ?
Great post as ever. Thank you!
I pulled down the exposure slightly on the right-hand side, using the Local Correction brush.
I asked the Profoto people about the Guide Number and power, and here’s the reply: