Directional light from your on-camera bounce flash
Most often when photographers start using their flashguns out of the directly-forward position, they move the flash head to point 45’ or 90’ upward. The idea here is to bounce flash off the ceiling. Even though this is an improvement in most cases over using the flashgun pointing directly forward, this is also most often not ideal. We can improve on this.
If we consider how studio lights are set up, we’ll rarely see a light source directly overhead of our subject. Top lighting just isn’t as flattering as light coming in from an angle to the subject. And in the same way, why would we want to bounce flash directly overhead of our subjects?
The subtitle of this post should be: You don’t really need that Lightsphere .
(Or whatever is the flavor of light modifier for this particular month.)
We need to consider the direction of our light carefully. This is one of the areas in which we can really set ourselves apart as photographers – by carefully choosing the direction our light falls onto our subject, we can control the mood of the photograph completely.
We have to think of the actual area that we’re bouncing light off, as our light source – and not of the flashgun as our light source.

On-Camera Flash Photography – revised edition
This book is explains a cohesive and thorough approach to getting the best from your on-camera speedlight.
Particular care was taken to present it all with a logical flow that will help any photographer attain a better understanding of flash photography.
You can either purchase a copy via Amazon USA and Amazon UK, or can be ordered through Barnes & Nobles and other bookstores. The book is also available on the Apple iBook Store, as well as Amazon Kindle. Also check out the Amazon Kindle store.
Learn more about how the cover image was shot.
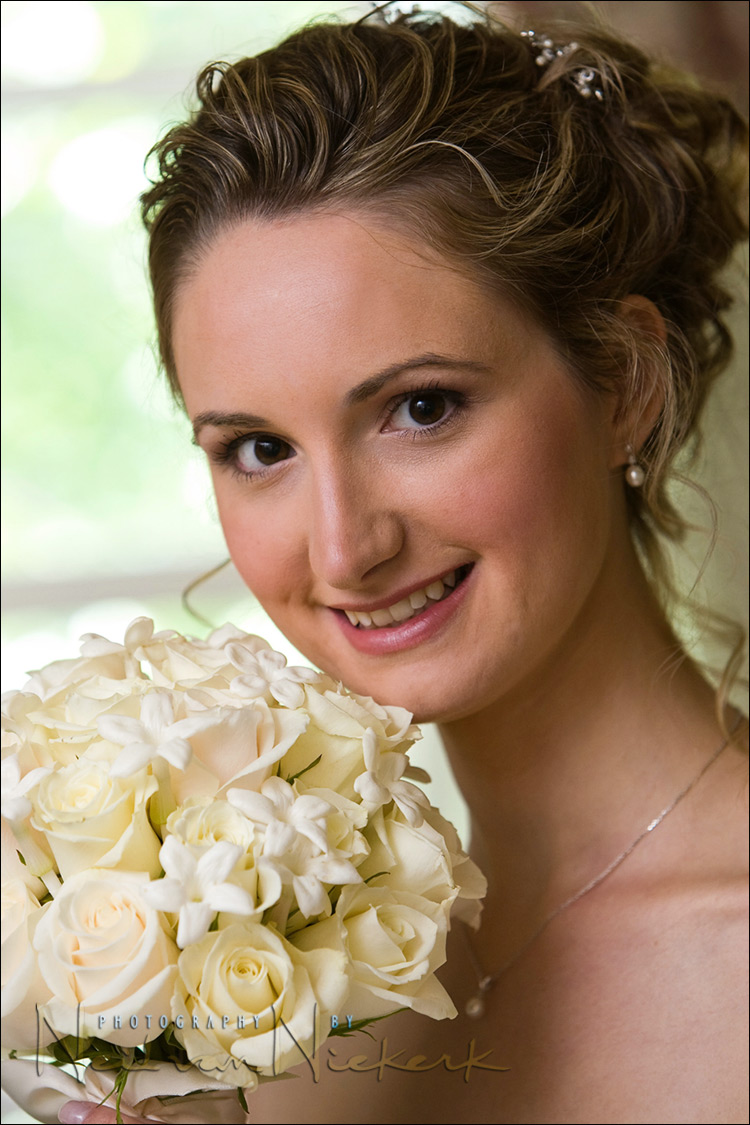
Looking at this, we can see that the direction of light came from slightly behind the subject to the camera’s left. The light falling on the bride was from a single on-camera speedlight.
A very important point here is that there is there is no light coming from ‘camera’s viewpoint’. In other words, from our viewpoint (which is the camera’s viewpoint), there is no light coming from directly forward. Therefore, instead of a flat even light, we have directional light. Light is coming in from the side, and creating that interplay between light and shade that creates shape and gives dimension to our subjects. The exact way that flash was bounced here, was by pointing the flashhead 45’ swiveled to the camera’s left, and tilted about 30’ up.
To stop any direct flash falling onto the bride, I blocked the strobe with my left hand. This way I shielded the light from her, and the light from the flashgun fell onto the wall to the camera’s left, and slightly behind where she was sitting. So in effect, our light source is coming from above and slightly behind our bride. This way we’re mimicking the effect that a large softbox would’ve given us. It is crucial here that we see that the light was not bounced on the ceiling, or even behind us.
Another very important point here to remember is, if your subject can see any part of your flashhead, then you are indeed getting direct flash. Or at least a measure of direct flash. Most often this is not flattering. The entire reason why we are bouncing flash, is to create softer light. And direct light from your flashgun will most often not be flattering and negate the quality of light we’re trying to achieve.
Bouncing the light on the ceiling would’ve given darker eye-sockets and that ‘raccoon eyes’ effect. Bouncing light behind us, would’ve given us much softer light from our flashgun than direct flash would’ve given us – but this would’ve produced light that is too flat.
Any off-the-shelf light modifier would’ve thrown too much forward, spilling directly on the bride’s face. That direct light would’ve been unflattering.
No flash modifier was used, aside from my hand blocking light. That introduces a color cast, so since then, I’ve started using the black foamie thing as my choice of on-camera light modifier to get this quality of light.
On-camera flash modifier – the black foamie thing

The BFT is held in position by two hair bands (Amazon), and the BFT is usually placed on the under-side of the flash-head.
The linked articles will give clearer instruction, especially the video clip on using the black foamie thing.
Camera settings & photo gear (or equivalents) used
- 1/100 @ f/3.5 @ 500 ISO; TTL bounce flash (1st image)
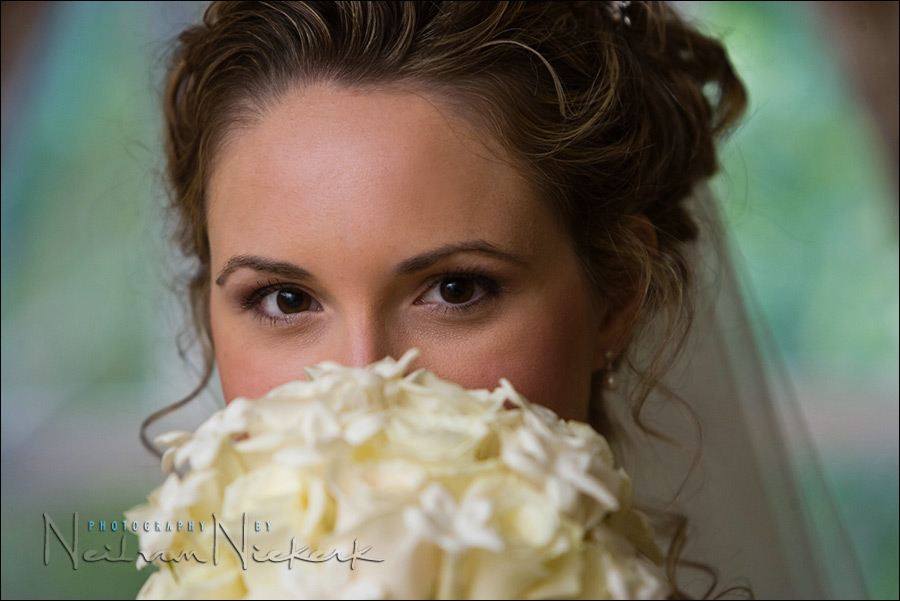
- 1/250 @ f/3.5 @ 500 ISO; TTL bounce flash (2nd image)
- Canon 1D mk3
- Canon EF 70-200mm f/2.8L IS II /equivalent Nikon 70-200mm f2.8 AF-S VR II
- Canon 580EX Speedlite /equivalent Nikon SB-900 Speedlight
Another great post. Reading your how-to on the correct use of on-camera flash has transformed my indoor photography and, what’s more, saved me having to add to Gary Fong’s already-considerable fortune. Top stuff!
Hi, my name is Lisa and I’m a reformed Lightsphere user. I’ve just started delving into lighting so I have a question…how would you achieve this look if the wall was painted? Wouldn’t it leave a color cast on the subject (depending on the color of the paint). Would you just bounce off the ceiling in that situation?
Great post! Thanks for the information. I just baught my first flash unit (Nikon sb-600) and was really struggling when I was asked to take a few pictures at a friend’s event.
I am also interested in the answer to Lisa’s question. What happens when the walls are colored (often dark colors in wedding halls)? What do you do when the room is big and the ceiling is high?
Thank you so very much for sharing your wealth of knowledge and expertise with me and all the other photographic enthusiasts who visit your site. Out of all the millions of sites/blogs out there …yours is totally up there above all others …my absolute favourite! (Australian spelling). The way you have set out your pages into categories and the way you explain things (without using all the technical hoohah moohah) makes it easy for me to understand and digest. I live in the hills behind Cairns in far northern eastern Australia and here I am learning more about what I love doing from I guy on the other side of the planet via his website. I always look forward to your new entries. Thanks again.
Lol, thanks Neil! I JUST shot RAW for the first time, so I guess I’m prepared to go forth and bounce off colored walls!
I’ve been photographing flash-less, and decided to start shooting with flash. Unfortunately, I’ve invested in one of Gary Fong’s whaletails. I’m still practicing flash photography with and without the diffuser, but found your tutorial to be amazing.
At a recent photoshoot, outdoors, I was trying to illuminate properly with fill flash(no diffuser, was being shipped), with the setting sun as backlight. Was a pain. :) I had completely forgotten to expose for the sky.
Love your before/after, with/without photographs. Very easy to absorb and see what you are talking about.
Credit for finding this site, I came via the Strobist blog, https://strobist.blogspot.com
Wing.
Great website… I just discovered by DWF and I already love it.
I really appreciate your last example with the before/after as Wing sais. Is the kind of picture I’m always looking for… to be able to let the background almost intact and add some flash light well controlled in order to get a well balanced image.
If you are shooting Manual, how do you control the power level of your flashgun? I have a nikon D2H and a SB-600. Looking forward to get the boss SB-800 :P I would really like to get some details about the last picture… maybe I have not found a post which explain this :S (sorry if is that the case… as I said I just know about your website)…
…Thanks Neil!
Neil, just wanted to say thank you for this great site. Been using flash for around six months now, having decided after years of avoidance to learn how to use artificial lighting, and I’ve really struggled with ‘raccoon eyes’ and sometimes hard shadows on faces. I knew what I was trying to do, but until I found this site couldn’t quite work out how to get there. Thanks again. Do you ever do UK workshops or CD tutorials?
Hi Neil..first of all, just like others i’d like to say a big thank you for your website. After searching for other a-like websites to properly understand a good technique of flash photography, yours has to be on top! I have a quick question and am not sure if I have missed it whilst reading through your pages. With your bounce card, I have noticed that yours is black. Are there any advantages of using black over white? Thanks!
PS: Let me know if you ever stop by Australia! :)
I stumbled upon your site yesterday and I have to echo the laudatory comments of previous posters. You are the man! I’m just getting into flash and I’ve already learned so much from your excellent tutorials which are comprehensible and encouraging. Simply brilliant. You are clearly a gifted teacher and if you come to the UK, I’ll be there!
WOW, your blog is just amazing. Love it. Love it. Love it!
So much easier to understand than some of the popular other blogs. More pics and easy to understand.
Good on you for sharing your knowledge!
Please let me know if you are planning anything for Australia.
Cheers
Dedrei
Cairns, Aus
Hi Neil,
I must echo what so many others have said before me: A great thanks for giving this easy to understand tutorial of how to use on-camera flash. After spending some days on the strobist blog, I thought I would need to invest in off-camera lights for great shots. Your site has convinced me that I can learn so much more with on-camera falsh still. Thanks for your time.
One question on this post. You bounce the flash up to the behind left of the bride, shielding with your hand so there should be direct light falling on the bride. However, I notive very nice catchlights in her eyes. How did you achieve these catchlights if there is no direct light reching the subject?
Cheers,
Jakob
Uganda
Just wanted to THANK YOU for this blog – it has taught me more than any other resource on lighting. I love my speedlight now that you have shown me how to use it properly.
What were your settings for these shots?? I’m assuming that your ISO must have been pretty high, and the aperture somewhat wide open…was the SHutter speed close to your Flash Synch speed since the background was so bright?? Just wondering if you metered for the bride?? or out the window?? If you metered for the bride in the low light situation, wouldn’t your background be blown out? Yet it remains so beautifully intact…thanks in advance. I’m learning so much from reading and re-reading all the info that you post.
hi..
first off all i’d like to say a big thank you for your website.great!
i have a problem with the direction of the speedlight..my head mixed:) can you draw the direction of light that come from the bridge? i still can’t solve it:)thanks..
Hi Neil,
Amazing site – great work, my flash work is coming on leaps & bounds.
However, I don’t use a tripod for a lot of my photography and find that shielding the flash with my hand compromises the steadiness of the camera – any suggestions to overcome this?
Hi there Neil,
Once again, thanks so much for this very informative and helpful site. Please keep it up.
Today, I was so inspired to get my flash out and try out a couple of on camera bounce flash test shots. Man oh man, I even tried out your 45 degree angle to the left of my subject and then 30 degrees up and I can only say… amazing. It worked so well.
My subject was inside and in front of a relatively bright window but with overcast weather outside. My test shot for metering purposes without the flash firing was just as yours was, with my subject all dark. I then tried out various apertures and finally came up with f 5 as the best one of the lot. My ISO was set to 400 and I was up to the maximum sync speed of my camera and Sigma EF-530 DG ST flash. I have a Canon EOS 350 D. My lense was the EF 50mm 1:1.8 II. In the end the light coming in from the window was a bit blown out, but I don’t mind that because my subject came out really well. I actually uploaded it to your flash photography techniques on flickr.
Thanks so much for all your help.
Hello Neil,
I have been devouring the information on this site for the past few days as I just got my first speedlight and want to understand the result that I’m trying to achieve before even practicing with it. Thank you so much for the invaluable information.
I am trying to picture where to place my hand to block the shot? Did you do this instead of using the foam 1/2 snoot? If so, why?
Thanks!
Sarai
This site simply rocks! Tell your friends about it……
WOW, Brilliant trick. Thanks for posting!
I’ve been bouncing the flash off the walls but I was NOT blocking the direct light by hand.
You saved me from lot of hassle as I was going to build another (4th) home-made diffuser but now I will not :)
Hi Neil,
I echo everyone else’s sentiments on the amazing information you provided.
Did you ever consider making a DVD tutorial… putting all your blog info into one comprehensive DVD? I would be first to purchase it.
Thanks again for your outstanding information. It has transformed the way I think and go about my indoor photography.
Thanks Neil ! I enjoy reading your tutorials. They have helped me..plan to direct some photography students that I have worked with spring semster to your site.
Would that be ok? It may add to your
question load. Thanks again,David Baus
Hi Neil,
I have just ordered your book which I hope will enlighten me further but I wanted to ask how you would cope shooting a couple in a wood panelled room where there isn’t really anywhere to bounce the flash? One particular shot was on the stairs, surrounded by dark wood and an open doorway behind me into yet another dark room, so nowhere to bounce the flash.
I have several weddings in a venue like this and am struggling to get the results I’d like.
Really hope you can help, I love your blog, it’s brilliant!
Helen
Great articles I recently bought two sb systems from Nikon one sb 600 and one sb 800 would love to buy to 900 but can’t afford it right now. Articles are great , now i just need to practice practice with shoot in all modes manual , ttl ttlbl and cls
Hi Neil. Just purchased your book and I have also read several articles on your website. Thanks for sharing!
I have a question that I see someone else asked earlier. I don’t understand how it can be correct that the light is offset 45degrees to the left (thrown behind the bride) and how you get the beautiful catchlight in her eyes as if the light was thrown behind your own shoulder? It seems like there is a softbox-like source of light in front of her?
Terje
I like the hand idea… i always tries to stick some small “shield” to protect direct light. Its slow and it looks strange too. :) Use a hand… how simple. Thanks for sharing!
One question: my SB-800 has quite limitation to tilt position… it starts at 45 degres which is very often to much. Any idea how to keep it at your 30 or less?
Hi Neil,
I’ve only just found this and am ‘baie gelukkig’ to find a fellow African with such a brilliant blog. Thank you so much for sharing so clearly, your wealth of experience & know-how. Till now my ref has been strobist and am thrilled to have found this. Just wondered if your ambient is as low as e.g shows with no flash, didn’t you need at least a reflector to fill the opposite side of the flash – here, the right side?
Suzanne,
Zimbo living in Mauritius
Hi there Suzanne … not a bad place to have landed up in!
About the fill light .. you don’t need to add fill light via a reflector. With the light from the flash bouncing around the room, there will be enough fill light on the shaded side. You can’t control how much fill light there will be, but there will be fill light.
Hi there, Neil
I’ve read so many contradicting opinions on all lighting questions that I just didn’t know which to believe! However, having read many of your articles you have impressed me with your knowledge and creativity that you’ve become my only point of reference. Your images are stunning and your site is so well written that I rarely go anywhere else for inspiration.
I’ve a few questions for you, if you don’t mind. I appreciate that you may have answered these elsewhere but there’s so much to take it I most likely missed them somewhere along the line. Any help you can give would be most appreciated. I also appreciate that these questions may seem a little basic!
1. You often say that you simply bounce your flash behind you (in general terms), and I get the impression that you do this regardless of what is behind you. Is this the case? If so, what if there is no wall or other surface sufficiently close for the flash to bounce back effectively? What would you do? I admit that my physics knowledge is somewhat lacking, but if a surface is so far away, does the flash light not die by the time it gets there and back onto the subject? Or, am I to assume that your flash is capable of such distances? (I use a Canon 580ex II).
2. When bouncing behind you – and I think this may apply for portrait orientation more than landscape – do you not get in the way of the light when it bounces back?
3. How do you know how much +ve FEC to dial-in? (I am assuming that, mostly, you need to dial-in such because you are bouncing).
4. Correct me if I am wrong, but your methods seem to eliminate the need for flash brackets (particularly for portrait orientation). Would you agree? If so, are there any circumstances whatsoever when you would use a flash bracket?
5. I assume (I don’t know why!) that bounce is not appropriate for ultra low-light dragging the shutter work? Instead direct flash is better? If so, where would you point the flash, would you use any accessories (stofen etc) and what -ve FEC would you dial-in?
Thank you in advance for your answers – keep up the excellent work.
Hi there Stacey … I replied to your questions with a new blog post – bouncing flash behind you.
Just discovered your site. Im enjoying it very much. However, when you stated you covered the flash with your hand, did you cover just the end of flash or whole body of flash? My hand is quite small and there are times when I need to do this.
No need to respond. Saw your video on that BFT. Great thanks
Thanks very much Neil.
Neil,
first of all, Merry Christmas !
My question is – Do you have specific way of turning flash head ? I mean – You tilt about 45 ` up, but the flashgun is set to forward or backward in relation to subject ?
You are going to have to work through the various linked tutorials and figure this out. All the info is there.
Done.
So the question is not where to put my flash, but where do I want my light come from. Thank you Neil.
By the way, where is the search button ?
Top right-hand side of this blog.
I greatly admire your teachings. Thank you very much!!! I have a question on directional light from your book “Direction and quality of light” (An EXCELLENT BOOK and I’ve ordered the other 2 books): On loc 755 of 2319 (the kindle copy) there is a superb photo of Noreen, with the explanation of light bounced off a wall to camera left. Her pupils are large, consistent with low ambient light and the light on her pupil is small and rectangular shaped, on the upper, outer part of her pupil. How does that occur with bounced light off a wall, or was it a small portion of wall, above and to her right? I would have presumed the source was a light box.
The setup is as described in the book, and this blog post: Short lighting with bounce flash. The size of the catch-light there is really a nice side-effect of bouncing on-camera flash this way.