on-camera flash modifier – the black foamie thing
Also make sure you check out this video clip where I demonstrate how I use the black foamie thing to flag the light from my on-camera flash.
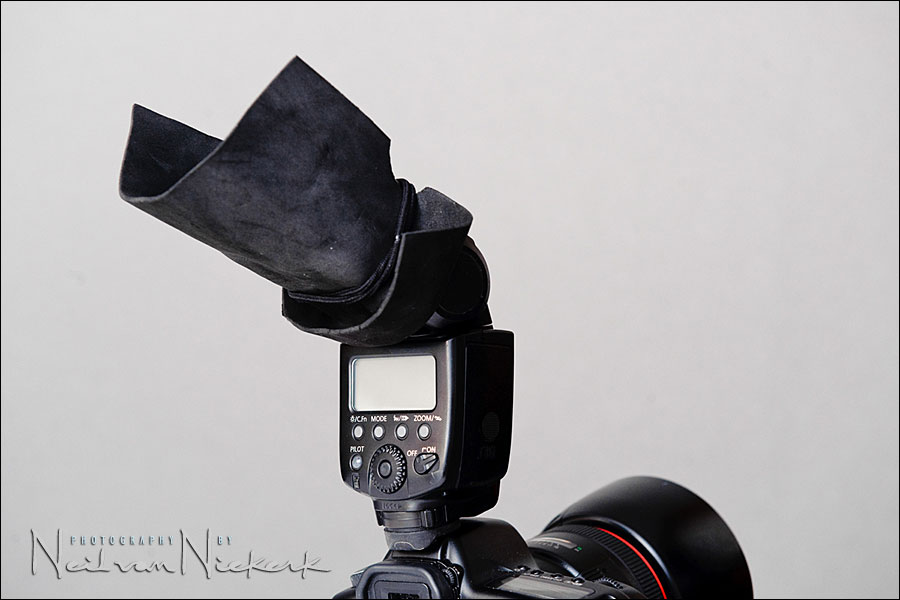
In essence, the (in)famous Black Foamie Thing is just a simple little device that I use to shield my speedlight’s output from directly hitting my subject when I bounce my flash forward. It has another benefit in that since I usually fasten to the ‘underside’ of the flash-head, it blocks light from hitting people in the face that are standing behind me or next to me. It really does help with being more unobtrusive with flash.
Soft, directional light from my flash – this is the main reason why I use this piece of black foam on my speedlight when I use flash indoors. The moment I start bouncing my flash ‘towards’ my subject, instead of over my shoulder, away from my subject … then I stand the chance of there being too much direct flash on my subject. This usually results in hard shadows and specular reflections on skin. The light from direct on-camera flash rarely looks good.
What I am trying to achieve in bouncing my flash when shooting indoors, is directional light that is also soft.
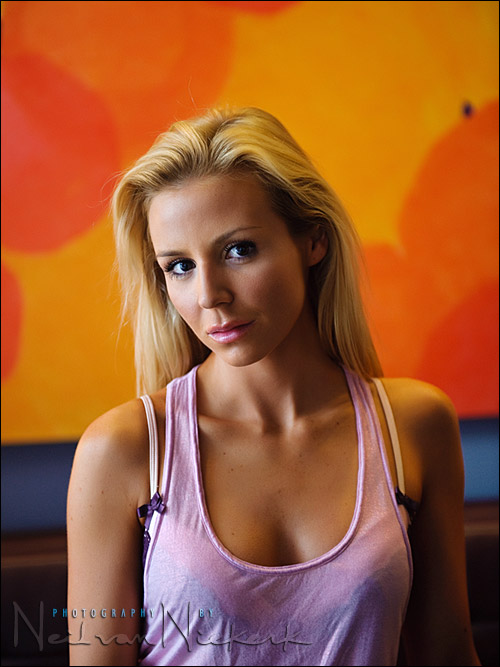
This example of a model that I photographed during a workshop, shows the kind of light I get from my on-camera flash – it is directional because I’m not bouncing the flash directly behind me, and I’m also not bouncing the flash off the ceiling above me. Bouncing flash off to the side, and even slightly ‘towards’ your subject can give you strikingly dramatic light from just an on-camera speedlight. Here’s an example from a recent workshop.
To my eye this looks surprisingly good for merely one on-camera speedlight (and allowing some of the ambient light to come into play.) What we’re mimicking here is ‘short lighting’ as it is usually achieved in a studio. Also read this follow-up article on why I chose a piece of black foam over something that is white.
Then there is an additional side benefit to using this piece of black foam to shield my light:
– blocking flash light from directly hitting other people in the eyes
This becomes important too. In bouncing flash behind you, or off to the side, you are wasting a huge amount of light from your flash. It really isn’t the most efficient use of your speedlight’s output .. but it does look pretty. With this, you are dumping a lot of light .. and this can be hugely annoying to guests and other people standing close to you.
Looking at how this BFT is mounted on the flash, you can see that the light from the flash is now directed upwards, and very little will be able to sear the retinas of people next to you.
Now, what I also wanted to show with this post, is that I manipulate this piece of black foam.
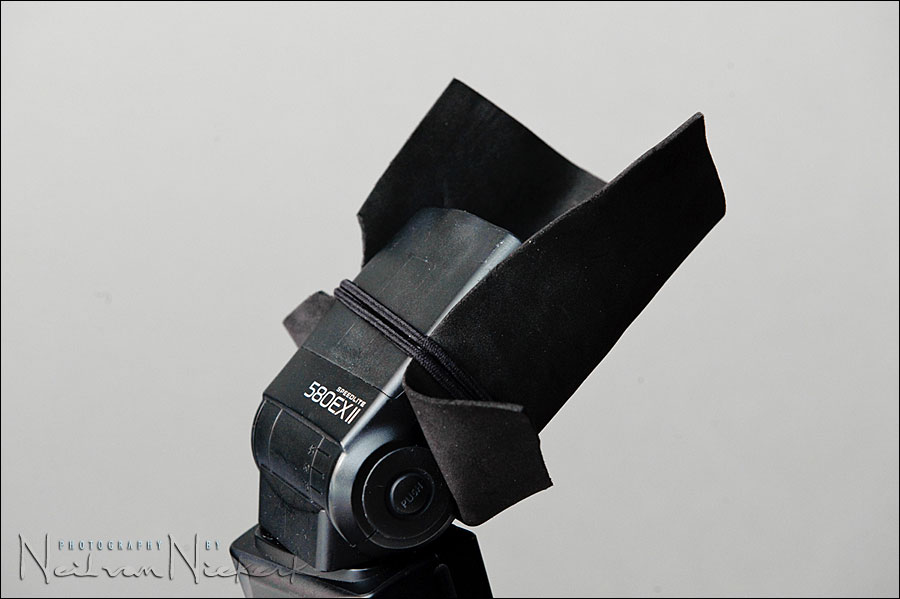
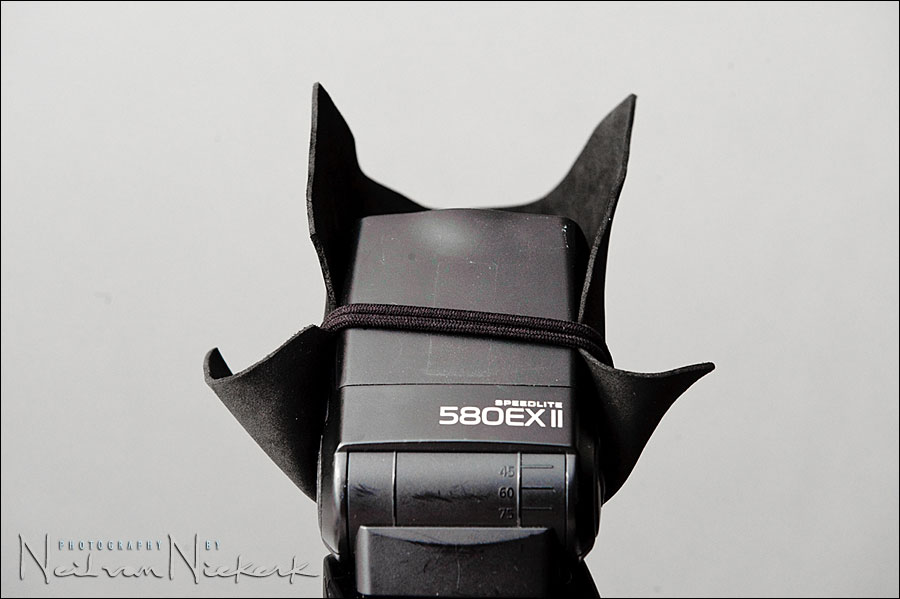
The original post on my favorite flash modifier, showed a neat piece of black foam .. and also longer than I usually have it when I actually shoot. In practice, I fold it, and shape it the way I want it to be .. juuuust enough to block the light in the way I want it to be. The piece of foam can be slid around the flash-head, and it can also be slid up and down the flash-head. I position this half-snoot / flag in whatever way I need to at any particular point .. depending on what I want to do with the light from my flash.
And finally, another benefit ..
– it is inexpensive and simple.
This little device is all about the best quality of light you can get from your on-camera speedlight. There is no expensive ver.2 that needs to be bought again next year. It is a cheap piece of black foam held into place by two hairbands. That’s it … oh, and the thought you need to put into HOW you use your flash. In the end all this is NOT about a specifically shaped device with an a fantastically designed strap; and manufactured to tight specifications and engineered perfectly … this revolves entirely around HOW you use the light from your speed light.
This on-camera flash modifier divorces the gear-head approach; (“this device on top of my flash will solve all my flash problems!”) .. from an artistic approach; (“what do I want to achieve with my light?”) At the very center of all this, this is about technique in lighting.
I’ve been using this “black flag” idea since reading your original post about it…quite a while back I’ve more recently made one with a velcro band attached to hold it on. Thanks for continuing to share your techniques!
Love using this now, took a little to get used to it but it is finally coming together for me.
Always love reading about this as well.
Neil
Would it be possible to do a plan sketch of the above shot of the model.It looks like the flash was pointing to your camera left,am I corrrect.Maybe I am a bit slow but a small diagram would really help me understand the lighting process you take to produce these fantastic portrait on-camera flash shots..Thanks Paul
Paul, here is a diagram of approximately how I bounced the flash.
As mentioned before, it is an inefficient way to use the speedlight, but the light that returns is sweet indeed .. and directional. As you can see from the diagram, I use the piece of foam to flag the light so that no light from the camera’s point of view falls directly on the model.
Hi Neil,
Since reading your articles on the black foam half-snoot, I’ve been using a cine-foil version as I had no black foam to hand. It works great but allows more control in shaping and folds even smaller than a sheet of foam.
Hi, I have been using the “black foamie thing” too – I made it from a mouse pad and velcro – works perfect and it is the cheapest part of my equipment :)
Hello sir
I am a great fan of you and your techniques. just a query, what flash mode to use when using this black foam or any other flash modifier.
I use Nikon speedlite sb800 with D80 camera lens Af18-70mm ED
Hey Neil,
Great site, great images and great book.
And thanks, someone finally said it . . .
“…ring-flash – ugly light which somehow has become trendy again.”
_rob
Hi Neil,
I must admit I rarely use flash photography but when I do I use techniques that I have learned from you.
In this post you made the comment “In bouncing flash behind you, or off to the side, you are wasting a huge amount of light from your flash. It really isn’t the most efficient use of your speedlight’s output .. but it does look pretty.”
If this is the case why not make a black foamie thing with a white colored or reflective surface on the side that faces the flash in order to bounce just a little bit more light?
Hi Neil
In the interest of saving some time with trial and error, what dimension of your ‘foamie thing’ seems to work the best overall?
Thanks,
Bill
To those who use velcro: I too had velcro on mine until I went to the workshop and what I learned is that the velcro is a real limiter, and the hairbands are a key part of the system as well. These allow, as Neil points out in the original post, one to slide the 1/2-snoot around arbitrarily and easily depending on which way you are pointing. No more velcro and things are working that much better…(except my daughter is minus a couple of hairbands — for which I blame the cat).
Very interesting.
Now stop teasing us!!! :-)
And give us a tutorial post on a few techniques and examples.
By they way, I started scrolling down the post you suggested we should look at for an explanation as to why you use a BLACK foamie https://neilvn.com/tangents/my-choice-of-flash-modifiers/, and therein looked for Comment #37 but I note that when I began scrolling the comments are not numbered. So how do we find Comment #37 (short of counting each and every comment)?
Thanks in advance.
Regards
Neil –
Just started reading your book – love it. I am looking forward to a sequel called “Flash x2 – Make effective use of 2nd flash, or assistant…”
So, I happened to have black and white foam around, which resulted in immediate experimentation upon reading your posting. Ok, I now understand that black is used because…
1. Any “colored” foam will impart a color cast
2. White foam, even pretty thick stuff glows pretty bright when flaging a flash…
So, I am playing with a two layer version. White on the inside ( > flash efficiently ?) and black on the outside…
Thanks for sharing your knowledge and skill.
Erik
aka ErikCincinnati on flickr.
Yep….the “black foamie thing” is a great tool. I use it and love how simple and effective it is. I bought some cheap stretchable velcro and made a strap rather then the hair bands you use. Works like a charm.
Thanks for this update on a wonderful invention.
Neil,
Since I read your book, I’ve been using this black foam + hair band contraption. And this thing almost never leaves my flash. Recently though, I’ve learned that if I use smaller apertures like f5.6, my 430EXII is sometimes not powerful enough (even at higher ISOs) when I bounce my flash with the foam. So sometimes, I do have to remove the foam and just bounce the flash over my shoulder. Or when the flash is slightly pointed towards the subject, I try to block it with my hand.
My foam is longer and looks like how you did it in your book. The only problem I have is that I find it inconvenient to take the foam on and off my flash. Is there an easy way to do this? Do you just slide it down or fold it out? Or do you completely remove it when you don’t need it?
Chris R.
Neil
is yor 5802 flash set to any particular setting when shooting with the black foamy thing? Example what was your zoom setting and your compensation setting at the time of the shot? or was everything shot with the TLL setting.
Hi Neil,
I am a big fan of your website, techniques and now have even purchased a copy of your book. I must say that you have helped me understand a lot about lighting in general. The black foamy thing was kinda what started it all for me. I do not have the inclination to carry around a bunch of flashes, battery packs and modifiers and was looking for the best way to get soft lighting with an on camera flash. Your website was the first place that showed how to achieve this without going gear crazy.
Now for a technical question. One thing I have noticed while using the black foamy thing is that when using lenses that cannot go below f/4.0 aperture it does not matter how you direct the light one still gets the flat flash color when mixed in with the ambient light. The trick works well when using larger apertures since the ambient light mixes well with the bounced flash. I am going to assume that you would need to add a gel of some sort to mix the light better. Would that be your take? Thoughts?
Once again thanks for this very informative website and a great book to boot.
Regards,
Vijay
Hi Neil,
I searched for something that might be just right for the “black foamie thing” and finally got this: the back foam of any mouse pad fits perfect! :)
Maybe this can help the others…
I wish you a nice day ahead!
PS: great site! I am reading all your posts!!
take care,
Mihai.
Neil,
I love the way you use your flash. I’m also interested in your thoughts about your cameras. I shoot Nikon also and I’m wondering if you feel that the D700 is worth the extra money over the D300. The ability to shoot quality images in low light situations like weddings would be sweet. I’m just not sure the D700 is worth the extra money. Thanks
Howzit Neil (some South Africanism thrown in there)
Your idea about the foamie thing is great. I constructed my own version from material which I found in my house. To keep it unique I named it … wait for it … black-non-foamie-thingy-majingy !!!
From the few test shots on my irate kids I can already see a VAST difference in the quality of my images. Because of your site I don’t suffer from straight-flash-sindrome anymore and my shots are now so much more balanced.
My wife and kids are not too impressed with you though, I drive them nuts :-)
Keep up the good work.
Rean Kriel
Hi Neil- -I was abble to find the blackfoamie thing this weekend and I was wondering if you can tell me the size that you cut it to?
Thank you,
Joram
“a neat piece of black foam .. and also longer than I usually have it when I actually shoot. In practice, I fold it, and shape it the way I want it to be .. juuuust enough to block the light in the way I want it to be.”
What is the difference in result of photos between an unfold foam and fold foam?
Does a fold foam block lesser light and allow more light to reach the subject?
In other words, by folding the foam, does it make it a little more efficient in using your speedlite than a non folding version?
Hi Neil! I’ve been using a black foamie thing for over two months now and love it! Mine hangs off just about 4 or 5 inches. I am wondering if you have any simple examples of why you would adjust it longer or shorter? Since it’s not a full snoot, I can’t think of any reason I would have adjusted mine in the couple months I’ve been using it. Thanks much!
Thanks for the response, as always!
Hey Neil,
I get the black foam idea and the bounce concept – but why not simply use a short snoot – you then don’t have to spin it for verticals, and you have no spill at all for more efficiency. You can then have the inside of the snoot silvery like the HONL ones and not absorb any wasted flash at exit. Shooting a snoot beam can also be directed better, will have better range as it is a concentrated circle rather than a spread rectangle light shape, and over distance the smaller exit beam will spread to create a large reflected bounce back. In my understanding of your technique, it’s vital to get the flash reach your chosen bounce surface as efficiently as possible and a full snoot seems better for this.
I’ve not found an explanation on your site as to why you do not use a snoot over a half snoot?
Does anyone have a link to an online store where I could buy this “Black Foamie Thing” by sheets.
Viktor
Viktor,
click (or copy and paste) the link
https://www.inspire-create.com
Thanks Medina! I’ll check out that website!
Hi Neil!
Firstly, thankyou for your website – it’s amazing.
I was wondering, though… it seems that most of the indoor photography on your site deals with photos of one, maybe two people at a time – so a smallish depth of field works well. (largeish aperture + high ISO + indirect bounce flash)
Can I ask if you take group shots indoors, like table shots and the like, which may require a larger depth of field (@f8-ish) and maybe more of a direct flash technique?
Thanks again – really appreciate your insight into flash photog. :)
Just bought the black foamie thing from Michael’s. .99 cents for a square foot. Pliant and easily placed on and taken off the flash. I bought a white colored one, too, in case I ever need more light.
I’m a new arrival at the Tangents website, and have to say I really enjoy your content here so far. There is such a rush now to get your flash off camera and throw various umbrellas, softboxes, grids etc. on there… so this is a very refreshing reminder of the power and flexibility of on-camera flash.
Brilliant technique with amazing results!
I love the comment “no expensive version 2.0 coming next year”. Ha!
I have been using your backwards bounce technique now for a couple of months.
It truly has made a difference in my images. In sincerely thank you for the help.
Curtis Copeland
Hi, For those living in the UK, I have just bought the black foamy thing from Amazon. Just type in ‘Funky Foam Sheet A4 Black’ or A3 costing just 49p a sheet, postage is just under £3.00.
I haven’t tried this technique yet, but desperately trying to improve my use of on-camera flash.
Would be interested to know Neil of your view on the BetterBounceCard. as I have one of those two. Great in some situations, but because some of the fill light is directional there is still some harsh shadows, but this I believe can be avoided depending on the situation, like all techniques I guess.
Thank you for all the inspiration here.
Teazle
Teazle … thank you for the note about the supplies in the UK.
Re the BBC … my experience is similar to yours. Sometimes it is useful, but mostly I am better off bouncing flash in an indirect way, a la the Black Foamie Thing.
Hmmmm…maybe that Fong guy with his spew light everywhere devices should read this and study some good common sense.
Well Done!!
Hi Neil, I found your site today and have it very helpful so far. As an amateur and having just shot my first maternity shoot in a client’s home I wish I had bounced my flash more. A question please, when you are quickly jumping between portrait and landscape mode, do you change the direction of your on camera flash for each photo? Do you know exactly what you are expecting to get from each pose or do you look through your viewfinder and change from portrait to landscape as you see each shot? If so, do you have to make rapid changes to the direction of your flashgun to make sure you don’t get any shadows? Regards, Peter
Hi Neil. This is probably going way back, but would manually zooming my 580EX to it’s max setting achieve a tighter patch of light, when bouncing off, say, a church wall, and have a similar effect to using a black foamie?
Nigel Davis
Dubbo, Australia
Not really. The black foamie thing is used as a flag, not as a way to contain the spread of light.
bounce flash portrait
throw away the tupperware
directional light from your flash
using flash to mimic window light
In these cases the flash is partially pointed towards my subject … and the black foamie thing is necessary then to avoid direct light from the flash.
I do zoom my flash-head though, to get more efficient use from my flash.
Neil, how do you get catchlights in the eyes using this method?
Dave
Hey Neil. I was at a jQuery Developers conference in Boston this weekend, and I was taking a ton of photos while attending. I happen to be using just my SB-800 and the black foamie thingy, which is great for bouncing and flagging the light. A guy came up to me and asked me about it and asked if I had read your blog. I told him your blog was where I learned how to use the black foamie thing. ;-) Thanks again for all the advice. It’s meant so much.
Oh, and you can see the conference photos at
Luke
Luke,
That guy at the jQuery conference was me. :-)
Nice job with the photos of the speakers at the podium.
Bookmarked! Thank you!
Ringlights are great with a lot of post production retouching. And who cares about searing the retinas of people around you. I’m on the job for my client to produce the best images that I can. Not to worry about every guest and whether their comfort level is being compromised. Come on, this “politically correct” society just goes too far so many times.
Yesterday night, at a party, it was one moment I was embarrassed: my flash fired in the eyes of three persons. They said Wow…!, etc…, but at least they were taller then me, so not my “attitude” exploded in their eyes and brains.
To be well raised, sometimes has a connection with seeking better ways to do one thing. Any thing.
Neil et al
I have also used the BFT with great success. Recently I found a light modifier that fills all of the needs of us photographers and is commercially available from Exoimaging. It’s called a Rogue
and comes in several sizes…Uses a well fitting Velcro band. Check it out
rick
Hi Neil, I just discovered your “the black foamie thing” (which at first I rather saw as “the black bouncer thing”) – thanks for the idea. But, I still have to experiment to get to the point of fully understanding how it works – that obviously is not ment to bounce anything!? My initial attempts suffered from huge losses of light! Is it something to expect or I was doing something wrong – or I got it all wrong and was doing everything wrong? And, I usually do not go over ISO400 – and prefer to stay there! Is in your experiance that approach going to be in the way of using “the black thing”? And, also, while learning/thinking through your “the black foamie thing” thing I noticed that you do not even mention (or I could not find it on your site) the “technic” I often use – those white bounce cards and ceilings!? Can you please comment on it – many would probably like to here your opinion/reasoning… I also lately tend to use built in camera flashes (Nikon) as fill-in light (in commander mode, manually control output) while bouncing off camera flash (still on my flash bracket) in remote mode from ceilings or walls. To be honest I do not get results I would want – or often not so, and would appreciate if you could pass your experiences or opinions about that “technic” on us. Thanks. Nick
Hi Neil,
What a very generous person you are to share your techniques! I am humbled by your generosity. I have a friend who is a wedding photographer who uses a flash bracket. I see that you do not from the looks of the pics in your photo blogs. With the ‘BFT’ I am assuming that you can easily do away with using a flash bracket since you are flagging the light to avoid red-eye. Or do you recommend using a flash bracket with the ‘BFT’ technique? Also, since you are flagging the light from your subject, does this not eliminate the catch-lights in the eyes? Many thanks in advance for your kind response!
Marty
Hi Neil,
Can’t tell you how much i love this site!! If you send me your address i’ll send some goodies your way next time i’m baking! (i’ve been known to do this–not blowing smoke!) I was experimenting with this and shot a few frames of my son eating at our table w/a bunch of windows behind him in our kitchen bump out. I found the light to be much softer/natural by bouncing it above/left/on wall behind him BUT his eyes appeared pretty dull. When bounced in same spot w/out the BFT eyes were crisp and had catch lights BUT there was direct flash falling on his face. Care to weigh in on what i should do differently? Also, when you speak of dialing down flash am I correct in thinking you mean specifically also dialing down TTL-BL fill flash?
thanks!!!
Jennifer :)
Hi Neil,
I have read and endlessly re-read your superb book on on-camera flash, and will shortly be getting an opportunity to put all the new-found knowledge (and confidence) into action. My question is regarding my brand new SB900. When you are bouncing with the BFT have you experimented using the the 3 different illumination patterns (standard, centre-weighted, even)?. Do you think it would make any significant difference, or would you suggest I just stick to using the default standard pattern?
many thanks again for all your inspirational work.
Neil
Your posts on flash are SO HELPFUL. In college I was part of an awesome photojournalism program, but the downside was, we only spent like 2 class periods talking about flash. Obviously it’s another thing you just have to go out and learn and experiment with yourself, but extra tips would have been helpful. Your posts have been a great source of help for me, so thank you much!
Autumn
Neil, what if you don’t have anything to bounce off of, like say I am at the playground shooting my daughter, do I use directional light? and how do I make it look not so hard?
thanks,
Larry
Niel,thanks you for all the great resources you are sharing.
I bought your On Camera Flash Book recently and it is great.
Can someone in US tell me where I can buy (not online) this black foamie thing?
Any of the chains like Wall mart or Target have this ? I don’t really know what to ask for !
Thanks for the reply Niel.
After I posted the question ,I saw somewhere in the comments that it is available in art stores.
I could pick one from AC Moore (found that it is also available im Michaels ,for anyone interested) and I put it to use and wow ,it brings a lot of difference and the best part is that it can be achieved under $1.
Thanks once again Niel for all the information and book.I need to get the Off Camera flash book soon :)
hi- Do u miss having catchlights in the eyes since you cannot use the white bounce card?
Neil,
just wondering how much of the BFT extends out beyond the end of the flash head
when you shoot in decent size churches and large rooms. i shot a friends wedding yesterday at similar settings you would use, bouncing flash to my right and up off of the church walls during the processional. they were under exposed a bit as if the flash had little reach. could i have been cutting off power by having the BFT extending out too much? i read a reply by you on another post explaining this as a possible factor. the BFT was about 1.5″ – 2″ in front of my flash head. the church was fairly narrow.
Nikon D700
SB-900
24-70 f2.8
thanks!
Also, if shooting wide angle, that will make the flash spread a wider field thinking it needs to shoot wide, so manually zooming flash head in at full 200mm will help a little.
Remember, you are bouncing, so you already will get a wider return of flash and zooming in will concentrate the light tighter giving more power/range where it’s shooting to.
Trev
I like your policy of no single flash solution. I was wondering what you use at an evening party. Often the lighting will be dim compared to a wedding and more “snaps” than set up shots. I’ll try all your suggestions, but would a stofen with a cut out top be best for the majority of quick shots in a party room atmosphere?
So, I have an SB600 and it doesn’t tilt backwards, how would you use the black foamie thing in that case? Would there be anyway to make it work, or am I limited to a diffuser and bouncing it off the ceiling? Maybe use the black foamie thing tilted up and to the right or left a little?
Neil,
Thank you for your artistry, your perseverance with us amateurs, and your attitude to your customers.
I just saw your “thingy” article and it solved many problems of mine. But with one problem last week, I simply couldn’t find a solution. It was a friend’s party, out in the park, in the middle of the night with no surfaces to bounce my flash. In a moment of inspiration (or idiocy, whichever you prefer) I turn the flash 180 pointing towards my big, bald head and…it actually gave the photos a nice soft white balance. I looked kind of weird shooting a flash backwards, but it worked!
Thank you again.
I have read all your articles on BFT (and everything else!) thankyou very much.
I’m still struggling a bit to understand. Please let me know if the following summary is correct….
So the BFT is used on the subject-side of the flash head when it’s being bounced forward any degree to stop direct flash falling on the subject, and it’s used on the non-subject side when the flash head is tilted backwards, simply to stop blinding those behind you – and no other reason??
So you need to swing the BFT from one side of the flash head to the other depending on whether or not the flash is pointing forward or backward??
Hi Neil
As 90% of my “bounces” are above and behind or on a left or right wall I find the Black Foam Thing 1) eats up too much light 2) very fidly to move it about and takes too long. The customer get impatient.
I also dont shoot directly behind me I move the flash head Two notches behind from the vertical position. I’m therefore not blinding people.
I therefore don’t use it, but I set my Canon 580 and 430 flash to max manual zoom (105).
The only time I would need to use it is for adove and forward flash which is less then 10% of the time. I’ll have to work this one out as I havent had occasion to use it like that.
Mike .. the black foamie thing, in most cases will just be a bit of a lip to block the light from directly hitting your subject when you bounce your flash forward to some extent. So if the black foamie thing eats up too much light, then you need to make sure that the BFT isn’t extended too far. It really should just be an inch or two of a lip. It does sound like you’re changing orientation a lot.
Now about the idea that you’re not blinding people behind you when you bounce your flash, just confirm by standing behind someone who is holding your camera and flash and repeatedly firing it.
Hello! I have a personal blog where I write guides that are like 40% about teaching beginners about photograph, and 60% about teaching myself. (I have found that writing blogs about things helps in making myself better and understanding more). Anyway, the point is that I just now wrote an article about using flash guns in portraiture. I have become a big fan of your black foamie thing so I wrote about that in my article while crediting you for the concept as well as linking to your site. I hope this is ok! If not, please contact me and I will naturally remove it :)
Thanks for the great guides!
– Geir
Hi Neil!
First of all, your tutorials are awsome. I have a Canon 430 ex ii and I want that black thing, but as I am in Brazil the Amazon one would take too long to come. Do you know if that is E.V.A.? I’m worried about using E.V.A. because above 60ºC (about 140 Fahrenheit) it can melt and glue to the flash head. I’m not even sure if that temperature is achieved when using the flash . What do you think?
Thanks!
I don’t know what EVA is, so I can’t help you there. Maybe some other photographers from Brazil can help?
Finally got my BFT material:
http://www.amazon.com/gp/product/B005M2Q9MO/ref=oh_details_o01_s00_i01?ie=UTF8&psc=1
Can’t wait to try it out
Looks the same as the material listed on the BFT page.
Hello Neil,
First of all thank you for all your tutorials and advises! I wonder by the quality of all of your shots and experience, do you ever now take a bad shot? :) I guess that 99% of the time from all of your lighting knowledge you probably in short time take every shot just perfect and the way you wanted (no trial and error for you, only shoot and success! :) )
Regarding your BFT I only have a question, say you wanted to bounce your flash upwards to the ceiling, your flash unit would be completely vertical, would you still use the BFT, and in that case where? In front of your flash unit or in the back of it? Also in the same way let’s say you wanted to bounce your flash to a wall just behind you (with no one behind you also), would you still use the BFT in that case and also where? in front or at the back of your flash unit?
Thanks!
Love your posts, Neil! The use of a BFT should be mandatory at weddings to keep from distracting guests with light bursts right in their eyes.
Just wanted to say thanks… the BFT is absolute magic and produces an attractive natural light effect that’s far softer than any of my other expensive modifiers including a mid sized double diffused soft box!