Bounce flash photography & white balance settings
A question that often comes up, is whether the white balance will change when bouncing flash. The answer is an obvious one – yes, the light will pick up any color cast from a non-white surface. But that is why we need to shoot in RAW. Then the decision about exact White Balance becomes less crucial.
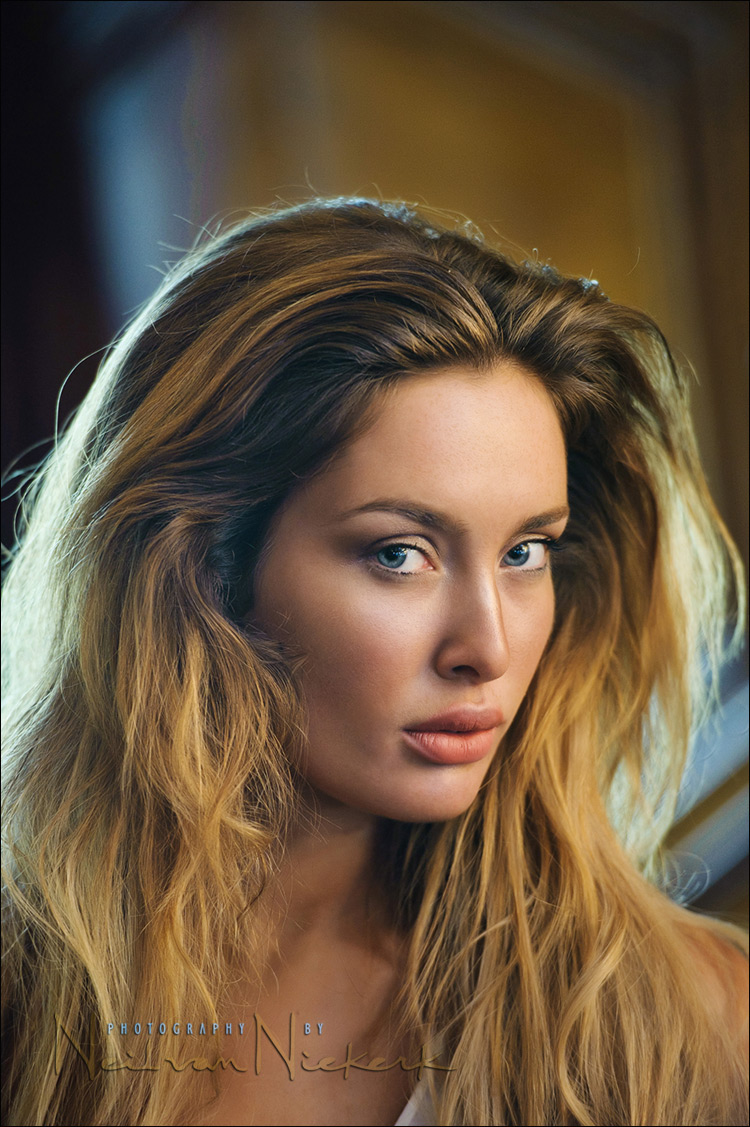
The photograph above, is of Roz, and was taken during the recent flash photography workshops in Dublin, Ireland. Roz was Ireland’s contestant in the 2010 Miss Universe contest, so it was quite a privilege to have her as one of our two workshop models!
The lighting in this image is simplicity itself: on-camera bounce flash, with the black foamie thing as a flag to block the light from the flash directly hitting her. Of course, the ambient light coming in through the window acts as a secondary light, helping with a bit of rim-light there and also in creating background lighting.
In getting the light from my on-camera flash to come in from a pleasing angle – short lighting – I had to bounce the flash off the wooden panelling in the room. This of course made for a far-too-warm white balance:

With this pull-back shot, you can see what the room looked like. For the photo at the top though, I bounced my flash off the wall to my right.
I knew the wooden panelling would make the color balance become very warm. So I guessed a 3700K white balance setting. It turned out to be fairly okay, but I still needed to fine-tune the White Balance as part of my normal RAW workflow for a pleasant color balance. The color of the background shifted as well, but this wasn’t of any concern to me.
As a comparison, here is what my out-of-camera WB (at 3700K) looked like, with what it would’ve looked like as Daylight WB (set on the RAW file via ACR / Bridge)

Therefore my advice about off-color surfaces and bounce flash, is to try and get the WB as close as you can since it does help in judging the image’s exposure from the camera’s preview. But ultimately, don’t sweat it – shoot in RAW, and concentrate on getting great lighting and also, keep the momentum and flow of the photo shoot going. Fussing over exact settings which can be finessed in post-processing, will only slow the photo session down.
Camera settings & photo gear (or equivalents) used
- 1/125 @ f3.5 @ 800 ISO
- Nikon D4
- Nikon 70-200mm f2.8 AF-S VR II / Canon EF 70-200mm f/2.8L IS II
- Nikon SB-910 Speedlight / Canon 600EX-RT Speedlite
- Nikon SD-9 battery pack / Canon CP-E4 battery pack
- a BFT (black foamie thing)
On-camera flash modifier – the black foamie thing

The BFT is held in position by two hair bands (Amazon), and the BFT is usually placed on the under-side of the flash-head.
The linked articles will give clearer instruction, especially the video clip on using the black foamie thing.
Related articles
- Bounce flash photography – short lighting
- Tutorial: bounce flash photography
- Bounce flash portrait – a consistent technique
- Other articles relating to bounce flash photography
Excellent – once again / as always
She’d even look great blue :)
I can see why Roz was an Miss Universe entrant. She has a strong presence. Neil brings out the best in people.
Love you blog as always, Neil!
One question, I found it tough to get a correct WB afterwards with my RAW. Usually I click on something neutral or white for the WB in post processing but many times it would still give me a colour cast. Do you use a grey card everytime the light changes? Because I certainly cannot do that when shooting in a church event.
Cheers,
Alex
Alex, with portraits I start off by clicking on the white of my subject’s eyes … and then I adjust it from there by how the image appears on my screen. It’s more “adjust to taste” than it there is a specific method to it.
It’s a lovely photo i can imagine you was pretty pleased with it also. Can i ask, do you ever bounce of a large reflector or just always available walls and ceilings?
Simon, a reflector would actually be more ideal than the wooden surface. And when there is nothing to bounce your flash off, a reflector is just perfect.
Like always great work !!!
Do you think using a WhiBal card for the first shot or before/after the shoot (then copy white balance to other pictures) would be helpful for those with limited experience.
Thanks
That would work if there was just the single portrait, or if several portraits were taken from one position. But when you change your position, the WB often changes as the surface you’re bouncing off, also change.
Maybe I’m crazy (or maybe I just need to recalibrate my monitor) but her hair seems a little on the green side to me. Anyone else, or shall I break out the spyder?
With the wild swing in color balance between the bounced flash and the daylight (which acts as background light), there is a bit of a turquoise thing happening there on the edges. I can’t say the effect bothers me in the least.
Hi there Neil,
What would be the effect, if any, in a situation like this, if you had gelled the flash?
Walter, to correct for the strong color cast, would need a blue gel of some kind. To get an exact value would mean a more rigorous method including using a color temperature meter. That just falls outside the scope of most photo shoots, especially a quickly set up portrait like this.
If the color shift is a problem, then the obvious way out would be to use off-camera flash, and not bounce the flash at all.
Thanks Neil, I was hoping you’d address colour cast more thoroughly in one of your posts.
I’ve been seriously trying your technique (BFT and all) and ran into a hitch when I was in a dimly lit private dining room for a special event. The ceiling was of standard height so any part of the ceiling near the bounce area was much brighter than the subjects (I had to shoot wide to include full tables of people at times). If I bounced over my shoulder the light fall off was dramatic – so my subjects were well lit but poorly separated from the dark background. What do you do in such situations while trying to avoid direct flash? I did crank my ISO very high to the limit of what my 7D can really produce nicely which helped but it wasn’t ideal.
Thanks for your input as always.
Philippe .. you could try bouncing your flash off a wall to your side, and that way get some light to the background.
But quite often, the only way to get some light in on the background is by using additional lighting. There is only so much we can do with bounced flash since it is a single light source.
Hi Neil
What skin smoothing processing did you use round Roz’s chin/cheekbone area?
Or did you just clone from another section of her face?
Derek .. it was just the Healing Tool in Photoshop, and then a slight variation of my usual retouching and post-processing for portraits.
Hi Neil,
I have tried gelling my flash with 1/2 CTS but sometimes I get a blue color cast or the orange grungy color cast as in the comparison photo on the right. Could it be because I set my camera’s WB to tungsten on the nikon D90?
Trina … the 1/2 CTS gel is best used around 3700K, instead of Tungsten / Incandescent WB. Otherwise your image will have a color cast. But you still need to shoot in RAW to help fix any color shifts because of the color of the bounce surface.
Check here for more on gelling your flash for tungsten.
Thanks Neil
Neil, do you have some user presets for WB in your camera? I’ve been pondering this for mine so I have a quick setting for wood interiors. Thanks, Cathy
Cathy – here is an article on WB settings.
Once again this new post is really good!
I don’t see any green in her hair (color corrected Dell via spyder II).
How about shooting a grey body as a raw backup. I always carry a small 18% grey cloth which will also clean your lens (it is meant to do that as it has micro cleaning fibers).
How about a custom white balance using a Hugo Fong (his cousin) cap over the lens. Fast and it usually works. In this type of lighting, I too prefer raw.
You would get it close this way also.
PERFECT loop lighting on her face. Lovely modified 2/3rds view. Love it.
You usually pick great looking women.
Canon 5d Mk II, 580 exII, Quantum T5d, white/silver reflectors and of course that black thingy.
Good write up, but Neil isn’t our goal to get as much done proper in camera to save our post production time. I’ve always felt it’s better time spent on front end than back? Maybe because I’d rather shoot than edit.
Then you have the clear choice of letting go of certain photos and situations because it would imply post-processing. Or not.