Improve your portrait photography: Lighting with bounce flash
For a straight-forward but effective portrait like this, there are just a few things that have to come together … all within your control as the photographer:
- Framing / Composition
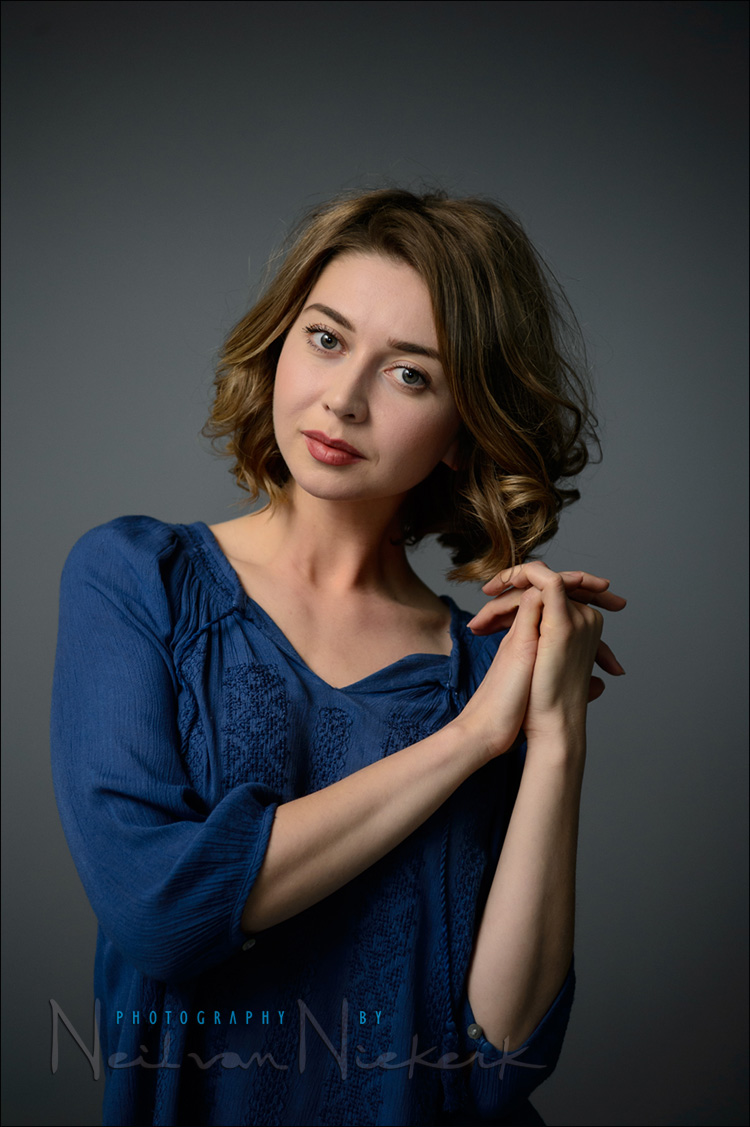
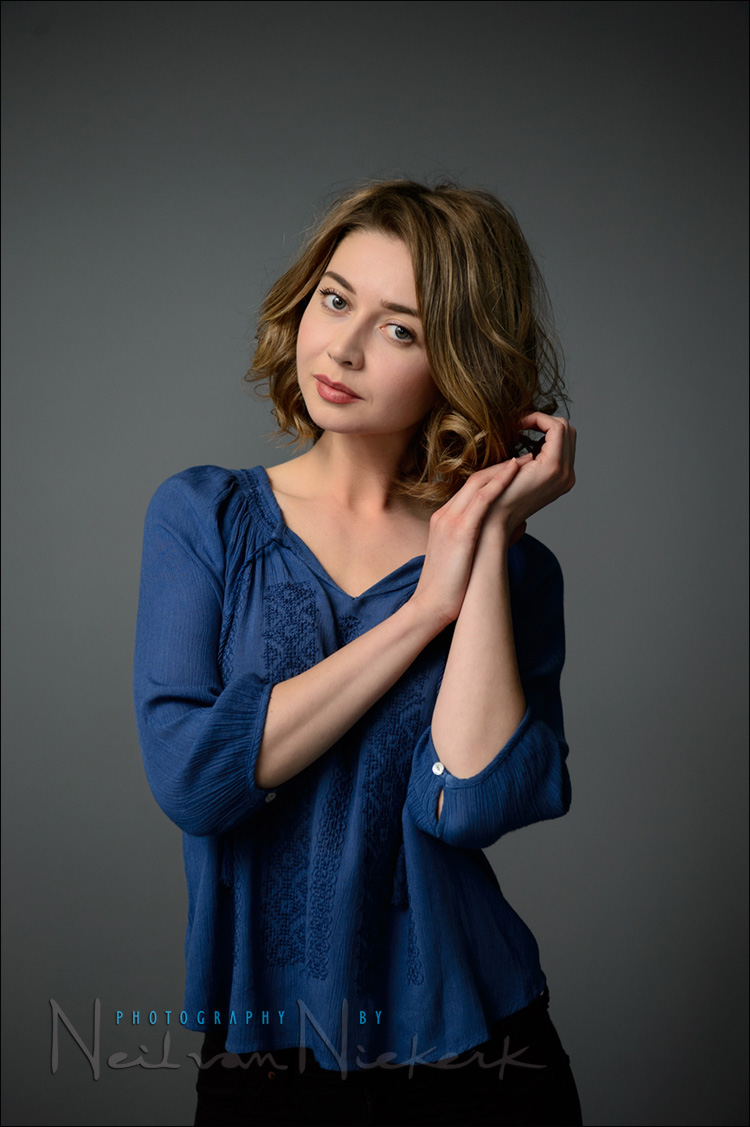
This is mostly as simple as looking at the edges of the frame in your camera’s viewfinder, and then deciding how much head-room or breathing room you want to allow. Also look at the background, and exclude what doesn’t add to your photograph. In this example, it was easy enough, working in my studio which has a grey wall.
So often though, I find that aspiring photographers that I teach at my workshops, haven’t developed the ability yet to look at the way they frame the subject, and look at the edges of the frame in their viewfinder. They either shoot too tight, or way too loose, or with a lop-sided composition as they center their subject in the frame. It just needs a little bit of practice.
- Posing / Expression
My subject here, Claudia, is a professional model who was our subject at the flash photography workshop held in my studio. She certainly knows to pose – however, she doesn’t know how the photographer is going to frame her. So it is still up to us to tell her how we are framing her. It doesn’t help if her hands and arms are out of the frame if she thinks we are shooting half-length compositions. So even with a professional model, you, as the photographer, still need to guide and pose your subject. Here are more articles discussing the topic of posing.
- Lighting
Here we come to the essential part that I wanted to discuss here – the lighting. In this example, the lighting is clean and open, with a slight gradient across her one cheek. That gives a more dynamic lighting pattern than flat lighting would have.
If this look appeals to you, then I have good news for you – it is within your reach. You too can easily have your portraits look as good as this!
The lighting is simplicity itself – on-camera bounce flash. This was shot indoors without much available light – my studio. Which is why I can’t really show a pull-back shot on the lighting – there isn’t anything else other than the speedlight on my camera.
If you are shooting indoors, and using your speedlight on your camera, the the simplest approach is invariably the best way to use the flash. This is discussed at length in my book, On-Camera Flash Photography.
There are two of the most important tips I can give you on getting the most of your on-camera flash when you use it indoors:
- Get rid of any light modifiers. No plastic cup. No Fong Dong. No flash-benders. No white flip-card. Nothing. Not even a black foamie thing. Just the flash. If you’re not convinced, then please watch this video clip: Best light modifiers for on-camera flash.
- Bounce your flash into the direction that you want the light to come from. Not towards your subject, but in the direction that you want the light to come from. (Mind if I repeat that again? NOT towards your subject.) Here I bounced the flash over my left shoulder because I wanted the light to come in from the direction best suited to how her hair is parted. In other words, I didn’t want the light to come from the direction where her fringe on her left-hand side, would block much of the light.
Summary
An elegant portrait need not be difficult in execution. Don’t get overwhelmed. A step-by-step control over the elements, and a straight-forward approach, is often the key to success here.
The next step though in expanding your repertoire, would be lighting with off-camera flash. If you’re new to off-camera flash, and unsure of what gear you’d need, here is the gear list – starting out with off-camera flash.
Photo gear (or equivalents) used during this photo shoot
- Camera settings for the photo: 1/125 @ f/4 @ 800 ISO
- Nikon D4
- Nikon 70-200mm f2.8 AF-S VR II /equivalent Canon EF 70-200mm f/2.8L IS II
- Nikon SB-910 Speedlight /equivalent Canon 600EX-RT Speedlite
Related articles
- More articles on posing.
- review: Best light modifiers for on-camera flash
- Bounce flash photography – Short lighting
- Tutorial: Bounce flash photography
- Bouncing your flash
- Bounce flash & white balance settings
- What if there is nothing to bounce your flash off?
Why no BFT?
Proving I am not a “serial liker” on FB. :p
Actually, I learn a LOT from your tutorials …when it’s time to shoot, however…my brain is overloaded with snippets of each and I get flustered.
So I usually wind up shooting from the hip and invariably wind up with mediocre photos at best.
I will continue to learn and practice …
No black foamie thing!
From what I have learned reading your posts I would precise the following :
– No black foamie thing if I bounce my flash behind me
– Use the black foamie thing if I have or want to bounce my flash in front of me (for example on a wall 45 degrees forward to my left)
Am I right ?
I was going to ask the same, why no black foamie thing? Surely we need this to control the direction of the light and avoid light spill off….
The black foamie thing is used to flag my flash so I don’t get any light from my flash spilling onto the scene or on my subject. In this case, there was no risk of that since I wasn’t using a wide-angle lens, and the direction of bounce was conservative. Hence, the BFT wasn’t needed.
In a scenario where I bounce my flash to the side, I needed the BFT to contain the light spill.
Also, go to 09:20 in the video clip where I review various on-camera modifiers, and I talk about the BFT and how I didn’t use it there. Same reasoning.
For me the most valuable part of this blog is the reminder that, despite my fascinating camera and lenses and flash gear, I should actually take a moment to look at the person I’m photographing. Far too often I load the pix into my computer and see that I haven’t; there are pieces cut off, hair out of place, whatever. Thanks.
“Fong Dong”. Classic! I kinda snicker when I see people shooting with these.
Excellent post again Neil – one has to learn to not only look at the subject throught the viewfinder, but everything else in the background. The point about bouncing from camera left due to her fringe which would cast a shadow is very subtle, but is the type of detail that will separate your images from the rest
Neil,
A great example of how simple techniques can create stunning images.
I do wonder how you managed such a well exposed image at that ISO?…
There was a typo – it should’ve been 800 ISO instead of 00 ISO.
I hope it makes more sense now.
Neil, how for away was the wall you bounced off in this case please? And did you zoom the flash?
I want to dissuade you from the idea that I bounced the flash off a particular wall.
The thought-process is exactly as I emphasized in the article – I bounce my flash into the direction that I want the light to come from. This means that the light was bounced off some shelves with gear, and a pillar, and part of a wall and part of the 14′ high ceiling, as well as other clutter in the studio. NOT a particular wall.
I bounce my flash into the direction that I want the light to come from.
I don’t remember if my flash was zoomed to a specific setting, or was zooming automatically.
To give you an idea – my studio is 25 ft x 40 ft, with high ceilings.
You can see some of my studio, and the size of it, in this video clip where I review various on-camera modifiers.
This kind of a pull-back shot from a different article,
https://neilvn.com/tangents/using-a-gridded-stripbox-as-the-main-light/
will give you an idea of what the studio’s interior looks like.
Where would I be now without on-camera flash, the best book about lighting by any photographer? I live by bounce flash, from weddings to night life.
Hi thanks for another great article. You were my first teacher via your video tutorials and convinced me to try OCF. When you use on camera bounce flash what zoom do you have the flash at?
TJ .. I usually keep it to a longer zoom length. This way the black foam doesn’t eat too much of the light from the flash.
Love it. I find that when I bounce I have to do a +1/3 or +2/3 FEC to have enough light with my 580exII to make it look halfway decent. No FEC means underexposure every single time :(
Charles – this is very much part of getting to know your camera’s behavior. In other words, it is just one of those things where you accept and adapt to the idea that you have to dial in +0.7 FEC as your default when bouncing flash. No drama – just get on with the shoot and create awesome images.
Hi Neil. What should I do if the ceiling is too high for bounch flash?
Check the Related Links at the bottom of the article.
Hi Neil, do you make any adjustments if the area you are trying to bounce the flash off is not white, say a blue or brown ceiling? Thanks
That’s discussed in this article on Bounce flash and WB settings, but if the walls and your surroundings are blue or green, then you might have to settle on Off-Camera Flash.
Thanks for the link Neil