
Lighting and Design in photography: (de)-constructing an image
For me, Design in photography relates to the way an image is constructed at the time of shooting. Composition and content. Lighting. Every element which forms part of a successful and eye-catching photograph. Some of the elements in the photograph are pre-visualized, some of it a kind of serendipity that is then expanded on at the time. Some of it might only be understood afterwards in looking at the photograph. My latest book, Lighting and Design for Portrait Photography, looks at exactly that thought-process throughout the 60 chapters in the book.
Several of the articles on Tangents look at that thought-process during a photo-shoot, working towards a successful image. For example:
– progression of an idea in a photo session (cosplayer: Ger Tysk)
– photo-shoot with a model: the progression of an idea (model: Nicole)
With that idea in mind – the design of a photograph – let’s step through the image at the top.
This photograph of our model Olive, isn’t a composite. It is pretty much SOOC (straight out of camera), aside from removing a car and a few people in the background. Oh, and bumping up the Contrast and nudging the Saturation. And retouching skin. I guess it isn’t really that SOOC at this point. But it isn’t a composite. It was shot like this. The cobble-stones looked like that – aglow.
That lack of shadow adds a sense of mystery. It all looks a bit surreal. The reason why Olive looks like she is floating in the air, is that she was jumping. We did several takes to try and get her at her most relaxed in mid-air. With her feet off the ground, there is no immediate tell-tale shadow behind her. The bright sun on the cobble stones also eliminate her shadow completely. There is also no shadow in front of her, since it is outside of the frame. So she really looks like she is incongruously suspended in the air.
Now, the lack of shadow wasn’t planned before-hand, but it was most definitely noticed when we started shooting a few test frames. So we continued with the idea.
Camera settings & photo gear (or equivalents) used
- 1/200 @ f/4 @ 100 ISO … with off-camera flash
- Nikon D750
- Nikon 24-70mm f2.8G AF-S / Canon 24-70mm f/2.8L II
- Profoto B1 flash (B&H / Amazon)
- Profoto RFi 1’×3′ softbox
- 75″ tall Gitzo monopod
Lighting & Design for Portrait Photography
Lighting & Design is a follow-up of sorts to Direction & Quality of Light. It’s a slightly eclectic mix, discussing the thought-process with various scenarios shooting portraits. The examples use available light, bounce flash, off-camera flash as well as studio lighting.
The idea is that in every one of the 60 sections, there is something to be learnt and applied, regardless of your level as a photographer or where you shoot – all shaped to form a cohesive narrative arc throughout the book.
You can either purchase a copy via Amazon USA or Amazon UK. The book will also available on the Apple iBook Store, and Amazon Kindle.
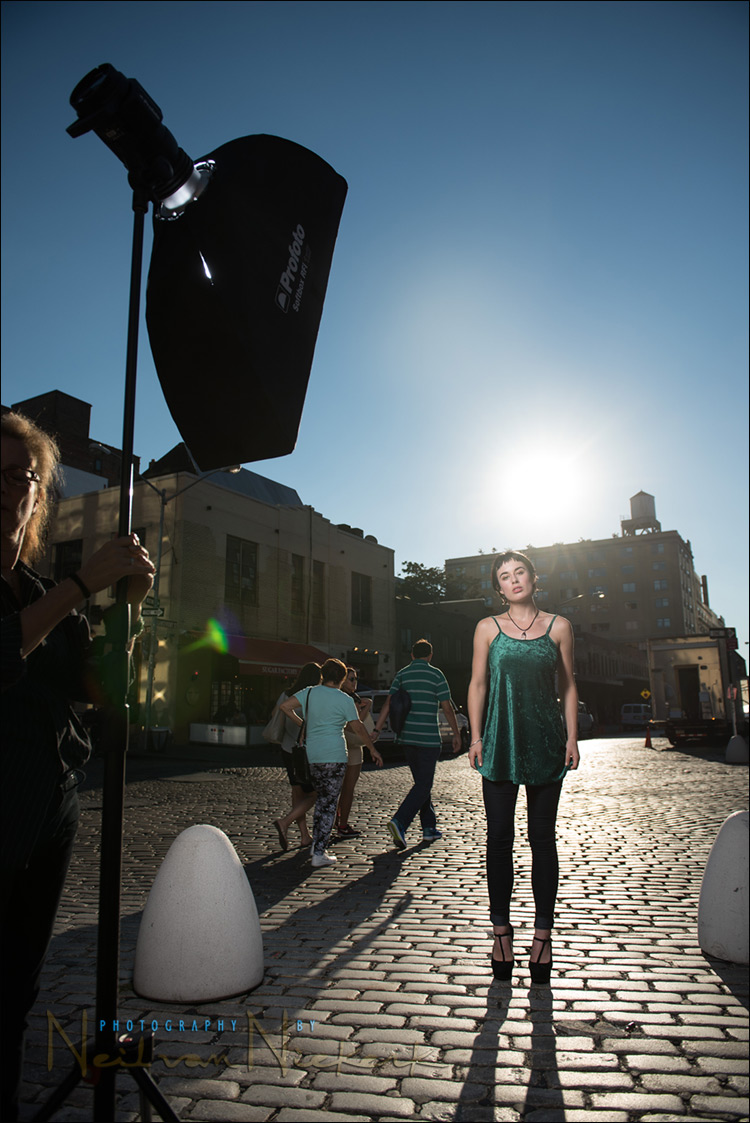
Working with the Profoto B1 flash (affiliate), I was limited to maximum flash sync speed. The camera I used was the Nikon D750 (affiliate), which is limited to 1/200 so to make sure that I don’t get movement blur, I timed several images at the peak of her jump. You can see how her necklace is floating now. That’s an essential nugget here – timing the shot at the peak of the action which in this case means the least movement and the least blur. In fact, this and several other images are crisply sharp even at that relatively slow shutter speed for action.
Ideally, I would’ve loved to have her right arm and hand visible, but this is difficult to control especially when the main instruction is to look relaxed … and she is intent on not breaking an ankle while jumping in high heels on cobble stones.
I was low on the ground, so I could be sure to have the sun behind her when she was at peak jump. This gave rim-light and that glow in the sky behind her. The same motive for the glow of the cobble-stones – I wanted her centered against that.
Regarding composition – I pay attention to the background and foreground, and balance within the frame. This is the motif behind photography composition for me – frame, don’t just aim. But for all that, the composition here is quite centered. I am very fine with central compositions. If that is what works, that is what works.
- 1/200 @ f/4 @ 200 ISO … with off-camera flash
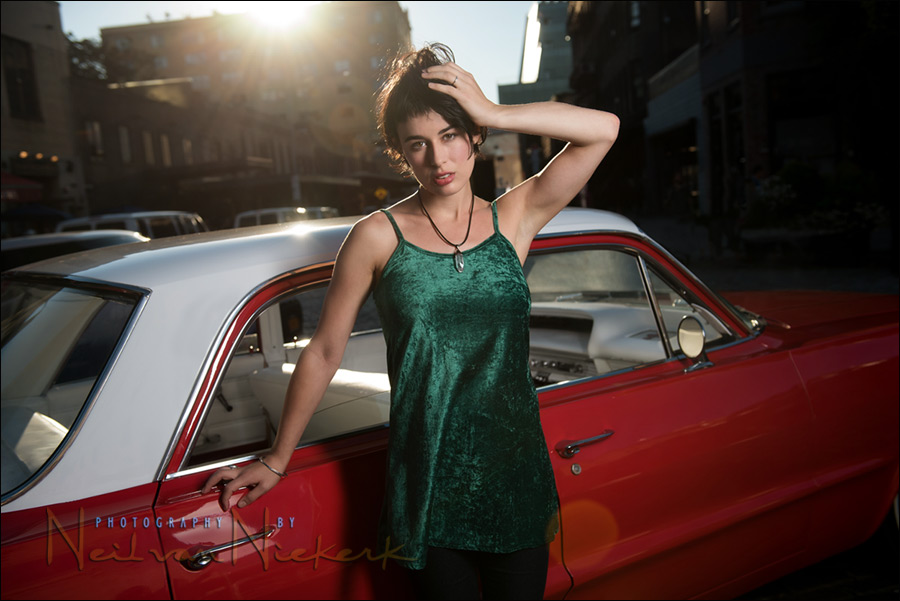
Another photograph taken in the same spot. I specifically wanted to highlight Olive with the off-camera lighting. The narrow Profoto 1’×3′ softbox (affiliate) helps with that, containing the light so it doesn’t spread too wide.
If you take note of the camera settings, you’ll notice that a perhaps surprisingly wide aperture was used in such bright light. The f/11 bright light was pulled down by three stops, using the B+W 3-stop ND Filter (affiliate). This gave me f/4 which helps with the separation between my subject and the background. With the image at the top, shot at 24mm, the f/4 aperture doesn’t give as noticeably shallow depth-of-field. But with this second image where Olive is leaning against the car, the lens was zoomed to 35mm and the DoF is now shallow enough to give some separation.
Summary
Here I wanted to show some of the thought-process, and some of the elements – purposeful and inadvertent – that played a role in creating these images.
And yes, this is the same location, where I shot the lead image for the review: Sigma 50mm f/1.4 ART lens. And the same car.
If you’d like to order my new book, Lighting and Design for Portrait Photography, you can do so via that Amazon link. Or you can order it from Barnes & Noble or any favorite local book store.
Related articles
- review: Profoto B1 flash
- Using a neutral density (ND) filter to control DoF with flash (model: Ulorin Vex)
- Progression of an idea in a photo session (cosplayer, Ger Tysk)
- High-speed flash sync (HSS) with the Profoto B1 portable flash (model: Melanie)
- review: Profoto B2 Off-Camera Flash – photo shoot
- Comparing output: Profoto B1 vs. speedlites
- Glass Olive , a New York model
Neil — Excellent article!!! You truly drew out the best of all the elements into one WOW photo. Location, composition, subject, lighting, angle, expression, crop/framing, and even jumping action. This photo makes me stop and look – again, and again. Kudos!
Wow! Way to go with the flow… I think I’ll read this book. :)
Awesome shot.
Thank you for such interesting article. How do you manage to focus the subject when she was jumping up? Do you manually set focus before the jump? Or did you try to focus her eyes quickly when she is in the air? I always find it hard to focus on a jumping subject.
Alex … I focused on her face while she was standing, ready to jump. I locked the focus and then shot. I’d never be able to focus accurately while she is moving like that.
Also, check with a DoF calculator how much depth-of-field you have at f/4 for a 24mm lens. Distance about 12 ft.
Got it. Thanks for the tips, Neil!
That’s impressive! Only while reading your article I actually believed that this photo is not a composite… your articles are interesting to read and also educating :-)
In the first shot, the model looks 100% copy-pasted. The high camera position, the direction of the main light and the lack of an aditional light not only makes it look like a composite, but you have to look really carefully to see that she is indeed in the air.
I would have gotten lower and used an aditional light to give volume to the scene.
A lower viewpoint would’ve meant less of the cobblestones. They help make the photo.
Great lesson in how removing just a couple of visual cues (the shadows that act to root the subject into the scene) can push a photo to a strange place. I guess this is also helped by the added lighting that while it looks lovely in the shot, doesn’t really make much sense within the scene.