Manual on-camera bounce flash
With the response to the article on bounce flash photography at wedding receptions, it might be good to continue the topic. While I prefer TTL flash when I use bounce flash, there are times when I do use my on-camera flash in manual exposure mode when I bounce it.
Julie & Kenny’s wedding, at the Laurita Winery, NJ, proved to be a bit of a challenge with the reception. The reception area was in the winery which had a beautiful interior … but it wasn’t white. Bounce flash was a touch more difficult than usual here.
With TTL flash, the flash exposure calculation is done for you by the camera – and your only controls are:
– judging the subject & scene before-hand, and dialing in flash exposure compensation (FEC), depending on whether the subject & scene is brighter or darker than “average”,
and / or
– going by the preview on the camera’s LCD display, and adjusting the FEC then if necessary.
Manual flash on the other hand, has that power / distance / aperture / ISO thing going for it, which gives a constant output. Ideally, when we use manual flash, we should use a light-meter … but this is tougher when using bounce flash and you’re on your own and don’t have an assistant running around taking light-meter readings. This wouldn’t be practical at an event like a wedding really. Therefore, we have to be guided by our camera’s preview, and adjust accordingly.
When I did a few test shots in this area before the guests entered, I found that somehow my TTL flash exposures weren’t as consistent as I was used to. I was bouncing off that wooden interior with the canopies and other decorations. No white surfaces. I suspect this somehow threw off the TTL flash exposure metering since I was working at a high ISO and wide apertures: 3200 ISO and a range of apertures of f/2.8 to f/4
I therefore decided to switch over the manual flash.
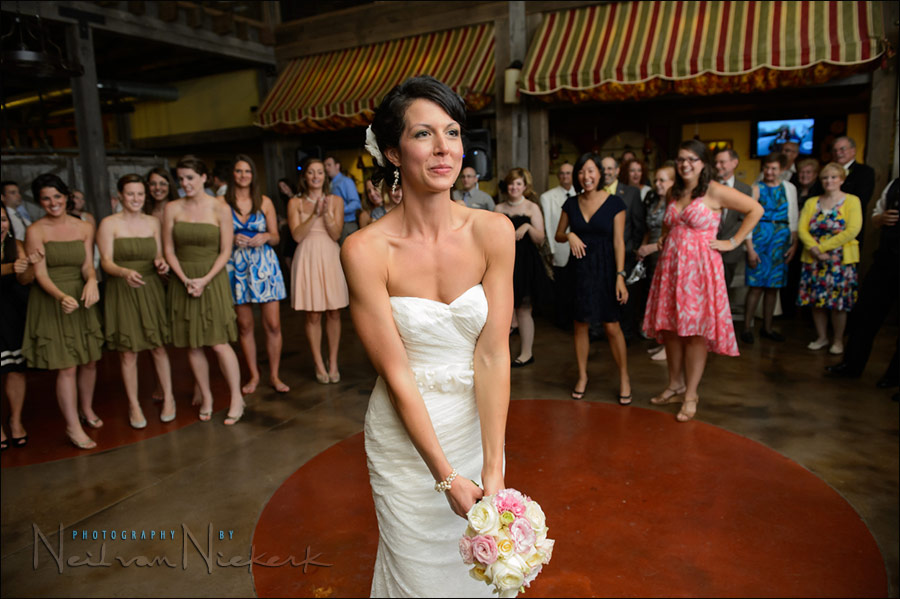
Just to confirm again – the light you’re seeing in that top image is from one on-camera speedlight only. I bounced it behind me, over my shoulder, at an appropriate angle.
For those who’d want to know what angle I bounced it at – my approach with bounce flash photography is to consider where I would’ve placed that hypothetical softbox, had I been shooting in a studio. In other words, a 30 – 45 degree angle is usually a safe start. It gives a clean open light on my subjects’ face.
Since the flash is in manual output, I had to figure out a few set ranges with which I’d get good results. No under-exposure! Since I was shooting at such a high ISO, under-exposure would’ve been a problem.
I therefore figured out which areas I could successfully bounce my flash off – three of the walls of the reception room. One side was wide open to a second level. So I limited my movement.
I also did a few tests to see what the typical apertures would be, depending on how “deep” someone was standing in the room / dance-floor.
A few things worked for me here. The distance that my light traveled didn’t change too much. Bouncing my flash behind me, the wall that I am bouncing the flash off, becomes my light source. So my exposures were fairly consistent for some movement “in and out” towards the dance-floor from where I was standing at any point. ie, closer to me, or further from me didn’t matter as much, compared to if I had my flash on my camera as a direct light.
Of course, as mentioned in the companion article on bounce flash photography at wedding receptions, the inverse square law helps us when we bounce flash behind us.
All this then combined to give me fairly consistent exposures for a fair amount of movement, whether myself, or my subjects.
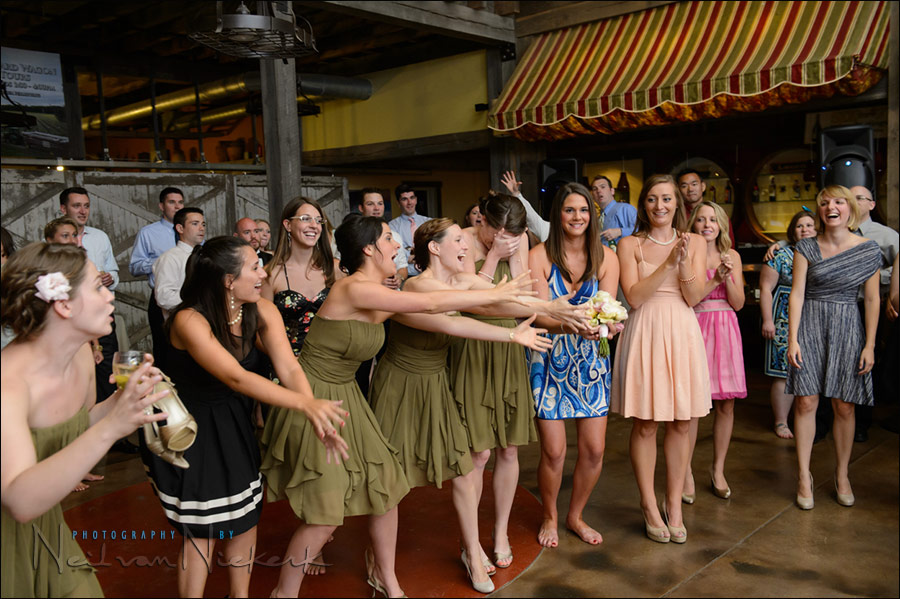
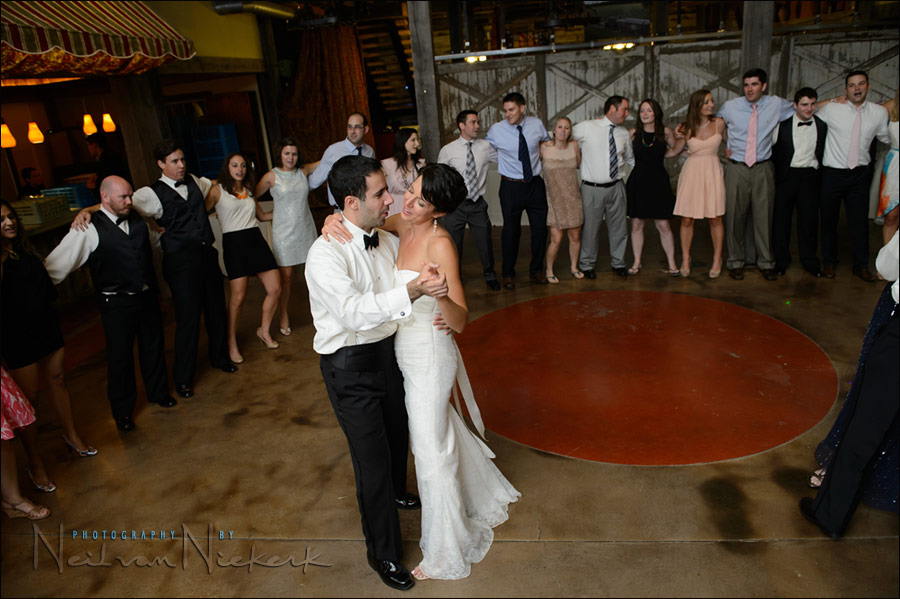
Two more examples from that same wedding:
(Again, just with one on-camera flash, bounced behind me.)
camera settings: 1/60 @ f/4 @ 3200 ISO … manual on-camera bounce flash.
(Yes, that bridesmaid actually ducked so that she wouldn’t catch the bouquet.)
camera settings: 1/60 @ f/3.5 @ 3200 ISO … manual on-camera bounce flash.
For the image at the top, (repeated here), I had to pull the exposure down by 0.6 EV in post-processing of the RAW file. I should’ve anticipated the slight over-exposure at the time, because she moved closer to me. ie, the distance changed.
camera settings: 1/60 @ f/3.5 @ 3200 ISO … manual on-camera bounce flash.
Camera settings & photo gear used (or equivalents)
- Nikon D4
- Nikon 24-70mm f2.8G AF-S / Canon 24-70mm f/2.8L II
- Nikon SB-910 Speedlight / Canon 600EX-RT Speedlite
- Nikon SD-9 battery pack / Canon CP-E4 battery pack
- a BFT (black foamie thing)

The BFT is held in position by two hair bands (Amazon), and the BFT is usually placed on the under-side of the flash-head.
The linked articles will give clearer instruction, especially the video clip on using the black foamie thing.
A few further observations
Generally, this is the lighting that I am after at a reception – clean open light – and as much of the ambience retained as is practical. I prefer simple. I prefer predictable. (I have a high success rate shooting like this.)
I tend to fix my flash’s zoom head to the longest focal length. Two reasons:
– I hate the flash going whizz-whizz-whizz as I zoom my lens. It’s annoying.
– Also, I work my speedlights hard. Most of them show the little fresnel lens has started to melt a little at some point. At the wider zoom settings, the discharge lamp moves much closer to the fresnel lens, and it can melt the fresnel more easily.
As for specific control of the flash’s zoom setting – I am sure there are situations where it is an advantage to zoom to either the widest or the longest zoom setting on the flash – but I don’t have examples that I can off-hand remember.
For this wedding reception, I didn’t use a gel on my flash. The light from my flash was picking up color casts from the wood and decorations, and there wasn’t much Incandescent light sources to consider anyway.
With the non-white surfaces, the key here is to shoot in RAW format for more control over the white balance. JPG is not an option here.
– bounce flash photography & white balance settings
– bouncing flash off non-white surfaces such as brickwork
With this continuation of the topic of bounce flash photography at wedding receptions, I wanted to show the results from a consistent technique.
Related articles
- Bounce flash photography at wedding receptions
- Using high ISO and flash at the wedding reception
- Bounce flash examples – wedding receptions
- Photographing the wedding processional
- Flash photography during the wedding ceremony in church
- More articles on wedding photography
Hello Neil,
wonderful article …
One question …… the flash in manual mode with ISO 3200 at what power level?
1/32, 1/16, 1/8 …..
thanks Neil
I was at the limit of what my flash was capable of. In other words, full output.
Hi Neil,
Thanks again for a wonderful informative article. One question about setting the flashhead zoom: Do you set it to the max length according to the lens you have on the camera? ie, if you were shooting with the 24-70mm you would set the flash head to 70, and not the flashhead’s max of 200mm?
Oh, and thinking about it, do you find if you do fix the flashhead zoom to max, thus creating a more concentrated beam of light to bounce of the wall behind and to one side of you, do you find you get a concentrated beam back? (If that makes sense)
Best wishes,
Gary
I set the zoom to max, but I’m not religious about it.
Amazing! You have taken on camera flash to a new level. When looking at your photos it is hard not to believe that a softbox is just out of the camera’s view. Learning more every time I visit your site.
Thank you Neil! I learned flash photography just reading your blogs and trying to remember them when im shooting. And everytime you post somethin and its always very helpful. Did you use your black foamy thing in this shots? thank you..
Glen, I did use the BFT here. But in these instances it wouldn’t have affected the look of the images.
Really amazing that the photos are so clear crisp and and noise-free at 3200! Thanks again Neil. I was reading this and thought about the recycle delay and if that was an issue for you and then I saw your equipment listed. So I just bought the the SD-9 battery pack using your link. Thanks.
I have to ask, re getting that second ‘catch’ shot, not about lighting but timing and by timing, not about the actual bouquet being caught; I mean going from bride to the girls with 2 individual shots.
I presume you grabbed the bride shot first and quickly side-stepped to your left to get the catch of just the girls? Since the distance would be the same your flash would then of course not be a problem.
Plenty of times I don’t have the luxury of such wide spaces and am trying to grab bride and girls all in one, which of course results in uneven lighting, but in future I am going to have a quiet word with bride beforehand, get her shot and move quickly to just isolate the catch.
Trev.
Trev … You’re right. I took a few shots of the bride getting ready to swing that bouquet over her shoulders … and then I stepped to the side to get a clear shot of the bridesmaids snatching the bouquet.
I don’t think we need the exact and complete sequence in detail to tell the story here.
We can learn always from the best … in this case, Hitchcock. Take the shower scene in Psycho as an example – it consists of the knife, the woman in the shower, and the water draining away. That tells the entire story.
Neil once again great photographs. Shooting at should a high ISO, what are some of your post production formulas to correct for noise. Thanks
David .. no more than the default noise reduction settings in Lightroom / Bridge. I keep the Luminance noise reduction slider to 20.
Unless I under-expose, which is something I really try to avoid. Then I might ride the slider up a bit. But my approach here is quite simple.
Hi Niel, is the SB-910 any better than the SB-900 regarding thermal cut-out? I mean, I always use my SB-900 with the thermal control turned-off and so far I didn’t have any problem. I was wondering if I use both(SB-900 and SB-910) with thermal control turned-off wich one is more resistant?
Thanks
Neil said: We can learn always from the best … in this case, Hitchcock. Take the shower scene in Psycho as an example – it consists of the knife, the woman in the shower, and the water draining away. That tells the entire story.
Excellent point. Thanks.
Thanks so much for these–well, basically, studies in speedlight usage. At your settings with the flash on zoom and full power suggests you were working in one heck of a dungeon.