Nikon D750 camera settings & custom settings
The Nikon D750 (B&H / Amazon), was one of Nikon’s most anticipated cameras, as so many photographers were waiting for an update to their beloved D700 cameras. And like you’d expect from a top-end camera, it has a huge range of customizable settings. These make the Nikon D750 a camera which can be configured in a highly personal way, depending on your shooting style and needs.
Going through the menu, the options might be overwhelming. Many of them can be left to the default. Some settings will clearly user preference. But with some settings, a change in the function of a button or dial can make a big difference in how the camera responds.
Here is an overview of my preferences for the D750, and the settings that I changed immediately upon getting the camera out of the box. This isn’t a thorough listing of every item in all the menus – that’s what you have a manual for. Instead, this is a quick overview of the settings I’d recommend. All of this of course only touches on the options available with this camera!
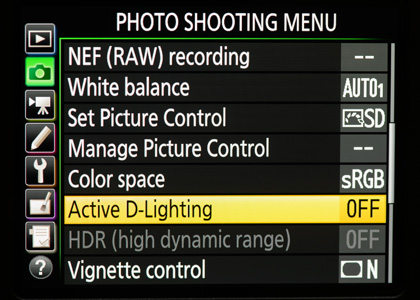
An interesting note is that there is a new addition to the menus. The Shooting Menu has now been split into two: Photo Shooting Menu, and the Movie Shooting Menu. This makes sense since it’s become quite prevalent that some photographers would use a DSLR as predominantly a video camera. So that menu needs to be directly accessible.
1. Playback Menu
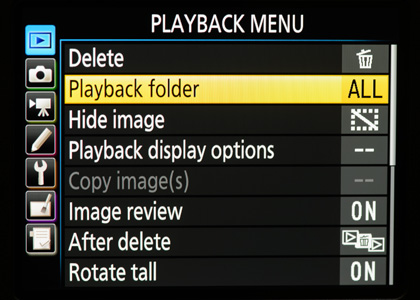
I also like Image Review to be On. This depends on where you are shooting though. Photographers that work in low light and need to be surreptitious, might want to keep this to Off.
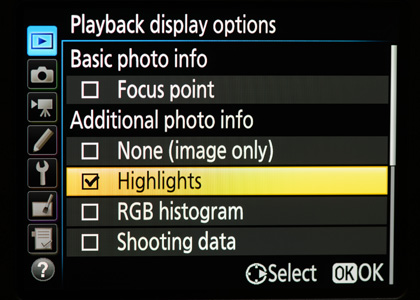
The rest of the options really are optional. Too many photographers keep everything checked, and then have to scroll through too many screens to get to the essential one – the high-lights.
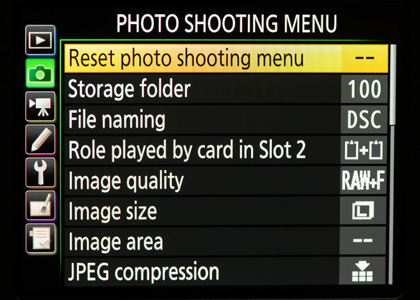
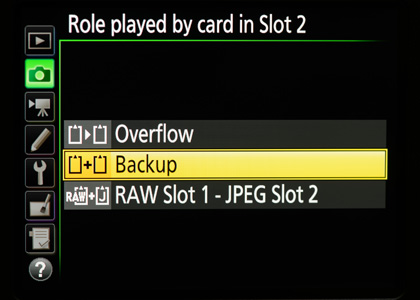
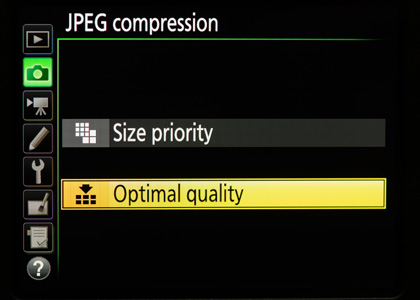
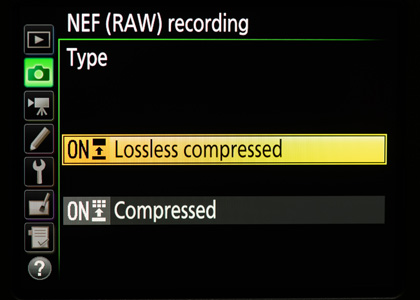
2. Photo Shooting Menu
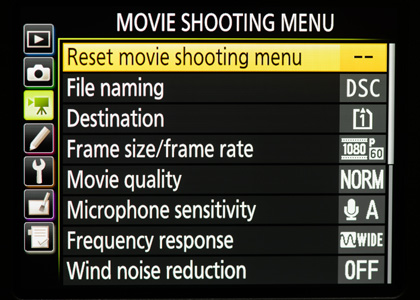
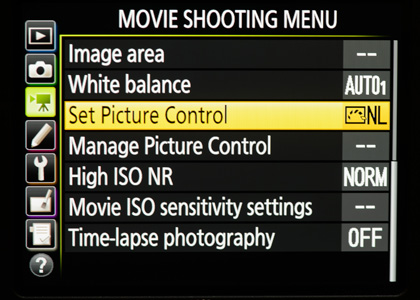
3. Movie Shooting Menu
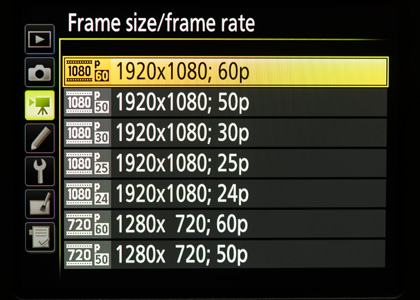
30 fps is the standard frame rate for video broadcasting the USA and other region 1 countries.
25 fps is the standard for PAL / region 2.
24fps if you want a more cinematic feel.
For all of these, make sure you do some research on the 180 degree rule to understand which shutter speed settings are preferred.

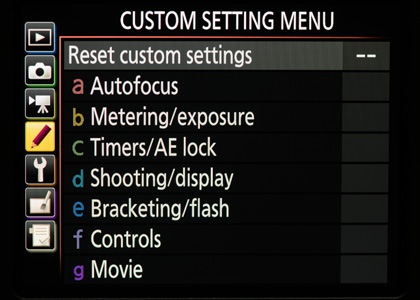
4. Custom Setting Menu
5. Retouch Menu
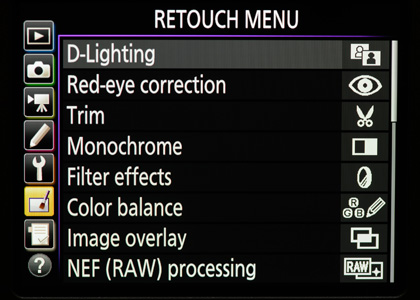
There might be uses for this – adjusting Color Balance in-camera, or any of the options available with RAW processing.
The more interesting effect here is the Image Overlay. You can combine two images, and adjust their individual brightness levels, which affects the way the images are overlaid.
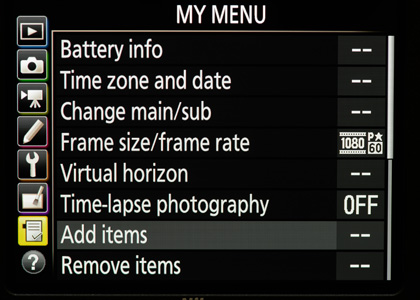
6. My Menu
Here are the ones I prefer having immediate access to, such as battery info and the virtual horizon.
Oh, I have the “Change Main/Sub” option available. I like the aperture dial to be on the back, and the shutter dial on the front. But when I hand my camera to another Nikon user, I can quickly switch it back to behave like a regular Nikon camera.
4. Custom Setting Menu in more detail
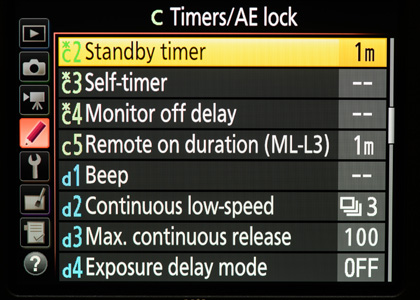
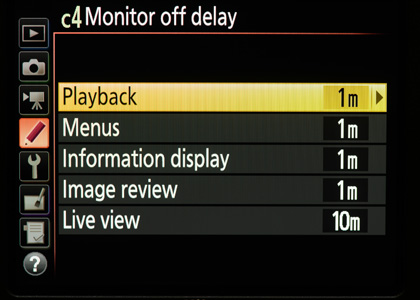
The Nikon D750 battery (EN-EL15) was designed to last longer than any Nikon battery before. Besides, you have s pare with you anyway. The LCD preview doesn’t eat as much power as Live View, so it can be set to display longer without affecting your camera’s power much.
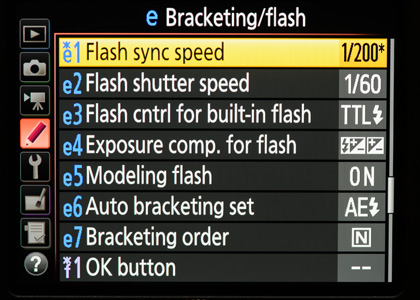
The difference between the two settings should be marginal if I go by previous tests: Auto FP flash setting for Nikon D300s & D700.
And if you’re unhappy that the max flash sync speed on the D750 is 1/200 instead of the usual 1/250th, keep in mind that it isn’t as a big difference as it may seem: comparing max sync speed – 1/250 vs 1/200
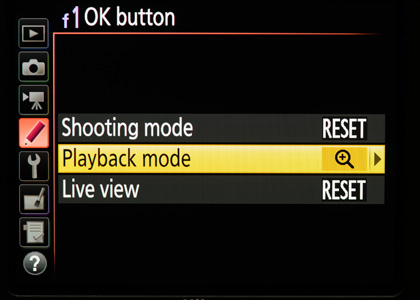
So instead of progressively zooming in, you can now just tap the OK Button, and instantly have a 100% view of the image!

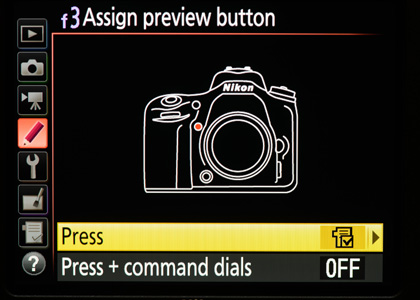
You can also change this button to change the White Balance.
When in Video mode, this button will act the record button that it is.
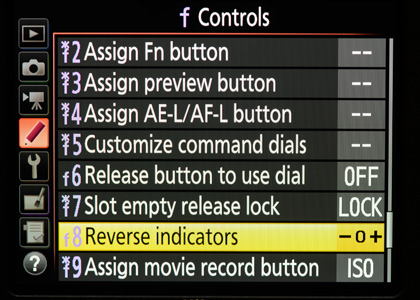
I suspect the original (+ zero -) display was done so that the dials had to be rotated in the direction shown in the metering display. Still, it was visually confusing, and I am glad they changed it.
Finally
These are my preferences and suggestions, not meant as autocratic must-do instructions.
Let us know how you prefer having your camera set up.
Related articles
- Nikon D750 – high-ISO noise performance
- Comparing max sync speed – 1/250 vs 1/200
- Auto FP flash setting for Nikon D300s & D700
- review: high-ISO performance – Nikon D4S vs. D4 / D3s / D610 / D700
- Nikon focusing modes – Nikon D300 / D700 / D3
- camera settings: Nikon D700
- camera settings: Nikon D3
- Buy the Nikon D750 (B&H / Amazon)
Neil,
as for “Assign the F’n Button” – I have a question.
When you set this button for disabling the flash how you deal with this scenario :
for example you are in church and you set your camera without flash – ISO 1600, f/2,8 1/100. couple of photos and then you whant to turn the flash on.
so your settings are – ISO 800, f/2,8 1/200 – another couple of phots and then you whant to turn the flash off again.
Is there any possibility that your camera automatically turn to settings as before (ISO 1600, f/2,8 1/100 s ?)
Neil,
I also use the function button to disable the flash on my D700. I find it useful to allow a quick comparison of ambient versus ambient and flash to see how much light I am adding. Two quick shots tells everything.
Additionally I set the preview button to spot metering. I generally stay in matrix metering but using your wedding dress metering method (with spot rather than zooming in to fill the frame) is as easy as a quick button press and dial it in.
Hi Neil,
I wanted to check if the ae/af button can be customized to back button focusing?
Canon user.
Yes, it can.
Key to this is whether it will activate VR? I know it did not on the D700 but hopefully they’ve added this function.
One thing I found confusing on my D610 which may be on the D750. There’s a flash setting buried somewhere that makes EV only affect ambient and not flash. This is opposite to everything before where EV affects both ambient and flash. Not sure what the default is, but somehow it was switched on in my D610 and then I couldn’t control my flash levels and was getting very confused!
It is Custom Function E4 that you need to play with.
Hi Neil
Greetings from Melbourne
In interesting issue
D750, 16-35 1.4g ED lens, tried to get f stop to 1.4 in manual, would only go to 4
Tried to photograph Aurora Australis
It is an f/4 lens. Not f/1.4
Only prime lenses have apertures that wide. Zooms tend to be in the order of f/2.8 and f/4
Hi, Unfortunately I only have the use of one hand (left one) and it would be ideal for me to use a different button to change from AF-S to AF-C to AF-A (I never usually use AF-A). At present it is as far away from the main wheel as they could get it, lol. it would be ideal to be able to use the AE-L, any ideas any one.
Cheers Clive
Hi, I like the controls setting f6, you can then alter values using the dials without holding the corresponding feature button, seems to make life a little simpler.
Hi Niel,
Thank you. That is such a needed article! My comment and query is long. Please bear with it and I would deeply appreciate a reply.
I had a curious problem and google brought me to you inadvertently. I had the camera switching back from RAW to JPEG even without my touching the menu button, never mind actually going into the relevant option. I suspected it might be the inadvertent default settings of one or a combination of the other buttons. And I need to solve this because my special trip to Namibia has landed me with zillions of jpeg images. Its pretty heartbreaking.
I still am not certain – and would definitely like your advice on this particular problem! But is it likely that the mode dial had turned to U1 or U2? I noticed that the settings in these two modes were turning back to JPEG although in other modes its stayed at RAW. Reading your article and following some of the steps, I discovered that one can actually assign the current settings to U1 and U2. I have done that and now it looks like its fixed at RAW.
BUT both U1 and U2 are completely identical. Help! And while I am sure you are not going to be the last to raise your eyebrows … I normally (read always!) shoot manual.
I must admit that I would have preferred to have ALL the menu options covered in this article. Its of immense help to those of us who are new to the whole science of photography. The menus are plain frightening in the number of options. As for all the abbreviations and technical terms, well … Yes, I know we need to read books and articles and finally the manuals of the bodies and lenses. But lets be real honest. How many of us do that – cover to cover – BEFORE launching out on an expedition? This is where articles like this really hit the spot! Not only do you give the information, you actually force us to scroll through those menu options at least once!
It does seem the most logical explanation for what you experienced – you must have knocked your camera to the U1 or U2 settings.
No real away around this than constantly be aware of your camera’s settings.
I have the D750, and love it. I am new to photography and have a lot to learn. I could use some advice for outdoor portrait shots. My images aren’t crystal clear as I would expect from a camera of this caliber. Can you please suggest some settings? Thanks so much!
Hi there Yvonne
There isn’t enough to go on to give you specific advice. If you want to post a few photos of examples, the Tangents forum would be the best place.
That said, your problem is most likely that you need to use faster shutter speeds for sharper photos.
It might also be that your focusing mode isn’t ideal for what you’re photographing.
Ultimately though, you’re going to have to delve into a good book to get through the basics of photography.
Hi Neil
I have been trying to set up ‘Back button focus ‘ on my Nikon D750 but so far no luck! Can you help me out,
The manual isn’t very clear. Thank you
Regards
Jim Horne
Try http://www.fullstopbooks.com/nikon-d750-experience/ its a great PDF that elaborates the use of Back Button focussing.
P Bryan
Hi Neil,
Love my 750! I had previously read this article when I set my camera up a few months ago. Tonight, a problem and a Google search brought me back thanks to a comment below.
So, two weeks ago at a wedding, I had the same issue as Swati above. However, I shoot all in manual mode, no U1 etc modes are ever touched
I had another photographer post in a popular preset group on Facebook about this issue tonight and realized I am not alone. A few mnutes later, another photog with same issue
There has to be more going on here! I only shoot in RAW and yet somehow a whole WEDDING on one body was ONLY shot in JPEG. My heart hurts over this one as I shot with Auto WB all day due to the constant changing of the outdoor skies and the bright wood church interior…
Any clue???
Coming from a d700… Confused with flash behaviuor in P mode. Chooses very small aperture and very high iso if iso auto is selected. Can somebody help?
Question – what ISO setting where you anticipating the camera to give to you?
Thank you very much for your response.
What i see is:
No flash 4000 2.8
Flash 10000 7
1/60
I don’t like this, no ambiance and noisy
What is the reason?
With d700 it did not happen.
I have no idea why the D700 and D750 would respond differently, but the one precaution you can take that the ISO doesn’t go too high, is to set “Maximum Sensitivity” under your “ISO Sensitivity Settings” in the Photo Shooting Menu.
Alternately, go full Manual Exposure mode on your camera.
I “accidentally” found your site this morning on a rabbit trail trying to find out why, after a photo shoot, I had no images on the SD card. Who knew there were different files/folders on the card. At least I hadn’t deleted by accident. Your settings showed me where to look. Thank you.
Hello!
”The Nikon D750 battery (EN-EL15) was designed to last longer than any Nikon battery before.”
How many single RAW pictures it can take on one charge?
Regards
Very helpful, thanks! Just that one change (to reprogram the OK button to enlarge the preview) was worth it’s weight in gold! Easy to follow instructions, too!
Neil
Possibly you can advise me with regarding the following problem.
I just bought the Nikon D750 and after a week or two it automatically is overlaying all images. But all the images have different filenames. Did I inadvertently change a setting?
Rob, I suspect you have Double Exposure enabled.
Go to your Photo Shooting Menu (the 2nd icon from the top),
and scroll down to Multiple Exposure, and see if that is enabled.
i recieved to day the d 750
the all written in the camera is Japaness
how i can switch it into english
The best you can do, is to meet up with a friend, and step through the menu simultaneously with the other camera’s proper menu.
I have a Nikon D750 and when I am shooting in Manual after I have set everything up with the light meter I take the shot -which is fine but the camera then chabnges the shutter speed so that I cant take 2 pictures in a row.
Sometimes when I have set everything up with the light meter the camera will not take a picture
I suspect you have bracketing mode enabled.
But as to why your camera would randomly refuse to take a photo – I don’t have enough info here to make an informed guess.
Hi if I adjust the flat profile for even less contrast and saturation and ‘0’ the sharpening does that give me even more latitude in post than the standard ‘FL’. (for video)
Mark … Unfortunately I can’t give you an authoritative answer to that. Hopefully someone more knowledgeable can chime in.
Are there any issues that may arise if I change the DSC file name to something else so th at I don’t have duplicate file names from phots that I have taken with my older Nikon camera?
Nope, no issues – that’s why the feature is there – to help you.
I give all my cameras slightly different names, which also helps immediately figuring out which camera I had shot a specific image with … but then I usually rename my images shortly after I ingest them onto the hard drive.
Hi Neil,
I have an issue when using Manual Mode. I choose my settings, take the picture, but my camera changes my settings automatically, from what I have selected. It appears to change them when I slightly depress the shutter release, before the shot is captured. Any idea what is causing that? It is a bit frustrating in that it has caused a few shots (at a wedding, no less) to be either under or overexposed. What could I have done in my settings to make this happen?
Thanks in advance.
It sounds to me like you have bracketing set. Disable that, and I think your problem will be solved.
Neil-
Thanks for this tutorial first of all. I have a question about what the best way to handle exposure differences between lenses. That is, say I have U1 setup to handle exposure (and esp. shutter speed) for a 180 f2.8 lens. I want this to have say a minimum of 250th sec shutter speed. Now I change to a shorter lens like 24-85 zoom. I want to set this up for something like 1/100 sec for arguments sake. Is there a good/better way to handles this as I go from one lens to the next? It would be great if there was a some way to have a preset for each lens I own but I don’t see any way of doing that. Any suggestions would be welcome.
Thanks for any help!
Hi there Phil – I see what you’re attempting to do there – you want to have the “minimum hand-holdable shutter speed” programmed in for each lens.
This is a dead-end though.
For starters – the idea of a “minimum hand-holdable shutter speed” will most likely give you soft images because of camera shake. Read more here: Faster shutter speeds for sharper photos.
Also, fixing each lens to some pre-supposed shutter speed makes no sense, because your shutter speed should be subject specific, not lens specific. Depending on WHAT you are photographing, you’d change your shutter speed accordingly (in relation to the amount of light available.)
Hi Neil,
I have Nikon D750. I am trying to do video shoot in Aperture mode, but problem is I can’t change neither ISO or shutterspeed. Camera is fixed with auto ISO & shutter speed, I can’t change it auto to manual.
But If I am switching to picture mode, I am able to change auto to manual through front dial.
Could you please help me out ?
Kedar .. you will have to adapt. Video is shot with manual settings. That is how it works.
Excellent article, Neil!
Somehow my D-750 was showing no images, so I knew what the problem was, but did not know which of the settings to change (“ALL”) to get around it. Interestingly, the images were in a folder I looked at, but could see none! Thanks! Wonder why?
Love your setting to zoom into the image! You saved my button and thumb both!
Love some of your settings; not the reverse indicators though! I understand your logic, but I like to move the “dots” the direction I’m rotating the dials, so prefer original way +0- . :-)
Thanks for your great work!
@Mercere Collins, that’s very understandable and also logical, so I think it’s best to EITHER change both of these settings simultaneously OR leave them both at default:
* (Customize Command Dials) Reverse Rotation
* Reverse Indicators
This way we can use – 0 + while keeping the dial movements in sync visually. :-)
How to take still images in 16:9, what are the settings on d750
You are better off cropping it to this aspect ration in post-processing of the RAW file.
But if you really need 16:9 directly out of the camera, switch the Live Preview to video, but instead of pressing the Record button, take a photo.
Awesome. The tip about using Fn for flash shutoff was helpful. It was really annoying having the flash pop up when I didn’t want it to. I’m still trying to learn this camera. Thanks
Neil,
You said you switched the main/sub dials via the control menu. How exactly did you do that? I’ve gone to that menu, but I can’t see where it’s available. Thank you!
It is under Custom Function F5 – Customize Command Dials.
I found that the D700 and the D750 colors are more radiant with the d700 than the D 750. Can someone tell me how to change the shooting colors in the D750.
I recently bought Nikon D750 recently and I couldn’t find a wifi option in the menu and the network option also appears grey. Someone told me about K version of the camera. How to check if it is K version.
This is the first that I have heard of the K version. Doing an internet search, it would appear that it is a version that is sold in some Asian countries. (Korea?). I see no mention of where they show it is a K version, other than labelling on the box.
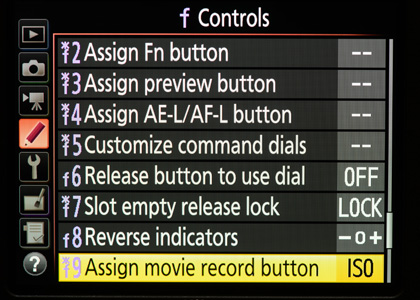
Your piece prompted me to do a thorough settings review, and in particular the (f) Controls settings.
I’ve always changed the ISO (b1) and exposure (b2) increments to 1/2 stops since I find it so much easier to make rapid exposure adjustments without having to count through triplets of clicks and readings. This likewise sets the flash and exposure compensation buttons to increments of +- 0.5 instead of 0.3 & 0.7. I might have valued thirds of a stop in the days of slide film but the RAW format has so much latitude, I find such precise control distracting and unnecessary.
An unexpectedly useful control (f5) customisation is that I can revert aperture control back to the aperture ring on the lens. Why would I want do that? Well, when I got the D750 I found that the default command dial configuration – shutter front, aperture back – was completely counter-intuitive to me. It took me a while to learn I could switch them about but by that time I was already half-adapted. Whichever way they were configured, I’d still regularly move the wrong dial the wrong way! Also my forefinger can’t seem to leave the front dial alone and so I’d frequently find I’d shifted it unintentionally. My lenses’ aperture rings are now constrained to 1 stop increments but again I find this to be less a limitation and more a liberation in terms of speed and decisive choice of aperture. I feel no less creative for not having the subtleties between f5.6, f6,3, f7.1 and f8 – decision fatigue is a cumulative effect.
Since there is already an ISO button on the back of the D750 I didn’t quite see the point of your customising the video/record button until I tried it. Now I get it! – with my current configuration I can adjust the shutter by up to two stops with my thumb, press the top button with the same hand and then compensate with 2 stops of ISO on the thumb’s return, just as swiftly as we used to advance a film frame!
I guess this is the thing. My D750 is now configured to operate more or less the same as the old film cameras I grew up with. Maybe we forget quite how ergonomic ‘analog’ cameras simply were, before microprocessors presented us with levels of sophistication and control that perhaps intrude upon the creative process.
Hi Neil, Sorry to write about the Nikon D750 so late in the review process. But I feel somehow compelled to disclose my experiences with it. I purchased a D750 about 3 to 4 years ago but I’m sorely disappointed because I frequently have to deal with its’ propensity to malfunction. Here’s what happens:
I see a target I want to photograph, do the required song and dance and push the trigger. The camera blinks, there’s a flash of light, it clicks and seems to shut off. No picture. “Err” blinks in the view finder! Press the trigger again and it seems to recover and suddenly a picture appears, be it smudged. Sometimes I have to shut it down for upto half an hour. Once, the camera did not recover for the rest of photo session.
A Nikon service dealer did a thorough once-over but I still have this issue. I’m asking myself if this is a Nikon problem or the proverbial “bad copy”. Ready to move away from Nikon; just that I’m a little too invested.
That’s most definitely not the usual behavior of the D750 — it is faulty. Which service center did you send it to? And is the problem intermittent, or regular?
Thanks for your response, Neil! I reviewed the camera’s tendencies and found that it is likely to do this when it’s been unused for a couple of days. The last thorough service involving this issue was somewhere in NY.