Tangents

photography tutorials, reviews & workshops

tangents photography blog
learn : discuss : share
  • Tangents
  • Tutorials
    • Flash Photography
    • Wedding Photography
    • Studio Photography
    • Posing People
    • Understanding Your Camera
    • Exposure metering
    • BFT
    • Best Photo Books
  • Reviews
    • Sony
    • Nikon
    • Canon
    • Fuji
    • Profoto
    • lighting gear
  • Workshops
    • Info: Workshops
    • In-person
      tutoring sessions
    • Online
      tutoring sessions
    • Workshops in
      New Jersey (NJ)
    • Workshops in
      New York (NYC)
    • Photo walks in NYC
    • Studio Workshop
    • Video tutorials
    • Workshop results
  • Books
    • On-Camera Flash (revised ed.)
    • Direction & Quality of Light
    • Off-Camera Flash Photography
    • Lighting & Design
    • On-Camera Flash (1st ed.)
  • Projects
    • Two Perspectives
    • B&W Infrared
    • Vintage lenses
    • Time-lapse photography
  • Info
    • About
    • Contact
    • My Photo Gear
    • Books by NvN
    • Join us on Facebook
    • Acclaim
    • Success Stories

off-camera flash – creating separation with back-lighting

July 22, 2011 Neil vN 24 Comments

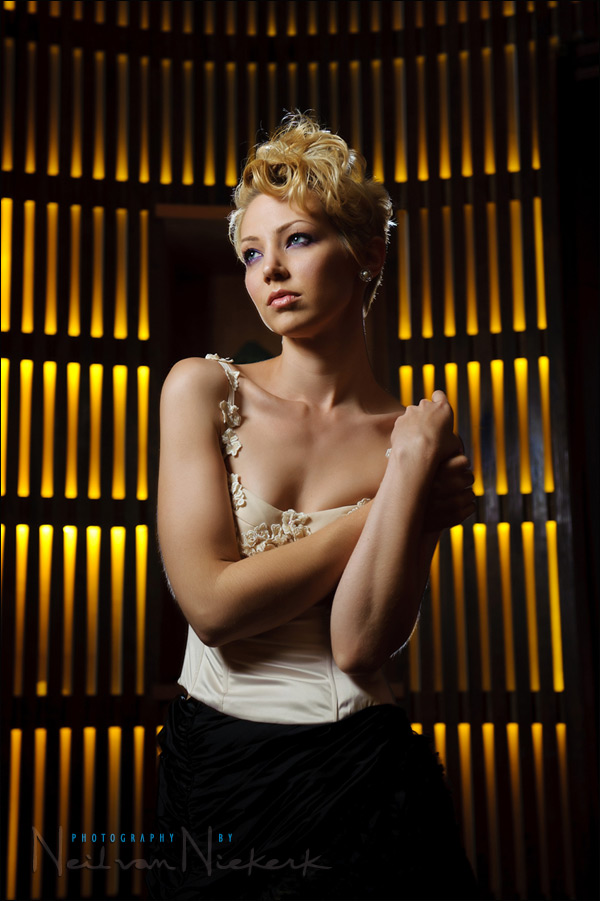
off-camera flash – creating separation with back-lighting (model: Bethany)

Another image from the photo session with Bethany, when I was in San Francisco earlier this year. This interesting background is part of the lobby area of a San Francisco night-club. I knew the wooden panelling and subdued incandescent lighting would make an interesting background because of the repetitive pattern and glow. A slow shutter speed brought the background light in … and then I used flash to light her. I didn’t gel my flash – specifically so that the background light would go that warm. The pull-back shot will show the simplicity of the lighting …


The main light was a speed light in the Lastolite softbox. To separate Bethany from the background, I used another speed light as backlighting.

The main light was set to TTL originally, but as she moved, the exposures varied a bit. This is because the amount of darker tones vs lighter tones (such as her dress), changed in the overall image.  As I zoomed in and out, my TTL exposures would also change, since my composition affected the TTL exposure for the same reason – more darker tones / less darker tones. So I had to change my main flash to manual exposure for better consistency.

The speedlight in the softbox was mounted on a PocketWizard FlexTT5 transceiver (B&H) which allowed me to control it via the FlexTT5 (and master speedlight) on my camera.  I started at 1/16 power on the main light, and adjusted it from there via the Master speedlight on my camera.

The background light was also set to manual. (Probably around 1/32 manual output since it was direct flash.) Any back-light like this is best controlled as a manual flash. Since the backlight doesn’t actually contribute to the overall exposure (and only adds that rim-light), it doesn’t make much sense to have it as TTL flash. The back-light speedlight was also triggered via a PocketWizard FlexTT5 transceiver (B&H).

I used a speedlight on the camera’s FlexTT5 instead of the PocketWizard AC3 Zone Controller (B&H), since I needed the infra-red AF assist of the flashgun in that dark lobby area.

camera settings: 1/10 @ f4 @ 400 ISO

In terms of posing – I left this mostly up to Bethany, since she is an experienced professional model. I did ask her to direct her gaze towards the softbox, so that the light would fall on her face from a flattering angle … and hence give that gradient across her cheek closest to the camera. I also had her angle her body slightly away from the light, so that the light came in over her shoulder, and not hit her directly on the front of her body.

Equipment used with this photo session:

Nikon D3;  Nikon 24-70mm f2.8 AF-S (B&H)
Nikon SB-910 Speedlight controlled by PocketWizard FlexTT5 & AC3 Controller
or alternately, the Canon 600EX-RT Speedlite controlled by Canon ST-E3 Transmitter
Lastolite EZYBOX Softbox Kit (24″x24″) (B&H)
(1x) Manfrotto 1051BAC light-stand (B&H)


related articles

– multiple off-camera flash: gelling your flash for effect
– mixing the white balance of different light sources
– available light portrait

Filed Under: Bethany, flash photography, lighting, models, off-camera flash, Uncategorized Tagged With: multiple off-camera flash, off-camera flash, off-camera flash photography, off-camera lighting for portraits


Help support this website

If you find these articles of value, please help support this website by using these B&H and Amazon affiliate links to order your photo gear.

I also offer photography workshops and tutoring sessions, whether in person, or via online video tutoring sessions.

Please follow me on Instagram for more.

You can also join our thriving photo community in the Tangents group on Facebook, where we show our photos and discuss all things photography.

Thank you,

Neil vN

Books by Neil van Niekerk


24 Comments, Add Your Own

  1. 1Lennox says

    July 22, 2011 at 7:07 pm

    Awesome image Neil. 1/10 was hand held or tripod?

    Reply
  2. 2Neil vN says

    July 22, 2011 at 7:12 pm

    Hand-held. The flash will freeze her movement, and I don’t particularly need the (already out of focus) background to be free of camera shake.

    Working with a tripod would’ve slowed me down in changing my composition through that sequence.

    Neil vN

    Reply
  3. 3peter brunotte says

    July 22, 2011 at 7:36 pm

    Neil, Love your work and sharing of knowledge ..
    My eye does get dragged to those 3 bars reflecting light near her hand, I think if that was burnt in it would be perfect..

    Reply
  4. 4Neil vN says

    July 22, 2011 at 7:40 pm

    Peter, I know what you mean … but I left it as is, since the purpose with much that I post here, is to show what is possible (nearly) straight out of camera. So at times some visual flaws will show.

    Neil vN

    Reply
  5. 5Stephen says

    July 22, 2011 at 8:17 pm

    Neil,
    I really enjoy your photos with Bethany and Ulorin. You get some really different types of shots with these two models, and I’m sure these types of photoshoots provide a break in your wedding photography work.

    Reply
  6. 6Jennifer Lynch says

    July 22, 2011 at 9:30 pm

    Awesome photo. Love the light and shadows on her face, just perfect. Love the rim light from back speed light too. Thanks for the great explanation. Can’t believe it’s so sharp at 1/10.

    Reply
  7. 7Tay says

    July 23, 2011 at 12:34 pm

    Another great post. Thanks Neil. It reminded me that with flash I don’t always have to be so concerned about low shutter speeds. It looks like you have the ezybox feathered significantly toward the camera, presumably to keep any spill off the background?

    Reply
  8. 8Neil vN says

    July 23, 2011 at 1:33 pm

    Tay … well spotted! Yes, I did feather the softbox so that there would be no glare on the wooden area to the left of the image. (model’s right)

    You can actually see that I had feathered the softbox if you look at the pull-back shot.

    Neil vN

    Reply
  9. 9Michael Gronow says

    July 24, 2011 at 3:07 am

    Neil,

    Another great image and blog post. I like how the background colours complement the hair and skin tones.

    Reply
  10. 10Jennifer Lynch says

    July 24, 2011 at 2:59 pm

    Hi Neil:

    For the Lastolite 24 x 24 portable softbox, which is what I think you use and displayed at lecture in Plymouth, Mass., what pole did you get, or would you recommend, for your assistant to hold it up with? I don’t think it comes with a pole. Thanks.

    Reply
  11. 11Neil vN says

    July 24, 2011 at 6:35 pm

    Jennifer .. usually my assistant would hold up a monopod. Any one would do.

    In this case, I used the Manfrotto 1051BAC light-stand (B&H)

    Neil vN

    Reply
  12. 12PETE says

    July 24, 2011 at 8:14 pm

    With the main so far to camera left, would the gel have spilled on to the background?
    Perhaps the pull back angle is deceiving me?

    Reply
  13. 13Neil vN says

    July 24, 2011 at 9:37 pm

    Pete .. the flash wasn’t gelled. And I feathered the flash so that I don’t get much light on the wood on the background in the left of the image.

    The reason why I didn’t gel the flash, was so that the incandescent lighting in the background would actually go orange.

    Neil vN

    Reply
  14. 14gt says

    July 24, 2011 at 10:29 pm

    which nightclub? I live in SF and I was just curious. Also, how do you network with nightclubs to allow this sort of thing?

    Reply
  15. 15Neil vN says

    July 24, 2011 at 11:41 pm

    The nightclub was The Temple .. and I know someone who knows the owner, so I was able to shoot there on the Sunday when it was closed. The images in the article on gelling your flash for effect, was also shot there.

    Neil vN

    Reply
  16. 16Ben says

    July 25, 2011 at 3:59 am

    Hello Neil, I am curious how you used the infrared auto focus with the flex. As far as I was aware this feature does not work and its one of my frustrations with the system, that as soon as you put the on camera flash on top of a flex the infra red focus is lost. What are you doing to retain this option?
    Lovely work as always.
    Many thanks.
    Ben

    Reply
  17. 17Neil vN says

    July 25, 2011 at 10:42 am

    Ben .. update your firmware and try again. They fixed that with one of the latest firmware updates.

    Neil vN

    Reply
  18. 18mike s\\ says

    July 25, 2011 at 1:18 pm

    how do you have the zoom heads on the flash set? narrow or wide?? thanks

    Reply
  19. 19Neil vN says

    July 25, 2011 at 1:44 pm

    Both speedlights – the one in the softbox, and the bare flash used as the rim light – both were set to around 50mm.

    Neil vN

    Reply
  20. 20Babs says

    July 25, 2011 at 9:41 pm

    How large should the hairlight be? Should it be snoot/gridded to only just hit the top of the head, to hit the whole back of head, or a bit more?

    Reply
  21. 21Neil vN says

    July 25, 2011 at 9:46 pm

    There was no hair-light. Just a bare flash behind her acting as a rim-light. The lighting setup is super-simple.

    Neil vN

    Reply
  22. 22john s says

    July 30, 2011 at 8:30 pm

    hey neil, wondering how you positioned your rim light?

    Reply
  23. 23Neil vN says

    July 31, 2011 at 5:11 am

    The speedlight was on top of a FlexTT5, which was mounted on the speedlight foot that comes with the speedlight. Nothing fancy.

    Neil vN

    Reply
  24. 24Lech says

    September 21, 2011 at 3:24 pm

    Neil,
    I just found your site and spent some time reading your flash tips. Thanks for all the great info. Those education sections are great. Also, this shoot really pops. Great separation – thanks for sharing.
    Lech

    Reply

Leave a Reply Cancel reply

Your email address will not be published. Required fields are marked *

categories

Articles & Tutorials

  • • About myself & this site
    • Books by Neil vN
    • Best photography books
    • Black foamie thing
    • Photographers’ success stories
  • • Flash Photography Techniques
    • Natural looking flash
    • Flash + Ambient light
    • Dragging the shutter
    • Bouncing your flash
    • On-camera flash outdoors
    • Exposure metering
    • Flash exposure compensation
    • Bounce flash examples
    • Which is the best flashgun?
    • Flash brackets
    • Off-camera flash photography
    • Flash photography basics
    • Using video lights
    • Flash photography tips
  • • Photography workshops NJ / NYC
    • Models @ photography workshops
tutorials:
flash photography
Photography
Workshops

All rights reserved. Copyright © Neil van Niekerk 2025 · Customization by The Traveling Designer

Copyright © 2025 · NvN on Genesis Framework · WordPress · Log in