Positioning your subject – direction of light & choice of background
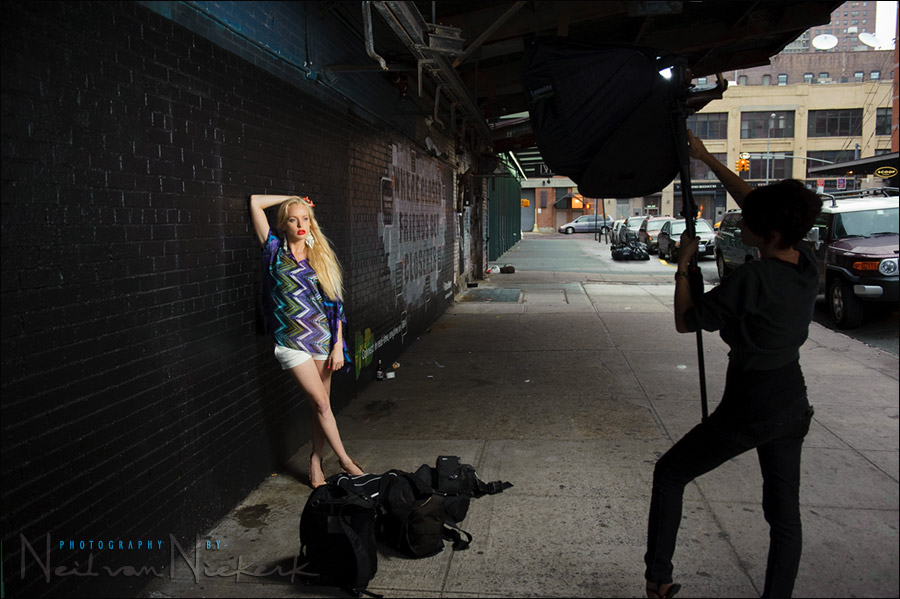
Taking cover from the rain under an awning during a photography workshop in New York, we ended up in this spot against a wall that was painted black. However, looking along the wall at an angle, the black paint of the wall reflected the light from behind. This completely changed the character of the background. Since the available light was low level, and not flattering, we added some light from an off-camera flash in a softbox.
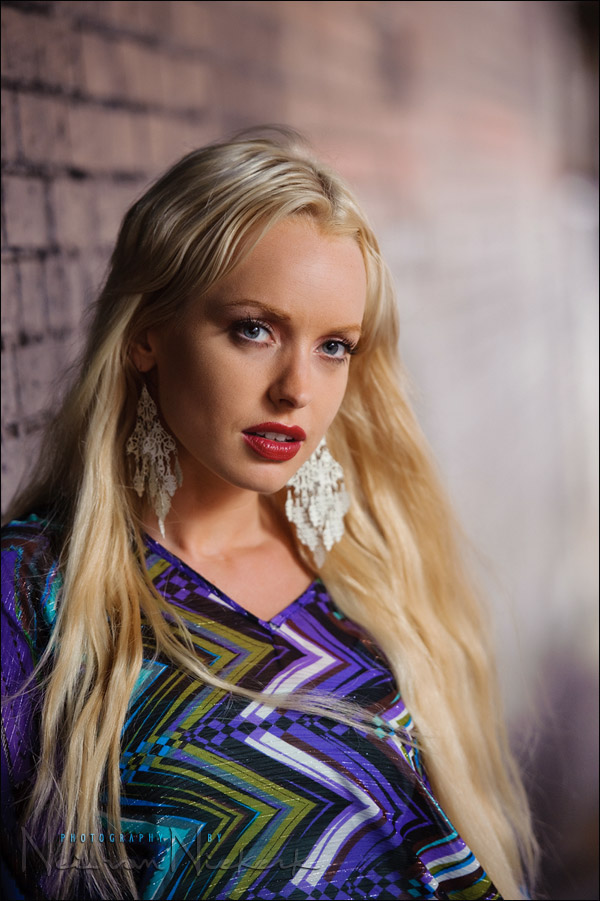
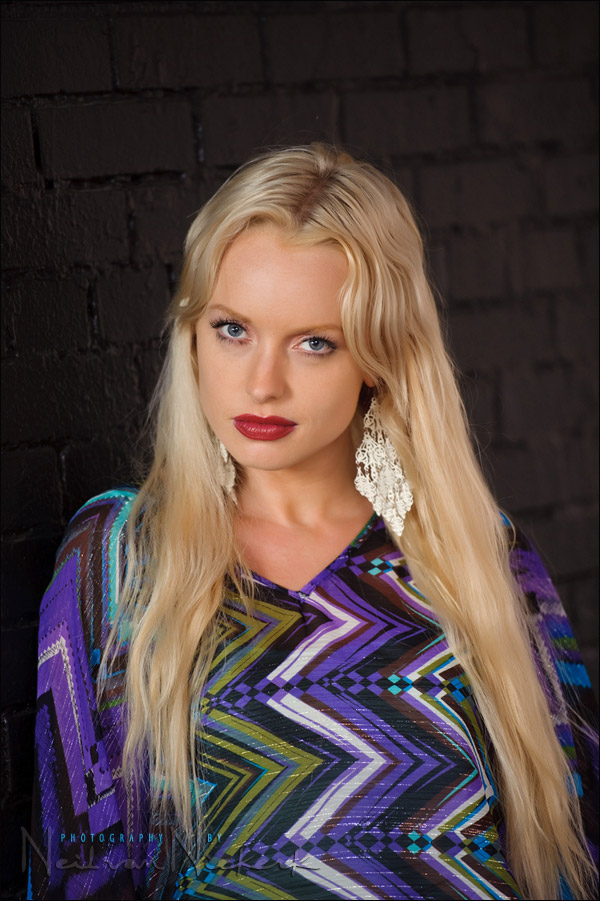
Shooting nearly completely in line with the flash, the light on Catherine was very even. Or flat. (Depends on how you want to think about it.) As you can see here, shooting more straight-on to the wall, it does indeed look black.
But moving positioning the light, and myself and the model at angles to each other … I was able to get the light from the background, and more dramatic light on Catherine …
As you can see in the pull-back shot below, there is a huge amount of random clutter outside the frame. Zooming to 165mm and moving closer to Catherine, and shooting along the wall … isolated her against the out-of-focus colors in the background.
Even though off-camera light was used here, the approach is very much in line as described in the previous post where we just used available light to photograph Catherine. But once again it was a combination of how I, as the photographer, position myself and the model and the background in relation to the light and the background. It’s a repeatable approach that works pretty much every time to guarantee successful portrait photography on location.
It is a topic also explored in this article: off-camera flash – change your position, change the direction of light.

Direction & Quality of Light
I wanted to distill the essence of what we, as photographers, work with – light! Before we can truly grasp on-camera flash and off-camera flash, and really, any kind of photography, we have to be aware of the direction and quality of light. We need to observe the light that we have, and then decide how best to use it, or enhance it.
With this book, I try my best to share those “aha!” moments with you, and I do believe this book can make a difference to your photography.
The book is available on Amazon USA and Amazon UK, or can be ordered through Barnes & Nobles and other bookstores. The book is also available on the Apple iBook Store, as well as Amazon Kindle.
Camera settings & photo ger (or equivalents) used in this photo session
- 1/80 @ f2.8 @ 640 ISO; TTL flash at -0.7 EV
- Nikon D3
- Nikon 70-200mm f2.8 AF-S VR II / Canon EF 70-200mm f/2.8L IS II
- Nikon SB-910 Speedlight / Canon 600EX-RT Speedlite
- Lastolite EZYBOX 24×24″ softbox
- Manfrotto 680B monopod with a stud to attach the softbox to the monopod
Related links
- Off-camera flash – change your position, change the direction of light (model: Ulorin Vex)
- Exposure metering & observing the available light (model: Aleona)
- Photography: direction of light & choice of background (model: Catherine)
- Photographic composition – look at your background (model: Jess B.)
HI Neil,
I’m looking forward the the August 26 B+H Eventspace Lecture. Great posts and job. You need to get your assistant one of those things the marching bands use to hold the flags at their waist. I think California Sunbounce makes one.
Best,
Bob
Whoa! I can’t wait to meet the real Charles Atlas of Photography!
Hi Neil,
what’s is the specific about your decision about compensate TTL flash to FEC -0,7, when you are using the off camera softbox. I saw it by previous posts also.
Thanks
Roman
Wow! Kinda reminds me of the old song by Snap – I’ve got the power! :-)
3 cameras, 2 softboxes and you still manage to take photos, amazing! (Kidding)
Speaking of which, I just bought the Lastolite Hot Shoe EZYBOX Softbox Kit – 24×24″ (60x60cm) on you for your recommendation. So easy to assemble. Thank you!
One quick question, being a photography blog, why does the spell checker throw a wobbly when typing the word “softbox / softboxes” in the ‘Leave a comment’ box?
Take care,
David
PS: It’s a good job you didn’t get any planes coming in to land! :-)
OK, TTL flash. So that’s explains the double catch lights in the second image. Is that just the signal from the master, or additional fill? Either way, very, very cool.
If I can consistently get shots like the second one in this blog, I’d still be happy. However, I do understand what you mean about the background. It is really dark and lacking “punch.”
Hi Neil, in this shot how do you mount your flash to a softbox? I have a Canon 580EX II but I use the umbrellas that look like a softbox and would like to mount my flash to a propper softbox like this.
Love you work, busy with your book on camera flash now.
Kind Regards
Hansie
Hansie,
Neil used a Lastolite Ezybox to mount the Nikon SB-900. It should work for Canon flashes as well.
See this post of his: https://neilvn.com/tangents/lastolite-ezybox/
Thanks Stephen. I looks awesome. Will check it out.
Hi Neil,
Thanks for yet another interesting article. From what I have gathered, reading through your website, is that you dislike any shadow cast from the flash (shadow being distracting and providing evidence that a flash was used). However, what I am trying to understand is that shadow can be important as it creates a more “three dimensional” (depth) effect to an image. Just to clarify I am referring to shadows on a model’s face and not background shadow. In the first image there is an obvious shadow (on the model’s face) and you did this on purpose to create more depth to the portrait. The second image has a small but noticeable shadow beneath the model’s nose (very few images I have seen of yours show any sign of shadow). Was this also intentional, unavoidable in this instance or just to emphasise that the first image is better in avoiding a “flat” look? Looking at the second image (and lets assume this is the angle you wanted the picture) given the model’s skin tone if there was not a slight shadow under her nose it would look VERY flat and her nose would be hardly noticeable. I have also read the very good article on this site by Chuck Arlund (Simple & Effective on-location lighting techniques) and notice some harsh shadows under the model’s nose yet they look to me like excellent images. I do appreciate that there is leeway on what is an acceptable shadow and to some extent a photographer’s artistic style. I guess what I am trying to understand is how you would decide when shadow is effective or distracting?
Regards,
Martin