Shooting wedding photos in the mid-day sun with off-camera flash
Shooting under the mid-day sun is always a tough scenario we face as photographers. Recent topics here have included photographing wedding portraits in bright sunlight, as well as generally taking photos in hard sunlight. These techniques mostly revolve around adapting to the harsh light. We can often sidestep having to work in the hard sunlight by positioning our subject so the light is more flattering.
Sometimes though, these alternatives are out of our hands, and decisions are made for us. Then we have to deal with the hard sun with the only other option that will give good results – overpowering the hard sunlight with lots of off-camera flash.
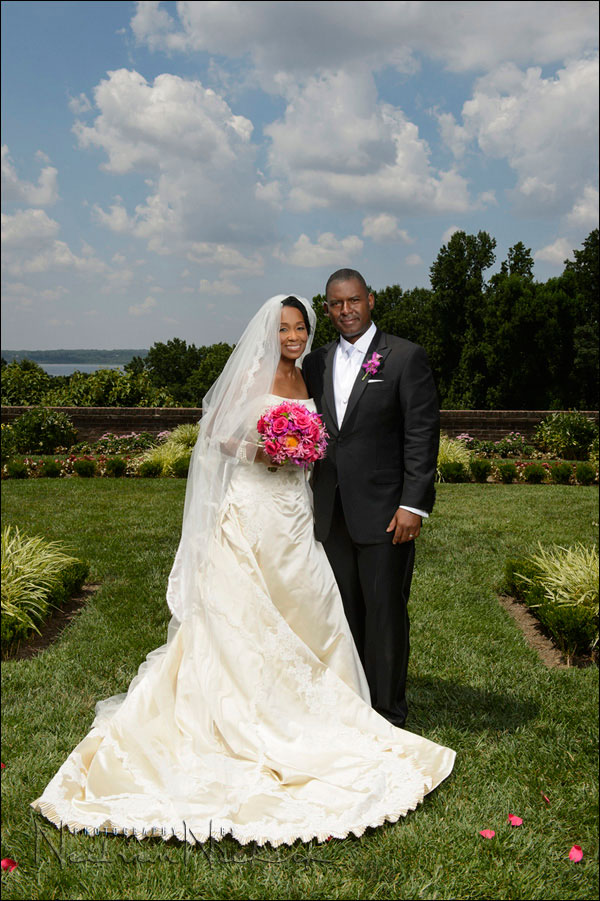
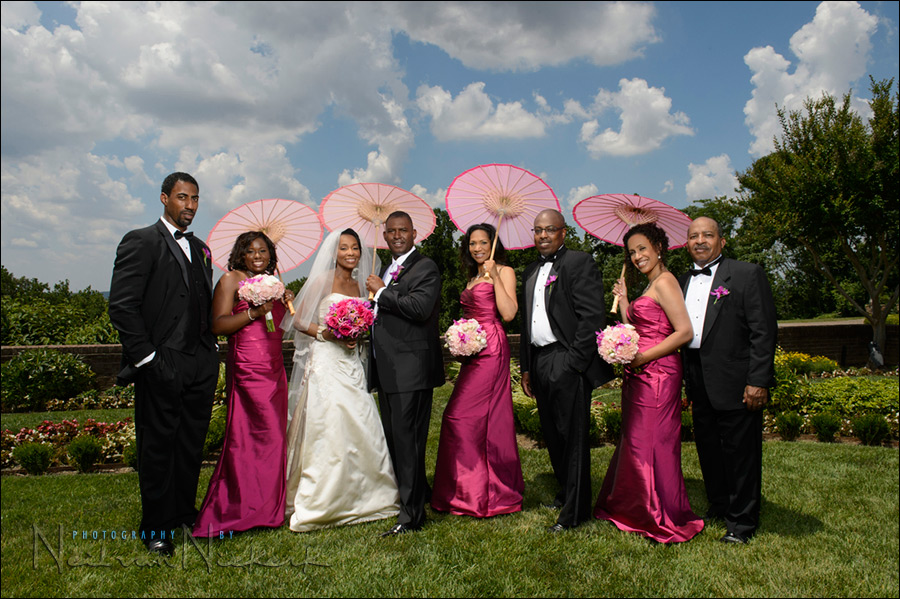
With Aluanda & Clarence’s wedding at the historic Oxon Hill Manor, I anticipated beforehand that we might have to do the family photos on the site of the outdoor ceremony. The weather forecast for the day was that it would be a hot day with lots of sun. Little chance of relying on cloud cover.
The Sunny 16 rule tells us that hard sunlight is in the order of 1/100 @ f16 @ 100 ISO … which becomes approximately:
1/250 @ f11 @ 100 ISO
The reason for the choice of 1/250th is that it is the maximum flash sync speed for my camera, and the flash that I was going to use, couldn’t go into high-speed flash sync. Then maximum flash sync speed really is the best choice for shutter speed.
The sequence of images that I shot here, were all at 1/250 @ f13 @ 100 ISO
Of course, I had to shoot in RAW, since I needed the flexibility of the RAW format to be able to easily adjust the Shadows and Highlights, Blacks and Whites, and Contrast. Very often, the notion of “getting it right in camera” as a justification to shoot in JPG, just isn’t practical. Then we need to rely on RAW. Which means, I always shoot in RAW.
The light that I used here is the same that I used during this photo session with two models, Sarah & Mark, as described in the article on overpowering the sun with flash. It is the Profoto AcuteB 600R which, even with a double-baffled 4×3 softbox, can match the sun’s brightness. This kit has been superseded by the newer Profoto B1 battery powered flash (affiliate). The softbox is the large Profoto RFi 3’x4′ softbox (affiliate)
The beauty of using such a powerful light on location, is that you can use a big softbox, and still dump that much light. The light is that perfect combination of being very powerful, and being soft enough to easily be flattering. Working with a bare speedlight can be challenging because it is a small light source.
With the need to work fast, and have a quality light that is strong enough, nothing beats these kinds of lights like the Profoto AcuteB / AcuteB2. Of course there are many alternatives on the market, like the AlienBee and Einstein and Elinchrom units. The point here is that often enough, speedlights just don’t cut it, and then we have to pull out the bigger units that can deliver a lot more juice.
Photo gear (and equivalents) used during this photo session
- Nikon D4
- Nikon 24-70mm f2.8G AF-S / Canon 24-70mm f/2.8L II
- Profoto Acute B2powerpack (600 Ws)
or alternately, the Profoto B1 AirTTL battery powered flash (500 Ws) - Profoto RFi 3’x4′ softbox
Related articles
- Camera & flash settings: what do you want to achieve? (model: Ulorin Vex)
- Controlling bright daylight w/ direct off-camera flash (model – Molly K)
- Wedding photography – big bounce flash
- Overpowering the sun with flash (models: Sarah & Mark)
- Wedding photography – Oxon Hill Manor, MD
I was wondering how you made such gorgeous photos (on Facebook) in the mid day sun. Thanks for this explanation. Where was the softbox and how did you determine its light’s power setting? Via light meter? Did you set your camera to Sunny 16 and adjust light until meter indicated a correct exposure? How did you know when you’d overpowered the sun?
Neil do you check only the red channel or all the channels combined?
Ever try a neutral density filter to give you a more normal aperture? I hate looking at how dirty my sensor is when I get beyond f8.
Neil,
I’m thinking of getting the B2’s myself. I am wondering why the normal B2 is $600 less than the B2 w/ PocketWizard built in. That just seems like a big price difference for a built-in PW, when I could save the $600 and just plug in one of the PW’s I already have. Is there a reason for such a huge price difference, or is that just the name of the game with Profoto’s pricing?
Thanks!
well done Neil, what kind of softbox did you use? I just saw mention of the size, just thought I would ask, the lighting looks great.
Profoto RFi 3’x4′ softbox
Hi Neil!
Why did you decide to underexpose 1/3 stop @F13 if you could have had a correct exposure @F11 ?
Some nice images!
Regards
Mike.
Neil! I live close and would’ve been happy to schlep your gear!! ha ha. Seriously though, was it a choice to forego an ND filter to bring the f/stop down and get some bokeh and saturation in the background? Thanks!
Jake
Another way to handle this is to use the High Speed Sync (HSS) trick.
With Nikon cameras (I’ve done this with the D7000, an SB-900 and Elinchrom strobes/skyport trigger), you enable HSS and increase your shutter speed to a value enough to make ambient dark. Then connect the sync port of the SB-900 to a strobe wireless trigger.
You need a strobe with a long flash duration (like 1/800s). I have performed this with Elinchrom D-lite 4, and the A-channel on the Elinchrom Ranger Quadra. The flash duration is longer on the A-channel.
When the SB-900 starts HSS, the studio strobe fires. The HSS cycle is complete before the studio strobe flash duration is complete.
You will see many examples of people that have performed this HSS trick on the web.
Hi Neil
Quick question for you. does your assistant set up the flash stand and soft box or do you do it yourself
Lou
I love your work in general and especially your tips with respect to flash usage. I was curious however why you didn’t use a ND filter (3-4 stop) and open up the aperture a bit. I think that most of these shots might have looked a bit nicer around F4… I haven’t used ND filters, but it’s next up on my list for wedding work.
Also, I was considering a set-up with the Lastolite Ezybox 90cm Softbox & 4 flashes. This should give me roughly 320 Ws which should work for most outdoor scenarios. I can trigger one with pocketwizards or a cord and the optical slave built into the SB-800/900s seems to keep up with the highspeed sync, allowing me to use whatever aperture fits the situation best. Then when I move indoors I simply slip two of the SB-800s onto my cameras and throw the other two in the bag. It seems a tad more portable. Any thoughts here?
Sorry – ignore my comment about the ND filter. I see that you have addressed that…
Won’t there be a concern on blinding the subjects if you use ND filters and increase flash power?
Neil,
Love the blog. I’m going to be shooting an outdoor wedding in a few months, and photos will likely be around 3:00 p.m. to 5:00 p.m. I’m not anticipating a group size of more than 12. Do you think two Canon 600EX-RTs with 26″ Octaboxes could handle it, or should I be looking into renting some strobes?
Best,
Nick
Thanks for the quick feedback – sounds like that’s how I’ll go.
Hi Neil,
I took in a few of your pods at After Dark in Saint Louis a few months back. Very educational.
After having a terrible experience yesterday photographing an outdoor moutaintop wedding in late afternoon July sun, Googling landed me here on your page.
For the formal shots, I did pretty much as what has been discussed. I set up several large strobes and used an ND filter. No problems there.
My frustration was that the sun was off directly to the West and the chairs were arranged so that the wedding party and bride walked directly South. This caused the right side of the groomsmen’s faces as they walked down the aisle to be directly lit by harsh sun, and the bridesmaids were completely shadowed by the groomsmen. I had scoped out the area a week prior, and I advised the bride of the lighting situation, but she was persistant on the arrangement of the chairs. The wedding party was so large, over 10 on each side, that I couldn’t get close enough for on-camera flash to add much fill.
I’ve shot many weddings, but yesterday was a worst-case scenario by far. Do you or any of your readers have any advice for handling such a difficult situation, where high-power strobes can’t be used and you’re at the mercy of the wedding planner’s positioning?
Thanks and take care!
David
David, it sounds like the scenario described here – How to overpower bright sunlight with on-camera flash.