Using grids with flash for a spot of light
My preference is for softer, flattering light. When I use off-camera flash, I really try to use a softbox if at all feasible. It’s easier to use in that you have leeway in how your subject is posed. For with a smaller, harder light source, you have to be much more specific about posing. A bigger light source is therefore easier to work with when you shoot fast – such as at a wedding.
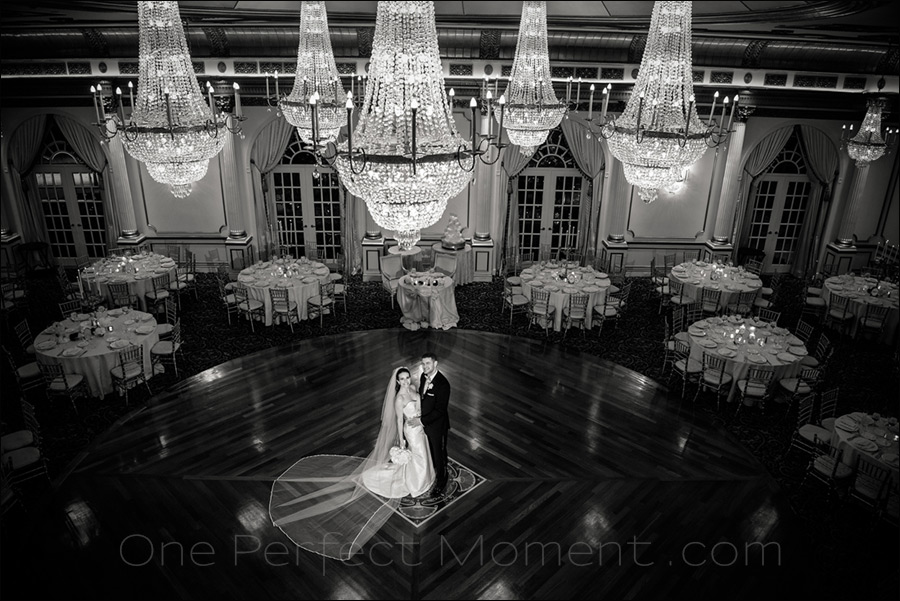
But there are times when you just want to light up a portion of the scene, or want to specifically light your subjects. The photo above is an example. I am shooting from up high from a balcony overlooking the dance floor. I don’t want to light everything up – I just want to light up the couple to the same level as the chandeliers at the top. Of course, how much light I add to them, or how bright I want the surroundings, is something I control from my camera with my camera settings – and the flash power. Choices. And this is how I wanted to balance the scene here with off-camera flash.
The pull-back shot below will show where and how I placed the Profoto B1. It was high up on a 12-ft tall Manfrotto 1004BAC light stand. I didn’t put it all the way up … just high enough to have the light fall from a proper angle from above.
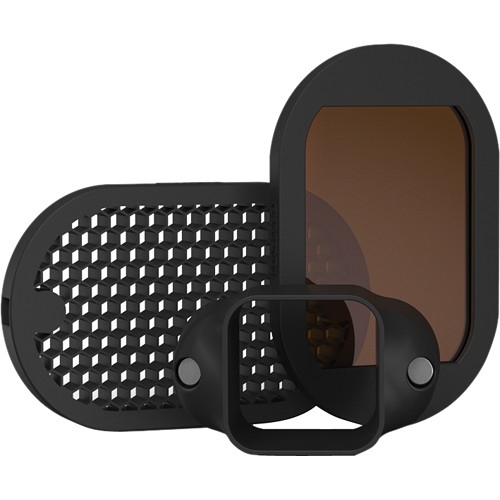
I also added the Profoto OCF grid kit (B&H / Amazon), to contain the spread of light. If you recall this article – comparing output: Studio lights vs. speedlights – you’ll see that the Profoto B1 and D1 flashes spread their light very wide. I wanted to control the spill of light to just light up my couple. I just keep the 30 degree as a default. No time to experiment when shooting faster. As it is, I had to shout at the couple for them to hear me – there is no leeway to run up and down and change the grids to a tighter beam. I choose the wider beam grid then as a default – it is the better compromise than one that throws too tight a beam of light.

Camera settings & photo gear used during this part of the photo session
- 1/40 @ f/4 @ 1600 ISO
- Profoto B1 flash (B&H / Amazon)
- Profoto OCF grid kit (B&H / Amazon)
- Profoto OCF gel kit (B&H / Amazon)
- A tall Manfrotto 1004BAC light stand
Since the venue had very warm lighting, I gelled my flash with a full CTS gel that comes with the Profoto OCF gel kit (B&H / Amazon). This brought the flash’s WB down to the value of 2850K that I tweaked the RAW file.


Summary
As always, with flash photography it is all about the control of light,
and specifically the Direction and Quality of light. [ book / video tutorial ]
Grids for speedlights
With magnets holding the items together, it is super-quick to change out gels, or add a grid – all to control your speedlight’s output and the spread of light. You literally just place the grid or gel, and the magnets snap it into place – and keep it there. Simple as that.
Gelling your flash
With the Profoto B1 flashes, I used the Profoto gel sets. But for speedlights, I cut my own strips of gel to tape to the front to my flash.
Since I frequently gel my flashguns to turn the WB of my flash much warmer (usually for Incandescent light), I use these gels that I cut up and tape to the top of my speedlight’s head. One of these sheets (which aren’t expensive), will give you a lifetime supply of these filters. For me, these gels are an invaluable part of flash photography.
Tape the gels down on your lens hood when not in use.

Related links
- Flash photography with a grid
- Using the Profoto B1 portable flash at a wedding
- Gelling flash for Incandescent light / Tungsten light
- More of Abi & Josh’s wedding at the Crystal Plaza, NJ
I’m surprised that the B1 is placed so far from the couple in the pull back shot – very informative – I’ve always thought it would be closer to get softer light and avoid too much spill into background. Thanks Neil, good article.
I had the flash that far back so it wouldn’t interfere with wider compositions.
Thanks for sharing Neil.
Would a snoot yield the same effect? Or maybe barn doors or something similar? I’m guessing a with a snoot you’d get harsher ‘edges’ to where the light falls off?
Thanks,
Ed.
Ed, I didn’t have a definite answer for you, so I had to do some testing of my own:
The difference in results between a grid and a snoot.