Wedding photography – Dealing with the videographer’s light
With wedding receptions, we’re most often working within a very warm spectrum. There are tungsten (incandescent) lights all around. (**) There is candle light. There might be twinkling lights as decoration … and there is the videographer’s light. The videographer’s light will be Tungsten balanced, even if it is an LED video light that they are using. (***)
So while a wedding photographer might be using a lot of flash to dominate the lighting .. and settle for Cloudy or Flash WB, there is often a conflict of interest when the videographer joins in with his video light. The video light obviously has a much warmer white balance than flash. So how do we best deal with this?
Not necessarily by asking the videographer to move away or switch his light off. We best deal with this by gelling our speedlights (and other flashes) for Tungsten.
** This is changing though, as more and more venues are changing to fluorescent lights. But it is still a warm color balance that is usually maintained.
*** The videographer will gel his LED video light with an amber gel, since he is trying to match the ambient light’s color balance … incandescent / Tungsten.
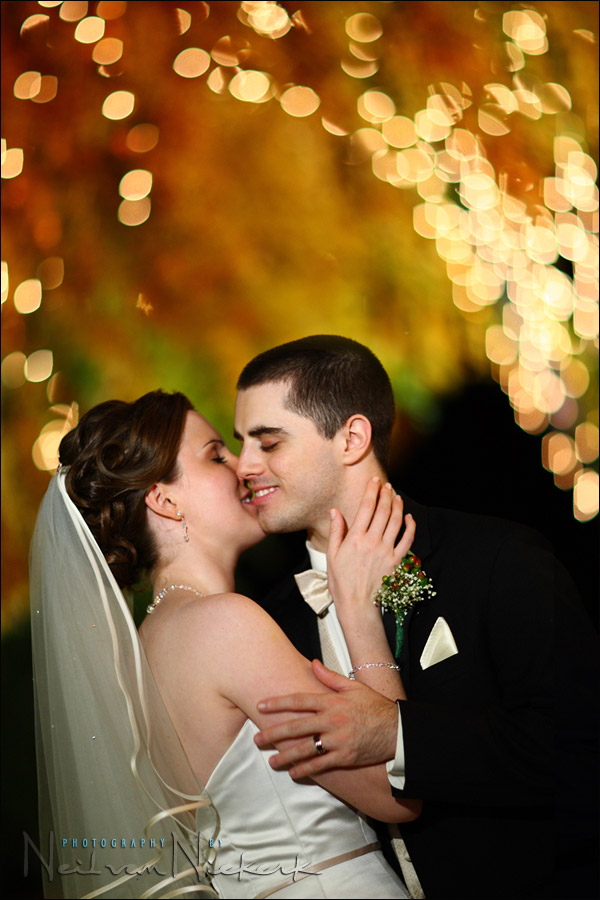
Now, the photo above was shot using just the videographer’s light. During the wedding reception, we snuck the couple out for a few romantic portraits. Instead of the videographer and I taking turns to shoot, I shot without flash and just used his video-light and worked around him. A few times I asked the videographer specifically to hold his video-camera with its light in position for me so I could get a certain angle.
But even when I do need to add flash – whether as the main source of light, or as fill-light to the video light – my flash is gelled, and close to the same color balance. No problems with the videographer’s light potentially becoming intrusive.
This specific blog post was triggered by a search engine query that I noticed linking to my site. The phrasing was interesting:

“wedding photographer conflict with videographer’s light”
Really, there would be much less ‘conflict’, if the photographer had gelled the flash for Tungsten. The entire spectrum that we see at a wedding reception is warm … we’re the only fools there adding blue light to this with our flashes. So really, the best way to deal with this, is to gel our flashguns.
Gelling your flash for Tungsten / Incandescent light
Since I frequently gel my flashguns to bring the flash WB closer to Tungsten / Incandescent, I use these gels that I cut up and tape to the top of my speedlight’s head. One of these sheets (which aren’t expensive), will give you a lifetime supply of these filters. If you use flash indoors where Tungsten lighting dominates, then these filters are an invaluable part of flash photography.

The Full CTS will bring your flash WB down to around 2900K, more or less neutralizing the look of the Tungsten light. The 1/2 CTS will bring your flash WB to around 3800K, which will leave your backgrounds still with a touch of the warmth of Tungsten lighting.
camera settings: 1/100 @ f1.2 @ 1000 ISO
Canon 1D mk III; Canon EF 85mm f/1.2 L
Yes, it’s a very special lens indeed. You just have to love the way it renders any background.
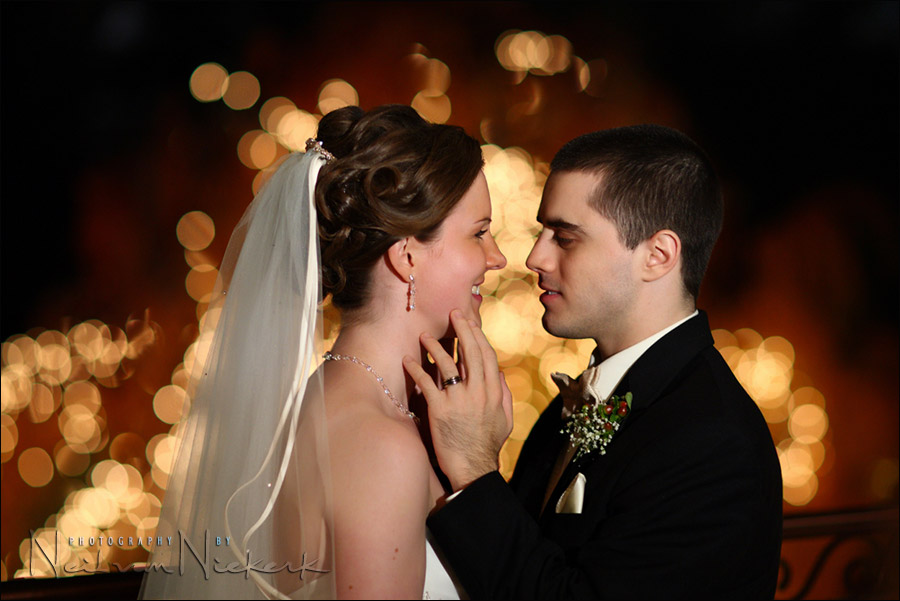
camera settings: 1/80 @ f1.6 @ 1000 ISO
Canon 1D mk III; Canon EF 85mm f/1.2 L
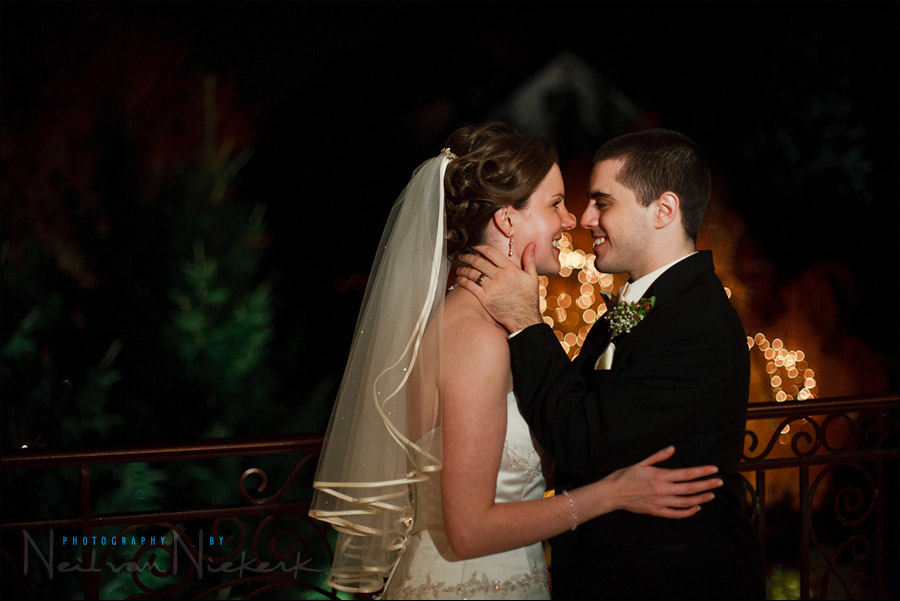
From the same viewpoint, my 2nd photographer standing a little further back with a 50mm lens. This will give you an idea of the background:
Summary
Gel your flash for Tungsten immediately when you work in a location with a predominantly warm spectrum. Simple as that.
Related articles
- Balancing flash with incandescent / tungsten light
- Flash and tungsten lighting
- Wedding photography tutorials
Thanks for another great post, Neil. Most folks I’ve read talk about gelling with CTO instead of CTS for matching tungsten ambient. Can you go into more detail about why you pick CTS instead?
Great topic! Note that the colour observed from a gelled flashgun will vary depending on the power setting of the flash. A full pop will always be more white, while lower settings will be closer to the gel colour. Of course, if you are bouncing the colour of the walls and ceiling will add to the whole equation too.
Great post Neil. One thing that struck me is how sharp your images were using the 85mm 1.2 wideopen. Do you get many OOF shots at that aperture. I use a 7D and select a focus point in one shot and I struggle to get many tack at 2.8. Im begining to wonder if my camera has a problem. Sorry this comment is off the topic.
thanks. Ken.
Neil…I’m wondering about the precut gels and adapter that come with the SB-900. How do those compare to using CTS?
So, you’re using Flash or Cloudy setting when you gell your lights inside? I thought you gelled and set to Tunsten setting. I don’t even remember seeing the Cloudy/Flash thing in either of your books (yes, I bought the new one, too). Did I just miss it, or am I not understanding what you’re saying now? Or both?
Thanks…
Great post. I needed this one this past Saturday :-) Will know for next time!
I would also love to hear a response to the post from Ken (above) about getting tack sharp images at 1.2 …
Thanks again…and again!
Christine
Hi Neil, I have one question regarding exposure with the videolight. The other night I was shooting an event and I was using 3200 iso and a bounced flash. But sometimes the video guy came in with that light and affected my exposure because I was shooting manual and I had everything set to use my flash balanced with the ambient light. The problem was that I never knew how close or how far he would be from the subject and with that I had to guess sometimes my shutter speed because the shooting was very dynamic and not only formal pictures when you have more time to check the meter. How do you deal with that?
Thanks.
Eduardo, In such situations I may quickly shut the flash off altogether and work off video guy’s lights. You could get some pretty nice stuff like this.
Cheers!
Bogdan
Thank you for the information, Neil – very helpful. Some time ago, I remember reading that flourescent light color temperature will shift picture to picture if you use a shutter speed other than 1/60 (or a multiple, 1/120, 1/180, 1/240). I usually have difficulty with flourescent color balance, even with using the green gels and I thought this might be the root cause.
Have you seen any color inconsistencies regarding flourescent lighting and shutter speed selection?
Thanks, Matt
Thanks Neil for the great post once again. I just have a quick question and maybe it’s answered already and I need clarification. When you gel your flash, do you keep your WB setting to Auto or do you change it to one of the presets or do you do a custom setting? I never know what to do with my WB setting when I’ve experimented with the gels. THANK YOU so much!!!!
Greetings Neil
Not sure where to post this question within your tangents, so here goes.
You often recommend to shoot in RAW, due to its advantages in processing etc.
If I shoot in RAW, come back to my PC which is a MAC, and begin to edit, then how does the client view the pixs if they do not have a RAW viewer. Do I simply save the image as a JPEG file for them, or is there another way.
Cheers
Angelo (Australia)
Thank you Neil for your response to my question about what WB setting to use when using a gel on my flash. That one has been a mystery for me for a while now. I appreciate you taking the time to answer me!!
Hi Neil
When you say convert, do you mean “save as a jpeg”, within the save actions .
Or do I need another programme for the conversion ?
Kind regards
Angelo (Australia)
Ps when r u coming down under ???.?
Hi Angelo,
Depends on which raw manipulator you are using as to ‘how’ to do it.
Once you have manipulated the image to suit your tastes, either in Lightroom or in Photoshops Adobe Camera Raw [ACR], you then either ‘Export’ it from Lightroom and choose ‘jpeg’ from options section, or if working from ACR choose ‘Save Image/s’ [bottom left] and in the Options section box that comes up again choose ‘jpeg’, making sure you choose the best quality if you want to be able to print the file also.
If saving a file direct from ACR, you should first of all click on the ‘blue hyper link’ at the bottom middle of ACR’s main window and choose your preferences from the ‘Workflow Options’ dialogue box that opens.
Mine:
Space: [working colour space] sRGB IEC61966-2.1 [up to you]
Depth: Unless working on large files for optimum enlargements, choose 8 bits, you will still have to convert the file to 8 bits anyway to print them.
Size: I choose a size close to my camera’s megapixel specs, usually 11.2 MP
Resolution: choose what your lab requires for printing, you can downsize it later in Photoshop. I have 300 pixels per inch to suit my lab’s specs.
Sharpen: never in this section, I have my own set of sharpening actions for various scenes. eg: if people are large in frame/portrait style, I have action so it masks the Red Channel which does NOT sharpen any part of a persons skin tones.
Another option, if in ACR, you can choose to edit/manipulate any changes in Photoshop itself if you wish by simply selecting the image/s then click on ‘Open Image/s’ button which will open them in Photoshop itself, edit them to any way, then go to Menu list click on ‘File’ choose ‘Save As’ [shortcut Ctrl-Shift S on PC or Cmd-Shift S on Mac] and in the ‘Format’ drop down menu, choose ‘jpeg’ and change file name or leave as is and it’s done.
[Actually you can simply hit Ctrl S when working with raw files when they are opened from ACR into Photoshop, as it will automatically bring up the ‘Save As’ dialogue box]
In Photoshop though when the jpeg options dialogue box comes up next, make sure you choose: Baseline (“Standard”) option, the first one, never the other two, then slide the slider over to ‘large file’ which will give best quality, and you should never have to change it again, unless you are wanting lower resolution of course.
Oh, handy hint, once you have done the first jpeg and you then want to save the next lot of images, in the Save As dialogue box it will keep the ‘Format… jpeg’ option already there, it remembers your last ‘Save As’ so you don’t have to keep choosing it. [well on mine CS5 it does]
Hope this helps.
Trev
Neil and Trev
Thanks for the help, especially Trev.
Cheers
Angelo
PS make plans to visit Australia, im sick of asking you :-)
Neil, I have learned everything I know about flash photography from your website. I’m still not sure if i understand this correctly. If I shoot raw and gel my flash, can I leave my WB in auto since ambient light and flash output will almost be the same color?
Regards,
Rod
Thanks to your answer(comment #12) Neil. When I said manual I was referring to camera exposure, I was using flash with TTL. I managed to change my shutter speed after a few shots when I figured out the average exposure. But to really mess thing up the videographer wasn’t using any gel so I had to take off mine to match with his light.
thanks
Wow..these pictures are amazingly irresistible to look at..it makes the pictures more beautiful and sweet to look at.
The way the shots look, this is a work of art..one look of it and it catches all your attention.
Good information. I will need to experiment with flash gels some more. Rarely have I encountered a professional wedding videographer though.
Hi Neil:
I have the Rosco Strobist kit and the 3442 gel is not included. But i see that the Pale Gold Gel #08 is very similar to #3442
You can see the graphics here
What do you think about this?
Thanks
Neil,
Ive been caught in quite the opposite situation: Ambient=Tungsten light, My flash=CTO/CTS Gelled, and the “PRO” video guy using White LED Light….I wanted to rip his head off. most of my shots ended up having mixed lighting (half face orange half blue). I didnt want to use plain ungelled flash because that would have made the background quite orange in comparison to my subject. Any ideas ?
Unfortunately there is no way around that idiocy. Speaking to that videographer is unlikely to make him realize he could be doing it better. Sorry.