Wedding photography – Using bounce flash outside
When working with a couple during the romantic portrait session, there’s the need to bring variety to the images – not just in posing and composition, but also in terms of light & lighting. For this reason I use a variety – available light; video light; off-camera flash and on-camera bounce flash. I really like using on-camera bounce flash since it is such an easy light source to use, always at hand. There was a recent article on using bounce flash outdoors, but I’d like to add another example where I used bounce flash outside a wedding venue. Let’s look at the sequence of images …
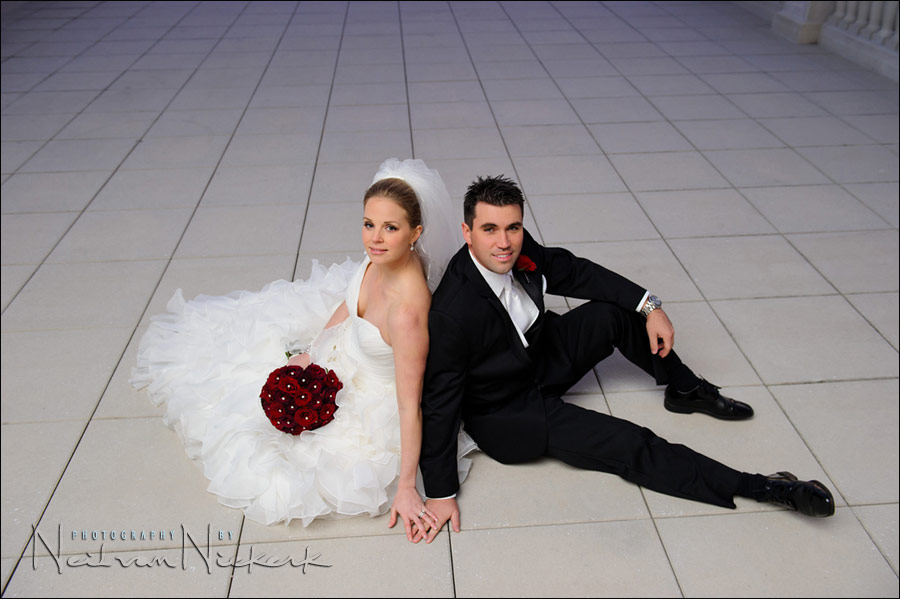
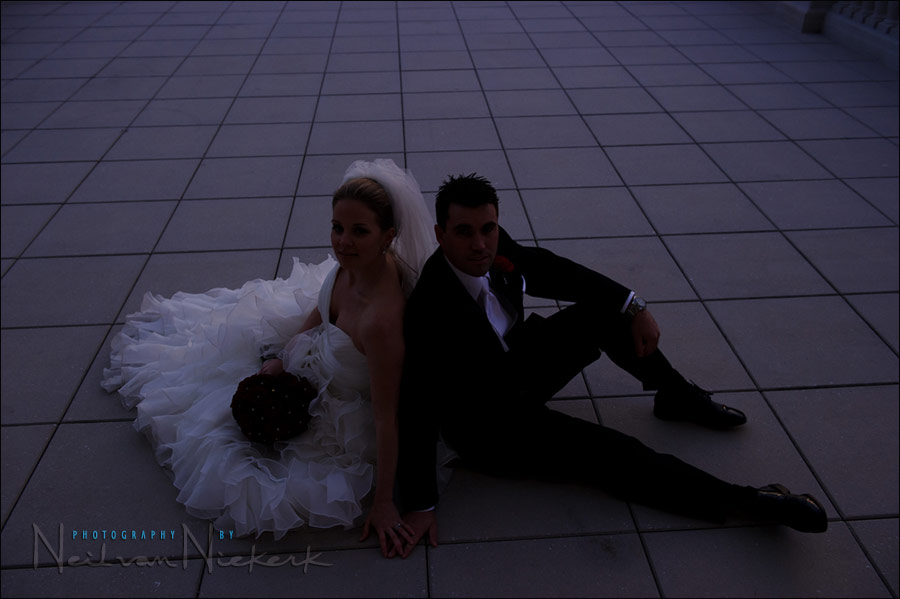
The soft evening light was just perfect. Nothing extra needed. The light was fairly low, so I used 1600 ISO. Not a problem with the Nikon D3s.
- camera settings: 1/250 @ f/4 @ 1600 ISO
- Nikon D3S
- Nikon 24-70mm f2.8G AF-S / Canon 24-70mm f/2.8L II … used at 28mm
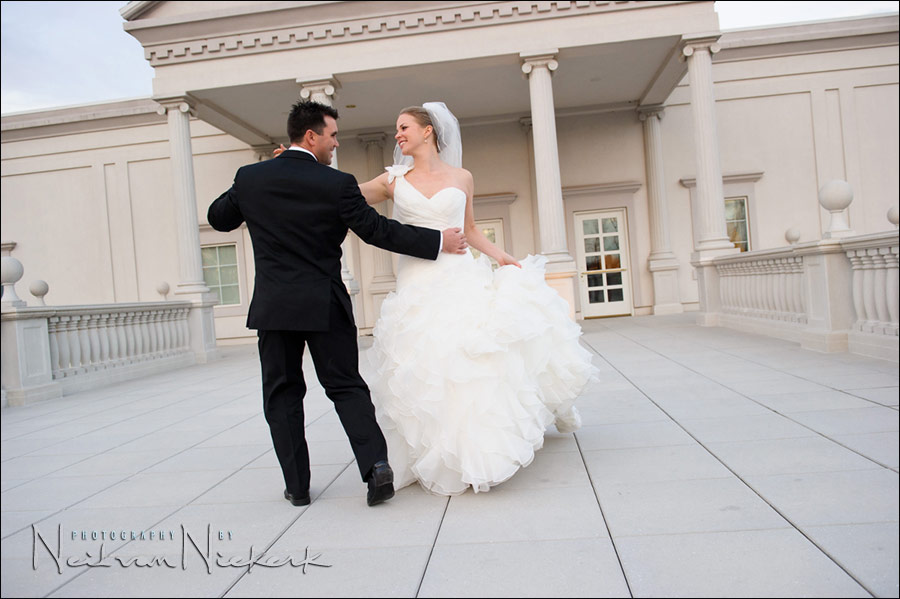
The light was getting low, but working with the direction of the light, there was enough light to comfortably get by.
Then I had the idea of shooting from an elevated point of view and using the lines there as a compositional device. Standing on a chair, I was able to get that point of view … but I also made sure that were I placed myself, I would be able to bounce flash up against the walls and ceiling of the entrance way.
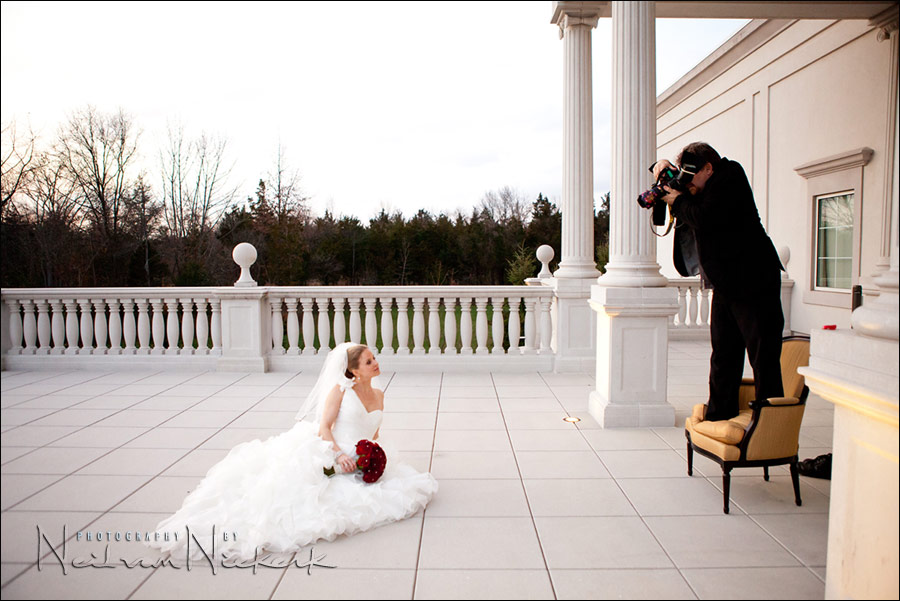
Here you can get a better idea of how high the ceiling was, and where I bounced my flash off.
Since the light was too low shooting in that direction, I didn’t particularly meter for the ambient light, but rather chose my settings so that they made sense … ie, enough depth-of-field and a not-too-low shutter speed. I needed to hand-hold a non-stabilized lens, and flash might not entirely freeze my movement there, standing on the cushioned chair.
Here is one of the final images in this sequence … and another as a comparison where I disabled the flash so that you can see what the ambient levels where at.
- camera settings: 1/200 @ f/4 @ 1600 ISO .. TTL flash @ +1.00 FEC
- Nikon D3S
- Nikon 24-70mm f2.8G AF-S / Canon 24-70mm f/2.8L II … used at 30mm
- Nikon SB-910 Speedlight / Canon 600EX-RT Speedlite
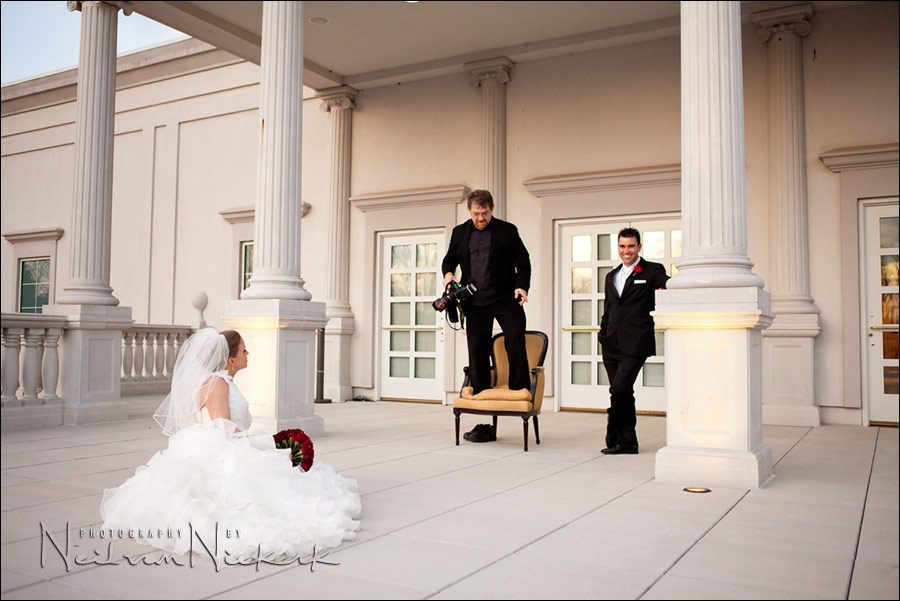
Since the couple had no idea of what I was aiming for, it helps in showing the result. I do this during the session – it helps reinforce their confidence in me. But I don’t do this with such frequency that it holds up the flow of the photography. It is important to keep the energy level up.
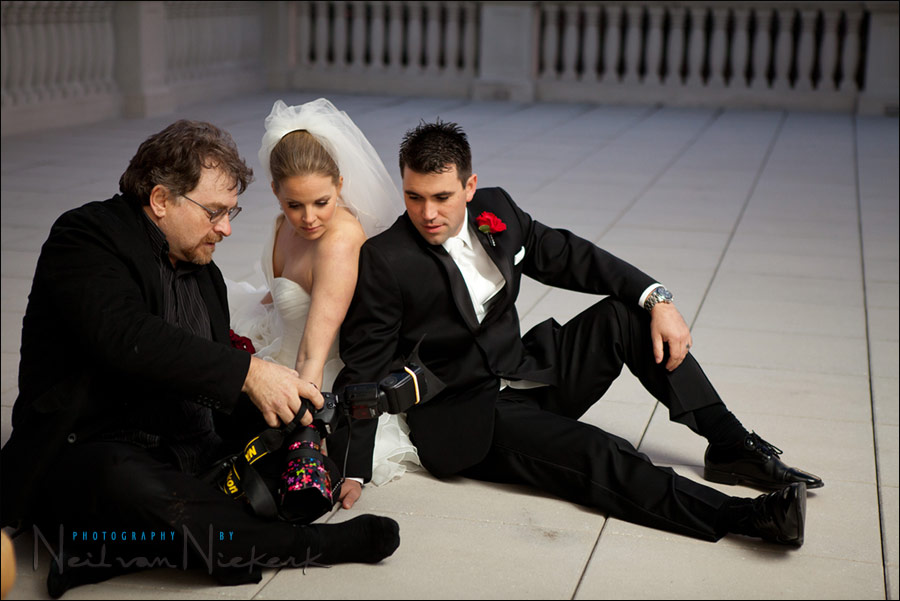
The image at the top of the page then is one of a sequence … which is one of a number of sequences I took. All of this with the motive to give the couple an interesting variety to their photographs. Using different lighting sources and styles definitely helps with that. It keeps it interesting for the couple, and it keeps it interesting for me as a photographer.
Related articles
- More articles on bounce flash photography
- More wedding photography tutorials
- Wedding photography – tips on posing – asymmetry
- Back-lighting with flash for silhouetted wedding portraits
I was wondering why you didn’t go down to F2.8 in the last image at the expense of depth of field? I don’t have a D3, and I cringe sometimes when I have to go up to ISO1600.
With the Nikon D3s this was much less of a concern. 1600 ISO on the Nikon D3s looks like 800 ISO on the Nikon D3, which already was remarkable. So there was no need for me to sacrifice that extra bit of depth-of-field by going wider on the lens.
Hey Niel,
I Love You.
Always great info thank you for sharing.
It’s hard to tell in the first pull back shot, but is the flash pointed directly at the ceiling or slightly at an angle? I can see that the BFT is on the side by your head, so I’m just wondering about the directionality. Thanks for another great post! (Made me laugh to see you in your stocking feet with the bride and groom in the last photo).
I had my flash pointed about 30 degrees off to my side, away and above me. Somewhere so I could hit the ceiling to the side of me.
Love reading your blog, very inspirational :-)
From Neil, I’ve learned that a lot of surfaces can be used as an bounce surface for flash. :)
It’s also good that this building was gray, so the color cast from the bounced flash would not have been a significant problem.
Another great post. Thanks to Neil’s tips, I now constantly look for walls, ceilings, etc., to bounce my on-camera flash.
Great post Neil and well done for taking off your shoes before standing on the nice chair! ;)
Hi Neil
Nice article
Also like the colourfull lens hood.
Niel,
This a great article to show how to use bounce flash outdoors. Question: What Raw WB settings did you use for the final image? The color is sweet.
I was using the Cloudy WB preset on my camera. But as you mention there, I was shooting in RAW, so this largely becomes immaterial.
Hi Neil, I noticed that you have been using now the D3s.
How high do you usually go now with your D3s regarding high iso during a weeding ceremony comparing with the D3?
Thanks.
Eduardo … the Nikon D3s has about a stop better ISO performance than the Nikon D3. And as I showed in a recent post, the Nikon D3s high-ISO noise performance is remarkable.
I now happily work between the 1600 ISO and 3200 ISO range when photographing a wedding ceremony, and will easily take it higher if needed.
Neil, awesome article.
I love how in the first image you stuck the brides head right in the curve of the light on the back wall.
Great article as always.
Did you misspell it? Is that D4 ;)
Hehe!!
You are actually using that lens coat !!
Great explanation.
Thanks
How could you not love (and use) a lens with that psychedelic flowery pattern!?
Hi Neil,
I’ve read this post and it is so inspirational. Using bounce flash outside is something new to me and you show it perfectly.
The tips is simple and practical. Actually, I’ve been managing the website about wedding photography and I wonder if you could allow me to post this article in my feature website. Of course all the credit goes to you and it will be a nice information for my subscriber. I have also social bookmark your website so people can find this useful article like I do.
Please continue to create awesome tips like this and you are doing really great things for lots of people.
Revand .. thank you for the compliment. Since the article already exists on my website, it is best to just link to it for your readers, instead of just copy & pasting it.
Hi Neil,
What type of material is the black foamie thing? I have been to my local art store and they didn’t have a similar material. Where do you purchase your material?
Thanks
Shelby:
https://neilvn.com/tangents/the-black-foamie-thing/
Trev
Hi,
If you did not have the building to bounce off of, what would have been your next choice? Bounce off an assistant-held reflector? thx!
Bruce .. using a reflector to bounce flash off, is a good idea. But sometimes there just isn’t anything to bounce your flash off. In this particular case, I already had a good selection of photos of the bride and groom, so I would’ve looked elsewhere for another idea. No need to chase this particular dead-end then with direct flash.
Whomever it is that takes the behind the scenes pictures(of you taking the pictures), gets some good exposures also. Evidently, they’ve learned from the best.
Greg
Hi Neil,
Your work is so completely fabulous – as are your lessons!
Forigve my ignorance but when you say in the above (bride in front of wall and tungsten lighting) “I chose my camera settings such that the ambient light in the background registered, and then added TTL flash. The flash picked up the exposure to where it needed to be. I had to dial a positive FEC to compensate for the brighter tonal values dominating the center of the image.” What exactly to you mean by making the background “register”
Thanks in advance!
Selina .. I meant that I wanted some of the ambient light to appear in the photo, and now completely under-expose it.
Hi Neil, another very helpful post as shall be looking to try this as soon as I can.
Neil,I have observed that in most of the cases you use your own tested/invented flash light modifiers,did you ever used the Gary Fong collapsible speedlite modifier ?
There are specific reasons why I don’t use any of the Fong products.
really good,your work inspire people thanks god bless you