Bounce flash & direction of light
An aspect to flash photography that I frequently underline in the articles on this site, is that we need to carefully consider the direction of light from our flash when we bounce our flash. Sometimes we just need to bounce the flash behind us into the room to get soft light. But when we have multiple walls / surfaces we can bounce the flash off, then our choices become more interesting … especially when we do portraits.
This is Carly Erin, a delightful model that I photographed for my own portfolio: an intimate photo session.
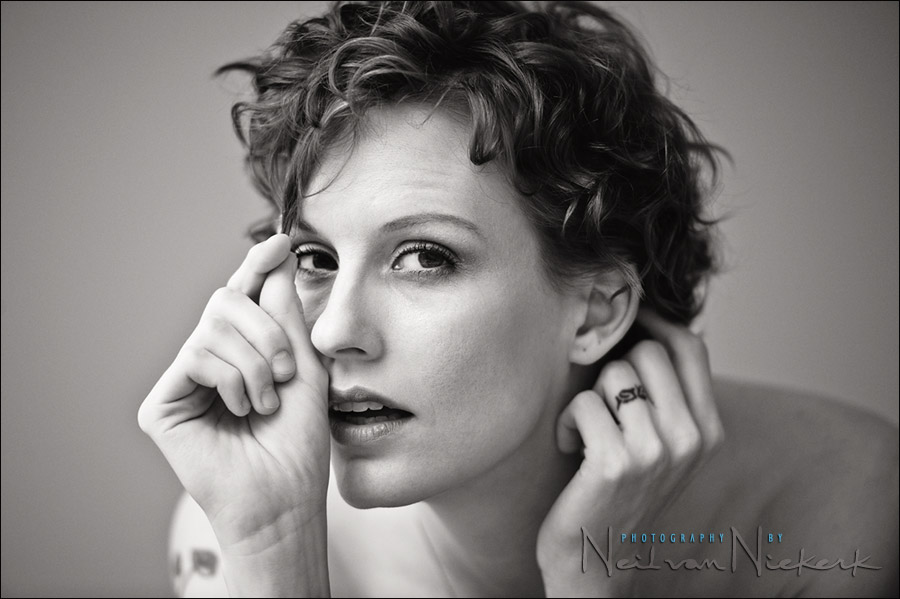
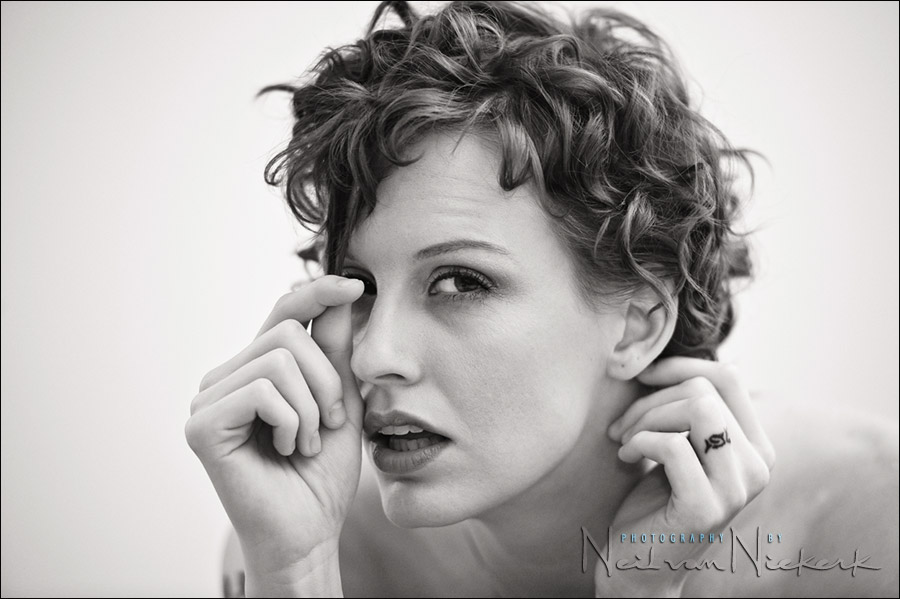
What I wanted to show with these two images, is how the direction that I bounce the flash towards, has a fairly dramatic impact on the final image. I once again used the black foamie thing to shield my flash from directly illuminating my subject. I bounced my flash towards the area that I wanted my light to come from.

On-Camera Flash Photography – revised edition
This book is explains a cohesive and thorough approach to getting the best from your on-camera speedlight.
Particular care was taken to present it all with a logical flow that will help any photographer attain a better understanding of flash photography.
You can either purchase a copy via Amazon USA and Amazon UK, or can be ordered through Barnes & Nobles and other bookstores. The book is also available on the Apple iBook Store, as well as Amazon Kindle. Also check out the Amazon Kindle store.
Learn more about how the cover image was shot.
Camera settings & photo gear (or equivalents) used during this photo session
- 1/125 @ f/2.8 @ 1000 ISO
- on-camera TTL bounce flash
- Nikon D3
- Nikon 70-200mm f2.8 AF-S VR II / Canon EF 70-200mm f/2.8L IS II
- Nikon SB-910 Speedlight / Canon 600EX-RT Speedlite
Looking at the photos, the camera and (TTL) flash settings and approximate focal length are implied. More important than these more mundane details, is the direction of light.
A little bit of homework
Lighting diagrams to show where I bounced my flash? Not this time. : )
Instead, look at the images, and look at the pattern of light and shade, and try and deduce from that where I had bounced my flash. It’s all there in the final images.
Related articles
- review: Best light modifiers for on-camera flash
- Bounce flash photography – Short lighting
- Tutorial: Bounce flash photography
- Bouncing your flash
- Black foamie thing
Materials for the flash modifier used – the black foamie thing

The BFT is held in position by two hair bands (Amazon), and the BFT is usually placed on the under-side of the flash-head.
The linked articles will give clearer instruction, especially the video clip on using the black foamie thing.
okay here’s my best guess (and I’m fully prepared to be declared wrong)
Picture 1: you are aiming the flash forward, camera left, and slightly high. the hotspot of the flash is hitting the wall/ceiling just slightly behind the subject’s head.
Picture 2: once again, you are aiming the flash forward and high. this time it is camera right. The hot spot of the flash is still hitting somewhere behind the subject, but this time, the wall/ceiling your hotspot hits is a lot closer to your subject. either that or you’ve upped your FEC significantly
Neil, I love it. Such a contrast in two nearly identical shots just from a change of light.
I’m just guessing, too, but my guessing disagrees with nick’s.
Picture 1: The light comes from a wall between model’s one o’clock and three o’clock (12 o’clock being the direction of the camera). This gives the almost-shade on the right side of the nose and the right shoulder. And the light comes from above, something like 30°.
Picture 2: From between model’s 10 and 12 o’clock, again from above (something like 30° again?).
I’m assuming that the wall in the background is not parallel to the camera’s sensor; it is closer to the camera at the left side of the photo and more distant at the right side. Else, my whole guessing would be wrong…
I’d love to see a diagram of these, including the walls (all walls!) of the room.
Neil – well done. Most captivating pictures I’ve seen of this model. Mike
I think that Nick is pretty accurate. What a dramatic difference between the two pictures.
Picture 1. Looking at the shadow in the palm of her hand, I think the light is bounced off a wall high and to the left of camera. The wall that is use is not visible in this picture. The wall behind her has no light bouncing off of it at all. I like the soft shadows to camera right of model.
Picture 2. Light is bounced high and to the right of the wall. One thing I can’t tell is the angle of the wall behind the model. I think that it might be on a diagonal. Further away to camera right and closer on camera left.
HI Neil,
Sorry, this is off topic, but I’m remember you posting something a few weeks ago about how to get the code for social sharing widget you use on this blog but I can’t find it – can you please post the link again or point me in the right direction?
Cheers David
David … it’s called Sexy Bookmarks. A search in wordpress will show it.
Thanks Neil :-)
#1 – I think the flash is pointed 90 degrees left and a little up so as to hit Carly but to be mostly feathered off of the back wall, leaving it relatively dark.
#2 – Flash pointed slightly forward right so that the light comes off the wall and hits Carly at an obtuse angle while spilling onto the background.
I think maybe that the wall to the left is farther away from Carly than the wall to right.
I don’t know enough about anything to guess your camera settings other than that you were perhaps shooting at f/2.8 with a long lens.
Neil, longtime fan of yours. Your book & website rock. You should receive the Nobel Prize in teaching.
#1) light fall-off is considerable in this picture as the background is dark. Thus, my guess is the flash was bounced over your left-shoulder, behind you.
#2) background is considerably brighter. Thus, my guess is flash was bounced either 45 to 90 degrees to your right w/the black foamie thing shielding any direct flash from hitting the subject.
Keep on teaching! I’m getting better learning and practicing =)
yeah I totally revise my opinion. I think the first picture is bounced over your left shoulder actually!
Hi Neil. Thanks for all the sharings and I have your book – excellent material for me as I have only 1 flashgun and no wireless possible on my camera.
Here’s my guess:
Pic 1: Bounced flash to your left shoulder slightly upwards and at an angle- since not much shadow at the nose (so shouldn’t be bounced at left wall) and the hand holding the hair is blocking some light casting soft shadows directly behind it (should mean slightly direct light from photogs view).
Pic 2: Direct bounce 45degrees into ceiling in front – since hair is lit and slight “racoon-eyes” in the model.
how’s I do? :)
Neil, while we’re playing the guessing game:
#1: I sense less DOF but I know the background is underexposed so smallish aperture f/3.5-4 with a quick shutter speed (at least 1/60). I also think that DOF is enhanced by long length using your trusty Nikon 70-200 f/2.8 VR II lens!
#2: more open aperture and/or slower shutter and/or higher ISO to bring out the background more; although I want to say this photo has more elements of her in focus, suggesting either less length and/or a more narrow aperture.
Hi Neil
Thank you for sharing your experience on this website.
I hope you don’t mind my attempt at diagramming your setup, still lots to learn though.
Right then, here’s my best guess:
Image 1: Corner shot, wall to left and rear of subject. Flash bounced left and in front at around head height (long lens?) Creating the shadow detail behind her left ear and the side of her neck.
Image 2: Subject rotated 90degs (or slightly less) counter-clockwise (corner walls now positioned to the right and behind) distance to the rear wall significantly reduced. Flash bounced right, again slightly in front and around head height. Increasing the exposure on the rear wall and creating the slight shadow detail to the right side of face. Some light wrapping around from the rear wall to fill.
I recently purchased your book and from there I found the blog. I’m enjoying reading past entries to catch up. I’ve been practicing with bouncing the flash and having mixed success. I do notice that I’m having a hard time getting catchlights when using bounced flash. Any tips? Thanks.
Meryl .. here is more on how I get the catchlights in the eyes.
One shot with the flash and foamy thing pointed over your left shoulder and then one over your right shoulder.
Yeah to me the image had a left far back flash bounce and the bottom 2nd image had a right flash bounce to the wall/ceiling that is closer due tot he changes in the background tonality which was affected more on the 2nd image.
No ceiling bounce.
I was kneeling on the floor in front of the bed, so no ceiling bounce. Just bounced off the wall(s).
Other than that, you’re spot on.
I will go out on a limb and guess that the flash was pointed back camera right for both shots with (window) light coming from camera left. I think the difference is shutter speed. First one had a slower shutter speed, allowing more ambient light in and flash just filling the shadow side. The second had a higher shutter speed restricting ambient light causing the flash to be brighter.
Neil
Nice examples of short lighting and broad lighting, I like the short light myself!
Just wondering if you find yourself shooting one more than the other. I find if you get the shortlighting right it has geat depth .( not all the time for me )
I did get your examples right, excluding I also had the flash slightly high.
Thanks for the examples.
John
John, I definitely have a preference for short lighting. It just looks more interesting, and it is also the kind of light that looks the least as on-camera flash. For this, I do need the black foamie thing, since I am most likely bouncing the flash ‘towards’ my subject.
Aha, she’s on a bed!
Shot 1: flash aimed left, to a “relatively far away” wall. It looses power, so the wall behind her is “lightyears far away” and consequently “relatively” dark…
Shot 2: I guess the bed is close to a white wall, camera right. Neil aimed the flash slightly forward (but flagged, remember) and so he spreads the light and creates a hughe soft-box wall to softly illuminate Carly, and since the wall is so close to her, it’ almost evenly lit…
Neil?
Regs,
Roel
Without knowing much about the room, there’s a few observations I can make in general.
1. First photo, background darker than foreground, light is coming from left side high, maybe some fill reflector form the bottom right (or just a dab of ambient.) The main light is soft and some of the ambient is allowed through for the lack of harsh shadows. The background distance is hard to judge but if the wall is close to the model, that means the bouncing area is very close to the subject or else the wall would be lighted by just as much as the model. My guess is the wall is farther back than it would seem in the photo and the bounce area is relatively closer to the model than the wall.
2. Second photo, light is coming from high and slightly to the right. But her left shoulder is lit almost as well as her right. There’s lots ambient light coming into play here, based on my assumption that the wall is far back.
PS: left and right are from the photog’s perspective.
Picture 1: Light coming from the left side, slightly behind you, probably raised towards the ceiling. I’m basing this on the small amount of shadow if the model’s finger/thumb as it falls on her eye.
Picture 2: The light appears to be coming from the right side, but with both the background and foreground very bright, I’m not sure of the direction.
Wait, I’m not sure I got it.
Clearly the 1st photo is flash bounced from the left, and the 2nd photo is flash bounced from the right.
The difference is distance of the walls. In this case, the left wall was far away, while the right wall was much closer.
Just checking that this is the case.
Thanks!
Yup .. I am much closer to the wall on the right. I barely got my flash directed towards it, since the wall is also part of the stairs leading up.
The right hand wall is further away.
Importantly as well, I am shooting at an angle to the walls.
You mean that the left hand wall is further away, right?
Okay, I think I got it!
Thanks again!
Neil, sorry, I’m still confused as to where exactly your flashgun was pointed. Perhaps a diagram?
Nope .. you have some homework. :)
Hi Neil,
Image 1: flagged flash pointed to camera left wall
Image 2: Flash pointed straight up to ceiling with flash head turned slight camera right.
Maybe?? LOL
Thanks!
Joy
Joy .. check comment #20 :)
oops! Sorry Neil:)
I need to read all of the above then!
Thanks!
Joy
Hi Neil,
so, as I can see in the comments 27 and 28, we have a pretty clear setting of the flash bounce ;)
Considering that we already discussed about the walls distance, I just want to add a sweet thought about the angle of the flash, if I am right:
-1st image has the flash bounced on the left and straight horisontally
-2nd image have a “touch” lift up. maybe 30 degrees or less.
am I right? :)
If you were indeed using the black foamie thing (BFT) for both images I would have to say:
Image #1: flash aimed over your left shoulder, maybe into the corner where the wall meets the ceiling. BFT prevented her face from being blown out and it also left the area behind her (over HER left shoulder) slightly dark.
Image #2: flash pointed slightly forward, angled to the right. BFT allowed the ambient light to do most of the work while the flash blew out your background and really lightened up her hair.
In #1 the hot spot is on the the model’s right shoulder, and the light is wrapping a tiny bit around her. If I understand things correctly, this means the light is coming from her right, slightly above her, and not quite 90 degrees … so flash is pointed a tiny bit upwards, to camera left and about 10o’clock.?.?.?
For #2 the hotspot is behind the model’s left shoulder, but the lighting on her hands and face give a flat appearance … almost like there are 2 lights. This leads me to guess you fired your flash into a corner…camera right, about 2o’clock?.?.?
If straight ahead is 12 o’clock, the in pic #1 I’d say the flash was pointed at about 10 o’clock in pic #2, about 4 or 5 o’clock.
Hi Neil,
I learned from reading your tangents that the closer the light source the softer the light. But, could you please touch on how the distance between the flash to the bounced object (walls/ceilings) affects the quality of light?
Thanks,
Khac
If you are close to a wall, then the light source is smaller and the light more contrasty.
Generally however, I don’t really take the distance into account in terms of the softness of the light.
Once I am sure my camera settings work, and I am getting nice light and correct exposure, I am more intent on the moment, than getting too academic about the how the distance to a specific wall, and the size of the wall will affect the light.
Thank you Neil.