Bounce flash photography at wedding receptions
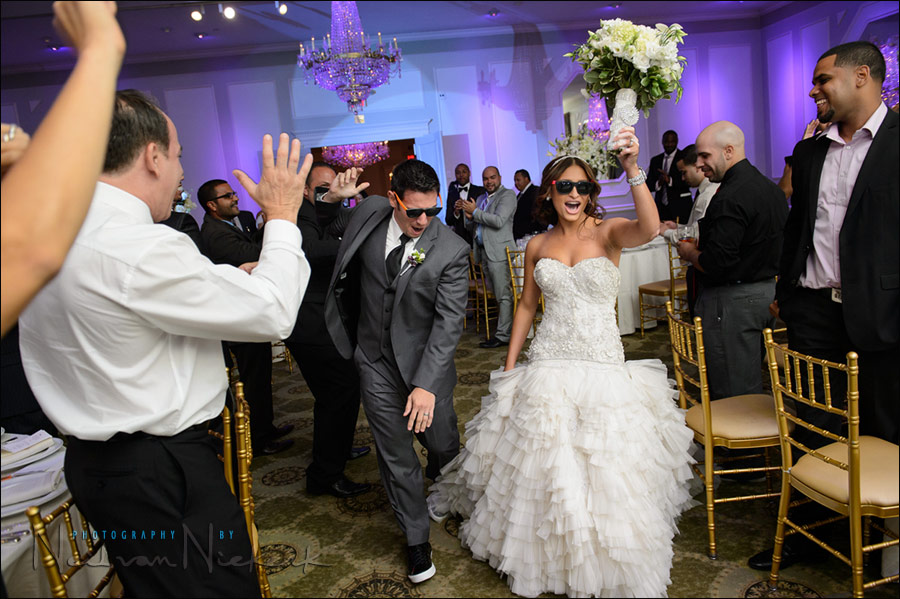
This photograph from a recent wedding got a few comments and questions in the album on Facebook. The questions really hinged around “where did all that light come from?” or whether I had used off-camera flash.
The purple and blue light in the back-ground is from the up-lighting from the entertainment / DJ company. The light on the couple entering the reception room … is all one on-camera bounce flash.

Bounce flash technique
Where did the light from the bounce flag come from? From behind me, because that is how I get the best light from my on-camera flash.
To recap quickly: for wedding receptions, I most often rely on
– one on-camera flash that I bounce,
– high-ISO capable cameras like the Nikon D3s / D4, and
– the receptions using up-lighthing.
With up-lighting like this, I don’t feel the need to use additional lighting – as in this example where the background would’ve been dark without the additional light. I mostly rely just on-camera bounce flash. And if done properly, it can look pretty awesome … for minimal effort. In the example at the top, I did use the local adjustment tool in Lightroom, to lift the exposure on the couple by 0.5 stops. Just a quick sweep of the local correction brush to sweeten the image.
As mentioned in that linked article, using on-camera bounce flash, I bounce my flash into the direction where I want it to come from. By creating that “big softbox effect”. The light wasn’t bounced off a wall near me. The light was bounced into a huge room. I am relying then on a wide-ish aperture and a high ISO to allow enough of that “big” light to register in the photograph. *That* is where the light came from – the rest of the room.
With this, it becomes important to dispel the idea that you have to have a specific wall or ceiling to bounce your flash off. And it is especially important to get rid of the notion that you have to bounce your flash forward at a 60 degree angle with the white card out. It usually doesn’t make for the best light from your on-camera flash.
An important aspect here, is how the inverse square law helps us when we bounce flash behind us.
A side-note about bouncing flash like this: Quite often when I take a candid portrait of a couple at a table, the guy will call me back and tell me my flash didn’t go off … because at 1600 ISO (and higher) and a wide-ish aperture, and the use of the Black Foamie Thing … it barely registered as a blip of light on the ceiling behind us. Then I will quietly show the couple the photo – well-exposed with awesome light – and walk away feeling superior when they look surprised. The light really can look very good.
I normally use a 1/2 CTS gel on my flash as default when shooting indoor wedding receptions. (I sometimes go to a full CTS.) For this image, I had the gels still on my speedlights, but later on when the activity subsided, I did a few tests and saw that the gels weren’t needed. There wasn’t any orange-hued incandescent lighting that needed to be corrected for. The colored up-lighting dominated the background.
Camera settings & photo gear used (or equivalents)
- 1/160 @ f/3.5 @ 2000 ISO
- Nikon D4
- Nikon 24-70mm f2.8G AF-S / Canon 24-70mm f/2.8L II
- Nikon SB-910 Speedlight / Canon 600EX-RT Speedlite
- Nikon SD-9 battery pack / Canon CP-E4 battery pack
- a BFT (black foamie thing)
Black Foamie Thing as my on-camera flash modifier
For this image (and the reception), I used black foamie thing to flag my flash. The main reason why I started to use the BFT way back, was to flag my flash for portraits with on-camera flash. But there is one other advantage of using the BFT, (which sits underneath your speedlight, NOT on top) – it blocks the light of your flash from blitzing people in the face when they stand close to you. This is important enough when you are standing close to the mother of the bride or someone you truly need to love you as a photographer. ie, it really reduces the annoyance factor of bare bounced flash.
With the reception, I predominantly only shoot horizontal photos, and mostly with one camera only, which has the 24-70 .. then I revert to the much lighter and smaller BFT. (I only shoot vertical with the speeches and some of the dances.) I always have the ultra-compact foldable black foamie thing(s) in my basic camera bag. It really is all about the direction of light.
Bounce flash – just do it!
That’s about as much of an explanation I can give about this light. If you’re amazed and wonder where the light came from, then just try it yourself. Bounce your flash behind you, over your shoulder, into the room … and see what comes back. And if I could paraphrase that guy from the Men’s Warehouse advert, “You’re going to like the way the bounced flash looks; I guarantee it.”
Related articles
- Using high ISO and flash at the wedding reception
- Bouncing on-camera flash in manual mode
- Bounce flash examples – wedding receptions
- Photographing the wedding processional
- Flash photography during the wedding ceremony in church
- More articles on wedding photography
- Juana & Steve – wedding – Rockleigh Country Club, NJ
On-camera flash modifier – the black foamie thing

The BFT is held in position by two hair bands (Amazon), and the BFT is usually placed on the under-side of the flash-head.
The linked articles will give clearer instruction, especially the video clip on using the black foamie thing.
Whatever works to achieve the result is fine with me- BFT or any other method
BFT: Bloody Fugly Thing!
Pretty dang nice..how do you set the camera… in Manual?
2 or 3 stops underexposed and the the flash lift it up a bit?
Nice article Neil, as usual. Funny you say about taking candids and the guy saying “your flash didn’t go off”…I had this happen at a wedding on the weekend under exactly the same circumstance…high ISO, wide aperture trying to grab as much ambient as possible and just adding a bit of bounced flash for a key light. Nice work.
Thanks for another great, clear tutorial-to-go, Neil! When you mentioned that you partially rely on the uplighting of the venue, it brought a different question to mind: Could you talk a little bit about how you interface with the wedding planner and/or location rep, i.e. how much do you find out ahead of time regarding such things as the overall decor and lighting? While a bride can tell you her colors and the look of the table arrangements, she might not be aware of the nitty gritty of what will go into the overall “look” of her reception. We all know that “luck favors the prepared.” How do you prepare for the lighting style you’ll be working in? Thanks in advance!
Hi Neil. I just want to add one thing to the notes about BFT in this post. I have added a black band (one side black and shiny, and one side with glue..i don’t know how u call it) to the interior of my BFT, so now i can spin the BFT with more ease now. Also I want to add that I didn’t found foamie here in Romania, so I have used a thin and cheap mouse pad, and with the help of water i have removed the one side with the picture on the mouse pad, and after that I have cut the mouse pad in 2 pieces and I now have 2 BFTs :) Thanks a lot for the helpful invention, and I hope my way of creating the BFT will help others who can’t find a proper material for BFT or have dificulties on spinning it.
Alex Bunea, do you have a picture of you modification to the BFT you could share with us?
Great shot, reminds me to not do so many verticals, easier with landscape and more even lighting.
Just editing my last wedding and was thinking to myself all these &^%$# verticals I took.
Neil,
This is THE great piece of advice! I now bounce of any wall I can. And the pictures are just gorgeous. Great tip. Thanks.
Neil,
After you decided that you didn’t need your CTS gel, what did you set the camera WB to? Flash? Or did you not care and decide to fix it in post-production.
It’s also a shame that some clients are that extremely superficial about a photographer’s gear. The BFT is a black piece of foam with a black camera and mostly black gear, so it should blend in. A photographer dresses properly for the event and brings in mostly black gear, only to be admonished for a piece of foam. If any client should question it, one simply should show them the preview photos.
I am looking to experiment with the Honl speed gobo, because it has the velcro strap allowing me to move the gobo quickly while keeping the weight down.
Hi Neil
How do you position your on camera flash when shooting vertically (portrait) , to avoid shadows and other unwanted effects , as your flash is not centered over the camera.
Rene … there won’t be any harsh shadows if you bounce your flash this way. The bounced flash creates a massive light-source that is near-shadowless, depending on the angle that you bounce it at.
Tip: remove that plastic diffuser from your flash !!
Hello Neil,
compliments very interesting article and clear as ever …. a question ..
The falsh SB 910 as it was used?
TTL (possibly as equaling ..)
Manual (if so, what power ..)
Thanks for the reply
Edy Trigona
Genoa Italy
Hi Neil,
1st of all: Thank you so much for your website! Captivating!
Can you give us feel for how far behind your position was the wall that you bounced off was?
The ceilings look to be about 12′ above the floor, would you agree?
Thank,
Shon
It looks like the couple was on the move here. I’d be super paranoid that if I’m relying on wall bounce, that if I do much movement (toward or away from the wall), for example, following the B+G, that my flash exposures will be off–in contrast to bouncing straight up, I mean.
Neil, Thank You, Thank You, Thank You. I have been playing with fill flash and bounce flash for some time now and have also been following your blogs about the subject, but i never really got it ’till i tried it. I attached my Lumiquest pocket bounce to my sb-600 backwards ( the black side facing the flash head ) and angled it up and out to block the direct light from the strobe and immediately produced absolutely outstanding results. One of our dogs is black and i was always frustrated when photographing her. I never could get the right light to show her beautiful coat, but your skill and advice has changed that. So again, Thanks Neil.
Hi Neil,
One quick question. I started reading your tangents blog several years ago and can’t thank you enough for all of your effort. I’ve utilized your techniques from day one. More specifically, the use of the BFT. I’ve used the bounce technique with it on 99% of my weddings. The question is this…The way I use it, I have it wrapped around the entire flash head almost like a mini snoot. The reason I did this was because it was easier for me to not have to worry about turning it when I changed the orientation of the flash head. This was a simple fix for stopping any light from hitting the subject directly(the ultimate goal).
In this post, you say, “But there is one other advantage of using the BFT, (which sits underneath your speedlight, NOT on top)”. We all know in the world of type that all capital letters is an attention getter. Is it really that big of a difference? Should I not use the whole “snoot” way of wrapping my BFT? Is it really killing a noticeable amount of light that could be filling the room and lifting shadows that much? Keep in mind, it’s only sticking out past my flash head a couple of inches. I know I need to test this myself, but I thought I’d ask. Thanks!
Neil,
The BFT might be a bit home-made looking but no denying the results…I love mine; it’s a life saver.
Hey Neil!
I read all of your post and it does help me alot..
I use your ‘BFT method’ and its great for some photoes when i get ceilings or a wall near me, but when the ceilings or wall is far enough, i mostly get my photo under expose or completely dark. I already set my ISO 1600 and +3 TTL exposure with F2.8 and as i said before if i got far ceiling the results get under expose. Is there any relation ‘how long the BFT’ and the effect?? I mean shorter BFT is better or otherwise longer better? mine is about 17 cm..
17 cm is far too long. It’s eating up all your light.
The BFT needs to be much shorter.It really is just a lip at the edge of your flash to stop light from directly hitting your subject. Check the video clip again on how I use the BFT.
Why is it the way it seems that the higher ISO the more accurate TTL flash “sees” the scene. I understand that more ambient helps, but again, in general, not only overall photo looks better, but also consistency and accuracy of the flash is more reliable.
(Talking about similar settings as this one you took during the reception) Or it is still due to “enough” ambient filling in?
Thanks!
Maks
It could be that you’re then not working at the maximum of what your flash is capable of.
I love the background lights! :) I woder if I can get the same result if my camera is D90? What setting should i use?
Vanessa .. your camera settings are going to entirely depend on where you are shooting. It is going to depend on how fast your lens is; how strong your flash is; how happy you are with the high-ISO performance of your D90.
Neil,
Thanks for sharing your knowledge. I have always been using bounce flash indoors. I’m still puzzled to see wedding photographers pointing their speedlites straight on when there are so many surfaces for bounced flash around. That thing swivels for a reason! :)
Neil-
I’m new to wedding photography (started as a sports photographer) and also new to flash photography. Originally I didn’t think wedding photography was as challenging as catching that winning goal but boy was i wrong! ha. I shoot with a Canon 5D MarkIII and an on camera speedlight 600ex-rt. I’d soon like purchase the additional equipment to shoot with my speedlight off-camera, but in the meantime I generally have great results bouncing my flash and don’t have to worry about lugging around extra gear. But my most recent wedding venue had gorgeous DARK, BROWN wooden walls and high ceilings. I struggled tremendously, and had even had tons of trouble focusing on top of not having enough light. (Besides coordinating with the wedding planner/lighting tech) Do you have any suggestions for situations such as these? I thought the low, yellow lights of a gym were tough–nothing compared to a pitch black wedding reception! Thanks for any input or tips!
Cheers,
Alyse
– what if there is nothing to bounce your flash off?
– what if bounce flash isn’t strong enough?
– photographing the wedding processional with extreme bounce flash
Neil – when bouncing into the room as opposed to off something, would it be safe to assume I will need to dial my flash exposure up fairly close to full power? Or does the high ISO you were using to expose for ambient mean you were able to dial it down a little? I’m still struggling to figure out how to determine appropriate manual flash power settings when bouncing (was ever so unkind of canon to leave the distance guide off the 430exii!) , let alone when scattering the light around the room. Thanks in advance.
You will most likely be working at full power or close to, depending on your choice of settings.
I wouldn’t dial down my FEC to allow more ambient light – doing so just under-exposes the ambient light. What you need to do, is juggle those three settings – shutter speed, aperture, ISO – to allow more ambient light in.
When you are saying that you are bouncing your flash behind you, do you mean directly behind you as in straight back? Or back and at an upwards angle? Also with the BFT, if your flash is pointed backwards the BFT would still be on the bottom side of the flash, so the flash that is closest to the top of the flash would be exposed and thus I would think bouncing some to the ceiling, and the BFT would be blocking it from bouncing on the floor?
Just trying to get the right visual in my head on that on. Thanks
Upwards and at an angle. I bounce the flash into the direction I want it to come from.
The BFT at this point just flags the flash so you don’t blind people behind you or next to you.
Neil,
Sorry to raise an old topic, but I have to ask!
If you tilt your flashgun head on a side and slightly behind (for instance over your right shoulder as I do it most of the time) – is BFT really needed to block stray light? I find that position of the head perfect because if the person rotates, all you need to do is flip your camear vertically and you still get light from broad side of the face.
I thing that Ryan Brenizer also rotates his flashgun that way
Thank you, love your work!
Sasa
Try it when using a wide-angle lens, and compare with and without the flag to control the way the light spills. You should see a noticeable difference.
Nice article Neil, as usual, Thanks man!