Tangents

photography tutorials, reviews & workshops

tangents photography blog
learn : discuss : share
  • Tangents
  • Tutorials
    • Flash Photography
    • Wedding Photography
    • Studio Photography
    • Posing People
    • Understanding Your Camera
    • Exposure metering
    • BFT
    • Best Photo Books
  • Reviews
    • Sony
    • Nikon
    • Canon
    • Fuji
    • Profoto
    • lighting gear
  • Workshops
    • Info: Workshops
    • In-person
      tutoring sessions
    • Online
      tutoring sessions
    • Workshops in
      New Jersey (NJ)
    • Workshops in
      New York (NYC)
    • Photo walks in NYC
    • Studio Workshop
    • Video tutorials
    • Workshop results
  • Books
    • On-Camera Flash (revised ed.)
    • Direction & Quality of Light
    • Off-Camera Flash Photography
    • Lighting & Design
    • On-Camera Flash (1st ed.)
  • Projects
    • Two Perspectives
    • B&W Infrared
    • Vintage lenses
    • Time-lapse photography
  • Info
    • About
    • Contact
    • My Photo Gear
    • Books by NvN
    • Join us on Facebook
    • Acclaim
    • Success Stories

Bridal portrait with on-camera bounce flash

June 29, 2010 Neil vN 13 Comments

Bounce flash photography – bridal portrait

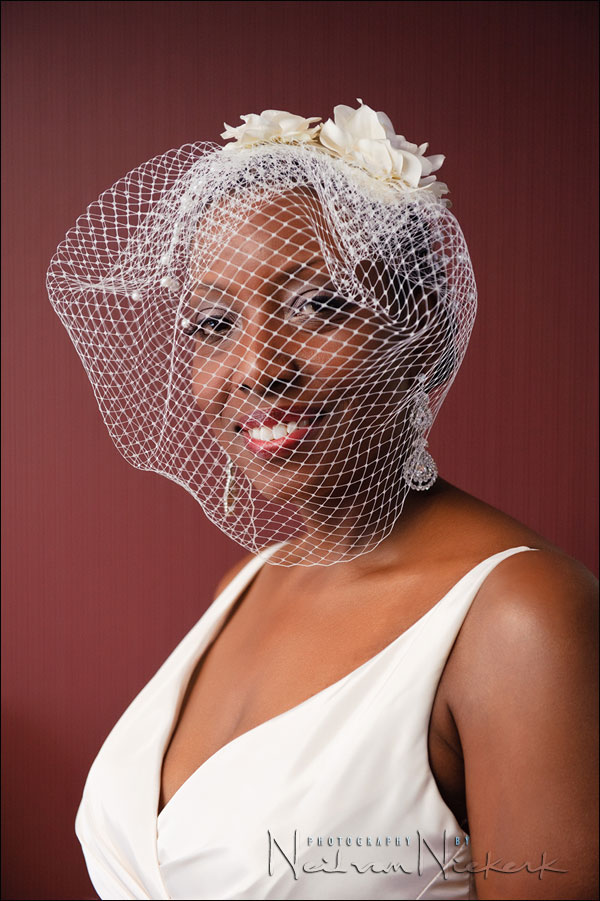
As another example of bounce flash technique, here is a portrait of the bride from a recent wedding. The technique is quite simple, and should be obvious by now to regular readers of the Tangents blog:

I used a wide aperture, focused on the eye closest to the camera .. and bounced my flash towards the bride, but blocked by the black foamie thing.  No direct flash.  No diffuser cup.  No tupperware on your flash.

Because of this indirect directional light, we have this broad swathe of light coming in from camera-left.  The intention was to mimic window light. The nearest window didn’t have much impact though on the final image.  I was more concerned by getting a clean enough background, devoid of hotel-room clutter.  I wanted that deep red wall-paper behind her as the single background element.  A simple composition to help make the image more striking.

Focusing was tough, since the bird-cage veil got in the way.  So I had my assistant delicately lift the veil. As soon as I grunted a “got it” to indicate that I’ve locked focus properly, he would gently drop the veil into position again.  I could then fire off a few frames.  And there we have it – a strikingly effective, yet simple portrait of the bride.


On-Camera Flash Photography

On-Camera Flash Photography – revised edition

This book is explains a cohesive and thorough approach to getting the best from your on-camera speedlight.

Particular care was taken to present it all with a logical flow that will help any photographer attain a better understanding of flash photography.

You can either purchase a copy via Amazon USA and Amazon UK, or can be ordered through Barnes & Nobles and other bookstores. The book is also available on the Apple iBook Store, as well as Amazon Kindle. Also check out the Amazon Kindle store.

Learn more about how the cover image was shot.


Camera settings & photo gear used (or equivalents)

  • 1/125 @ f4 @ 1250 ISO
  • Nikon 70-200mm f2.8 AF-S VR II  /  Canon EF 70-200mm f/2.8L IS II
  • Nikon SB-910 Speedlight  /  Canon 600EX-RT Speedlite
  • a BFT (black foamie thing)


On-camera flash modifier – the black foamie thing

I use the black foamie thing (BFT) as a truly inexpensive flash modifier to flag my on-camera flash to give me lighting indoors that truly look nothing like on-camera flash.The piece of foam (Amazon), can be ordered via this link. I cut the sheet into smaller pieces.

The BFT is held in position by two hair bands (Amazon), and the BFT is usually placed on the under-side of the flash-head.

The linked articles will give clearer instruction, especially the video clip on using the black foamie thing.

Filed Under: flash photography, technique, wedding photography Tagged With: bounce flash at weddings, bounce flash photography tips


Help support this website

If you find these articles of value, please help support this website by using these B&H and Amazon affiliate links to order your photo gear.

I also offer photography workshops and tutoring sessions, whether in person, or via online video tutoring sessions.

Please follow me on Instagram for more.

You can also join our thriving photo community in the Tangents group on Facebook, where we show our photos and discuss all things photography.

Thank you,

Neil vN

Books by Neil van Niekerk


13 Comments, Add Your Own

  1. 1john says

    June 29, 2010 at 8:06 pm

    Neil
    Boy this is a incredible shot and the first thing I asked was were was his focus point, second such a beutiful bride with a smile that stops and make you look.
    I really love your bounce flash! can you say how your wb was set?? on this?
    really really like this.

    Thanks John

    Reply
  2. 2Neil vN says

    June 29, 2010 at 8:51 pm

    Thanks! Since I used a 1/2 CTS gel, my WB would’ve been set to 3850 K. Looking at the edited RAW file, now, I see I had adjusted it to 4200K in post.

    Neil vN

    Reply
  3. 3nick a says

    June 29, 2010 at 11:21 pm

    Hey Neil,

    Some questions:

    1. How much of your exposure is flash and how much is ambient? In other words, if you had turned off your flash in this instance, would the frame have been black? What ratio do you usually shoot for when you’re taking an image like this.

    2. How important do you feel a longer lens is to taking a nice portrait? Do you think the compression really makes a difference?

    Thanks for any help

    -Nick

    P.S. I’m only asking because I’ve been attempting your techniques, and I find that I don’t always get quite as stellar end results!

    Reply
  4. 4Neil vN says

    June 30, 2010 at 12:53 am

    Nick, I didn’t do a comparative photo with only the available light, but it would’ve appeared similar to the photos in this discussion on bounce flash, with this model photographed during the workshops in Cork, Ireland. Same idea; same effect.

    I didn’t aim for a specific ratio of ambient vs flash. I was more interested in getting a specific look, and for that I wanted the flash to dominate.

    A longer lens does help to get a tighter perspective. This helps in excluding irrelevant background details. In the end though, this was shot at 70mm .. which isn’t particularly a telephoto setting.

    Neil vN

    Reply
  5. 5Frank says

    June 30, 2010 at 1:41 am

    Instead of lifting the veil, wouldn’t it be easier to focus on the veil and move the camera 1 inch closer?

    Reply
  6. 6Neil vN says

    June 30, 2010 at 1:46 am

    aaaah, but we’d only be guessing about the inch. Whereas the auto-focusing would be exact and precise.

    Neil vN

    Reply
  7. 7André P. says

    June 30, 2010 at 7:14 am

    Hi:

    My question is: why did you aim at such a high ISO if you didn’t “care” about ambient light on this shot?
    Is it to save batteries on yout speedlight? In this kind of situation, I also find myself shooting at high ISO for no reason… :) Even with the most recent cameras, it’s always best to shoot at low ISO settings for the picture’s quality sake.

    Thanks,

    André P.

    Reply
  8. 8Neil vN says

    June 30, 2010 at 7:16 am

    Andre .. the scary thing here is that I don’t think 1250 ISO is particularly high anymore with the most recent digital cameras. It certainly looks clean on the Nikon D3. Sure, lower ISO settings will look even better, but the pressure is reduced to constantly think of lowering the ISO for optimum quality.

    800 ISO would’ve looked great, and the flash would’ve easily handled that .. even with my throwing the light *away* from my subject. But 1250 ISO also works.

    The photograph in this blog article, was shot at 1600 ISO. I have this printed as a 24×36 inch canvas on the wall of my consultation area. Admittedly, the canvas printing does help hide the digital noise, but it really isn’t perceptible.

    Neil vN

    Reply
  9. 9Allan says

    June 30, 2010 at 7:19 am

    I pack a black foamy thing in each of my bags, and practice this indirect flash technique whenever possible. Before I shoot, I look at the billiard shot – what my light will be bouncing off of before it hits the subject. Often, I am faced with dark walls like the one behind this subject. Are you selecting locations where you can get a good white wall to bounce the light onto the subject?

    Reply
  10. 10Neil vN says

    June 30, 2010 at 8:09 am

    Allan .. I definitely do pick locations depending on where I can bounce my flash. Equally important though, is that I need to consider the background. A great background can make a photo. Check that link for an example of this.

    Neil vN

    Reply
  11. 11Steve says

    June 30, 2010 at 8:59 am

    Neil,

    what color was the wall you were bouncing off of? I’m assuming it wasn’t the same red color, otherwise you’d be a color cast. Did you simply position in a place with a white wall available? Any other advice for removing color cast?

    Steve

    Reply
  12. 12Neil vN says

    June 30, 2010 at 5:14 pm

    Steve … I bounced it off part of the ceiling in that direction, but also bounced it into the room in that direction. No particular wall. Just ceiling, wall, curtains and random items in the hotel room.

    Any color cast is corrected as part of the usual RAW workflow.

    Neil vN

    Reply
  13. 13Sheri Johnson says

    June 30, 2010 at 5:46 pm

    thanks for sharing the info about how you were able to determine focus on her face by lifting the veil, not sure if I would have thought of that on my own :)

    Reply

Leave a Reply to Allan Cancel reply

Your email address will not be published. Required fields are marked *

categories

Articles & Tutorials

  • • About myself & this site
    • Books by Neil vN
    • Best photography books
    • Black foamie thing
    • Photographers’ success stories
  • • Flash Photography Techniques
    • Natural looking flash
    • Flash + Ambient light
    • Dragging the shutter
    • Bouncing your flash
    • On-camera flash outdoors
    • Exposure metering
    • Flash exposure compensation
    • Bounce flash examples
    • Which is the best flashgun?
    • Flash brackets
    • Off-camera flash photography
    • Flash photography basics
    • Using video lights
    • Flash photography tips
  • • Photography workshops NJ / NYC
    • Models @ photography workshops
tutorials:
flash photography
Photography
Workshops

All rights reserved. Copyright © Neil van Niekerk 2025 · Customization by The Traveling Designer

Copyright © 2025 · NvN on Genesis Framework · WordPress · Log in