Using lens bokeh as a design element
In previous articles we could see how a fast 85mm can be used for shallow depth-of-field to shoot nearly anywhere by melting away the background. There’s another aspect to this – the bokeh of the lens. The bokeh is a reference to how the quality of the background blur is rendered by a lens. It can be smooth, or have “jittery” patterns to the edges of objects, and the highlights.
Do note though that bokeh and shallow depth-of-field are not quite the same thing. While the DoF / choice of aperture does affect the appearance of the bokeh of a lens, the shallow depth-of-field look isn’t “bokeh”. Similarly, you can’t do something like “add more bokeh”. Bokeh is the quality of that background blur. It’s mostly an aspect of the lens design.
Now, very often, when a fast prime lens is used wide open, there’s a kind of swirly feel to the background blur – and if you’re aware of this, and find an appropriate background, it can really accentuate the portrait.
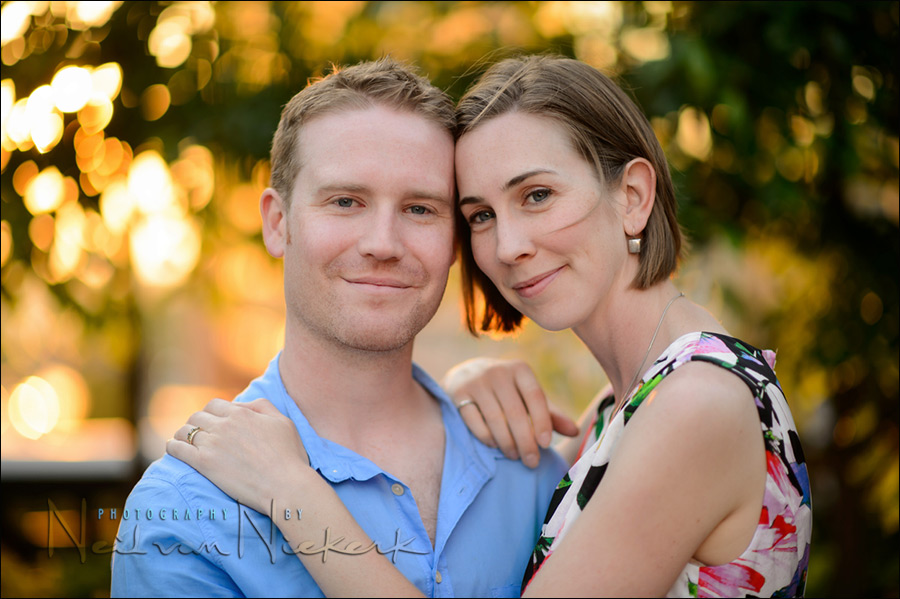
The image at the top of Jen & Corby, was shot at f/1.4 and you can see how the background behind them has a distinctive circular swirl to the out of focus high-lights.
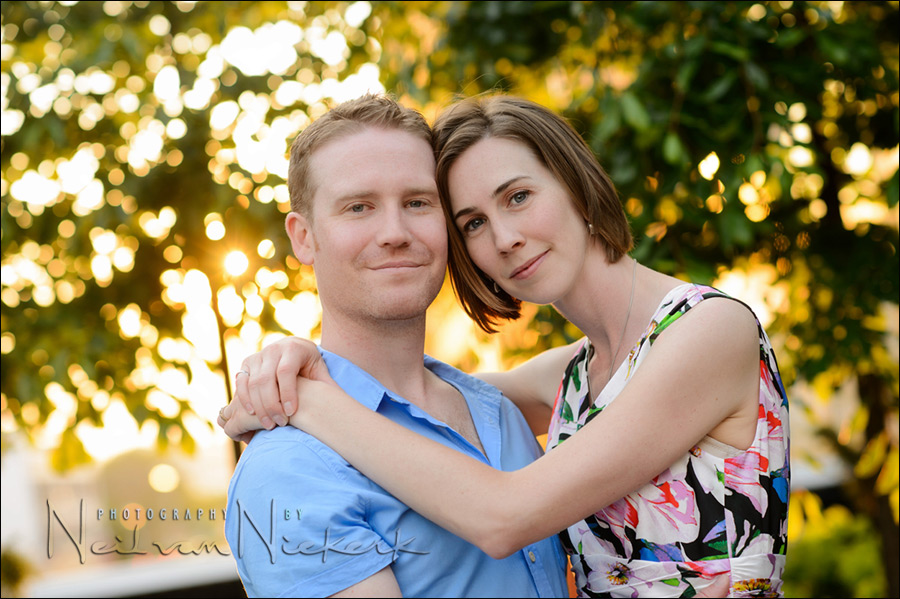
Stopping down to f/2.8 you can see this characteristic has changed subtly. In other words, the bokeh has changed. The look to the background blur has changed. (Co-incidentally, the DoF also increased.) While with this second image I did change my position, and the two images can’t be directly compared for specific detail, you can see that the characteristic of the background blur has changed.
Camera settings for the image at the top: 1/320 @ f/1.4 @ 200 ISO
Of course, at such shallow DoF as f/1.4 and photographing a couple, extra care need to be taken to ensure they are both in focus.

Here is the 100% crop of the image at the top which was shot at f/1.4 and I knew that not every shot would work. The DoF is so shallow that it feels if you just breathe, your focus is out! So you have to get used to the idea that your success rate in terms of sharp images, will go down.
Summary
The way the background blur (the bokeh) appears, will differ from lens design to lens design. And a fast aperture is not necessarily an indication that the bokeh will be great. Many fast 50mm lens designs are notorious for having poor bokeh. Fast 85mm lenses tend to have wonderful bokeh, and this is something you can play with – using that specific look. Not all 85mm lenses have grey bokeh though. The Nikon 85mm f/1.8D had notoriously poor bokeh, but this was fixed with the f/1.8G update. Check review of the Nikon AF-S 85mm f/1.8G
Related articles
- 85mm – the best lens to change your portrait photography
- 85mm f/1.4 portraits in the studio
- Shallow depth-of-field does not mean good bokeh
- Other articles on bokeh
Recommended 85mm lenses
The faster lenses are a bit more spendy than the f/1.8 optics, but the change in depth-of-field is incremental. You’d get a very similar effect at f/1.8 so if your budget is limited the f/1.8 optics are excellent choices too. In fact, I’d say the Canon EF 85mm f/1.8 USM (affiliate) is arguably their best lens for the best price. Similarly, the Nikon AF-S 85mm f/1.8G lens (affiliate) too is an optical gem at an affordable price.
The faster lenses are a bit more spendy than the f/1.8 optics, but the change in depth-of-field is incremental. You’d get a very similar shallow depth-of-field effect at f/1.8 so if your budget is limited these are excellent choices too.
The Canon EF 85mm f/1.8 USM (affiliate) is arguably their best lens for the best price.
Similarly, the Nikon AF-S 85mm f/1.8G (affiliate) too, is an optical gem at an affordable price.
thanx for the post neil!
was an on camera flash used as a fill fo these images?
Nope, just available light
Neil,
While shooting at f1.4, did you focus on the eyes for the female subject? Most of my shots at f1.4 from my 35mm lens, I often miss focus where I only have one individual in focus or sometimes neither.
I would either purposely have one person of the couple in focus, and the other out of focus … or, as in this case, both in focus. It took a few attempts to nail it as perfectly as that, at f/1.4
To get both in focus at 1.4 did your efforts involve getting farther away from them, finding ideal point of focus, getting them on same plane, all of above, none of above?
I need to get them on the same plane of focus.
The ideal point of focus is “in focus”.
I know this is a lesson on bokeh. But given that this was shot with just available light this could also be a lesson on how to see the light and see that the light is right for a beautiful portrait. How did Neil know that this light, falling on his subjects, would produce such a photo without added fill? Did he just see it? Did he instead see the angle and location of the light and know it would work? Why not throw in some fill? Not needed here but would love to know how Neil knew it wasn’t necessary. And of course the exposure was spot on but it is more than that. Wondering what the exposure mode was, spot? Matrix? In camera meter or hand-held meter?
I shot, like I nearly always do, in manual exposure mode, using Matrix / Evaluative Metering mode.
No fill flash needed.
Here is how I used the available light:
There’s a consistent approach here.
I have written an article on lens design, specifically a spherical aberration, and how it affects bokeh: http://jtra.cz/stuff/essays/bokeh/index.html
Hello.
I am just trying to understand one thing. If this is available light shoot, with no fill…so what is this catchlight in
their eyes. Looks like sun, or geled flash, but sun shines behind them, or am I wrong?
We were on the Highline in Manhattan. The sun which was getting lower on the horizon (behind them), were creating interesting splashes of light when reflected off the windows of buildings opposite them. I chose one of these pools of light to shoot in.
Wow, so the light on them is reflected light from the buildings? Holy cow, brilliant. Even got catchlights? Magnificent.
Yup, the couple wasn’t just posed and positioned randomly.
Here is the exact building which was reflecting that light for the two photos shown here:
Neil do you use a hand held light meter? I’m thinking you see this great light on them from that building and it would be easy to overexpose if you relied on camera’s indications (histogram and in-camera meter).
Are you talking about the photos of them?
Nope, no hand-held meter. Not necessary here. Using the camera’s built-in meter and interpreting the tonality of the scene, is good enough to nail it.
Are you talking about the photo of this building?
Nope, a few test shots nailed it.
Yes, I meant the photos of the couple.
As far as pristine quality of bokeh… I wonder if any (even astute) client would even care… or rather yawn.
I believe the reward of excellence is unfortunately merely for the photographer.
Sean … I’ve thought about this a lot. I think few clients would look at an individual image and say, “meh” … the way the background looks, bothers me.”
But I do think that if a photographer does photography with an elevated artistic sensibility and is then additionally careful in using lenses with superb bokeh, then it might just leave an overall better impression with viewers and potential clients. Even if they don’t quite know why, the entire body of work might just seem more appealing.
So the effect might be subliminal for the majority of people, but I do think it is there.
Oh yea, definitely. They will go ‘wow!’ but probably not know why it’s a wow photo., why it’s a cut (many many cuts) above other similar photos.
Hard to believe this was on the highline. Just shows you can get awesome photo anywhere. You could say this was Central Park and who’s to know? The other thing about this photo, especially the first one, that is a huge factor is the really great posing. Perfect posing in #1 (great in other one too but I’m in love with 1). Perfect expressions. All these elements, executed so perfectly and seemingly effortlessly, conspire to make an outstanding photo.
Some people do notice the details of the photograph like bokeh and other qualities. There are quite a few people who are quite good at pointing out exactly what they like and do not like about a photo from focus to bokeh to colors. The type of crowd that when they view a painting at an art exhibition they get right up on the canvas to look at the details of the brush stroke. They may not be painters or photographers themselves…they may have never picked up a brush or a camera, but they know how to provide a critique and point out exactly what they like/dislike. Another thing to keep in mind is if the people hiring for the shots do not notice the little details then surely their friends will. These photos will be displayed somewhere whether it be in a living room or on a workplace desk. Details are important because ultimately your work will be displayed and critiqued by someone.
The top photo seems to be of a softer focus then the bottom which is the result of using the 1.4 aperture. A lot of people on internet forums rave about the usefulness of the wide aperture for event photography, but its much harder to apply in real life.
What I most like about the photo is the expression on the couples faces. It seemed like Neil really made the couple comfortable and put them at ease. Their smiles seem natural…not forced. I would like to see a post in the future about that topic…how does Neil create a pleasant atmosphere for the people involved in the shoot.
Very good point about the smiles and natural expressions. This would be a very different photo if the smiles were forced. Like many factors this one can make or break a photo. It’s really a talent to get those natural expressions, it’s discouraging to take a zillion photos of a senior or couple or even family and see that the smile is the same in every single one, especially if they’re doing little more than baring their teeth. I imagine it’s easier with a couple or family than a single person since you can encourage a little interaction.
I don’t mind that lock of hair on her cheek, maybe it’s even good as it’s natural, but it’s something I probably would have fixed, eliminated. Is this a good detail, does it add something, or should it be Photoshopped out, tho there’s no right or wrong answer, wondering what others think. Often I’m surprised that clients ask me to fix hair that’s out of place that I either did not notice or liked or thought was a nice part of the whole package, hair wise.
Awesome photos, Neil. The guy in the shots is definitely a stud…….ok, so it’s me.
I’ll chime in on a few of the questions/comments here:
1 – yes, I/we definitely have an appreciation for the quality of the bokeh. I’m a wee bit (emphasis on wee) of a photographer myself so it’s something I definitely notice, but my wife also really liked it. Most people notice it even if they can’t articulate what it is they like about it, and usually just say “I really like the way the background is blurry”.
2 – Other than our wedding, this is the only other time I’ve been professionally shot. Add in the fact that I have long considered Neil a god of photography (learned everything I know about flash from this website), and you have the makings of a very nervous client. But Neil was amazingly personable, down to earth, and in the end it just felt like we were hanging out for a couple of hours. It was a truly eye opening experience.
3 – A bunch of stuff just seemed to align perfectly for the shoot – the weather was perfect, the sun was setting to give a nice golden glow, and we happened to be in the right spot when the light reflected off that building. But as Canadian writer Stephen Leacock once said “I’m a firm believer in luck, and I find the harder I work, the more of it I have” – Meaning that all of these factors are meaningless without the skill of the photographer to package them together into a great set of shots.