wedding photography – light, lighting, posing & direction – making the decisions
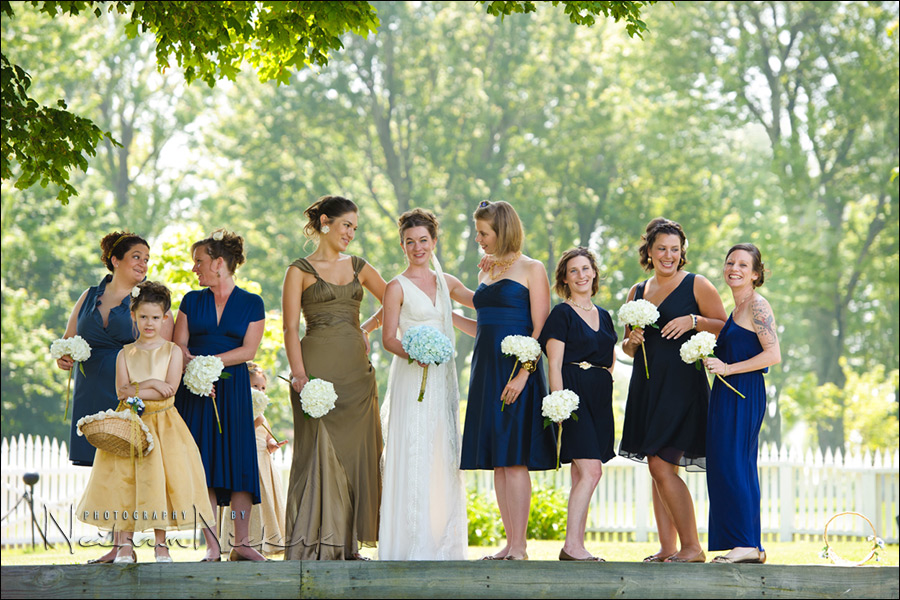
The title of this article is quite ambitious. To cover all of that, it would be a 50,000 word book. But in editing this wedding at the moment, I noticed this photograph, and I love the look of it. So in the context of that one single image, let’s look how it all came together. While the photograph itself isn’t complicated, a lot of quick decisions went into making this image work … and easy to edit. A number of things had to be considered, but instead of being overwhelmed by juggling all the decisions and thought-processes simultaneously, there’s a way to break it all down to simple elements which will help the photo session come together naturally.
Now even if you’re not that interested in wedding photography per se, hang in for a while, for the thinking here is applicable to just about any other field of photography …
1. photographing during the middle of the day
This was shot around 2pm on a sunny summer’s day. It’s hot and the hard sun isn’t flattering. Therefore my first thought in working with the bridal party here is to have even light on them – preferably open shade. I also know that I want to photograph the bridal party at several spots around the grounds of a historic building. This way I can get variety … but I also limit my choices to areas that make it easier for me to shoot and edit the images. This, for me, usually implies clean open lighting. I found this shady spot under the tree here, with a neutral background. A good background is one that is neutral or complementary. Not too busy and distracting.
If I hadn’t been able to find a shady spot then I would’ve found some place where I still have a good background, and had my subjects turn their back to the sun. I want everyone’s face to be evenly lit, without harsh cross-shadows from the sunlight.
So now we have shade. Great. The side benefit here is that it keeps everyone cool. It is okay for me to work in the hot sun, but my client or subjects should look cool and relaxed and happy.
The open shade here works like a charm, giving me great light. I can let the background blow out to an extent. I don’t care much for specific “correct” exposure for the background. It’s just context. And if the background is somewhat over-exposed, it helps convey a bright, hot summery day. The brighter background also helps isolate my subjects by creating separation from the background.
Now we just need to figure out our camera settings …
2. starting off with sensible camera settings
Before we get much further in discussing things, the settings for that photo are:
1/250 @ f4.5 @ 200 ISO … TTL flash -1.7EV
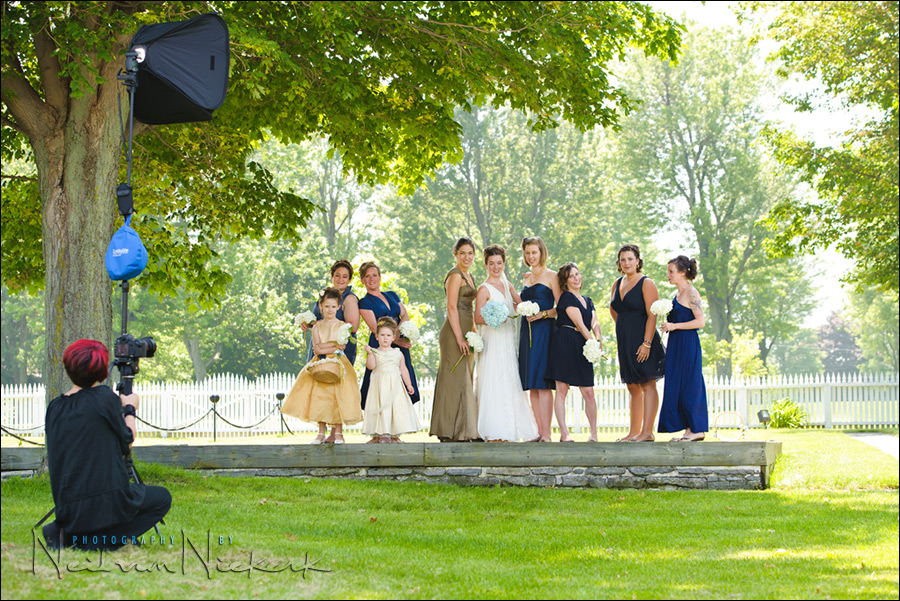
And here is the lighting set-up with which I added the TTL fill-flash:

It is an extremely useful thing to constantly learn what the usual camera settings are for bright sunlight, as well as for shaded areas. When you work and play with your camera, take meter readings or test exposures. This way, when you’re actually doing a shoot, you have a good idea of the range of settings which would make sense. So from experience, I knew that open shade like this under a tree, would be in the order of 1/250 @ f4 @ 200 ISO … and I was right.
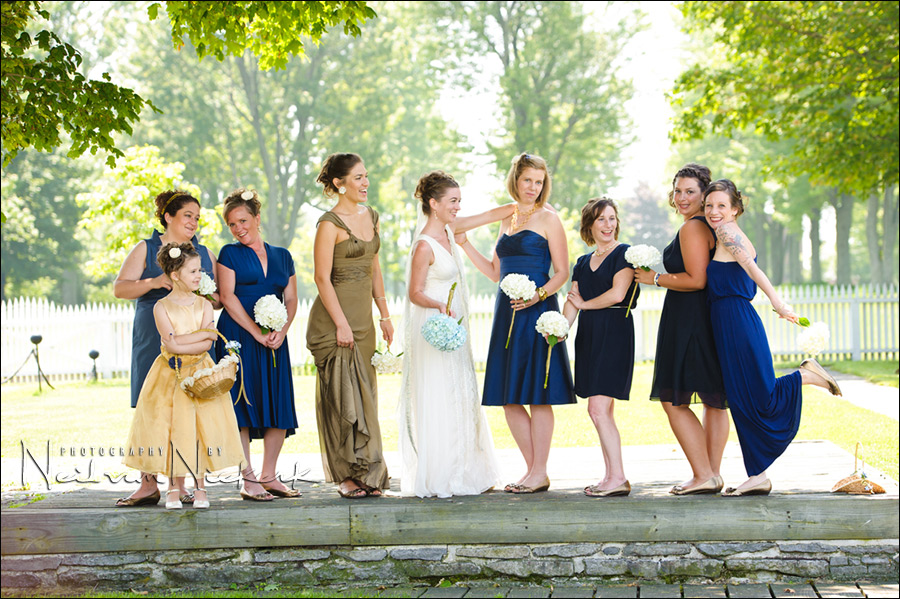
Here’s the starting image of an entire sequence in this spot:

camera settings: 1/250 @ f4 @ 200 ISO … TTL flash -1.7EV
The choice of camera settings isn’t a lucky guess, but comes with years of experience and playing with a camera, and remembering the usual settings that would come up for specific types of light. This helps me get there faster when working under pressure. And there’s less pushing of buttons and turning of dials in front of your client. You can just concentrate on the other aspects of the shoot, such as directing or talking to them. You have to become very familiar with your equipment. Play a lot!
So for the rest of the images, I dialed to f4.5 as my working aperture. This aperture gives enough “bite” to the lens’ sharpness, and there is enough depth-of-field (DoF) for a group posed like this in a single line. The image at the top was zoomed to 140mm, and the second image of the group was shot with the lens set to 90mm. So at these medium telephoto focal lengths, the f4.5 aperture gives a fairly shallow depth-of-field, without being f1.8 kinda crazy for this group. The aperture choice makes sense.
For my shutter speed – since I knew I would add fill-flash – was immediately set to maximum flash sync speed. It just made sense. And there was no need to go into high-speed flash sync territory to chase a shallow depth of field. I already had the DoF that I wanted.
And there we have our settings, with off-camera TTL fill-flash (via a softbox) picking up the exposure a bit on them, enhancing the light.
The softbox was my usual Lastolite EZYBOX 24×24 softbox (B&H), with an Nikon SB-900 (B&H); Nikon SD-9 battery pack (B&H) … and with the flash fired with a PocketWizard FlexTT5 transceiver (B&H), controlled with another FlexTT5 on my camera. Dead simple.
3. posing and directing the group
The style that I prefer for wedding portraits and group photos, is less formal than would be expected from a wedding photographer working in a traditional style. Therefore, when photographing someone, whether individually, or as a group, my approach is more to guide their natural pose. Rather this than formally positioning someone according to classic rules of posing.
It is easier to guide someone’s natural stance of posture, than force a more specific pose. Besides, the couple on this day was far from formal. As you can see, the bridesmaids wore shades of blue, with different styles and cut for their dresses. So an overly posed look wouldn’t really be necessary here.
So I am more attuned to how they might turn their body, or hold their head or hands. A simple instruction to someone to lean … or jokingly telling them to flounce or drape themselves over something (or someone), always helps in getting reaction and a smile.
(While we’re on the topic of quips and jokes as a wedding photographer – don’t be that wedding photographer that trots out the tired “act like you like each other” line. It’s barely worth a sneer of a smile by now.)
You will notice that my viewpoint in the image right at the top is lower than the 2nd image of the group. I noticed that there was too much of an overly bright area behind their legs … so I dropped down in my position to eliminate most of that as a possible distraction for the rest of the sequence.
Oh, and in the pull-back shot, you can see Jessica, busy shooting HD video on the Canon 5D mk2 … a fusion clip is in the works.
And it all comes together …
There we finally have it, in a much shorter time than it took to describe this. Fast to set up, fast to shoot … and an easy edit because of the clean open light. A bunch of decisions easily made to get fun, energetic photos of this group.
more images from this wedding: Sydney & Paul – their wedding day
more articles about wedding photography
more articles about off-camera flash
equipment used during this photo session
Nikon D3; Nikon 70-200mm f2.8 AF-S VR II (B&H)
Nikon SB-910 Speedlight controlled by PocketWizard FlexTT5 Transceiver & AC3 Controller
or alternately, the Canon 600EX-RT Speedlite controlled by Canon ST-E3 Transmitter
Lastolite EZYBOX 24×24 softbox (B&H)
Manfrotto 1004BAC light-stand
Hello Neil,
congratulations again for your work.
One question: In this photograph your experience as a professional photographer tells you that 1 / 250 f4 aperture settings are correct for subjects in shade.
In another context, it is good to expose correctly for my background and then let my TTL flash take care of my subject?
If my background is very bright and I can always apply this technique should find another background?
If I had used that power with manual flash Flash (1 / 2 or 1 / 4) would have snapped this wonderful picture?
You’re the best … thank you for everything.
Edy Trigona Genoa Italy
Why is there a Lastolite (blue bag) suspended on your light stand ? What purpose does it have ?
It holds the plutonium-powered nuclear reactor which in turn fuels the 1.21 gigawatts flux capacitor inside the softbox. So now I’m not reliant on waiting for a lighting bolt to strike.
Neil vN
Great post Neil. Often times I have to fight the instinct to ALWAYS expose properly for the bg and then balance the fg with flash. Sometimes it looks great but in situations like these it doesn’t look natural. The washed out bg looks even better with the shaded leaves providing context.
Thanks again.
Neil,
Just curious why you use a softbox instead of a shoot through umbrella. Better in the wind?
“To cover all of that, it would be a 50,000 word book”
Well, I would buy such a book…
Thanks again Neil!
Hi Neil,
You recently remarked on the forum that the PocketWizards do not transmit the FEC settings back to the camera (because I couldn’t see the FEC data in my images using the units). How are you able to remember your FEC settings for the photos throughout your wedding assignment, since you probably have to change the settings several times?
Like others I’m curious… when you knew you were going to use the soft box to add fill light (and went with your max sync speed for shutter speed) did you also know you were going to fire the strobe at -1.7EV or did you have to experiment with that a bit first? To find the right amount for your desire.
And while not a wedding photographer I truly appreciate your conveying the thought process here, especially when noticing those tiny details like the overly bright area behind their legs when you stood higher for the shot.
I can SO appreciate everything you shared here, well done. Thank you for all you do. :)
I would love to know how the wizards work- I have the same flash and softbox, but never have understood how to use the wizards with them… future post…please, please, please…not so dead simple for us Neil wannabes :)
“The softbox was my usual Lastolite EZYBOX 24×24 softbox (B&H), with an Nikon SB-900 (B&H); Nikon SD-9 battery pack (B&H) … and with the flash fired with a PocketWizard FlexTT5 transceiver (B&H), controlled with another FlexTT5 on my camera. Dead simple.”
Great work as usual Neil.
What would your camera settings have been if you wanted your background more in focus or less blown out?
Hi Neil,
I noticed how warm the flight from the softbox is, did you use CTS/CTO gel for this? I didn’t see this mentioned. A subtle ‘warming gel’ is always nice with flash for outdoor use.
Where do you buy your plutonium-powered nuclear reactors? Normally you have a B&H link to products you mention. I’m having trouble locating them. Thanks.
Hi Neil,
Thanks for clarifying about the AC3 unit. I went back into my archives and looked at photos I took without the AC3 unit. I was using a SB-900 as the commander mounted on a PocketWizard, and in that case, the FEC information was transmitted into the EXIF.
Neil, at that distance, do you find that a softbox has and advantage over a bare flash?
Neil,
I noticed that your lightstand can go up to 12′. I’ve never tried group lighting like this and want to try it. About how high would you guess that it is for this group, and about how far from the group? That’d be helpful to me. Thanks alot.
Neil,
Great photo. Love how the whole group is “split” into 3 groups of 3, each with their own interest, with the most important element, the bride, looking directly at the camera
Neil, very nice photo indeed. I have a question about your ISO setting. Why do you choose to use 200 instead of 100. Is it because you specifically wanted the DOF of 4.5 at the maximum flash sync speed of 1/250? Why wouldn’t you use ISO 100 which means you would have more room to play with the aperture before you exceeded the max sync speed. You might not always want to, but if you used ISO 100, this would give you the option of going one stop wider with the aperture if you so desired. One reason I can think of is that you like to stay as close to the max sync as possible, which would make sense. Is this why?
Tony
Looks great Neil! I’ll have you know that I”m a fanatic for the CTO gels. Did you gel the flash for this photo?
LOVE these shots! Super-timely post, Neil. I have a wedding tomorrow with group shots at 2pm in a park along the side of a lake. This is pretty much exactly what I was hoping some of my images would look like, in an ideal world :)
So, thanks!
I’m just bewildered at pocket wizard for placing the screwmount off centre from the flash head (TT5).. I don’t think it is as problematic using the Lastolite EZYBOX, but i can’t buy those boxes here in Asia.
Thanks for the response to my question. It’s very helpful… as is your daily feeding for folks like me.
I was wondering how long it would take for someone to ask where you buy the “plutonium-powered nuclear reactors”!!! My smile for the day!
Read your blog on this shoot Neil. Your advice of “Play a lot” was right one the money.
I find so many shooters who don’t do this and adhere to (cookbook)
formulas.
They may get good exposure, but oft at the cost of creativity.
Pro’s may not like to admit it, but many of us came to where we are by
“shoot-analyze—shoot more–delete–shoot some more” for thousands of
frames.
Neil,
On the other photos for this wedding, can you tell me a few things.
The one of the grooms men all walking towards you. Did you use the soft box or fill flash as I see absolutely no dapple and I struggle with that a lot this summer.
The night photos of the paper lantern release can you explain a little how you did that. I thought low shutter speed but seems you stopped some action as well.
Love your stuff and hope to meet one day.
Joe
Thank you Neil for post photos that show your set up. It’s very helpful to see what equipment you are using and the camera settings. Cathy
Neil,
Just curious, were you spot metering the bride? You mentioned fill flash and ttl not ttl/bl.
THANKS
Tom
Hello Neil
Congratulations on such a tremendous job teaching and sharing your knowledge. I have learned a lot from you regarding speedlights and controlling light. I also own all your books. Thank you!
I have a question regarding the pullback image above which shows a lastolite 24 being used. When using this softbox in a situation like this, outdoors and with the soft box positioned so far away to light the entire group, do you use both the diffusers or just the outer diffuser on the softbox? I find my 580ex to be very underpowered when used at such distances with both diffusers attached……