Flash photography: How far can you bounce your flash?
The question regularly comes up: how far can you bounce your flash? The answer is quite straight-forward: It depends on the power of your flash, the bounce distance (and surfaces), ISO and aperture.
Power, distance, aperture and ISO – the four things that control flash exposure. Yup, we can’t really escape this.
So how far can you bounce your flash? It depends on how far (and reflective) the surfaces are that you are bouncing your flash off; as well as how high you’re willing to take your ISO and how wide you can take your aperture. And obviously, it depends on how powerful your flash is – which is why I would always recommend that you get the most powerful flash you can afford. There are advantages to this.
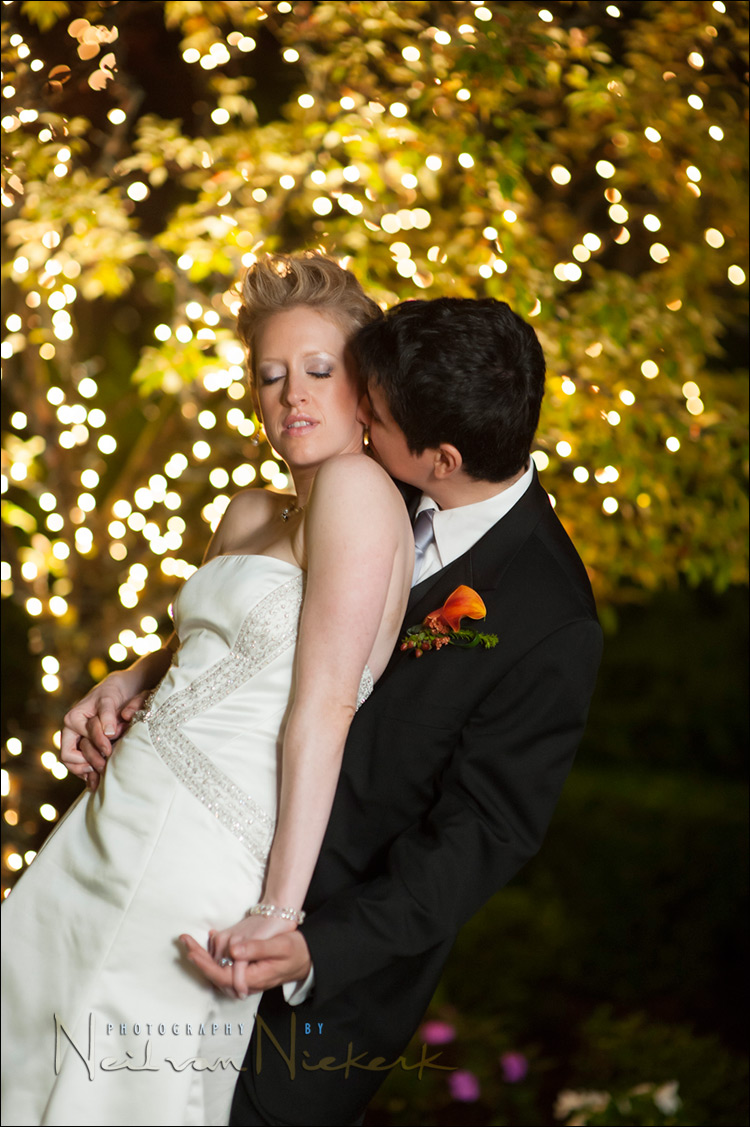
As an example, let’s analyze this image from a wedding, and see what went into creating it.

Here is one of the test shots to show what the top image would’ve looked like without the addition of on-camera TTL bounce flash.
camera settings: 1/60th @ f2 @ 1600 ISO
The final image at the top is more though than just adding a bit of TTL flash. It came together through a combination of choices and controlling the situation. Nothing there is arbitrary. The choices made were in terms of the setting; the composition; the use of flash to augment the lighting and in directing the couple … finally culminating in an image that I love.
Choices and control
I am usually quite specific about my backgrounds. A cluttered background can really bring down an image which might otherwise have worked. So in a case like this, when creating the romantic portraits outside the venue with this couple, I was on the look-out for something interesting to work with. When I saw the twinkly lights in the trees outside, I knew that it would definitely make a great out-of-focus background.
I then needed to position the couple in relation to the background – and in this case use a lens with a longer focal length to help place them. A wide-angle lens would’ve given too wide a field of view. I need a tighter composition.
But in how I wanted to position the couple, I also knew the light on them wasn’t ideal. I would have to add on-camera flash as a quick fix for the lighting. Since I was working alone, I couldn’t rely on an assistant to hold a reflector or an umbrella / softbox. I therefore looked for something to bounce my flash off … and I figured that I could bounce my flash off the outside walls of the venue. The wall was about 20-30 feet behind me, outdoors. Even then, I bounced my flash at an angle, that I could still have a measure of directional light on them.
These two things then combined to make it this particular spot that I used:
– an interesting background, and
– an area I could bounce flash off.
Since I knew I would be losing a lot of light from my on-camera speedlight in bouncing flash off a large wall outside, the short telephoto that I wanted to use, also needed to be a fast optic.
The lens I decided on was the Nikon 85mm f/1.4 (affiliate) and if I had been shooting Canon, it would’ve been my Canon 85mm f/1.2 (affiliate). However, if these lenses seem out of reach, then both the Nikon 85mm f/1.8 (affiliate), and the Canon 85mm f/1.8 (affiliate), are excellent and affordable optics that will open up a whole new look to your images if you’re only used to the depth-of-field of slower zooms.
So how far could I bounce my flash? Well, it depends on my aperture (had to be a fast aperture here); and a high ISO (I immediately went for 1600 ISO), and a powerful speedlight … and then a bit of common sense and testing to make sure the final sequence of photos would work.
Photo gear (or equivalents) used
- Nikon D3
- Nikon AF-S 85mm f/1.4G / Canon EF 85mm f/1.2L II USM
- Nikon SB-910 Speedlight / Canon 600EX-RT Speedlite
- Nikon SD-9 battery pack / Canon CP-E4 battery pack
Posing the couple
In this example, the way that the couple, Megan and Mike, are posed, is mostly due to Megan. She is a dancer, and had a certain dramatic flair to some of her movements. After the basic pose, where she stood in front of Mike (similar to that seen in the test shot), I asked her to lean back into him … and for Mike to whisper to Megan. And from that movement came the gesture that you can see in the top photo, with that melting-into-him half-shrug of her shoulder. Very sensual. That’s a magical moment for a photographer, when a couple takes your cues and runs with it and make it their own thing.
Summary
Choices and control. The final image at the top then is a combination of choices and controlling the situation. In terms of the lighting and location, nothing there is arbitrary. The choices made were in terms of the setting; the composition; the use of flash to augment the lighting and in directing the couple .. finally culminating in an image that I love.
Related articles
- Tutorial: bounce flash photography
- Using on-camera bounce flash outside
- Throw away the tupperware on your flash
- On-camera bounce flash outdoors at night
- Tilted compositions / Dutch angle
Neil,
Fantastic as always.. I am much more aware of the background when i frame my subjects.. It really does separate a good, sharp image to a photo that just screams professionalism..
Much like a lot of your readers, we want to understand your processes when you analyse a shot!
With regards to the photo above, can you run down what goes through your head??
ie) Eye catches an intriguing background.. Calculate some settings to expose for it.. Take a test shot to analyse the background.. Observe possible surfaces to bounce flash.. Dial EV +/- etc??
:)
Albert
Albert .. you pretty much have the thought-process nailed there, with the exception that I’d first check for surfaces to bounce the flash off before doing the test shots.
Hello Neil,
just a quick question. I have read your book and I understand that you – to create a greater light source – bounce of your on-camera-flash. But what do you do when there is nothing to bounce the flash of, e.g. a park, where you just have trees and gras.
Thank you
Andreas
Andreas, then you have to do something else obviously .. whether you position your couple in a specific place so that you have great light .. or whether you use additional lighting.
But when you don’t have something to bounce your flash off, you either have to create that “something” by having an assistant hold up a reflector or umbrella .. or you have to do “something else”.
Fantastic (as always) Neil. Do I sence a slight rotational blur to the background? I assume that was intentional, and beautifully done. May I ask how you get your non-professional models (like B&G’s) to pose in such a dramtic way? It seems most of them think they need to say cheese, like in your test shot. Thank you so much for sharing your setup.
Daniel .. the rotaional effect you see there is purely how the bokeh appears on this lens at that aperture. Many large aperture lenses do this.
As for how I work with my clients to have them respond like that .. it’s a combination of just having a fantastic couple, but also how you as the photographer collaborate with them. Personality goes a long way.
:) If the B&G are comfortable with the photographer and have a good rapport with the photographer and at ease with the photographer then ‘MAGIC’ happens :) it is important to have very good communication. Sometimes no need to coach them since they interact nicely between themselves specially in a wedding situation :)
After seeing so many examples of your work, I have to ask if this effect was purposeful.
For me, the body positioning, facial expression, hairstyle, and angle of the frame of your final photo make it look like the bride is falling into the groom’s arms (from upper left to bottom right). Was this a conscious capture, artful post-process grab, or happy coincidence?
Dan .. the image isn’t a crop. It’s full size. So the composition was purposeful, although I did fire off a number of images, and instinctively changed my composition while shooting. In editing the images, I liked this one most of all.
The composition therefore is partly a (near) conscious decision at the time of taking the photo … with the post-production editing of images also factoring in.
As for the pose … it was how the bride responded to my instruction. I got lucky in having a couple that was great to work with and full of energy.
Ultimately, I’d say all the factors you mention, do come into play.
Neil — you inspire me!
Thanks for sharing!
Neil – Great shot, as usual!
What do you use to get rid of noise since the photo was taken at 1600 ISO.
Joram .. I have Neat Image and Noise Ninja, but don’t use the programs at all.
I use the Nikon D3 currently, and with correct exposure, there is barely even a hint of noise at 1600 ISO, and I happily photograph the romantic portraits in low light with such a high ISO. The images look great even at 100%.
I second what Neil says. I use a Canon 1D3 and at ISO 1600, the images look like ISO 400 on most cameras…..when properly exposed that is.
As for Noise. I found Noiseware recently and its amazing. This program feels better than Noise Ninja which I have. I used it on some of my past shots at ISO 3200, and this program almost completely gets rid of all noise…..but it leaves detail in the subject. Its wierd, its like the program knows where to pull noise and leave those fine single stray strands of hair alone. The fabric detail, remains untouched, but that grain is gone. Its great, and it sharpens nice too.
Neil, great post. I find that choosing the background in shots seems to be the single most missed item in many shots. When I shoot a wedding, and the Bride has requested “In home” before wedding shots, its difficult. You are walking into unknown, uncharted, uncontrolled territory. So I will go as far as find a nice area in Livingroom, then turn on the table lamp behind them to add some light in background, then gel the flash and it adds sooooomuch to the image. Thinbgs like this make the difference between my shots and Aunt Lucy’s Powershot snaps.
Background placement/angle is often the difference in a amatuer snapshot and a professional shot. Many people dont realize that even a distant tree with color will make a nice out of focus backdrop to an otherwise boring image.
Keep it coming Neil. This site is great. Its one of the few where the photographer doesnt mind sharing details on how they got the shot. So many are affraid of competition….they dont share. I cut my teeth on advanced flash contro/technique here years ago and its made such a difference in my work. A real photographer is confident in his/her abilities and will glady discuss technique.
And so, if I ever have someone ask me how I got the shot, I gladly go into detail after wedding to show them, then if they still dont get it, I write down this website for them on my card, and give it to them. I couldnt dare keep this helpful information to myself.
Thanks Neil, I’m sure many aspiring photographers pick up a bunch in each and every one of these posts.
Take care,
David
Dear Neil
Just bought your book but already got great inspiration (also from your blog as well). You are the absolute genius, both in photographing and explaining.
I love the idea that you posted some videos which includes the process of how you work. I wish to see some more!!!
Viv
Hi there Vivian .. thank you for those very flattering comments.
I do have a few video clips available here to show a little of how I work, but they are more like glimpses.
For instructional clips, check out the video tutorials available in the Tangents Store.
Dear Neil,
Learning a lot from you…thx
How did you get the background warm after using the flash…!
Would you like to have post processing on images? If I would be there I could do the bride dress(only) one/half stop under and make the lase(only) more sharper thru lightroom adjustment brush.
Your flash control is its extreme. The way/rythm you drag the flash light thru the image is beautiful. Can you please explain a little more..how did you avoid the black suit from the flash ?
I didn’t make the background warmer. The background is that colour in relation to the colour of the flash with a 1/2 CTS filter on it, and bounced off the outside wall. In that way, the colour of the background just “fell into” that colour range you see there.
I might have done a touch more to the image in post-production of the RAW image, but this is where I left the image at the proofing stage. I am happy with it with the minimal adjustment done to it in RAW.
As for the black suit .. once again, the tonality of the black suit just fell into place in relation to the brightest part of my subject, the dress. There is the possibility of adjustment again afterwards by using the contrast, local contrast, brightness, fill and black point .. but I didn’t have to here. With my basic defaults as I have it set in ACR / Bridge, I was happy with the way it appeared.
In the end, I am more concerned with the mood and expression than fine-tuning the more technical consideration of the image. You also need to keep in mind that this is one of about 700 images delivered to the client, and I still need to keep a fast workflow or I will drown in it.
With the articles and postings on the Tangents blog, I largely aim to keep it true to the way the image appears with minimal fuss outside of the camera and basic editing in RAW.
Magical moment indeed. Love that pose and Dutch angle framing. It all works so well together.
Rudy
I don’t like tilted images much, but in this case, I felt (in camera) that it worked. Afterwards it could be analyzed in the same way as mentioned here: tilted compositions, as to why it worked here.
Hello Neil,
Say, do you by any chance have an idea how powerful the Yongnuo YN 568EX (or YN’s most powerful flash) is compared to, say, the SB900? I can’t afford the SB, but I also don’t want to get something cheaper if it’s really going to backfire on me in the end, not having enough juice.
Thanks very much.
I don’t have the Yongnuo YN 568EX, but I looked at the flash’s specs, and the guide number of 58 (not specified for the zooming of the flash-head), it would appear to be about 1/3rd stop less powerful than the Nikon and Canon equivalents. But I am guessing here since I don’t have an actual unit to compare.
Such great info, something I will definitely write down and keep. Now if those lenses were not so much out of touch of my budget…
The 85mm f/1.8 optics are very affordable, and less expensive than most zooms. Even more affordable if you buy used.
I see that, better than what I thought but at only getting 2 weddings this year and assisting in 2 and a few portrait sessions – they are still out of my range.
Better luck this year cause I also need another HSS flash on my Canon I’m saving up for.
Beatiful image, credits to the awesome photographer. Questions (Neil, if you dont mind)
1) Whats the highest ISO you are comfortable shooting with on FF? Crop Sensor?
2) If your flash was on ETTL, does that mean the flash zoom was on automatic and the setting was near 85mm? If I had went manual, what is your preference on the zoom?
3) Is there a reason why you had to bounce on your RHS rather than the left? Wouldnt bouncing from camera right eliminate cast shadows? I know it was an event and time is very critical and photographers will just have to do with what we have.
Kindest regards
1.) 3200 ISO at the most. I’ve done higher (5000 ISO0), but only out of absolute necessity.
Here are some posts where I specifically mention shooting at a high ISO such as 3200 ISO.
2.) I usually keep my flash zoomed to the max (or close to max) zoom setting when I bounce flash.
3.) As far as I recall, I had to do this because of how the building exterior was situated.
Great article Neil. My question: would you recommend to use just a plain flash or something like Sto-Fen or similar bounce products?
Plain flash, because the moment you add a piece of plastic to your flash, you’re most likely losing the ability to get directional light from your on-camera flash.
Follow this article for more: https://neilvn.com/tangents/on-camera-flash-light-modifiers-remove-the-plastic-diffuser/
Thank you Neil. I will take a look. All the best
Neil, what was your metering mode set to Spot, Center Weighted or Matrix? And metered from what part of the scene? The reason I am asking is recently I tried similar shot but the TTL bounce flash was so inconsistent or irratic (either highly over or under exposed) that I had to resort to manual flash power. Nikon D700 with SB800. Please clarify. Thx
I rarely go out of Matrix / Evaluative metering mode.
Hello Neil,
Thank you very much for your time and effort put into these ressources, as well as into your books.
I am looking to delve into on-camera bounce flash, and my question concerns the relationship between E TTL and bounce. I use a Canon 5d Mk2.
Shortly put, would you say a 3rd party flash, with E-TTL II compatibility, would produce reliable results when bounced?
Longer said, I am hesitating between buying a Canon 430 ex ii which lacks the capacity of rotating 360 degrees, or a Phottix Mittros with 360 and greater flash power, but for which I cannot assume that it fully communicates with the camera in the way a Canon flash would. Could you help me on this?
I can rephrase if you prefer, I’m sorry if it’s convoluted.
Thanks again and best regards,
Ioan
Ioan, you can get a used 580ex for about the cost of a 430EX ii. The extra power and full 180 degree rotation each side (plus master and slave capabilities) will serve you well.
Thanks for your reply ! I am based in Switzerland and I couldn’t find a 580 used, but I did end up going for the Phottix and all is well for now :)
Go with the more powerful speedlight. The 430 EX is limited also in how you can rotate the flash-head.
https://neilvn.com/tangents/flash-photography-techniques/best-flashgun/
Sometimes I have been surprised how far bounce worked. I would even turn off the flash just to confirm how much it was contributing to the image.