A simple lighting setup for photographing the wedding formals
Photographing a wedding can be pretty hectic at times, especially as it so often becomes the photographer’s de facto responsibility to keep everything on track. The formal photo session specifically is a part of the day that many photographers find challenging. The other challenging part of the wedding day is photographing the wedding processional. You have a narrow margin to get things just right. No second chance.
When photographing the family portraits, you can really help yourself by nailing your lighting. Get it down. Then you can concentrate on getting the groups together, and concentrate on posing the groups. But your lighting works! Much less stress.
I mostly work with the Profoto B1 flash at the moment, because of their versatility and sheer power. However, I often work with a speedlight setup …
Here is a proper close-up of the photo gear that was used. Anything similar would do well.
Suggested photo gear to light the wedding formals
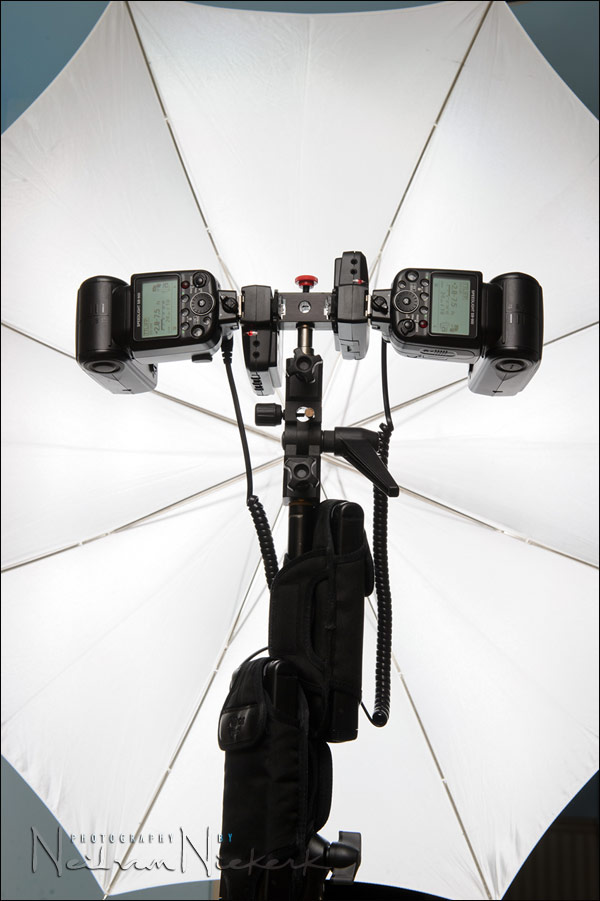
Two Speedlights
Here I used two Nikon SB-900 speedlights. They’ve been updated as the Nikon SB-910 Speedlight (affiliate).
If you’re a Canon shooter, then the Canon 600EX-RT Speedlite (affiliate) is a great choice. But any speedlights would’ve worked. There are good reasons to use cheaper manual-only speedlights, but I prefer having only the top-end speedlights which offer the flexibility and features I need, such as TTL flash and high-speed flash sync.
I used two speedlights ganged up like this, because they (obviously) give more power than just one – but the impaction is also that if I run them at half power, they recycle much faster than a single speedlight at full power. And of course, if I need more juice, I can push them both to full power.
Radio triggers
I like the PocketWizard TT5 units, but since we’ll be using manual flash only here, there’s a wide variety of radio triggers for flash that would’ve worked well.
45″ white satin umbrella
This single shoot-through umbrella disperses the light surprisingly evenly.
Umbrella Bracket
You need something to hook the umbrella up to the light-stand, and be able to swivel the umbrella into a specific direction.
You will also need some kind of bracket to hold more than one speedlight, if you decide to go with two or more speedlights:
- Triple Flash/Umbrella Mount
- RPS Light Bar with Four Accessory Shoes RS-3102
- Lastolite TriFlash Shoe-Mount Bracket
Battery Packs
For faster recycling, I’d strongly recommend battery packs. The proprietary battery packs make a lot of sense:
– Nikon SD-9 battery pack
– Canon CP-E4 Compact Battery Pack
But it does make sense to get two speedlights in there for extra power, or for faster recycling. Besides, you have at least two speedlights anyway.
Light-stand
I like the Manfrotto 1004BAC – tall light-stand (affiliate), but any light-stand that is tall and sturdy, and gives you the confidence it won’t topple over, is a good choice.
That about covers the gear you’d need.
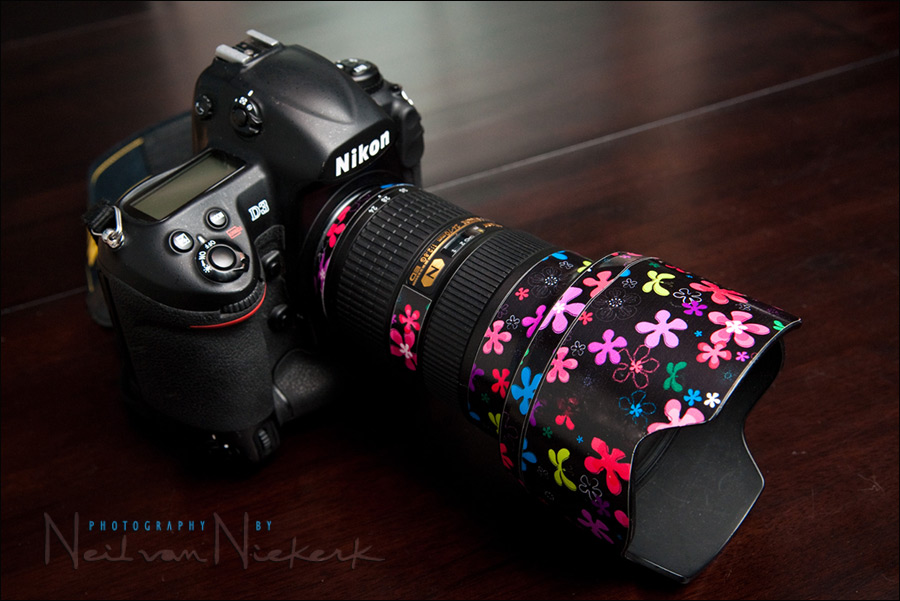
Lenses
My workhorse lens for wedding formals is the 24-70mm zoom:
Nikon 24-70mm f2.8G AF-S (affiliate) / Canon 24-70mm f/2.8L II (affiliate)
Make sure you step back (as far as possible), and then only zoom for proper framing, to get the best perspective and least spatial distortion!
I bling mine out with Lens Skins. It’s an interesting conversation starter with grandparents and flower girls alike. I must seem less scary with a flowery lens.
Exposure metering for the flash
I mostly rely on the histogram method of getting accurate exposure with manual flash.
Since the family members will be in a fixed position in relation to the light (on a light-stand), it just makes the most sense to use manual flash. TTL flash will cause too much variation in exposure. What you need for a faster workflow afterwards, is consistent and accurate exposure. Every frame with exactly the same exposure.
Manual flash exposure is controlled by these 4 factors:
– distance between the light source and subjects (which is fixed)
– power – the power / output of your speedlights. You need to figure this out, for your chosen aperture and ISO
– ISO – select a reasonable ISO. I often go as high as 800 ISO with the family photos with a suitable camera.
– aperture – pick a suitable aperture. f5.6 makes sense. f8 makes sense. f2.8 is kinda risky for a group because the depth-of-field is so shallow. Stay with a medium aperture.
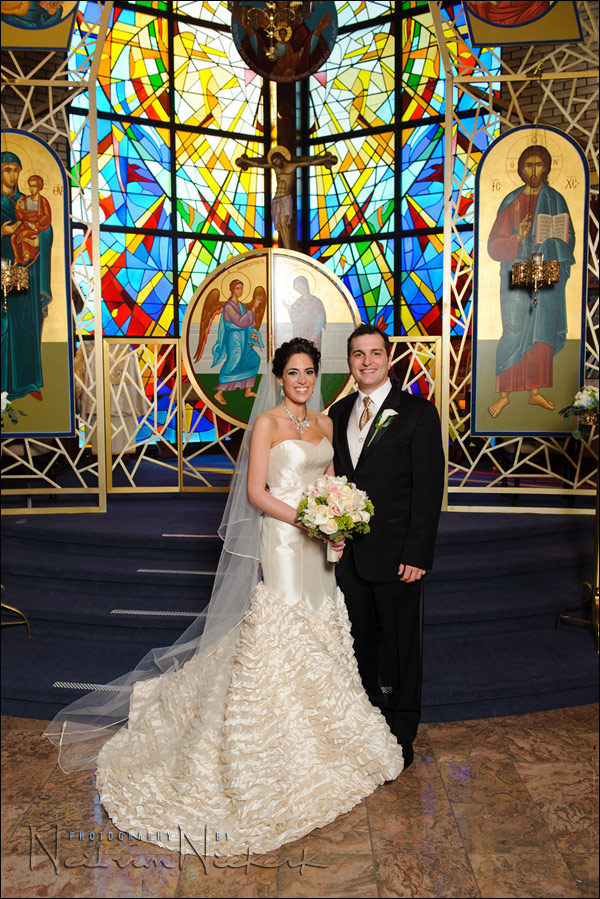
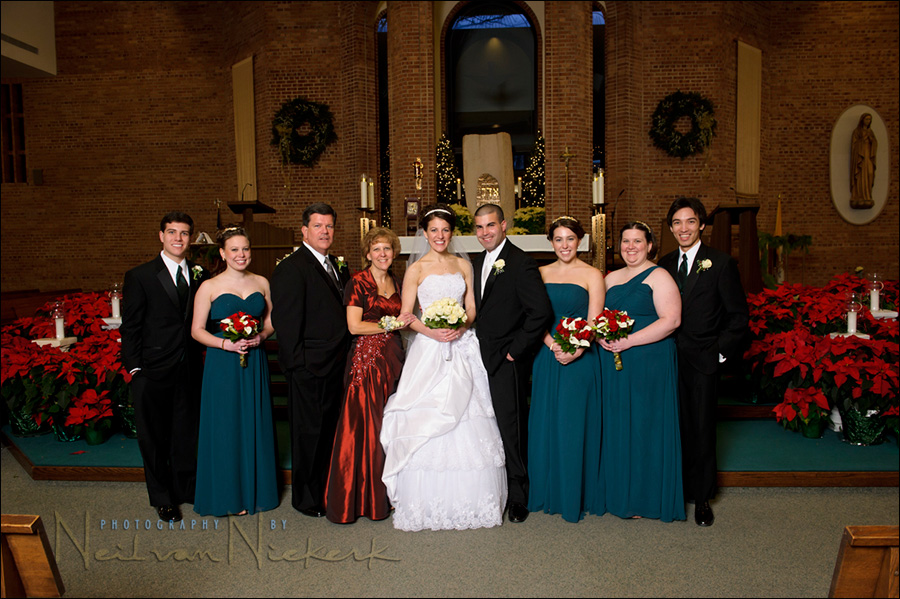
My settings for the image at the top were:
1/160 @ 4.5 @ 400 ISO
There was a lot of available light streaming in, so I chose my settings accordingly, and added enough manual flash to give me good exposure for the brides dress. All other tones fell into place along with this.
- Related article: Exposure metering for the bride & the bride’s dress
For this wedding, in a darker church, I chose:
1/60 @ f5 @ 800 ISO … using exactly the same setup.
A quick note about focal length – use as long a focal length as you comfortably and practically can. Really resist the urge to zoom wider on a group of people .. really try to rather step back and keep to a longer focal length.
And this is how it comes together for the lighting – using a lighting gear that is easy to use, and gives surprisingly great light for a medium sized umbrella. This way you can take stress off you by having great light with the family formals session.
Related articles
- Wedding photography: positioning your flash for the formals
- Gear list – Starting out with off-camera flash
- Wedding photography – lighting large groups
- A simple lighting setup for home studio photography
- More articles about wedding photography
Does adding a second flash double the power?
Lou Recine
Yes, you can double your output by adding a second speedlight. Or, you could lower your output of the single flash from 1/1 full output, and run both at 1/2 power for faster recycling. Or somewhere inbetween.
i thought I read your initial assessment of the new Nikon SB 910 was not much better than the SB 900. In particular you stated that you wanted to take a photo when YOU wanted and did not want the flash to slow down to keep cool and slow down your picture taking . Hence you would turn that feature off. Here I read that you have upgraded to the newer SB910. Any particular reason ??
Neil, LOVE the blog, regular reader. Any reason for shooting through the umbrella vs. shooting into the umbrella?
>>Does adding a second flash double the power?
Lou Recine<<
Assuming you're using two similarly rated flashes like 2 Nikon SB900 or 2 Canon 580EX II, the flash output is doubled. That is, if both flashes are manually set to full output (1/1), you would get an additional stop of light than if you'd only used one flash (measured by a light meter).
But flash power isn't the real reason for doubling flashes. Doubling allows you to set them to a lower power setting so they don't work as hard, and it also increases recycling time.
Doubling up on the number of flashes improves / shortens the recycle time because no single flash needs to work quite so hard.
Thanks for this post. Quick question. Do you light from camera axis or from an angle?
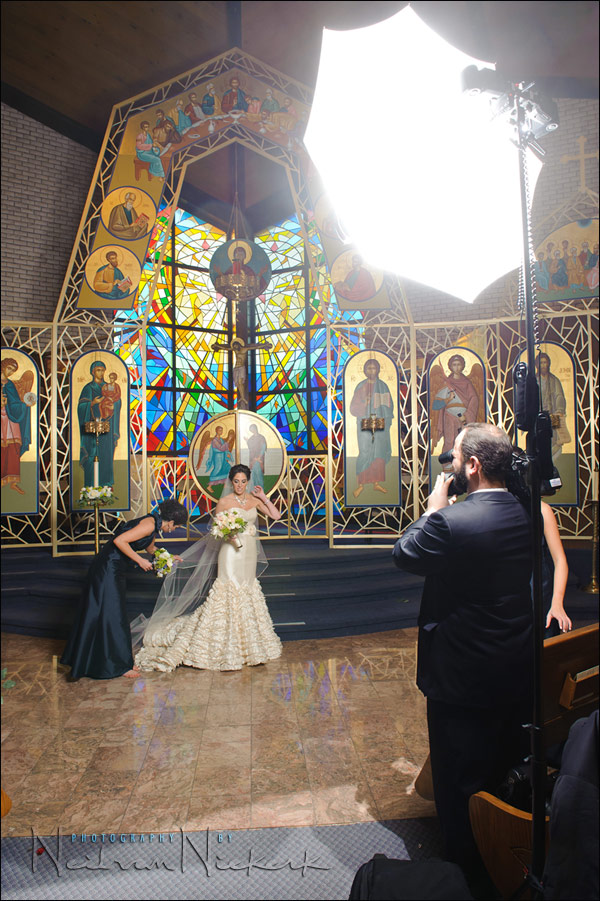
Sanka .. in the 2nd image, the pull-back shot, you can see the height that I had the umbrella at.
If you had the light from the camera’s axis, you’d have very flat light – not necessarily a bad thing, but not as interesting as off-axis lighting.
I usually have the light-stand at about the 2nd or 3rd pew in … and to my side so that it doesn’t get knocked over. And the umbrella is at about 30 degree angle above.
Better with 2 lights?…. one on each side of the camera?
Sure, two lights is usually how I set it up.
– lighting the family formals
– lighting large groups
Yet often enough, this simple setup works. The photos look good, and that’s the final test on whether this way of shooting is good or not.
Neil, long time follower, OK, even with your settings you presented what was you flashes output for the sb900s set to manual.
Jerry …. I try not to be at full power. Other that that, the actual power setting doesn’t really matter, and I don’t take much notice of it.
What matters is that I get proper flash exposure, and that I balance it with the ambient light to some extent at least.
And I do that by juggling the flash power / distance / aperture / ISO equation. Since the output of the flash is affected by the diffusion (whether softbox / umbrella), I am not that concerned with the actual manual output of the speedlight, as long as I am not demanding more than it can deliver.
Neil, some of the more eagle eyed readers might wonder why you’re talking manual flash here, yet both flashes are still in TTL mode. For those readers, the answer is simple actually. These particular PocketWizard triggers requires the remote controlled slave flashes to remain in full TTL communication mode while their mode of operation and power ratio of is set by the unit controlling them (in this case manual). This is Nikon’s thing and even using Nikon’s CLS in commander mode (SB900/901/800 or SU800), works the exact same way.
Cheers!
Love this setup. I’ve been shooting formals with this setup for a long time, and with shooting in manual exposure and manual flash, the consistency really helps in post. Great blog post !
We have a lot of dark catholic churches around here so 90% of my weddings are done in them. I’ve been using a 2 light (one on each side) set up and have been happy with that however sometimes I just don’t like how the ambient light comes into play. Some churches have lights in the back shining on the wall and some are just dark. I don’t really care for the background to look dark and sometimes orange unless I gel my flash. I shoot with the Nikon D700 and have lowered my shutter speed and increased my ISO as high as 1000 on the formals, but still very dark behind them. On my last one I actually set up a speed light on the floor behind them and let it light up the background some but then we’re looking at setting up 3 lights. What do you do in these cases? Any suggestions?
Damn! That’s a great shot.
Trev.
great shot thankx for sharing!
would u have gotten more light and a bit of a more even spread had u bounced off the umbrella?
also am i correct in thinking that u feathering the light by pointing the nose of the umbrella over the subjects head thus getting softer light and a subtle hair light and maybe even to illuminate the background a little?
Thank you for sharing this very nice set up…looking forward to trying it!
please Be Careful Neil,
flash bracket like that, will stress out TT5 hot shoe.
they break easily.
i’ve broke mine :(
If you do the math then a battery powered flash head & battery pack like the Elinchrom Quadra thru an umbrella will probably cost the same as the 2 strobes, 2 PW TTL’s, brackets, extra battery packs. (yes, you may have these already). Less hassle to set up, still manual, versatile for other siyuations and lots of bang for the pack.
Hi Neil, could you please expand on your second to last paragraph? Why are you recommending resisting the urge to use a wider angle focal length but rather to stick with the longer focal lengths and step back. I am less concerned with coverage as I am with depth of field since one of the issues I am consistently facing is slightly soft people in either the front or the back depending on where I focus. Even at apertures between f5.6 and f8. Seems to me that a longer focal length would exacerbate that problem.
Thanks again for a great website
Ross
Ross,
The reason being at a longer focal length the lens gives a different perspective to the image rather than at a wider angle.
If you look at the main image at top, he could have been much closer, then do a zoom out to 24mm to fit what he wanted in, but, that would then have meant you start to suffer from ‘converging verticals’ where the outside of the frame starts to ‘lean’ in, and any person on the outer edges start to look like they are leaning right in. Nothing wrong with that if you are pressed for room.
Now if Neil had of zoomed out to widest angle and got closer, the edges of the window frame would be really distorted more than pleasing to the eye, also the more zoomed in, the closer the perspective the couple has being to the background.
If you shoot upwards to a building with a wide angle, it ‘converges’ [converging verticals] and if there was a tall enough building and you had a wide lens, eventually it could converge into a point.
Stand on some railway tracks [watch out for trains is a given] and look down at feet, the perspective is ‘correct’ that’s how wide they are, but then raise your head, it will disappear into a point.
So by zooming in, stepping back to then fit in frame what you want, gives a nice perspective to an image that will benefit from such a move like the above shot.
To the question of depth of field you struggle with, if there are 3 rows of people, f6.3-f8 will cover that, focus on the front row, if 4 or more rows, you can stick to f8, but because of how depth of field works you could focus on someone in the second row.
Generally, and I say generally because it also depends on how far back you are standing, plus focal length; this depth of field is 2/3rds behind, 1/3rd in front for a set distance which will be in focus.
What this ‘distance’ is depends on those factors mentioned.
Aperture, the further back you are from the subject will be of benefit, or you will need to have aperture around f11 if you are close.
So that means 2/3rds of a ‘distance’ is in focus behind the focus point, and 1/3rd in front of that focus point should be sharp. If you can step back further, that depth of field ‘distance’ increases. The closer to the focus point you are the shallower the depth of field distance becomes. Hope that makes sense.
This method is often used in shooting a landscape as DoF ‘distance’ can be done by focusing on an object you wish to remain in focus in the foreground is a 1/3rd of the way in the frame, so the remaining 2/3rds behind [the rest of the landscape] will by a general rule also remain in sharp focus, that’s why I mentioned if 4 rows of people or more that may help by focusing on the second row.
Trev.
Another reason for using a longer length — which lets you get further from your subjects — is that if you have several rows of people and are close to them, the nearer heads will appear larger than the further ones (consistent with the ratio of their distances from the camera). As you back away, the ratio of subject-to-camera distances (front row divided by back row) approaches 1/1, so the difference in apparent head sizes approaches negligible. (Not an issue with only one “row”, more of a problem the more rows there are.)
Duane,
Good point. Elongation/distortion of facial features with wider lenses if too close.
You have absolutely the best advice. You amaze me with your flash prowess. I am learning posing composition and the couple in front of the steps with the brightly colored stained glass is most certainly the traditional shot. Could the couple be moved closer to the camera with the camera at thigh or knee level so that they’d be enveloped by colored glass with perhaps some bokeh to diffuse the glass?
Mike … I could’ve, but during the family photo session, I keep things as streamlined as possible. One set-up with regards to the lighting, and one position. Efficiency is really important here.
As an aside, where you say ‘bokeh‘, I think you meant shallow depth-of-field. Those two terms aren’t the same thing.
Hi Neil,
Are you now lighting the formals with one 45″ shot-through umbrella instead using the 60″ bounce umbrella and how do you avoid lens flare?
Trina … for a fast, simple setting up, I use this.
There is of course the risk of getting lens flare if I step back too far. I’m careful with that. And with digital, it is easy enough to spot. I also remove the lens filter if I suspect I might get lens flare.
And when I’ve had lens flare causing low contrast on a good shot, then sliding up the Black Point in the processing of the RAW file, usually solves that.
Neil,
With those two speedlights in the umbrella, are they coordinated in one group (i.e. both of them in group A) or separated (one speedlight in group A, the other in group B)?
Just one group. This is meant to be simple. Besides, the two flashes are blasting through a single umbrella, so there’s nothing like ratios or lights that need to be balanced.
Neil what would be best 6o reflective umbrella or the 45 in shoot through. Also what is your take on using a 4oo watt mono light with a shoot through umbrella 60 inch or 45 inch .
thank you.
In my experience, a shoot-through umbrella scatters the light more. For photographing the wedding formals, this is usually a (slightly?) better option.
Cool rig but wondering if you’ve found a way to attach the battery packs to the light stands in such a way as to secure them but also allow quick removal of them if need be. Got a recommendation?
The battery packs have loops / straps … and I just slide this down the stem of the lightstand before attaching the clamp, etc. It works well enough.
Ah ha. I didn’t think there was enough room in there to slide over, but I’ll check it out. Thanks.
I was hoping to use the two speedlight/umbrella setup. Do you think it would be possible to use that setup with what I have and purchase a few small accessories. I have an 8ft. light stand, a canon 600 ex-rt speedlight, a canon 430 exll, and a canon speedlight cord. Would the 430exll work as a slave with line of sight with this set up? I would purchase the umbrella and additional accessories for attaching the speedlights along with battery packs. I know it’s stretching it , but just thought I would ask. Wasn’t sure how high the lights were placed. Also could I use your two speedlight/one umbrella setup for a group of say 20? I also read one of your articles stating the reflector umbrella is better to use than the shoot through? Thanks for all your knowledge. It has helped me so much!
You would have to set the 600EX to be optically triggered via the Canon wireless system, to trigger the 430EX as the slave. You can’t slave another flash via the Canon optical slave system, while using the 600EX in radio slave mode.
Would two speed lights in an umbrella be enough to light a group of 20 people? That depends entire on the DoF you need, and the ISO you would like to use.
Check the linked article for more info, such as how to place the lights.
Neil – if one has enough room to move back, would a 70-200 have an advantage over the 24-70 due to the compression it offers? I use both lenses extensively, but somehow prefer the look of the 70-200. Speaking specifically about formals and not environmental portraits inside or outside of church’s, etc.
Paul, a longer lens would give better compression.
Practically though, (for me), two things make me favor the 24-70mm more.
I often have to photograph the family formals in the church. Then the pews get in the way of a longer lens being practical.
Then there is another aspect to this – communicating with the group, arranging and posing them. Stepping back with a longer lens can mean you lose “connection” with them. They can’t properly hear you, and their attention might even momentarily waver more if you’re further away.
So I tend to work with the 24-70mm, and mostly at the 70mm end if possible.
Neil – thanks for the explanation, but even more so thanks for the wonderful books you’ve produced (have the first two and will be purchasing your third book soon) and for all of the hard work you put into your website/blog. Having worked in publishing/printing for many years I know how much time and dedication all of this takes on your part! You’ve become great mentor for many of us…
Neil, I am curious. If there is substantial tungsten light at the altar area, do you try to underexpose it enough with your choice of shutter speed that it won’t create any mixed color issues, or would you gel your flashes to match the ambient?
We run into this a lot during church formals and often during the reception where the bridal party head table is located. Would love to hear your thoughts on this Neil. thanks.
I most often gel my flash with a 1/2 CTS to bring the flash closer to the existing ambient light.
As described in this related article: Positioning the flash for the wedding formals.
Neil, thanks for the article. I have a question though. What if I use softbox instead of umbrella and manage to put two speedlight inside? Will that work? Let me know please. Thank you :)
Sai – that would work very well too. I do think an umbrella would be easier to set up, and would spread the light wider.
I like this set up better. I usually set up a 500W Photogenic in the back bouncing into the wall or ceiling behind me and lighting up the entire front with light, then I have the task of breaking down and carrying that heavy strobe back to the car. This is very much lighter. However if I have a large group seems like using the Photogenic off the back wall would give better coverage.
But I have a question. I frequently use a 46″ parabolic umbrella diffuser with silver reflective interior. Would that be just as efficient as the shoot thru you do?