Camera & flash settings: Photo session in bright sunlight
Analyzing other photographer’s work to figure out how they got the result, and figure out how to re-create it if you want, is a solid exercise. I do it often. It’s part of expanding your understanding of photography and lighting, and a way of expanding your technique and your repertoire.
The challenge to figure out the camera settings and additional lighting for a sequence of photos from an engagement photo session – reverse engineering an image – had some interesting guess-work, and some good sleuthing.
Let’s have a look at the images posted in the challenge, and then slowly step through the thought-process. Some of these are near-instinctive decisions, but some are done with a quick frown and an “ok, let’s do it this way then”:
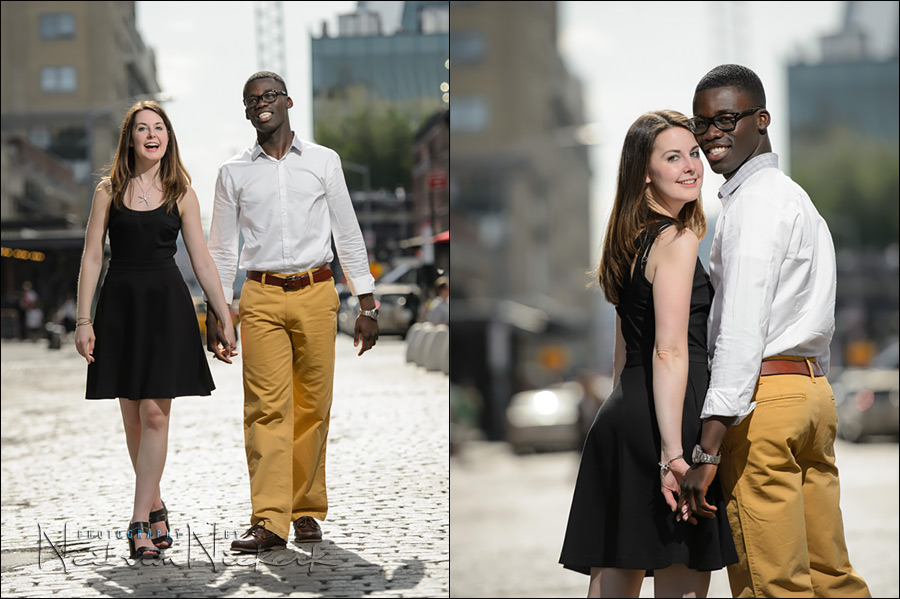
1/1000 @ f/3.2 @ 100 ISO … 70-200mm lens zoomed to 135mm
Full power manual flash, off-camera, bare.
1/1000 @ f/3.2 @ 100 ISO … 70-200mm lens zoomed to 120mm
Full power manual flash, off-camera, bare.
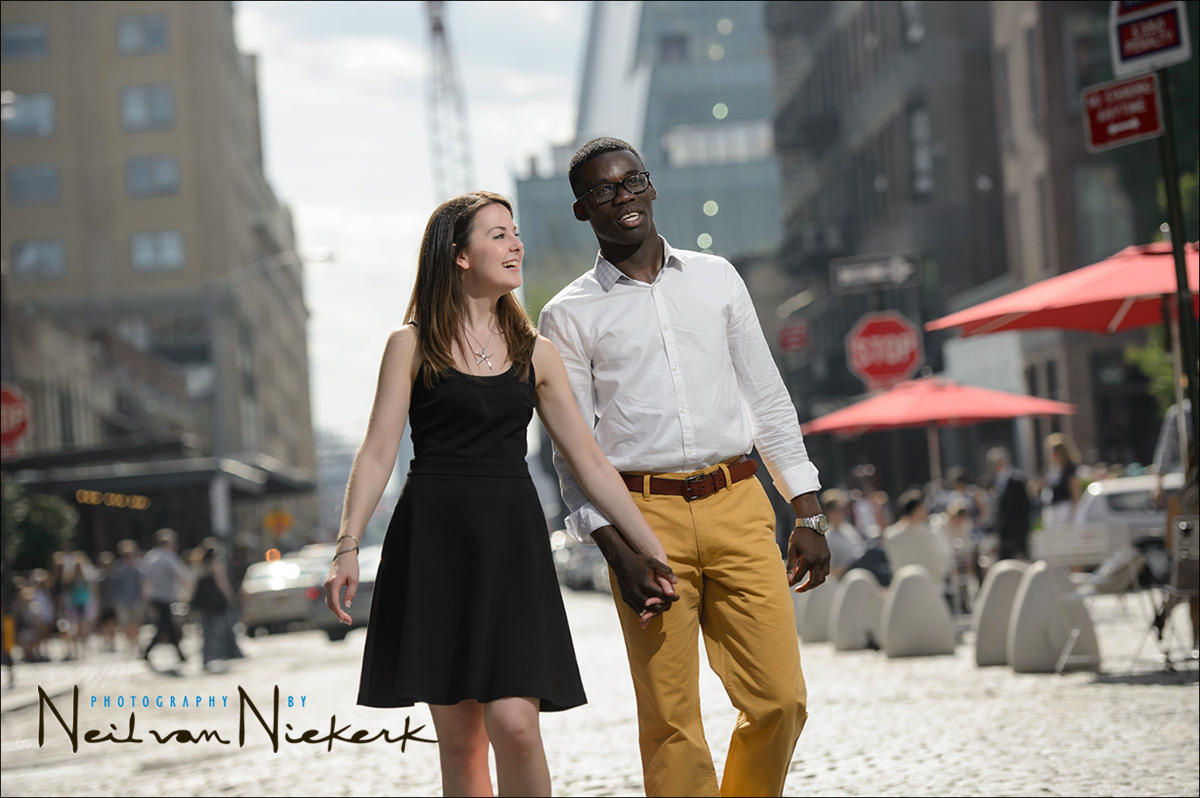
I asked the couple, Jessica and Tony, to walk towards the camera with two passes. The three images shown in the original challenge to figure out the camera & flash settings, were taken during the second pass. But I did run and change position to get longer shots again between images.
Always start with the ambient light
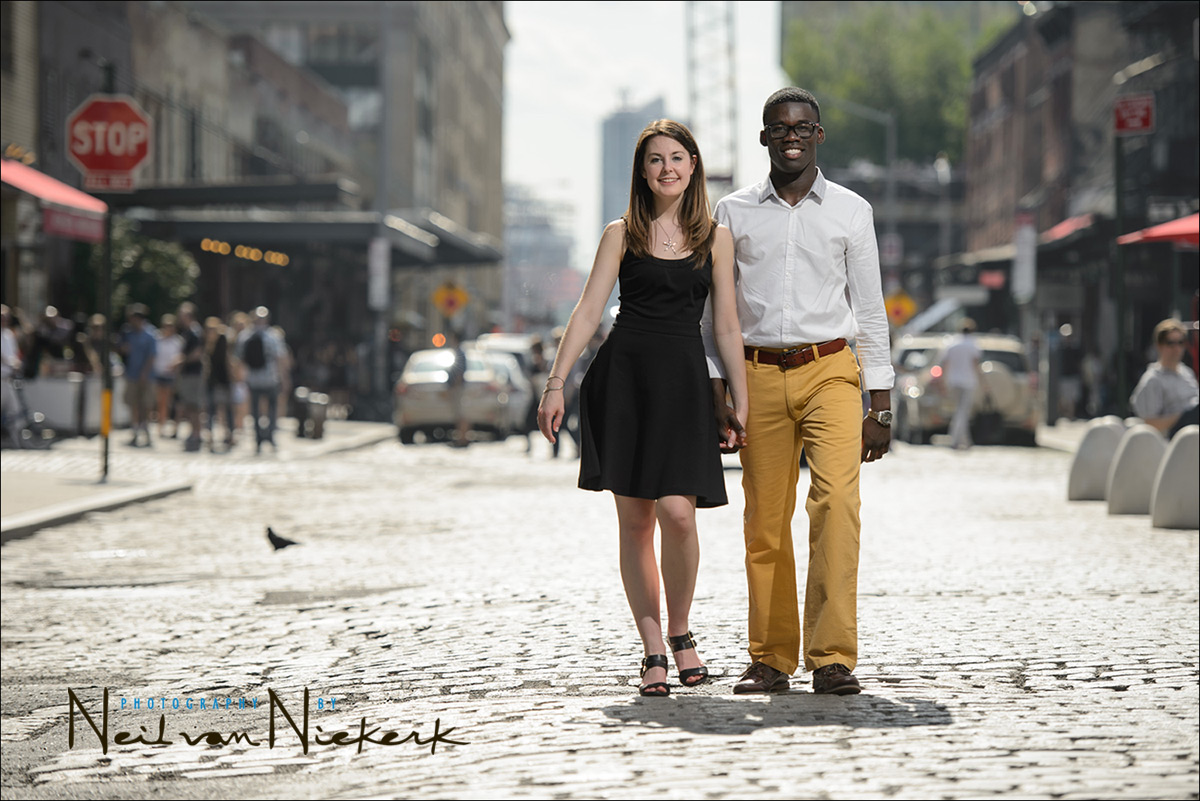
Here are two of the initial test shots to check my settings and exposure.

Both photos are available light only.
When you work with additional lighting on location, you invariably start with the ambient light as your base decision.
left-hand photo: 1/1000 @ f/3.2 @ 400 ISO
right-hand photo: 1/1000 @ f/3.2 @ 100 ISO
My starting point for exposing the shadow side correctly, (and ignoring the strong backlighting), was:
1/250 @ f/4 @ 100 ISO
This is explained in the second part of this article: taking photos in hard sunlight. Those are very handy reference settings to keep in mind!
The settings: 1/1000 @ f3.2 @ 400 ISO is then 2/3 stop away from that starting point.
f/3.5 would’ve worked just as well, and that is quite close to the rule-of-thumb explained on that linked article.
Three stops away from 1/250 @ f/4 @ 100 ISO, is
1/250 @ f/11 @ 100 ISO, which is very very close to the Sunny 16 Rule.

Direction & Quality of Light
I wanted to distill the essence of what we, as photographers, work with – light! Before we can truly grasp on-camera flash and off-camera flash, and really, any kind of photography, we have to be aware of the direction and quality of light. We need to observe the light that we have, and then decide how best to use it, or enhance it.
With this book, I try my best to share those “aha!” moments with you, and I do believe this book can make a difference to your photography.
The book is available on Amazon USA and Amazon UK, or can be ordered through Barnes & Nobles and other bookstores. The book is also available on the Apple iBook Store, as well as Amazon Kindle.
Deciding on the flash settings
Now ideally I might’ve wanted to work at 1/250 @ f/11 @ 100 ISO for the photos to keep the sunlit areas from blowing out. But with flash, there are limitations that I had to keep in mind:
- At max flash sync speed I have the most range from my flash. In other words, I effectively have the most power from my flash.
- If I go into high-speed flash sync range (by going over my max flash sync speed), then I drop at least one stop in range.
- So now I have to balance this decision – do I want f/11 depth-of-field (DoF), or do I want to isolate my subjects with shallow depth-of-field?
- I decided to go with shallow DoF.
In deciding to go with shallow DoF, I knew the range of my flash would be limited. As you crank the shutter speed higher past maximum flash sync, the flash starts to behave like a continuous light source in that shutter speed affects flash output. (Below max flash sync speed, the shutter speed has no effect on flash output, and the shutter speed becomes your independent control for ambient light.)
So looking at my test shots, I have:
left-hand photo: 1/1000 @ f/3.2 @ 400 ISO
right-hand photo: 1/1000 @ f/3.2 @ 100 ISO
Ideally I might have wanted to drop the ambient even more for the right-hand photo, but I also knew the flash would need to be held too close to the couple to get the compositions I wanted.
Even as it was, I had to crop some of the RAW images to remove part of the softbox or monopod. You can see it in the top left-hand corner from one of the earlier images when we did the first pass.

Adding off-camera flash to the available light
One of the most valuable things to know about your speedlight (or most of them), is that it will show you the distance at which your flash will give you correct exposure.
– for TTL, it will be a range
– for manual, it will be a specific distance.
Make sure your flash is directly pointing forward, and the distance scale should appear (for most flashes).
This tutorial explains how to use that distance scale:
getting the most power from your flash / speedlite / speedlight
A related tutorial explains how to use the guide number of your flash.
These two tutorials carefully explain how you would be able to figure out your flash exposure close-enough-to-correct, without metering for it.
For example:
Guide Number = Aperture * Distance (for 100 ISO)
The Nikon SB-900 / 910 and Canon 580EX / 600EX have guide numbers close enough to 110 when the flash head is zoomed to 35mm. That’s also a handy thing to remember, because:
110 = f11 @ 10 feet.
Notice how neat that is … f/11 is also the aperture you’re going to use if you use flash, and go with the Sunny 16 Rule!
So if I need f/11 worth of flash from a bare speedlight held off-camera, I make sure my assistant keeps it 10 feet from my subjects! Dead simple. And I then shoot at 1/200 or 1/250 @ f/11 @ 100 ISO.
Because distance is one of the controls for flash exposure with manual flash, I had my assistant walk at the same speed as the couple, and hold the flash at the same distance from them all the time.
Back to my chosen settings: 1/1000 @ f/3.2 @ 100 ISO
- I want shallow DoF, but I will lose flash power.
- using a neutral density (ND) filter to control DoF with flash isn’t really an option here since the couple would be moving towards me. The camera would have too much of a battle with 3 stops lost, and the strong back-lighting. This means, I would have to go in to high-speed sync if I want that shallow DoF.
- The light is super bright outside, so I will have to go with a bare speedlight. A softbox would kill too much light. So that’s not an option. It will be bare flash.
- At the time, my much loved Profoto B1 didn’t offer high-speed flash sync yet, or it would’ve been my choice to use here.
- Ideally I would want something in the order of 1/2000 @ f3.2 to drop the ambient light in the background even more, but then the flash would be too close.
With all that, the chosen settings are a compromise between flash range, and how much I am okay with the background blowing out.
There are other real-world compromises. The harder flash does mean that the lighting pattern might not be entirely ideal. It’s not realistic to expect loop lighting or butterfly lighting on two people in every photo when they are walking and talking to each other. The way the flash was used here is the best-case way of having some control over the background exposure and how my subjects are light. For example in the image where she is twirling around in a dance move, the shadow of his hand isn’t ideal. But, the overall look and feel of the photo trumps that minor technical concern.
Finally, this sequence needs to be seen as just part of the entire photo session.
Choice of lens
I love using my 70-200 to compress perspective, and to isolate my subject. This is discussed in the tutorial on making your images pop through choice of lens.
I mention the focal length each image was shot at, as I zoomed in or out. Remember the couple was walking towards me, and I was also scurrying further away frequently.
With the challenge, many guessed the focal length to be 35mm or 50mm. These lenses would not give this compression. It is important that you play with your lens, and walk towards and further from your (test) subjects, and build up a visual repertoire of what your lenses’ field of view look like.
Even 85mm wouldn’t give this tight a view. Also, prime lenses are for me more difficult to work with in a fluid scenario like this. I need to be able to zoom in and out.
With all that in mind, and specifically the need to isolate through shallow DoF, and the compression a telephoto allows, AND the convenience of image stabilization of the lens, the 70-200mm f/2.8 is the obvious flexible choice.
Summary
While it might seem arbitrary to ask for settings – I mean, how could you deduce camera settings!? – there is a thought-process behind all of this. With some of the steps, there is a very specific decision, and with others there’s leeway. But it all makes sense and there’s a repeatability to this.
By having a method like this, there’s a solid base to start from, and your work will look consistent. Consistent during a shoot, and consistent from shoot to shoot, to help define a style.
Related articles
- Off-camera flash for wedding portraits on the beach
- Camera & flash settings: What do you want to achieve? (model: Ulorin Vex)
- Using high-speed flash sync / Auto FP (model: Aleona)
- Overpowering the sun with off-camera flash – what are my settings?
- Flash photography tutorial
- Jessica and Tony’s engagement photo session in New York
That was allot of fun! However I was way off..1/320 at F2.8,ISO 50..I would of swore you used ISO 50 and you rarely shoot bare..Nice adaptation to what works! Thanks for posting!
Going to 50 ISO (known as “L 1.0” with the Nikon D4), would actually have helped me. My shutter speed could then have been a stop lower, and that would’ve given me more range on my flash. (With High-Speed Flash Sync, the shutter speed does affect flash range.)
Ehh, I was close….
Neil,
you said, that if you want to use flash in bright sunlight , you set your camera to 1/250, ISO 100, f/11 (for front light)
than you said, that you use 1/250, ISO 100, F/4.0 (when sun backlight your subject)
Correct ?
Follow the linked article for the full explanation of this rule-of-thumb.
Ok, so I`m correct :)
Thanks
A simple “yes” wouldn’t suffice. It needs context. The article explains the context.
Yes, Of course it depends on situation. 2 days ago I had a photoshoot, and believe me, theory and practice are like 2 persons. IF you know both Of them, you are complete photographer.
Everything is so clear when you go outside and implement these things .
Thanks Neil.
Thanks Neil not only for this great exercise, fun and educational, but also for this long explanation.
I was also way off, guessing that it wasn’t shot in HSS and that the background was blurred due to the distance between the b/g and the couple, and the long focal length of the lens. Still, interesting to see what can be achieved – thank you (again), Neil!
Just a side note – there’s a different approach to this as well, albeit more time-consuming one. In Photoshop, choose a quick selection tool, select the couple, refine the edges (hair etc.) via “Refine edges” option, inverse the selection and then apply e.g. the Field blur to the background – and you’re done, more or less. Recently I “hobby-shot” two friends of mine @f/11-13 in bright sunlight, and this quick Photoshop trick works quite nicely! It can be done decently in a matter of a few minutes only, especially if the couple is on a simple background, like sky etc.
My understanding is that the straight flash analysis gives 1/250 @ f/11 @ 100 ISO (assuming bare flash, full manual power, 10 ft from subject). You want to open the aperture for dof. The first guess is 1/1000 @ f/5.6 @ 100 ISO. But this doesn’t account for the loss caused by moving into hss. You need to open the aperture more by 1 2/3 stop. So 1/100 @ f/3.2 @ 100 ISO. This is great because the initial test photos showed great ambient at this setting.
Is my thinking correct?
I note that for the SB 900 the guide number is also dependent on fx or dx format camera.
Don … yup, that would be careful analysis after-the-fact.
During the time of shooting, it’s more in the line of “oh crap, I’m not getting enough light, let me open up a bit .. and yeah!”
This is why I come to Tangents. This is why I buy Neil’s books and use his click-through links. I’m not aware of another photography blog that provides so much know-how and simultaneously challenges followers to test their knowledge. Three cheers for you, Neil!
Justin
So did you use HSS or did you just cheat the shutter?
You will have to read the text.
Also, what does “cheat the shutter” mean?
I meant to say cheating the flash sync instead of cheating the shutter in my first comment.
Cheating the flash sync is a technique where you take your shutter speed past the max sync speed (let’s say 1/400th for example) but position your subject at a place in the frame where they are fully illuminated by the flash without getting blacked out by the closing shutter. Now that I think about you couldn’t have cheated the flash sync because you were at 1/1000th. Only a small sliver of the frame would have shown at that speed.
Aaah yes. This wouldn’t work with wireless systems which are high-speed capable. There’s no way to go over maximum sync speed without going into HSS mode.
So you could do this with the older PocketWizards for example. But even then, I do think this application is more novelty than of real practical use. (David Ziser might not agree.)
This has been a fascinating exercise and shows what can be done when tackling difficult conditions with top class equipment, especially lenses that can handle the harsh sunlight. On aesthetics, the shots don’t quite look right as the strong light from camera right looks very harsh. Could this sequence been done with the assistant holding a large reflector?
I really like the lighting, posing and grungy set in the other shots from the shoot.
Not really Jon, this shows what can be done with top notch expertise, skill, experience and talent. Giving credit to the equipment is like giving credit to Julia Child’s oven or Ernest Hemingway’s typewriter.
Jon, as I mentioned here, see this sequence as part of the overall photo session with the couple. There are other images too to give a final selection that has variety and show their personalities and how they interact with each other.
So while the lighting here is pretty hard, that’s the compromise we had to make … or else just go “meh” and walk off and do something else. That’s a valid option too. I decided to make it work. I really like the results, as do the couple.
A reflector wouldn’t have been as easy to control as off-camera flash, and we’d have to work in a static position. I can’t imagine trying movement like this – with the couple walking towards the camera – with someone running in front of them with a huge reflector.
The lighting is hard, but it definitely works here. The couple is given a radiant “glow” that separates them from the background.
Neil delivers again.
Neil,
Another thing dawned on me at 2 A.M. When shooting when hss may come into play we need to have the right triggering system. The built in optical (I use the SU 800) might work. My dumb Pocket Wizards won’t. My other choice is Radiopoppers PX. MY problem is I realize this after the shoot! Must keep making mistakes so I can learn faster!
Don
Hi Neil,
Is there a reason you favor the rapidbox over a shoot through umbrella? I’m still struggling with what light modifier to use when.
Thanks so much for all you do for the photo community, I learn tons from you.. (yep..I’m smoozin :-), but it is true
David
This time I used the Lastolite 24×24 Ezybox, instead of the Westcott Rapidbox.
On location (such as a busy area in New York), an umbrella is potentially cumbersome, compared to someone holding up a softbox on a light-stand. A softbox is also more efficient because a shoot-through umbrella scatters the light in all directions.
Does Nikon’s flash system allow a 1/1000 shutter speed with the flash, off camera, in manual mode? I’m a Canon user and I don’t believe HSS works in manual mode with Canon flashes. Were the flashes connected via hot shoe cord to your camera? or, did you find a wireless system (Pocket Wizards?) that can reliable work with HSS at 1/1000 ?
Yes, Canon’s flash system does most definitely go to HSS with manual flash.
Do read this tutorial on high-speed flash sync.
Ok. I just figured out that you used a master flash on your Nikon camera to trigger the slave.
I have a PocektWizard TT5 on my camera to control the off-camera slave flash which had a TT5 to receive the control signals.