combining flash and ambient light
Going by the emails that I receive, one of the areas that many photographers struggle with is that of combining ambient exposure and flash exposure. This question is also expressed in other ways. It can be a frustrated, “where do we even start?” I also often see it expressed as an involved step-by-step deconstruction of technique, making the entire process more complex than it is.
In reply to that, and many other emails I’ve received in the past few months, I’d like to offer an analysis of a few images from a recent shoot.
One of my favorite clients has the most adorable baby boy that she wanted some portraits of. I had to shoot fast, since his attention span was .. oh, zero. He’s still a baby! I also wanted to be able to cover myself in getting some available-light only portraits, and some with bounce flash. I didn’t want the flash to be overwhelmingly bright. And in bouncing the flash, there was also less chance of disturbing the baby. So I had to mix it up in order to get some variety, and be sure of images that worked.
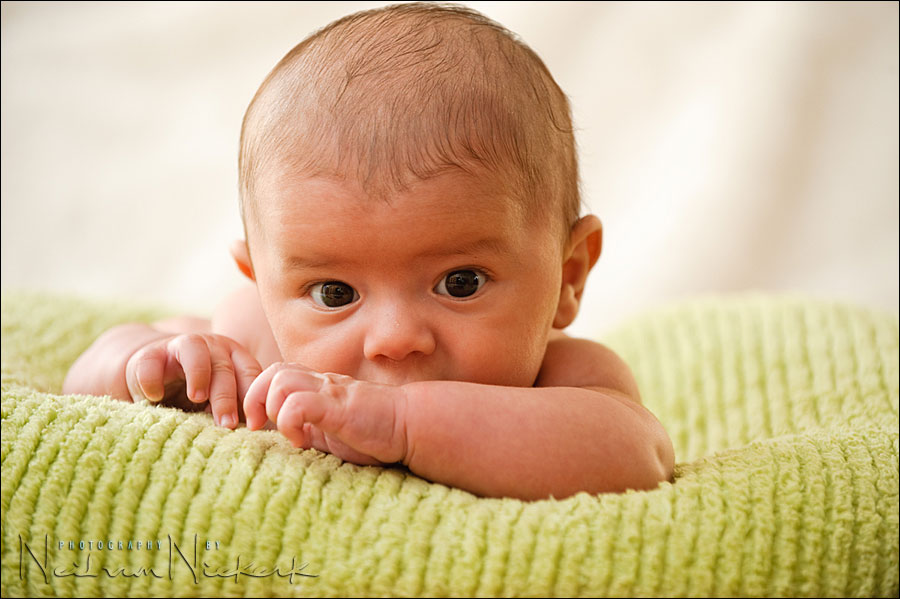
The image at the top was shot with the Nikon D3 and the Nikon 70-200mm f2.8 AF-S
Lighting here was a combination of available light and bounce flash. And as usual, I used the black foamie thing to flag the flash so NO light from the flashgun fell directly on the child.
camera settings: 1/100 @ f4.5 @ 640 ISO, using TTL flash
The FEC was not recorded, but would’ve been around 0EV because my flash isn’t merely fill-flash here, but fairly dominant.
Now where the settings look like they might be informative, I also often feel that these numerical values are a diversion. Too many photographers will get hooked on the choice of f4.5 over another aperture. Why 1/100th of a second? Why 640 ISO?
The truth is that this could’ve been a different combination of settings. What is important here, is the quality of light. It is our major concern here, and should interest us more than f4.5 at this moment.
The light on the baby’s face is directional. There is more light coming from camera left .. and from this you should be able to deduce that I did indeed bounce my flash to my left. Using that piece of black foam to flag my flash, I was able to get directional light like that.
The light is soft. Since I bounced my flash into the room, and it bounced off the walls, and furniture, I will have soft light.
So those two aspects of the light from my flash is easily understood – soft directional light.
Now let’s look at how I chose to balance my flash with the available light …
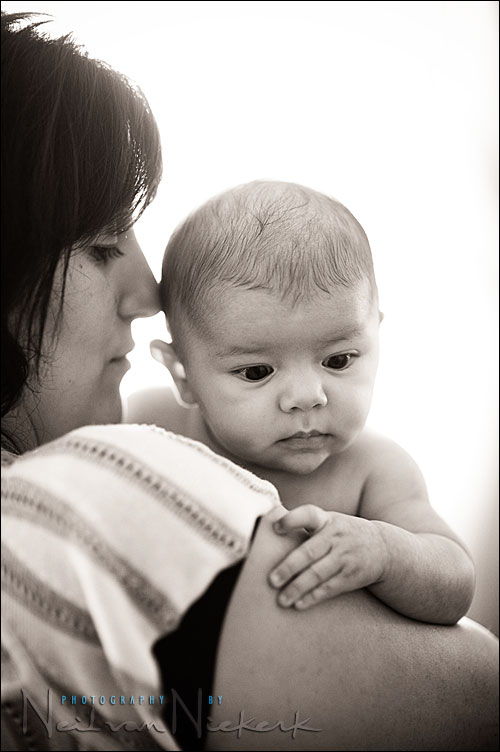
In that bedroom there was enough light for available light portraits of the baby, and I made sure to get that.
Camera settings: 1/200 @ f1.4 @ 1000 ISO; no flash
I shot this with the 85mm f1.4 since I needed the wide open aperture for two reasons – the low light levels, and for the specific look that the razor-thin depth-of-field would give me. Since the baby did move a fair amount in his mother’s arms, I machine gunned it to an extent to make sure I had a few key images that were actually crisply sharp.
There is the base exposure – my ambient light with no flash … for this specific scenario with the baby turned away from the window light in his mother’s arms. If I had moved position and shot with the incoming light, my exposure would obviously have been vastly different. But I wanted this high-key look.
So there I have the exposure at which the baby is correctly exposed for the ambient light. If I chose a slower shutter speed and higher ISO here, I’d have over-exposure. I can’t go “that way” in my exposure. Where I can go with my exposure … is under. I can under-expose my subject and then add flash to make up for the lack of ambient exposure.
So by how much can I under-expose my ambient light (and add flash for the difference)? Here we get to the crux of this article – how do you decide? How do you decide what your settings should be and how much flash should you add?
Here’s the answer … you decide. There is such a wide range of possible settings here, that there is no real correct answer here. My main consideration is that the lighting (for my tastes) remain soft and directional and complements my subject.
Here is another image in the sequence, but with flash:
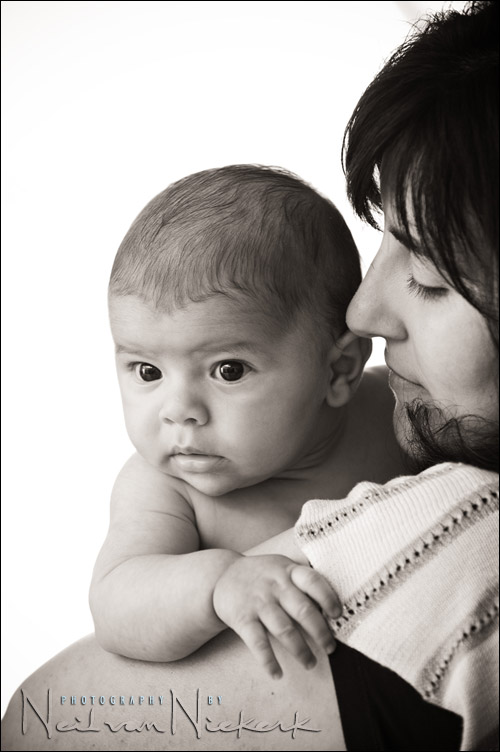
Camera settings: 1/80 @ f5.6 @ 640 ISO; TTL bounce flash
Here again I used the 70-200mm f2.8 zoom, and at the 200mm setting.
The shooting scenario was exactly the same – the baby’s back was towards the curtained window-light.
The difference in ambient exposure is just over 3 stops. Without the flash, the baby would’ve been severely under-exposed. So the light you see on him there is primarily the bounced flash.
How did I decide on my settings? To a fair extent they were random. Since f1.4 is such a shallow depth-of-field, I wanted to make sure I had images that were sharp, so I picked f5.6 … but it could’ve been f4 … or f4.5
Similarly, why 1/80th shutter speed? It didn’t really matter. I don’t want to go too slow and risk camera shake, but I also didn’t quite need 1/250th here. So anywhere sensible would be good.
Looking again at my base exposure – ambient light at 1/200 @ f1.4 @ 1000 ISO … any exposure where I under-expose the ambient light, and then add flash, would’ve worked. I could’ve had a studio light (and risked the discomfort of the baby) at 1/250th @ f11 @ 100 ISO. Anything in between that, and the correct ambient-only exposure, would’ve worked.
That’s a HUGE range over which I could’ve had my settings. But in the end, I just need enough depth-of-field. And this time, I’m happy with an aperture of f5.6 but another mid-range aperture would’ve been fine too. I need the baby’s eyes in focus, even if he moves a little, and for that, f5.6 is fine. The same kind of reasoning goes for the choice of shutter speed and ISO.
With that, let’s look at the top image again, and answer a few questions:
1/100 @ f4.5 @ 640 ISO; TTL bounce flash
Why TTL flash and not manual flash?
No particular reason, except that I find TTL flash is faster to work with here. The TTL flash metering gives me a head-start in getting correct exposure. This I nudge up or down as I need to.
Why bounce flash and not the strobist route with a softbox?
Speed and efficiency. I can be ready to shoot as I walk into the room. No setting-up required. Also, lack of space in the bedroom is a problem. Therefore, in this instance, bounce flash got the results I wanted, and much faster than I could’ve if I had decided to set up off-camera lighting.
How did I meter for the TTL flash?
I pre-judged the scene. As mentioned earlier, the flash here isn’t mere fill-flash but more dominant than that. I also know from experience that a back-lit scene needs a bit more FEC than a normal scene. Therefore my FEC was around the 0EV range. Adjustment was to taste, according to what I saw on my camera’s preview.
How did I meter for the ambient light?
By checking my camera’s built-in meter, and knowing I want the background to be lighter. It’s not an average tone. I could take my time and meter for the scene and decide on tonal values and get all Ansel Adams on this … or I could get a general reading from my camera, and take a test shot. I want the baby a tad under-exposed, so I can take up the slack with bounce flash. In doing it this way, I am able to open up the light on his face.
summary
Ultimately, in using flash indoors like this, I want the ambient light under-exposed to an extent at least, so that with bounce flash, I can achieve an open, clean look. With this, the specific numeric values of my camera settings aren’t all that important. (I don’t want to go over maximum sync speed here though.)
My main concern is direction of light and quality of light … and concentrating on getting the endearing expressions that his mother wanted me to capture. Mood and expression – the essence of portrait photography.
related articles
– how do you meter for TTL flash & ambient light
– black foamie thing
– bounce flash portrait – a consistent technique
– my favorite lighting setup to photograph kids indoors – bounce flash!
Great insight Neil! Thanks for sharing your thinking process, it’s really helpful.
Neil,
Quote: Why bounce flash and not the strobist route with a softbox?
Excellent! I guess a lot of people think that strobist is the way to go with flash, but, IMHO, I’m glad you manage to explain that there is a fairly decent place for bounced TTL as well !
All the best for 2010.
R.
Thx Neil for the sharing
I have a question, how do you manage to get the catch light in the eyes. I can see them in almost every portraiture pictures that you have posted. Any tips?? espeacially using TTL bounce flash only
Thanks
IchibanSheng
Thanks Neil. As usual a very informative post.
If the bounce flash has a strong color cast to it due to non white walls would you still bounce? If so how would you color balance in PS?
Thanks.
I have a similar question– did this baby have a white-walled room, or did you have to do some white balance correction?
Great article! This is something I’ve been toying with a lot recently and it’s good to see that my approach is generally the same as yours (though, I’d assume, mine involves much more “guess and test” than yours, as I’m still learning! :) …
Thanks Neil! :) I still have some questions regarding the ambient light metering in general. Since you are moving around the room, are you constantly metering with your in-camera meter? When you take your test shot, are you turning your flash off to see how the ambient light is rendering on the LCD? Currently, I am struggling a bit metering with the in-camera meter to determine Aperture/Shutter/ISO when using flash… For example, if I meter with the flash off, my in-camera manual meter reads something different when I have my flash turned on in AUTO/Pre-Flash TTL setting. If possible, can you quickly jot down some pointers on how you go about utilizing your in-camera metering to set your base A/S/I? You rock and I love this website!
Hi Neil – Thanks for another great lesson. I am wondering…. how did you position the black foamie thing when you bounced to camera left for first photo of baby?
Hi Neil,
just a quick question as I struggle here with monitor calibration. The baby appears to me very redish, is that correct? Thank you Andreas.
Great Post and info Neil!
One suggestion for future reference. It would be nice if you could include with your samples the histogram that you see in the camera when you shoot your images. We can only balance our camera screens so much to what we might actually see and it would be nice to know what you are seeing via your histogram on shots like these that come out so well done! I am sure there is a little post processing, but through reading I know you create most of your light rather than chimping an exposure and pushing it later.
Keep up the good work!
Neil, big fan off yours, Great Book
can you please tell me your input in to use manual settings f-stop and shutter speed and leave Auto_ISO I shoot Nikon this will speed up the work ?
Its reliable.
thanks
Hi Neil, great post as always and at first I looked at the picture of the baby on the blanket, I thought you were going to say the left side was window light. Very nicely done.
It’s funny though, with on camera flash, I can’t think of a time that I don’t balance ambient. Without ambient, I might as well be in a studio with softboxes and gobos. :-)
Great work as usual, Neil! I’m learning a lot in here. I’m really looking forward to get myself a flash soon and somehow be able to practice your tips and techniques.
Keep up the good work!
Hi Neil,happy new year and keep teaching us,please :).One question,yesterday I was using a lookalike of your famous “foamie thing”,to get some nice pics of my new nephew at the hospital.I noticed the skin tone on the pics were far better [less orangish] than when doing pics at home.The WB was set to “Auto”,and the flash was bounced off a white ceiling on both cases.Does the hospital’s dim light something to do with this issue?.
Thanks in advance!
Gorka.
Hi Neil,
Love reading your blog, etc. I’m interested in the Black Fomie Thing. Where can you get some Black Fomie stuff? I know you can get some if you get something packed in it. However I have not gotten any latley. So, can you buy it somewhere. Hope no one else asked this a nd I missed it.
By the way I have been to Capetown, Durban and many more, years ago. Always enjoyed South Africa. Will never forget it.
Thanks,
Joe S
To Joe S.: the Black Foam Thingy is known as “craft foam” in the U.S. You can often find craft form in art supply stores.
To Neil: “As far as I’m concerned, the histogram only has a direct use if you have only your subject in the entire frame” I’ve been looking at too many scenes using the histogram, and your statement has generated an “aha!” For overall scenes where I cannot have the subject in the entire frame, I need to practice the blinking highlights and basic zone system ideas to determine how I want to meter the scene.
Hi Neil,
I understand that changing ISO with ETTL flash does not increase or decrease flash power, but when in really dark environments – where ISO 200 or 1000 would still barely register ambient – ISO becomes a very handy way to boost the flash exposure beyond what FEC provides. (speaking of which why on earth does my Canon 5DII only permit FEC of +2 in camera but +3 on the Speedlite!)
This is becuase the camera is now more sensative to overall light – and if flash is the main light source it appears to become more powerful and travel further. Have I got that right? Just trying to cover all tactics.
ISO gives you more range from your flash at the same power level. Many people seem to confuse flash range with flash power I find.
Hi Neil,
Your website is one of the most useful photography sites I have come across and I visit it almost every day. Thank you for all the advice you give here! I also love your book, and the Black Foamie Thing has improved my pictures a lot. I have yet to find black foam, though; so far black cardboard has done the trick for me. I have an idea: Why not include an “original Neil vN Black Foamie Thing” with every book ? Or you could sell them separately for like $20… ;))
All my best wishes for 2010 !
Stefan
Neil thanks for the past year its been fun!
Related to this shoot I am confused, why you didn’t go to max sysn on your ss.
I still don’t get when to use it and when not to.
Thanks
John
Hi Neil,
Should we do any kind of special attention to get the baby’s eye in full sharp?
Hi Neil,
I’m trying to understand why there is a difference between maximum FEC and maximum manual flash power? For example, Camera settings of 1/200 F8 and ISO 1600 – If I dial in +3 FEC I can just about get a good ‘bounced’ exposure, but if I simply switch my Speedlite into Manual 1/1 power I get an almost overexposed exposure – this implies the Speedlite has more power available in manual than available to use in ETTL. What’s going on here? The higher the ISO the brighter manual flash seems to be over ETTL.
My only logic is that ETTL FEC is biased by the scene into less power output, which is fine but there’s no solution to push the exposure up if you need to other than switching the flash to manual.
Many thanks as usual.
Neil,
For directional light, you like your black foamie thing. However, looking at my SB-900, when I zoom it, the bulb recedes in to the camera. In effect, it turns the top three inches of the speedlight head in to a mini-snoot, if you will. Do you think that zooming your flash to force the bulb to recede can help mimic your black foamie thing by reducing spill and force more directional light when you bounce?
Hi Quash,
Hope you don’t mind helping with an answer.
There is one way you can test this, position your flash head so it is pointing 90 degrees (either left or right) then take a photo of yourself in a mirror, if you see a bright point at the tip of your flash you have your answer, and need to flag your flash. :)
Plus when you flag your flash with a ‘black foamie thing’ you can also be more creative (depending on the type of lighting you want to achieve) by having the flash bounce of a surface to one side or the other slightly forward of yourself, without any light from your flash directly hitting your subject.
Hope this helps.
David
Thanks Neil for all of your instructions. I recently purchased your book on flash photography. I have really enjoyed it and it has improved my photography. One question I have. I shoot a Canon 5d with the 70-200 2.8 L series lens with the 580EXII flash. When you are bouncing, do you have your flash zoomed or at 24mm, and if so, how do you determine whether or not to zoom the flash? Thanks in advance.
Larry Holloway
John, If we’re talking about the top shoot, then there just simply was no need in High Speed Sync mode, because it wasn’t too bright for desired f and/or ISO.
If the in-camera meter would give us ‘correct’ exposure at shutter speed of, say, 1/2000 of second, than we could go to HSS. Since camera allows us to shoot up to 1/250 (or my D40 up to 1/500) AND our exposure is not overcoming this shutter speed, we’re not needing more than 1/250, just use anything below that, i.e. 1/100 ;)
I just wanted to say thank you, Neil, for sharing such vital information in an easy-to-understand manner. I’ve been all over the net getting all kinds of information about lighting particularly on-camera flash and the buck stops here at Neil’s Tangent blog. May your tribe increase, Neil! More Power!
Hey Neil,
Max syn is obviously very important but I don’t understand why with my Canon 5D2 at max sync of 1/200 I get 2 different flash exposure if I have HSS button on or off with manual flash- why is there a difference when I’m not even past max sync?
I read elsewhere in your blog about turning off HSS at 1/200 but I don’t understand why this is needed.
Hope you have an answer!
George
Hi Neil, great post as always!
In one of your blogs you explained that TLL for Nikon and Canon are different.
If I understand correctly:
– Nikon: -2 EV (ambient) and 0 FEC (flash) ==> -2 EV on image (with flash)
– Canon: -2 EV (ambient) and 0 FEC (flash) ==> 0 EV on image (with flash)
Is this correct?
In this case you used Nikon. How would a Canon camera be different?
Frank.
Hi there Frank …
You’re referring to this article where I compared how the Nikon and Canon flash systems differ, using a Nikon D3 and a Canon 5D.
You have to keep in mind that that article is true for the D3 and 5D, and would differ for other models of camera. I know the D3 and D2x differ in this regard. The Canon 1D mkII and Canon 1D mkIII also differed slightly in how much FEC was needed.
So just catch up on that article – it isn’t quite like you have it there. : )