Gelling your flash for warm light at sunset
Since the light from a speedlight is relatively quite cold, (ie, blue-ish), it can create an unpleasant color cast when you use flash with existing warm ambient light. A typical problem situation would be the Incandescent environment that we often find ourselves in at night. But there are other times when the WB from our speedlights (typically around 5400K) is just too cold (blue) compared to the light we have at sunset. (The Daylight WB preset relates to color of daylight during the middle of the day.) Then we need to do something with our flash to help match those warm hues at sunset. Gelling is the answer.
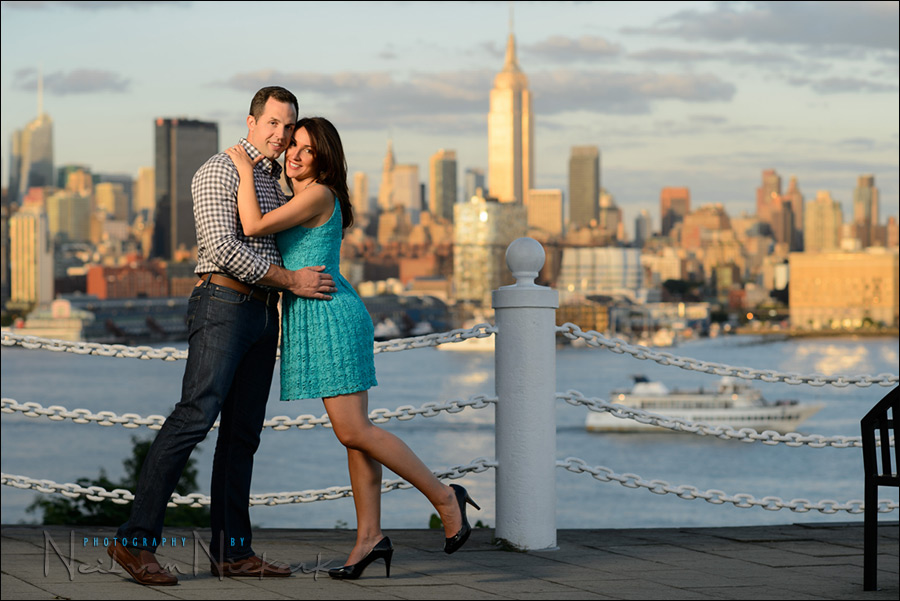
With this photo session of Lauren and Chris, we were at this breath-taking vantage point overlooking Manhattan. The sun was starting to set and taking on those very warm tones that look so gorgeous. Blue-tinted flash would’ve spoiled this. Since they were in a shaded spot, I had to use additional lighting here. I had to try and make it appear as if they were bathed in the same warm light.
I normally keep 1/2 CTS gel taped to my lens hood, so that I have ready access to gels. The 1/2 CTS is measured for 3700K which would’ve been too warm in this instance. So instead of covering the entire face of the flash-head with the gel, I only partially covered it, by turning the gel sideways. In other words, taping it down vertically instead of horizontally over the flash head … and this was just enough to have the same warm light on the couple, as there was on the city. A much better balance.
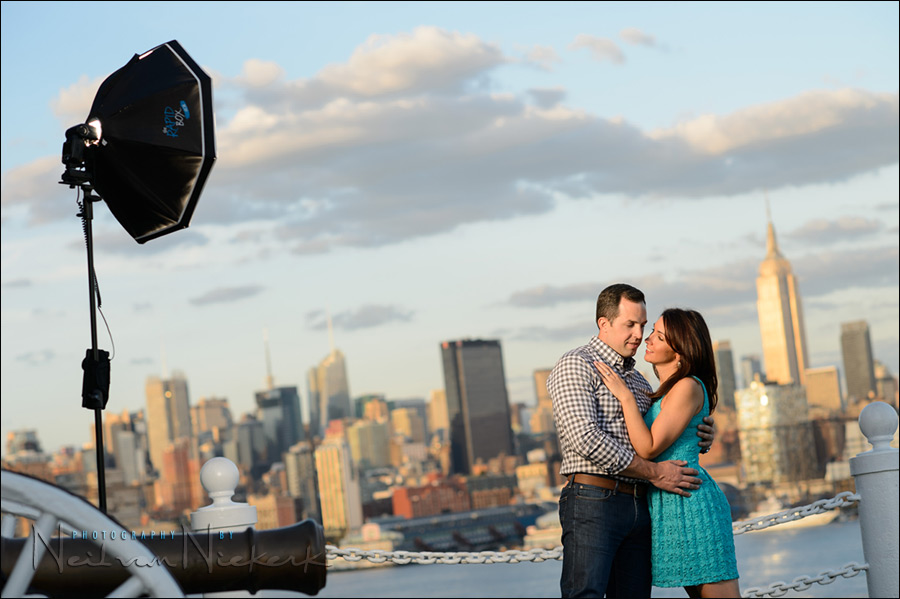
The light was supplied by a speedlight and my new favorite light modifier, the Westcott Rapidbox – 26″ Octa Softbox (affiliate).
Camera settings for the image at the top: 1/250 @ f/3.5 @ 100 ISO
I used the Nikon AF-S 85mm f/1.4G (affiliate) which I decided to give more of a work-out with this photo session. The equivalent Canon lens, the Canon EF 85mm f/1.2L II USM (affiliate), is of course a legendary lens. The awesomest of awesome lenses.
For the apertures I was shooting at though, the more affordable 85mm lenses would’ve performed just as well:
Nikon AF-S 85mm f/1.8G (affiliate) / Canon EF 85mm f/1.8 USM (affiliate)
I decided to go without an assistant with this photo session, so it was just me and the very portable Westcott Rapid Box on a light-stand. I weighed the light-stand down with my camera bag to keep it from toppling over. Fortunately, the wind was very mild on this day, so it didn’t need something or someone more sturdy than the light-stand weighed down like that. And no, I am not going to carry a sandbag around with me when I already have a heavy camera bag over my shoulder.
Regarding the image at the top, I really love how the light on them is similar enough in warmth as the background. However, I don’t have a non-gel comparison shot, since this was a shoot for the couple, and I didn’t want to slow things down too much.

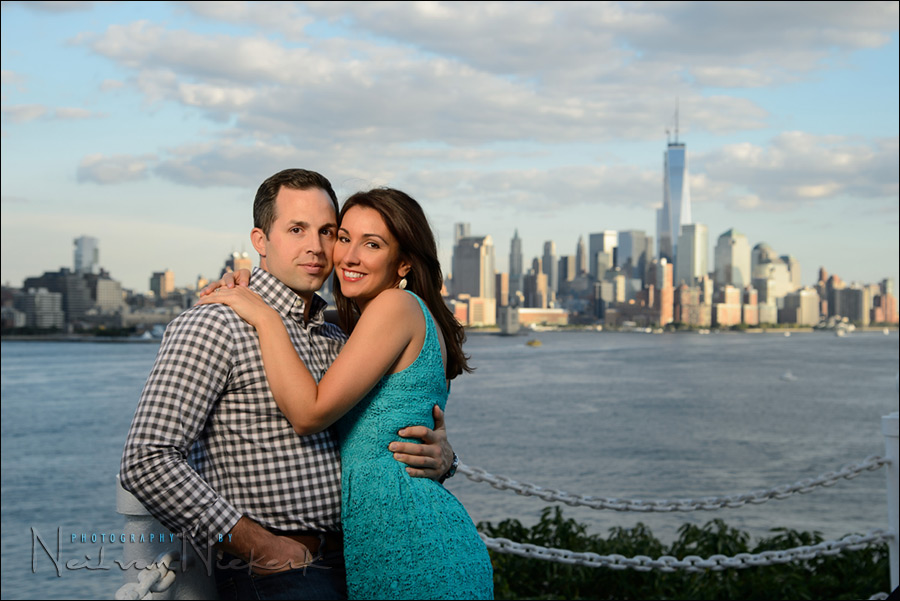
There is of course the option to forego the off-camera lighting, and go with a more silhouetted appearance. This works too, for a few images.
Earlier on the sun was coming from a lovely low angle, and I could use just the available light. I posed Lauren into the light, so the hard light from the sun was still flattering. The specific way I posed her, had to do with the direction and quality of light. Indeed, it all comes together at some point!
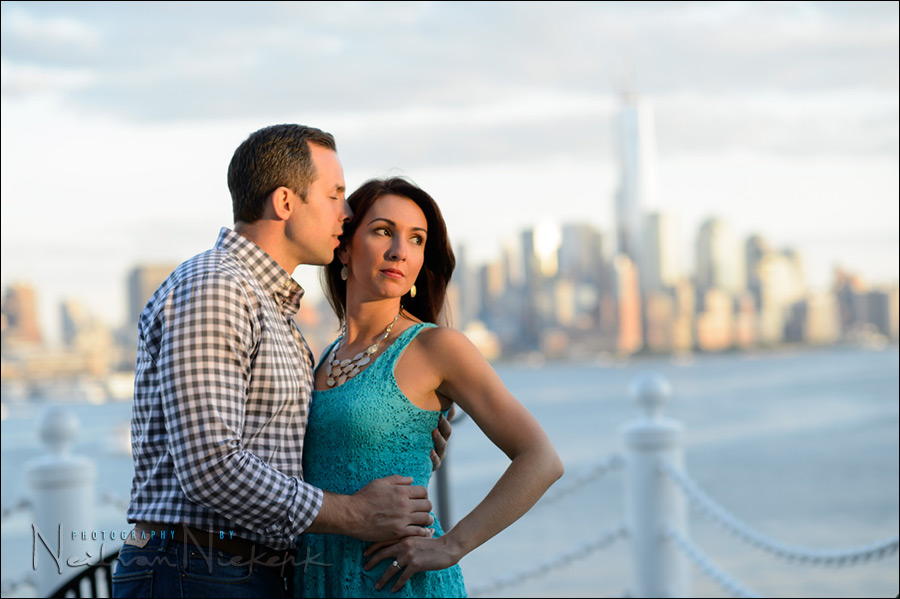
Nikon D4; Nikon AF-S 85mm f/1.4G (affiliate)
camera settings: 1/640 @ f/2.8 @ 400 ISO (available light only)
Working with just the ambient light, left me with less control over how the background appears … but I am quite happy with the blown-out cityscape behind them as a backdrop.
But there is always a choice to move into a more shaded area, so that I can use off-camera flash to balance them against the background. Again, this photo below had the gel over part of the flash-head. I kept the WB to Daylight, so that the warm look remained. Neutral (or correct) would’ve been too cold again, and some of the mood would’ve been lost.
Nikon D4; Nikon 24-120mm f/4 VR (affiliate), for a wider sweeping view
camera settings: 1/250 @ f/5.6 @ 100 ISO (available light only)
As always, we have choices, and it becomes a matter of adjust-to-taste in terms of our light, and how we use it.
Lighting & Design for Portrait Photography
Lighting & Design is a follow-up of sorts to Direction & Quality of Light. It’s a slightly eclectic mix, discussing the thought-process with various scenarios shooting portraits. The examples use available light, bounce flash, off-camera flash as well as studio lighting.
The idea is that in every one of the 60 sections, there is something to be learnt and applied, regardless of your level as a photographer or where you shoot – all shaped to form a cohesive narrative arc throughout the book.
You can either purchase a copy via Amazon USA or Amazon UK. The book will also available on the Apple iBook Store, and Amazon Kindle.
Gelling your flash
Since I frequently gel my flashguns to turn the WB of my flash much warmer (usually for Incandescent light), I use these gels that I cut up and tape to the top of my speedlight’s head. One of these sheets (which aren’t expensive), will give you a lifetime supply of these filters. For me, these gels are an invaluable part of flash photography. Tape the gels down on your lens hood when not in use.

The Full CTS will bring your flash WB down to around 2900K, more or less neutralizing the look of the Tungsten light. The 1/2 CTS will bring your flash WB to around 3800K, which will leave your backgrounds still with a touch of the warmth of Tungsten lighting.
Photo gear (or equivalents) used in this photo session
- Nikon D4
- Nikon AF-S 85mm f/1.4G / Canon EF 85mm f/1.2L II USM
- Nikon 24-120mm f/4 VR / Canon EF 24-105mm f/4L IS
- Westcott Rapidbox – 26″ Octa Softbox
- Nikon SB-910 Speedlight / Canon 600EX-RT Speedlite
- Nikon SD-9 battery pack / Canon CP-E4 battery pack
Related articles
- Gelling your flash for effect (model: Bethany)
- Gelling your flash for effect – blue background (model: Anelisa)
- Wedding photography – dealing with the videographer’s light
- Flash and tungsten lighting
A little bit of homework
I used my flash here at full manual output. Since I had to balance the off-camera speedlight (in a softbox) with bright daylight, I had to crank out everything the speedlight was capable of. How did I get to correct flash exposure then for the different settings?
Neil,
Even though you were only using “half” the gel, your camera WB was still set to 3700K (to match the gel), correct? (or did you change the WB to something slightly lower?)
—————-
Your homework question:
“I used my flash here at full manual output. Since I had to balance the off-camera speedlight (in a softbox) with bright daylight, I had to crank out everything the speedlight was capable of. How did I get to correct flash exposure then for the different settings?”
Manual flash is controlled by
– distance from light to subject
– aperture
– flash power
– ISO
You already know your aperture, flash power, and ISO, so you need to determine the distance. You could use your technique described here to get your distance (with a second speedlight).
https://neilvn.com/tangents/getting-the-most-power-from-flash-speedlite/
Stephen … I kept my WB to Daylight, even in post-processing, to retain the warmth.
If I had dialed a lower Kelvin setting, it would be more neutral.
That’s the lookout at Stephens Institute of Tech, isn’t it? I recognize the cannon. I shot a (friend’s) (second) wedding last month, and did some portraits/family shots there beforehand. Awesome view. And it only took me a couple of shots before I realized I needed to use the flash. Heh. Used the Canon 85 and the 50 primes, and the wireless flash to hold the flash up high in one hand for some shots, or with a little help from the Maid of Honor holding it off to the side in others.
I was shooting at 1:00, so the light wan’t quite as warm, but a gel might have helped a little…
Still, why didn’t you write this two months ago for me. ;-)
Was there still a crane doing construction spoiling half the view over to the other side?
Good reminder to use a gel outdoors when you want that nice, warm glow and you need it to match the fading sun. As always, well written and timely, as I will be using this tip for some sessions coming up! Thank you!
They look good Neil! Excellent balance between ambient and OCF….and the 85mm f/1.2 is good but the 135mm f/2.0 is my favorite….because I can afford it :)
Rudy
Neil,
Oops on me. You did mention setting the WB to Daylight in your blog entry, but I somehow glossed over that. Thank you for answering my question.
I carry both 1/2 CTS and CTO gels with me and attach them with velcro to my speed lights. That’s a great tip about just covering part of the flash with gel to lessen its effect. Are two layers of 1/2 CTS equivalent to full CTS? I have used them in this way to add extra warmth to images but always wondered if the result was the same as using a full CTS.
Mike,
Yes, I have used 2 1/2’s and the answer is close enough that it does not matter, saves getting a separate gel each time, want more warmth, just drop another 1/2 on top.
Yup, while two 1/2 CTS gels aren’t the same as a full CTS gel, it does bring it closer. I’d guess around 3200K.
With much of this, I’ll happily accept the color of the flash being much more pleasant-looking. No real precision. Fortunately, we can get away with it in these situations, because we don’t have to chase the specific color balance with the exactness a commercial photographer would.
The images look great Neil.
Quick question… the only Gels I have are what came with my two 600EX Speedlites and they are not marked as 1/2 CTO etc. They’re marked SCF-E10R1 which is the lighter shade and SCF-E10R2 for the darker shade. I assume just Canon numbers. I have frequently gelled the flash with the lighter shade which I have assumed all along to be a 1/2 CTO… can you confirm this?
Jon … the gels and stuff that came with my 600EX-RT speedlites, are in their boxes in the attic. And I’m just too lazy for that mission to confirm. Sorry. Perhaps someone else can help?
Hi Neil, any difference between CTS and CTO ? Is CTO more orange maybe ?
I have some full, 1/2, 1/4 and 1/8 CTS gel , it is a pitty a “Gel Bracketting” does not exist :) I find it difficult to know which one to use, have to practise !
CTO (color temperate orange) is slightly more red than CTS (color temperature straw) … and personally, I think I have an easier time getting nice skin tones out of CTS.
So my preference is based on a non-rigorous observation on having used CTO in the beginning, and then trying CTS.
1/2 CTS is my default gel.
It’s these little nuggets — gelling half the flash — that I find particularly valuable. As for the homework, since aperture, ISO, and power were set, I’d assume you had to change your distance. Great post!
Justin
great post neil! love the tip about covering only half the flash head with CTS. Curios why u say that 2 half CTS stacked wont equal a full CTS?
… because I’ve tried it.
Great pictures Neil.
How is it that their faces have no shine or specular highlights? I always, and I mean always have shine or specular highlights even when using large modifiers.
You’re going to love Shine-Off
Nice shots Neil, and as always the tutorials are appreciated. Even though I’m doing this stuff for 30 years, there’s always new things to learn from others.
Question about that Wescott Rapid 26″ box – is the rear opening large enough for 2- SB-900’s if you had one inverted head to head with the base flash? This would either double your full power blast or better yet, allow both heads to be at 1/2 power for better recycle time. Easy to hold the 2 together with a velcro strap or elastic band of some kind.
I use the Wescott Apollo 28″ box with my Quantum T5D’s, bare bulb and love it – at least double the output of a single SB flash. But the SBs are faster to work with outdoors and that’s a very nice setup
Only one flash will fit in the softbox’s mouth.
Homework:
Because you had full power in manual mode, then you have 3 different variables to juggle (distance, ISO, aperture). And because there was bright, you need every photon from the flashgun. Is it correct ?
Neil, You proposed Rosco CTS gels, and what about Lee Filters HS 020 Medium Amber which should be good for afternoon sunlight and candlelight?
They might work well. However, I have no experience with them. I’ve standardized in a narrow range to a few things which I know will work. You’re free to experiment.