
High-ISO bounce flash photography
One of the misconceptions about bounce flash photography that many photographers cling to, is that you absolutely need a white wall or ceiling near you. While it does help, this shouldn’t stop you from trying to be a little adventurous with on-camera bounce flash to see if it gets you the results you want. There have been several articles on the topic of bouncing off various other surfaces, or, not any particular surface nearby:
- Bounce flash photography at wedding receptions (bride: Juana)
- Wedding reception lighting with one flash (groom: Andy)
- Bouncing on-camera flash off a brick wall
- Bounce flash photography & white balance settings (model: Roz)
Let’s step through another recent example: Gaby and Michael’s wedding reception was at a winery, with the reception venue a huge area with stone and cement walls. It was a beautiful venue, but dark. The top-heavy lighting didn’t help either.
Sometimes … actually, very often … you just need to add additional lighting to the mix to get the results you and your clients want. Simple as that. Then it is up to you to figure out a way that best serves that need – good lighting while retaining the look and feel of the place.
I’m hesitant to use multiple flashes in the corners of a venue – the cross-lighting can look wonderful when it works, but very often leads to weird cross shadows. I prefer predictable results. So for me, multiple light sources wouldn’t be a first choice.
I tried the Profoto B1 as a bounce flash into the area, but it wouldn’t give predicable results, or … it would mean that my assistant would have to scurry around and help match the direction that I am shooting in. This can get a little hectic.
I then did a few test shots with on-camera bounce flash to see if it was feasible. And at full manual power, and selectively bouncing, I could get pretty good light at high ISO settings and wider apertures!

The area behind me that I was bouncing my on-camera flash off. Dark wooden beams and stone and cement. This was an available-light shot at the same camera settings as the main photo at the top: 1/40 @ f/3.2 @ 3200 ISO
A comparison photo without flash. This too was shot at 1/40 @ f/3.2 @ 3200 ISO.
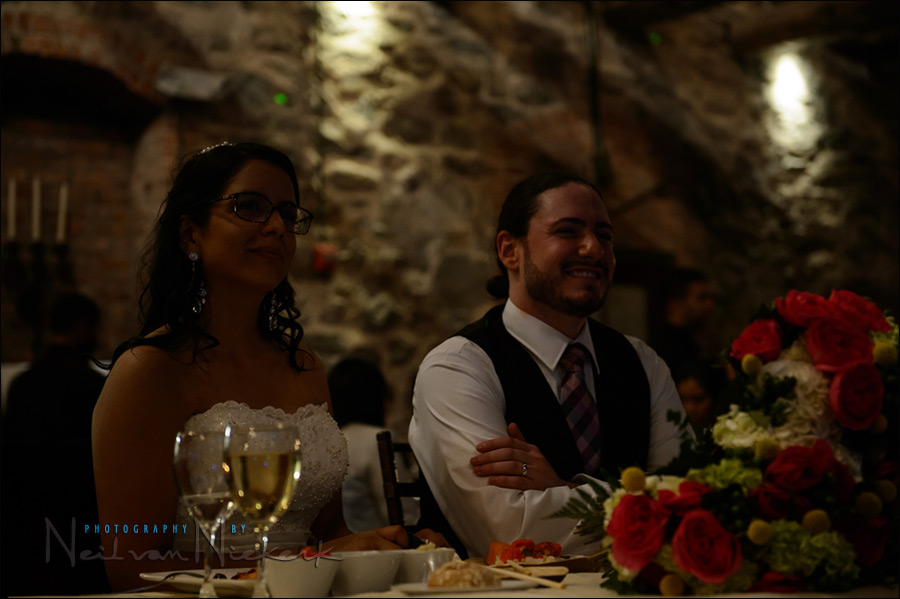
While we’re here, can we just dispel entirely with the idea that high ISO settings and fast glass can get you usable results every time. The light levels here were too low for any meaningful and useful camera settings. The light would’ve been too uneven as well to give clean open light on their faces.

Camera settings and photo gear used (and equivalents)
- 1/40 @ f/3.2 @ 3200 ISO
- on-camera bounce flash, full power in manual mode.
- 1/2 CTS gel on the flash
- Nikon D4
- Nikon 24-70mm f2.8G AF-S / Canon 24-70mm f/2.8L II
- Nikon SB-910 Speedlight / Canon 600EX-RT Speedlite
Nikon SD-9 battery pack / Canon CP-E4 battery pack

High-ISO capable cameras
I’ve seen comments on photography forums and FB groups that amount to, “yes, but they use expensive DLSRs”. Or something to that effect, implying that certain techniques – such as in this case, bounce flash in seemingly impossible situations – is out of reach of someone with a non-pro camera. Perhaps true.
The counterpoint is that this is actually within the reach of someone with a more modest camera, and a fast prime lens. Using the wider apertures bring extreme bounce flash within your reach, if the shallower DoF doesn’t hamper the final image.
A slow general-purpose zoom is just not going to allow you the best results in challenging scenarios. Honestly, a 50mm lens or 85mm f/1.8 lens isn’t that expensive! It’s well within anyone’s reach. And really, at some level we need to get serious about our equipment if we want to do work at a certain level. This means either faster prime lenses, and / or high-ISO capable cameras. And it need not even be the $6,000 beasts either.
Neil,
considering that you teach bounce flash since at least 2006 (back then on planet Neil), and that the high ISO+bounce-technique is in use for a couple years as well, I’d argue that ANY modern DSLR or mirrorless is perfectly capable of producing good results, given decent glass. The increase in image quality at high ISO was the main development over the last years and a beginner’s camera is probably as good as a professional camera was 5 years ago.
Tobi
Nah! My D3200 won’t do well past ISO 800. Quality goes to pot quickly after that. But it is Nikon’s lowest entry level camera. Oh, a good one at that, mind you, but not for high ISO ranges.
I totally agree with you Keith, my Canon 50D also will not do well past 800. I barely go to 1600 only if I really need to and I never dare to go to 3200, no way.
I decided that 800 was the absolute top limit for my 50D and I was disappointed with the results at that ISO, my 5Dmkiii though is a completely different story and I’m shooting at 1600+ sometimes and the results are perfectly acceptable most of the time
By the time I get the money to get a 5D, it will be up to mkxIV I’ll go 1600 if I really need the shot and NR the heck out of it. Clients in my area see one speck of noise your reputation is toast. Has to be perfectly lit and all smooth here :(
Neil,
What is the distance from the bounce wall to the subject?
The photos of the B&G were taken from about the same spot where I took the photo of the wall.
In the end, the exact distance isn’t something I’d take note of. Mostly because the end result is what I’m concentrating on, rather than the technical aspect like specific numerical values. Keep in mind that the Inverse Square Law means the bounce flash doesn’t have a strong fall-off gradient at this point.
https://neilvn.com/tangents/bounce-flash-photography-and-inverse-square-law/
You can see this by how the people in the background have about the same exposure as the couple.
Great article Neil, lovely pictures.
You demonstrate perfectly what can be achieved with extreme bounce flash with the right equipment. And as you say it doesn’t have to cost the earth. I’d love to have the canon 85mm f/1.2 but can’t justify the cost being an enthusiast shooter, however I’m more than pleased with the results from my 85mm f/1.8 on my 6D. I think I paid just under £300 for it at the time, currently on Amazon its at £260 as opposed to £1549 for the 85mm f/1.2, most definitely the best bang for your bucks considering the quality it delivers.
When pushing the limits of on camera bounce flash, I assume you would have it zoomed out fully for maximum reach?
Tony
I don’t recall what my zoom head setting was. I usually keep it fixed to around 70mm – 100mm for bounce flash.
Neil
Thank you for practical and detailed articles. I always leave your blog with something of relevance. As I go deeper into the world of flash photography your books and posts have been an incredible source of learning for me.
Thank you for giving back.
Ken
I was shooting a wedding last week with the D750, Damn thing sees in the dark lol. I didnt have a flash to use with it so had to use the 5D2 at 3200 ISO and bounced the flash of a far wall using a BFT so as not to blind other guests.
I got lovely, clean images which still retained the warmth of the ambient lights.
I caught a lovely shot of a child looking up at a bridesmaid. Perfectly lit, and lit from the correct angle. The mother loved the image so much she wants a copy, and told me she wished she was getting married again so i couyld be their photographer ……..you cant ask for more than that!
The entire techniques i used were learned from your videos, your books and your blog!!!
I keep saying it, if you are ever over in London get in touch…I owe you a beer …or three!
Cheers Neil.
Greg
There’s a well known photographer that once told me in a forum that he had bounced off (SB800) a 40ft high ceiling with the camera (Nikon D3) at ISO5000, F2.8 and it gave him usable fill light. The image looked amazing. If found it hard to believe at the time and I’ve never had the opportunity to try a similar scenario. Have you ever had the opportunity to bounce in a similar scenario?
If it works at 1600 ISO and 3200 ISO, it will work at 5000 ISO.
I try not to go over 3200 ISO, but it would work in the right scenario.
thanks neil!
just curious how did you manage to consistently deliver full power flashes? did you use an external battery pack?
Check the equipment list.
An external battery pack is a must for this.
Neil,
I recently spoke with a photographer who always uses on-camera bounce flash in manual mode. Her rationale is that it is just as easy to guess the necessary power level after a test shot as it is to estimate the required flash exposure compensation. I haven’t tried her technique yet but curious to know your thoughts on the matter.
I can go with either – TTL or manual – depending on which is the easiest or gives me the best results. What is the “best”? Somewhere between the easiest and most consistent. So it is either TTL or manual, depending on where I find myself.
There are many situations where shooting in TTL just is much faster than guesstimating manual bounce flash. Then I could easily outshoot someone who dogmatically sticks to manual bounce flash.
Somewhat unrelated, but still related….have you seen that new Nissin i40 flash that will be available for Fuji soon, Neil? As a former Nikon user, I miss the nice flashes I had with the Nikon system. As I understand it, this new Nissin i40 will give me pretty much everything I had with a Nikon D700 and SB-700 attached to a Fuji X-T1, minus TTL for any slave units, is that right? Otherwise the new i40 will give me everything I was used to on the SB-700/D700 on a Fuji X-T1? If so, that’s good because I really need a descent flash for my X-T1….something I can tilt/swivel for bouncing and something easy to adjust +/- flash exposure comp that works with TTL (it has a dial on the back for that). Thanks for your input!
Neil, I’ve been reading stuff on your site for a while now, and I totally agree that you can do this with lesser gear.. I’ve used this technique with my old D7000 and D7100 with great results.
I just bought a D750, and I greatly appreciate the added ISO flexibility over my old d7100, but I’m curious how the D750 stacks up against the D4 in high ISO shots.. I know you’ve used both, can you notice that much of a difference?
Neil,
Could you share a little of what you’re doing as far as controlling NR in post?
When I’m working with a high ISO shot like this — even taken with a low-light beast like the D4 — I find that I still need to do a fair amount of NR adjustment in either LR or Nik (my preferred).
But I never feel confident of what I’m doing with those sliders. I want to smooth out the noise but at the same time avoid an over-processed look (worse than noise, to me).
I’m also dismayed sometimes to see what I thought to be my properly NR-adjusted images on other, lesser quality monitors than my iMac. The difference can be jarring.
Any advice/magic settings for NR?
With Noise Reduction, nothing more dramatic than:
– going for the best exposure that I can at the time.
– noise reduction is set to a default of 20 in Lightroom / Bridge.
– for higher than 1600 ISO, I might set values of 25 or 30.
That’s it.
I don’t necessarily want a complete lack of digital noise / grain. And I most definitely don’t want overly-smooth and plastic.
I subscribe to that 100%. A little bit of grain never hurt anybody. I sometimes wonder how retentive people get with this. In my book a well exposed and timed moment at ISO6400 always trumps a pretty flower shot at ISO100 (Edward Weston’s peppers excluded :-))
Hi Neil, thanks for this tutorial. Two questions.
1. Can you tell us what your thought sequence was when you chose to use the CTS gel? Did that help match the flash light to the color of the walls? Had the walls been blue would you have used a blue gel? If so, what is going on? Does the sand-colored light emitting from the flash negate the sand color of the walls so that there is no color cast on the subjects? What WB setting did you use?
2. If you are bouncing a great distance and relying on inverse square law to even the light, is it better to shoot at long end of zoom (say 70mm on 70-200) so that you can be closer to subjects and farther from light source (wall) or to shoot at tight end (say 200mm on 70-200) so that you can be closer to light source (wall) and farther from subjects?
Hi Neil, thanks for this tutorial. Some questions.
Test shots. I did a few test shots of my assistant to see just how warm the Incandescent / (Warm Fluorescent?) lighting in the background would be with and without a 1/2 CTS gel. I preferred it with the 1/2 CTS gel, even with the brickwork adding a lot of warmth.
The 1/2 CTS gel has very little to do directly with the color of the wall. Whether I gel or not, is mostly dependent on how warm the AMBIENT light is. The color of the walls will influence the color balance / white balance of the flash.
But my choice of whether the gel or not, is based on balancing my flash with the ambient light.
No! You’d be adding blue gel to flash which would be blue-tinted because of the wall. So you’d end up with an even more blue image.
You will have to think this one through a bit more.
Again, read the comment about the decision to gel relating to balancing my flash with the AMBIENT light.
The color of the wall will affect the color of the flash … but the way you are thinking about it now, is that it might cancel, when in reality it adds.
I think it was around 3300K. I adjusted it further in RAW processing as well.
Zooming your flash-head does not bring your flash closer to your subject.
So it has no correlation with the Inverse Square Law.
Really appreciated yr tips & photos… Why you used full power in manual mode & why not only control by fec or ttl???
In theory, TTL should follow and give proper exposure … but I’ve found that with (Nikon) TTL, the camera is hesitant to dump full power and will tend to under-expose when what I really need is a lot of juice.
Also, with this specific sequence, I’m kneeling on the floor close to the B&G’s table. My position is static as is the direction I bounce in … so I might as well keep to manual flash for consistency. But really, this was done to make sure I get max juice from my flash.
I can’t second-guess your choice to gel–I have no idea how saturated the ambient was–but I think I’d be hesitant to gel in this case due to the loss of effective flash power (which I suppose is moot due to battery pack). Perhaps it’s also an aesthetic preference as well.
I’m getting slightly confused about what the battery pack does. Some of the comments lead me to believe the pack actually increases the flash power, but I *think* I know that can’t be true, because the max flash power is determined by the unit design. I thought the battery pack was just so you didn’t run out of battery life during a shoot?
The battery pack doesn’t increase power. It just shortens the recycle time.
So you’re correct there – the battery pack helps you not run out of juice at an inopportune time.
There is light loss with the gel – maybe 1/3rd stop. I was okay with it in this case, compared to the change in color balance that I wanted.
Hi Neil,
Another great article. Thank you.
I’ve been a regular visitor of your Blog. I’ve learn’t so much about bounce flash and direction of light and my photos have certainly improved.
I used to primarily bounce from the ceiling but unless there is reasonable distance from the subject I’d get shadows under the eyes and also the inverse square law doesn’t work in my favour for what’s behind the subject.
Also to add I’ve found that even if I increase the ISO, as long as the photo is correctly exposed, the noise isn’t very apparent anyway. Noise seems to live more in the shadows.
Thanks again,
Anoop
Any idea if there are bounce surface are too far… Do you recomend using plastic cap put on flash or using the white flap on flash… Really appreciate your tips
Hi Randy,
Try this post: https://neilvn.com/tangents/flash-photography-during-the-wedding-ceremony-in-church/#more-6771
Look for the heading “what if I have nothing to bounce my flash off?”.
When the bounce surface is too far, then you have to improvise a bit from purely bouncing your flash off a wall or other surfaces. So a plastic diffuser cup or bounce card would help.
In my last event I had the horror of a ceiling made up of mirror tiles. Wherever I bounced I got a grid shaped shadow from the tiles!
I ended up shooting at hi.3 ambient only, and was surprised at how well the images turned out.
Never fear pushing the ISO if that’s the only option you have.
Hi Neil, Great article.
I’m using a Canon 6D and a Canon 600 speedlight.
Does this technique still work if the subjects are moving around ?
At 1/40 second is there a point at which ‘on camera flash’ will fail to freeze motion ?
Also does a higher iso mean that the flash has to work less hard so that you can conserve battery life and the life of your speedlight ?
Thanks for your help.
Darren
Darren – the answer isn’t clear-cut. It mostly depends on how bright your ambient light is, in relation to your flash exposure … and this also then depends on how fast your subject is moving.
More here: Will flash freeze movement at slow shutter speeds?