manual off-camera fill-flash, controlling the contrast
In using a softbox outdoors on location, we easily get beautiful soft light. When we work indoors however, where the flash dominates, then the results can look very contrasty. The reason for this is that outdoors, the available light acts like a fill light. This is especially true when we consider our available light in our overall result and balance our flash with the available light. With the softbox being the only light source, the light, while still soft, can be too contrasty for our liking. Still, that single softbox is a lot better than hard direct off-camera flash … but it can be improved with some fill light.
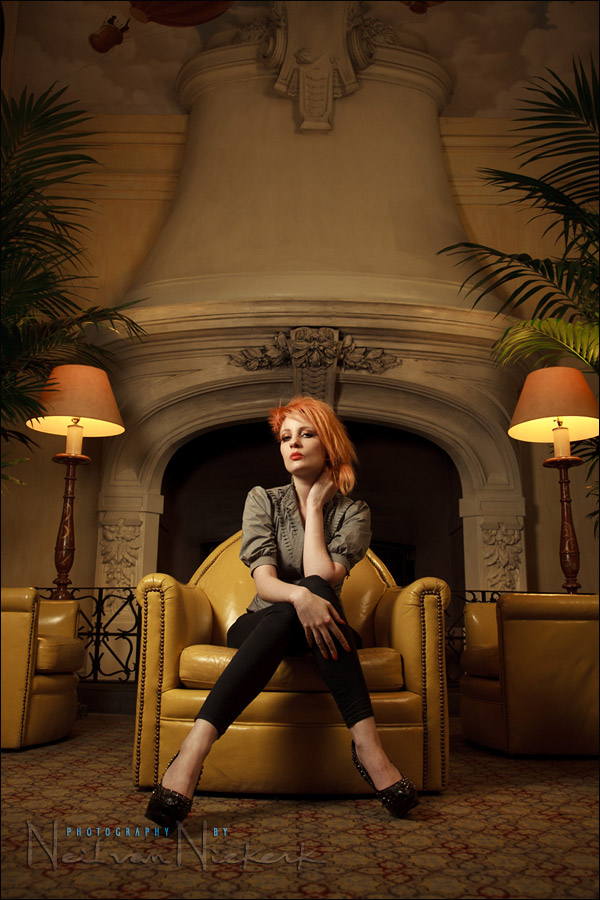
The photo above of Ulorin, our model at the recent workshop in San Francisco, was lit with the 24×24 Lastolite Ezybox softbox. But we did lift the shadows with some more off-camera fill flash, bounced into the room.
Here’s the short explanation and a longer, thorough explanation of how we went about it …
The short version:
We had the softbox at camera-left, metered with a flashmeter to give us f5.6 @ 800 ISO. With the contrast higher than I prefer it, I decided we should add a second off-camera flash (metered for f2.8), bounced into the entire room. (No diffusion – just a barebulb flash bounced straight-up into the room.) This then lifted the basic light level in the room to 2 stops under what we had the main light set to. Hence, fill light at 2 stops under.
Alternately, we could’ve used an on-camera flash bounced straight-up, set to -2EV (or there-abouts) in TTL mode. This would’ve had a similar effect of lifting the contrast via fill-flash.
The longer, more thorough explanation of how we added off-camera fill-flash:
With the softbox to camera-left (see the pull-back shot lower down), we decided to set the main exposure to:
f5.6 @ 800 ISO
Remember, for manual flash, four things dictate the flash exposure:
– aperture
– ISO
– distance from the light source to the subject
– power of the flash (including any diffusion)
So we set the softbox up at a distance from our subject which was close enough to give soft light, but far enough so that the light didn’t limit our composition. So that’s the “distance” portion of the aperture / ISO / distance / power / distance ) equation taken care of.
As mentioned, our aperture and ISO was chosen to be: f5.6 @ 800 ISO
A reasonable aperture and a not-too-high ISO setting. Nothing extraordinary there, but will give enough depth-of-field and good image quality. If we needed a lower ISO such as 400 ISO, we could’ve taken the aperture to f4 or doubled both speedlights’ output.
Now we only have to find our power setting of the flash. We now use a hand-held flashmeter, and adjust our flash’s manual output until we get an exposure of f5.6
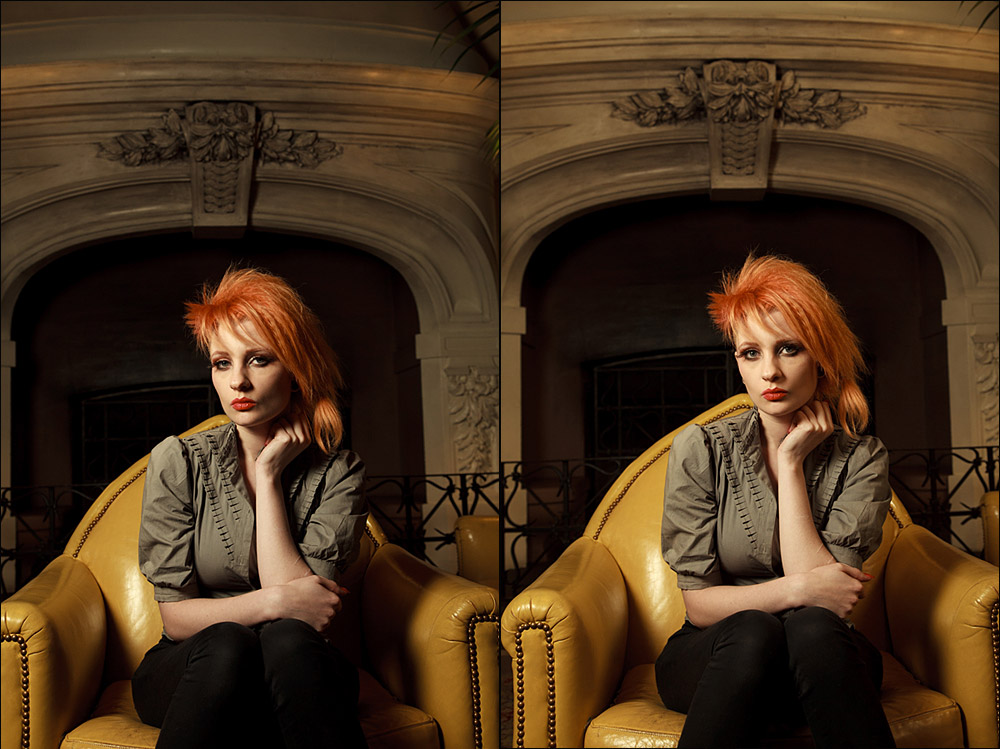
Here’s the result with just the one light source – the 24×24 softbox and speedlight.

It looks good. Quite dramatic. But perhaps too much contrast for my liking. Right now, there isn’t a right or wrong way. It really is up to personal preference. I like soft, directional light.
To reduce the contrast by adding some fill-light, we set up a second speedlight on a light-stand. There was no diffuser or umbrella or softbox. It was just the barebulb speedlight bounced straight-up into the room.

We switched off the main flash, and metered the bounced speedlight to give us f2.8 … it was a decision we made to have it 2 stops under the main light. Again, this is a personal preference. We could’ve added more light or less light, by dialing the power up or down on the 2nd speedlight. Of course, the 2nd speedlight here was also used in manual mode. We want control.
Here’s the side-by-side comparison:
(click through for a larger version)

Just adding a reflector or another softbox with a speedlight set to 2 stops under, wouldn’t have had the same effect in lifting the light levels for the entire scene. We needed to push some light into the entire area.
And here’s a side-by-side comparison of a close-up shot of Ulorin which will give us a clear idea of how the fill-flash acted. (click through for a larger version)
In the example here, the White Balance of the 2nd flash would end up being different and much warmer than the flash in the softbox. This is due to bouncing off the warmer toned walls of the room here. Both speedlights here were gelled with a 1/2 CTS gel. In retrospect, I could’ve had the 2nd flash without the gel, allowing it to become warmer just by the color of the walls here.
Ultimately though, the photograph with the warmer fill light looks really good, and I’ll happily run with it as-is, where the 2nd flash was gelled and adding a warmer fill light.
The method here is quite simple, and the results look really good. We could’ve achieved similar with an on-camera flash bounced straight-up into the room (but flagged to not add direct flash to our subject), and used in TTL mode at -2EV. With TTL flash not measuring the main burst of light during the pre-flash sequence, it might be slightly different than the manual-flash only method here. But the base light levels would’ve been lifted as well, and thereby lifting the overall contrast.
Wedding photographers do the same thing by adding additional lights in the reception venue. (Also called, adding “room lights”.) You could add more than just the one flash, set up at other places deeper into a large venue. But the general idea remains the same – to light the dark corners and light the general light levels.
As an aside – I was so impressed with our model Ulorin, that I arranged for another photo session with her on a day after the workshops. So expect to see more of her in upcoming posts.
other articles on Tangents, featuring Ulorin Vex
model – Ulorin Vex
change your position to change the direction of light (Ulorin Vex in red)
mimicking window light with off-camera bounce flash (Ulorin Vex in lace & latex corset)
directional light from off-camera bounce flash (Ulorin Vex, Monaco foyer)
equipment used with this photo sequence
Canon 5D mk II (B&H)
Canon EF 24-105mm f/4L IS (B&H)
(2x) Canon 580EX II Speedlite (B&H)
Canon CP-E4 Compact Battery Pack (B&H)
(3x) Pocket-Wizard Plus II Tranceiver (B&H)
Sekonic L-358 lightmeter (B&H)
Lastolite EZYBOX Softbox Kit (24″x24″) (B&H)
(2x) Manfrotto 1051BAC light-stand (B&H)
Since I frequently gel my flashguns to turn the WB of my flash much warmer (usually for Incandescent light), I use these gels that I cut up and tape to the top of my speedlight’s head. One of these sheets (which aren’t expensive), will give you a lifetime supply of these filters. For me, these gels are an invaluable part of flash photography.
Tape the gels down on your lens hood when not in use.

Neil,
Thanks for another very informative post, with everything explained so well.
One thing though, do you have a shot of the room without any flash? The reason I ask is… those lamps. When I try a shot like this any lamps/lights end up being over exposed. I’m wondering what your ambient exposure looked like before flash, and just how dark the rest of the room was.
Neil, I love the fact that you show the additional shots like the one you pulled out from your tash for Tony and the wide shot. Very few photographers want to share that stuff and yet it is vital to the learning process to know what was what. Thank you!
…and thank you for the effort Neil.
That shot completes the picture (sorry) for me, and is a definite *Aha* moment.
Wonderful demonstration of using flash as a ‘contrast control’ as well as tonal placement :) Again it is inspiring :) I got the 2nd book and thanks for signing! :)
Hi Neil, why did you use a lightmeter in this scenario ? Also where did you place the meter and was the room light on when you metered ? As usual thank you for sharing.
Can you tell me why you gelled the key light at 1/2 CTO? I assume you were trying to give the model a warm tone. Could you not do this just as easily on post?
Teck – I was at this workshop (amazing!). Not speaking for Neil here, but I believe the only reason he used the light meter was because he wanted to teach us how to use one in a traditional manner. I’m quite sure he could’ve nailed it without the meter ;)
RE comment 8: ‘they could’ve used the model’s white blouse she was wearing at the time, as a way of metering the manual flash output, via the histogram’
Would this involve (at the chosen ISO and aperture) framing only for the white blouse and adjusting the power of the flash until the histogram was placed on the right hand edge? If so, could you apply this method to a studio situation using a piece of white card if a lightmeter was not available?
Thanks!
Hi Neil
I have read your book and almost all your blogs but this is my first time adding a post. I have a Sekonic L-358 light meter and not too sure on how to use it for flash. Do you have a post on using a meter that I missed or do you plain on running a blog on this subject. I try using my speed lights on manual but have a hard time getting set correctly.
Love your work.
Kelly
Neil,I have learned more,reading this article,than I have learned in taking courses and reading books on this matter.You are just fantastic.You take flash-photography definitely to the next level.Once again,a great thanks from Curacao
Hi Neil,
I enjoyed reading all your blogs, books and follow your posts closely. Indeed they are terrific and very informative. Thanks for your kind generosity, sharing vast amount of photography knowledge. I am starting out into wedding photography and have a delemma with on-flash photography on a wedding banquet typically.
I used Tv mode, shutter set at 1/60 (as I want to have some ambient light captured). I know shutter does not affect flash exposure at least within the maximum flash syn speed. My lens is a f 2.8 17-55mm, I let the ISO to roam freely. Ironically, in all the modes, be it manual, AV, TV the ISO is set to 400 though I set it to auto. Why is this so? Is it a Canon behavior?
I am on the Canon 7d, mounted with 430EXII flash with a DIY white bounce card on top the flash.
My final results of most of the photos are sharp at the focus and slight blur due to the fact the largest aperture is selected ie. f2.8 when one is on TV mode. Hmm, I can only think of to eliminate this, I need to go to M mode, and set 1/60 or maybe 1/30 at f4.5 while letting ISO roam freely.
What is your advice to have a better picture please?