Mixing the white balance of different light sources
While we would do well to gel our flash when working in a very warm or incandescent spectrum, (such as when shooting at a venue bathed in Tungsten light), the last few articles showed how we can use it to our advantage when using different light sources with different color balance. The effect can be quite dramatic.
The examples shown have been varied:
In the first example (with Bethany as our model), we looked at using random found available light as portrait lighting. With the next example, the effect was purposely sought by gelling our flash for effect. A similar contrast in white balance can also be found by using a Tungsten-gelled LED video light in a non-tungsten environment, forcing all the daylight colors to go toward a bold blue tone. The most recent example showed how we could use the modeling light in the studio with additional flash as rim light, to give a punchy image with warm colors.
Those four examples all had entirely different scenarios, but the same idea was used in all of them to get punchy colorful images – using light sources with different white / color balance.
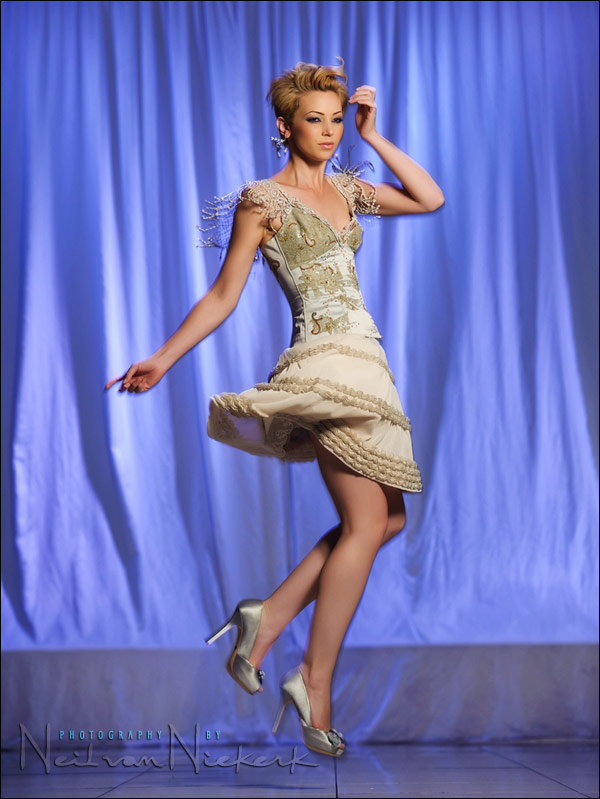
This image here at the top was shot with a similar set-up as the sequence where we gelled our main flash with 1/2 CTS gels to allow the background to go blue …
With this first image, both the foreground flash and the background flash were ungelled, and shot at Cloudy WB. The blue tint of the drapes in the background, were from lights in the ceiling. This is exactly the same light that gave the strong blue background in the other article on random found available light as portrait lighting.

With this image which is the starting point, I decided we could make the background far more bold by once again gelling our main flash (in the Lastolite Ezyboz softbox), with two 1/2 CTS gels.
And this is how we ended up with the final image shown at the top, where the background goes to a neon blue. Quite striking.
The main flash on her was a speedlight in a Lastolite Ezybox softbox, set to camera right. The background light was a speedlight bounced straight up into the ceiling to the left here of our model, and further back than our model’s position.
The motion blur seen there was purposely done by shooting at a relatively slow shutter speed while there was such movement.
camera setting: 1/60 @ f4 @ 500 ISO … TTL flash @ +0.3 FEC
Summary
Finally, all this is to bring home again the idea that we could use the same thought-process in a variety of situations. While each situation was different with different light sources used, there was a similarity in the approach to the lighting (or even recognizing the lighting). This gives us a method and thought-process to come up with striking images under a variety of conditions – by creating and using light in our images which have divergent color balance.
Photo gear (or equivalents) used with this photo session:
- Nikon D3
- Nikon 70-200mm f2.8 AF-S II /equivalent Canon EF 70-200mm f/2.8L IS II
- Nikon SB-910 Speedlight controlled by PocketWizard FlexTT5 & AC3 Controller
or alternately, the Canon 600EX-RT Speedlite controlled by Canon ST-E3 Transmitter - Lastolite EZYBOX Softbox Kit (24″x24″)
- (2x) Manfrotto 1051BAC light-stand
Gelling your flash
Since I frequently gel my flashguns to turn the WB of my flash much warmer (usually for Incandescent light), I use these gels that I cut up and tape to the top of my speedlight’s head. One of these sheets (which aren’t expensive), will give you a lifetime supply of these filters. For me, these gels are an invaluable part of flash photography.
Tape the gels down on your lens hood when not in use.

Related articles
- Directing & posing an available light portrait (model: Bethany)
- Off-camera flash – creating separation with back-lighting (model: Bethany)
- Multiple off-camera flash – gelling your flash for effect (model: Bethany)
Neil,
interesting to note is that, when first shown to a novice (me!), one would say the background flash was gelled blue and the shot was taken with standard daylight flash / sunny WB…
Could you have managed the same shot like that? Why (not)?
Regs,
Roel
Neil,
Thanks for a very good series of articles. I have always wondered about what to do with multiple light sources. Now, I know what to look for.
By the way, at the web resolution of the images, I can’t readily see the motion blur. It looks like freeze frame. At first I thought you were shooting at faster than 1/60. I agree that these photos are striking. :-)
Hi Neil,
First of all thanks heaps for all the tips and inspiration! Your blog has been pivotal in developing my flash technique :) Just wondering if you have any recommendation for a gel kit? Also does the softbox reduce the effectiveness of the gel which is applied to the flash? I would have thought that the white diffusion material of the softbox would affect the temperature of the light?
Cheers,
Dave
Absolutely more punch with the gel.
How to mount Nikon SB-900 with PocketWizard FlexTT5 on Lastolite EZYBOX Softbox? It seems to me that the handle is too short :(
Jacek,
You have an old model of the bracket. You have to buy the new, longer bracket.
The new shaft is an inch longer than the old model and will fit the SB-900 and a FlexTT5.
Thank you Stephen, I didn’t know until now :)
Thanks Neil, I always enjoy reading your articles. The detail on the lighting setups and why you make certain decisions is really enlightening.
Hi Neil,
How do you recognise the light sources for WB, ie up lighters are yellow but they may be fluorescent and not tungsten ,is there guide to recognising what needs to be done or is it trial and error , also what advantages are there for setting daylight w.b. as against the usual flash WB…flashes do seem to be a little yellow Sb800-900. Trying to stop using autoWB.
Do you use daylight wb against flash wb in daylight?
David