Multiple off-camera flash – gelling your flash for effect
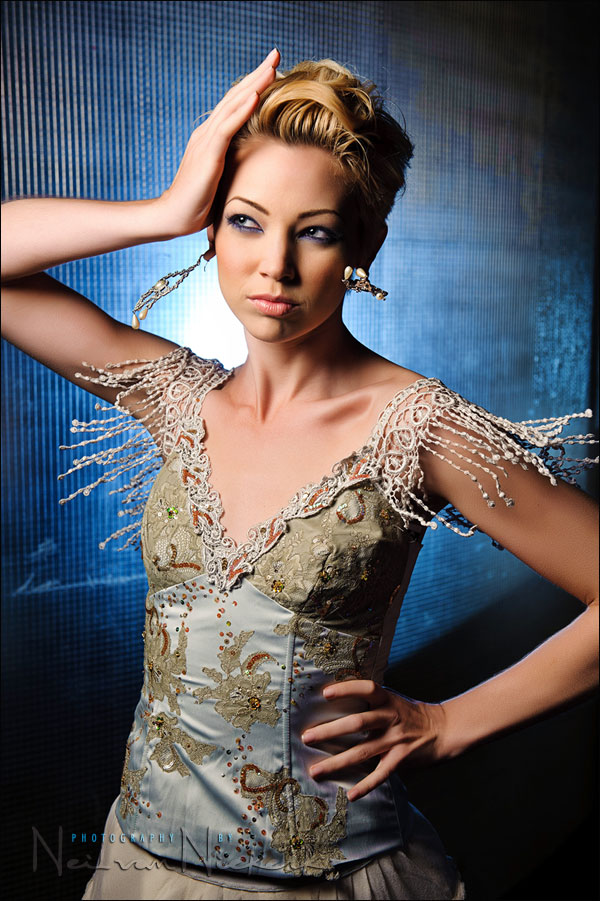
All the light you see in this photo, is from two speedlights. The blue color in the background is because I gelled my one flash. While that might give you the idea that I gelled the background flash with a blue gel, what I actually did, was gel my main flash with two 1/2 CTS gels (affiliate). That’s all I had with me, but I wanted those hard cold blue tones to the background.
A single 1/2 CTS gel would take the flash to 3700K. Adding a 2nd gel didn’t take it as far as a full CTS would’ve, but closer to 3350K, going by my settings with the RAW file.
By having my main speedlight (in a softbox) now at a color temperature of around 3350K, meant the background shifted towards blue in comparison. Intended effect achieved!
Now, about the placement of the speedlights, and to explain what the spectacular background actually is ….

Direction & Quality of Light
I wanted to distill the essence of what we, as photographers, work with – light! Before we can truly grasp on-camera flash and off-camera flash, and really, any kind of photography, we have to be aware of the direction and quality of light. We need to observe the light that we have, and then decide how best to use it, or enhance it.
With this book, I try my best to share those “aha!” moments with you, and I do believe this book can make a difference to your photography.
The book is available on Amazon USA and Amazon UK, or can be ordered through Barnes & Nobles and other bookstores. The book is also available on the Apple iBook Store, as well as Amazon Kindle.
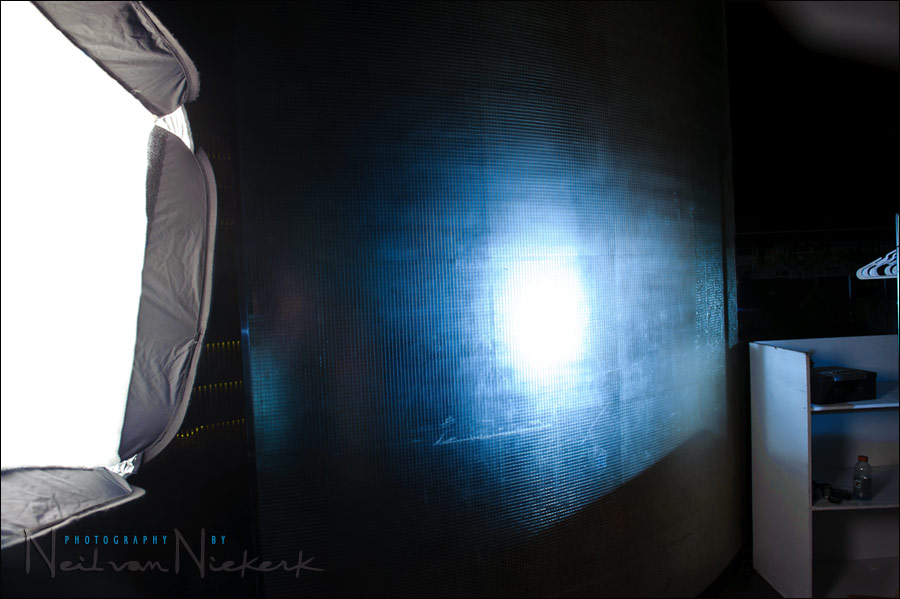
Photographing Bethany in the foyer of the night-club where we did these photo sessions, I saw this curved wall lined with small mirror tiles. Just like one giant curved disco glitter ball. All kinds of awesome. But it needed light. This club, outside of hours, was dark!
In this first pull-back shot above, you can see the main light on the left – the Lastolite EZYBOX 24″×24″ softbox (affiliate). In the middle you can see the blue hot-spot on the mirrored wall as the other flash lit it up.
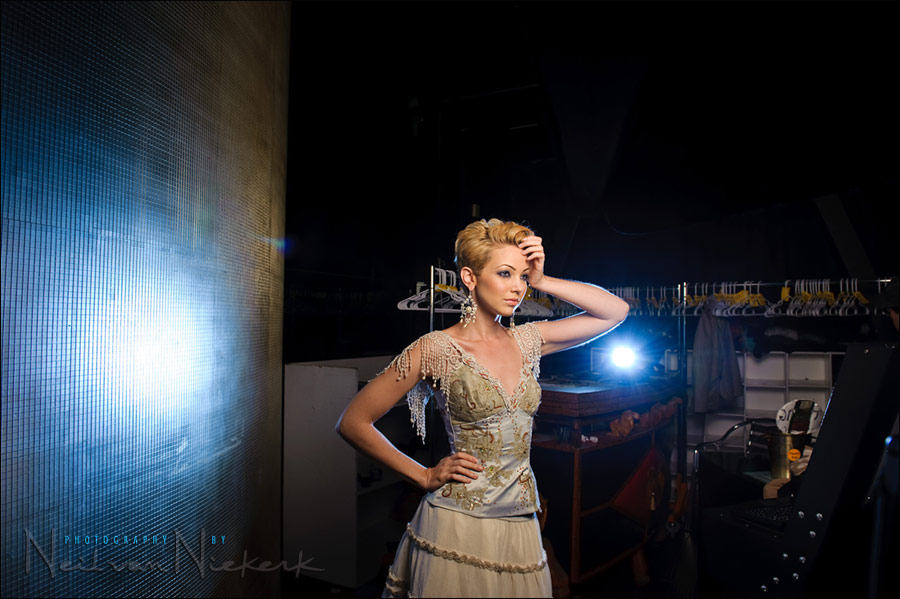
This pull-back shot, shows Bethany in relation to the flash providing the background light. The area was too small to do a complete pull-back shot, getting everything in a single frame. This background speedlight had a black foamie thing to flag / block any direct light from hitting Bethany.
Without the blue background, the results were nice … actually pretty good … but not as other-wordly as the final images.
Adding the blue background (via the un-gelled flash), immediately gave it an unusual feel. Something like a modern-day Marie Antoinette in a futuristic night-club.
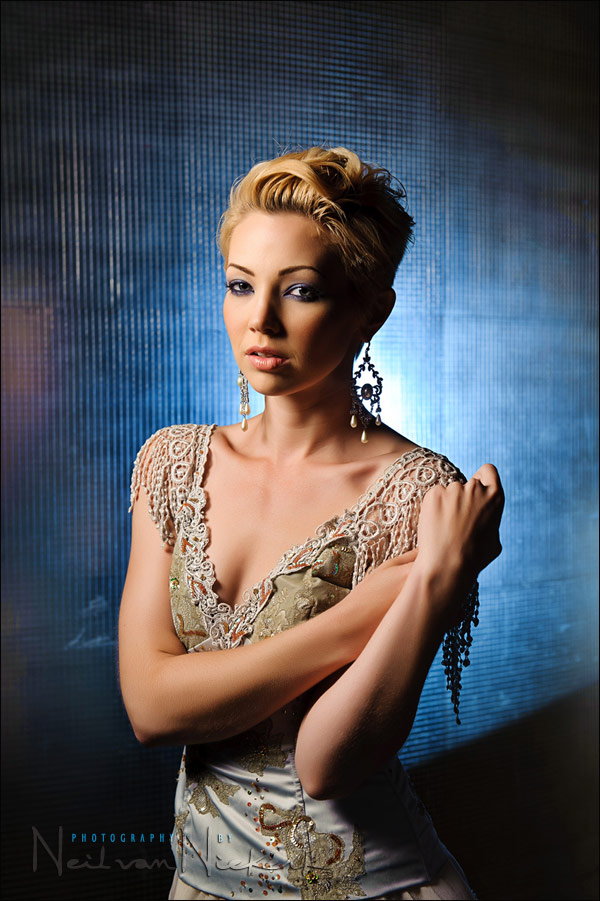
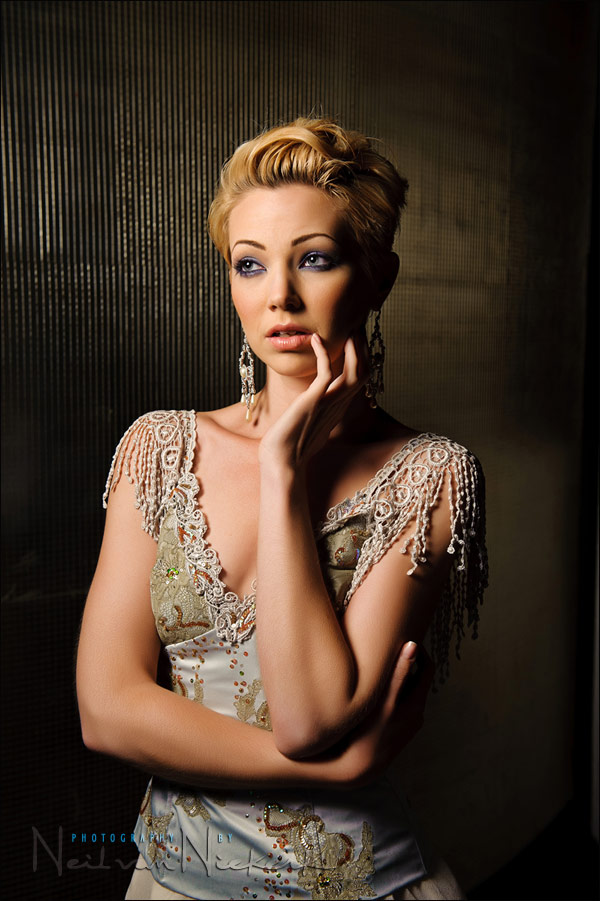
The statically posed shots we came up with looked really good … but then Bethany suggested some movement to get her jewelry swinging around … so we did a sequence of photographs were Bethany spun around on the spot. Quite a few missed shots as I mis-timed or she blinked … but in the end we got several shots that worked. The image right at the top of this page is a favorite, as well as this next image.
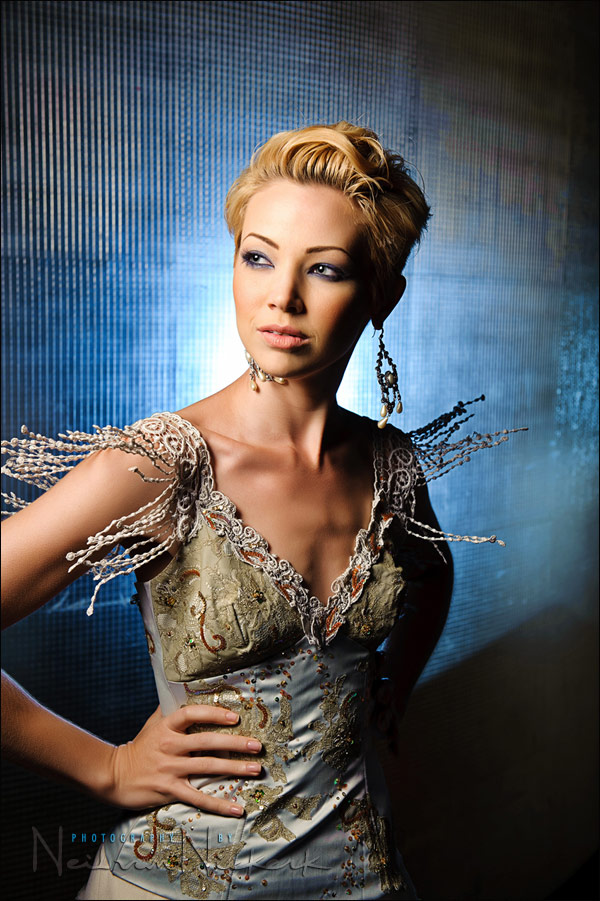
A fabulous model in an unusual setting … all sweetened with some interesting light, and I think we have some eye-catching results.
Technical details & settings
The two speedlights were both fired via two PocketWizard FlexTT5 transceivers (affiliate). I had another FlexTT5 transceiver on my camera, on top of which was an SB-900 controlling the output of the two speedlights.
The light on the background was adjusted to taste by looking at the camera’s preview. I’m not even sure it would be possible to use a light-meter to meter for that, since there is so much reflection of light. So it was quicker for me to set a low power setting of around 1/16th full power, and adjust from there. I controlled the output with my on-camera (with TT5) SB-900 speedlight which was the Master controller. (I don’t recall the exact final power setting of the background light though.)
As mentioned earlier, this background light was flagged with a black foamie thing to make sure that there was no direct flash on her from that side.
Both speedlights were set to manual output since it was much simpler controlling the exposure like this. There was no real way to predict what TTL flash would do here with such a reflective background.
Camera settings & photo gear (or alternatives) used in this photo session
- 1/60 @ f6.3 @ 200 ISO … with multiple off-camera speedlights
- Nikon D3
- Nikon 24-70mm f2.8G AF-S / Canon 24-70mm f/2.8L II
- (3x) Nikon SB-910 Speedlight controlled by PocketWizard FlexTT5 & AC3 Controller
or alternately, (3x) Canon 600EX-RT Speedlite controlled by Canon ST-E3 Transmitter - Lastolite EZYBOX 24″×24″ softbox
- Manfrotto 1051BAC – compact light-stand
Gelling your flash
Since I frequently gel my flashguns to turn the WB of my flash much warmer (usually for Incandescent light), I use these gels that I cut up and tape to the top of my speedlight’s head. One of these sheets (which aren’t expensive), will give you a lifetime supply of these filters. For me, these gels are an invaluable part of flash photography.
Tape the gels down on your lens hood when not in use.

Related articles
- Directing & posing an available light portrait (model: Bethany)
- Off-camera flash – creating separation with back-lighting (model: Bethany)
- Mixing the white balance of different light sources (model: Bethany)
Very, very impressive. Your hat is full with magic and tricks. And that 1/60 when the model is moving, you did catch the perfect moment! Bravo!
Hi Neil,
You mention in the last paragraphy that you “had another FlexTT5 transceiver on my camera, on top of which was an SB-900 controlling the output of the two speedlights”, can you explain why you had the SB900 on the camera controlling the output as opposed to using the pocket wizard zone controller(as you have done recently in other posts), is there an advantage to using one as opposed to the other?
John
great lighting + beautiful model = amazing effect :)
Well it looks like John asked exactly the question I had in my mind this morning after reading this. And if the SB-900 worked as a commander, would the SU-800 have worked as well? https://www.bhphotovideo.com/c/product/410490-USA/Nikon_4794_SU_800_Wireless_Speedlight_Commander.html/BI/2096/KBID/2822
-Alex
Hi Neil,
Did you shoot any of the motion poses at a slower shutter speed? My first impression of looking at the lead image was: “Are the fringey things by her shoulders like that, or is she in motion?” Then I noticed the earrings, which led me to the latter. However, I’m thinking that motion blur with a sharp capture from the flash would get it all in one shot.
All the best, sho
Hi Neil,
These are fantastic.
Working on the thought process here for settings on this shoot. The flash was the dominant light source and the ambient light levels look very low in comparision based on the pull back pics above. Meaning that your….
1. ISO choice was for a high quality noise free final image
2. Aperture choice was for enough depth of field
The flash guns power were then manually set based on the above settings.
3. Shutter speed – In theory, could you have increased this to help with the swinging jewellery shots without any affect on the overall image exposure?
Scott (on the continued quest for understanding….!)
Hi Neil,
The first one is definitely something out of a fashion magazine!
You say you double-gelled your main flash that was inside the softbox and you left your secondary light ungelled. What did you set your camera’s white balance to for these photos?
Hello Neil.
In the last photo accessories hanging on the sleeve of the model, the effect was done with a rotating fan or model itself on?
Thanks
Paulo (Brazil – São Paulo)
Hi Stephen,
I’d guess that Neil set his camera WB to Tungsten (or fixed the WB in post). The “usual” technique I hear about is full-cut CTO gel on the key light with WB set to Tungsten. This combination will make your subject (lit with the key) at the “correct” WB. Daylight sources (which includes ungelled flash) will appear blue.
Another technique to try, particularly for sunset pics, is gel your key for fluorescent and set your WB to fluorescent. This will shift your daylight balance (i.e., sunset) to magenta.
Good luck!
sho
Hi Sho,
Thanks for your input on this. Fixing WB in post is a given since Neil shoot in RAW. I was curious what his initial WB setting would be.
It would make sense to set the WB based on the key light (key flash). It looks like if two 1/2 CTS brough it to 3350K and tungsten is near 2900K, I guess the camera would be be set to tungsten.
These DO look great! I’m so excited!!
Very Nice work Neil!
Great work as usual, Neil! The pull-back shots really helped me put two and two together. The detail and depth on your models created by your light is always spectacular.
Neil,
Thanks for the reply. I have to get used to adjusting the WB and chimping when I run into this situation.
Loving these shots!! Great Photography!!
Neil, I’ve been interested in the 24×24 softbox, but your links go to the 21×21 version. Is that intentional?
These posts, plus your book on off-camera flash, are GREAT. I’m really liking the suggestion of using something white plus your histogram display as a light meter. Little tricks like that, plus lots of practice are helping me finally get it. It’s actually not that hard, but it does take practice.
Bud,
They no longer make/stock the 24″ version, 21″ is closest size, next up is 30×30″.
Lastolite Ezybox Hotshoe Kits [from their website]: Available in three sizes featuring the 38cm x 38cm (15″ x 15″), 54cm x 54cm (21″ x 21″) and the NEW 76cm x 76cm (30″ x 30″) EzyBox Hotshoe. The kit includes the EzyBox Hotshoe (with plate), 4 section stand, tilthead bracket, extending handle (24cm – 48cm), padded shoulder bag and circular carry case.
Trev
Hi Neil,
Lovely light and photos. :)
With that Ezybox kit, is the bracket suitable for the SB900 flash with headroom, as I recently saw some comments regarding that, plus do you find the flash mounting on the hotshoe safe, I mean some reviews say it’s ‘friction held’ and not capable of locking.
I currently have other gear ie: Quantum with the Norman 19″ Octagonal softbox and wanted to get into something more flexible/lighter with SB900s.
In other words getting the 21×21 Kit straight out of the box be fine or get extra plate like the Westcott Magic Slipper Plate Adapter, having the PocketWizards, hoping to later get the FlexTT5’s/ACR3 [of course the adjustable/tilt bracket and stand I know would have to be purchased].
Thanks for advice.
Cheers,
Trev
Thanks Trev, that’s helpful information regarding the 24×24. I was trying to figure that one out from the sellers’ web sites.
gorgeuos!!!
These are absolutely beautiful and very futuristic! I love the nightclub feel and vibrance.
Hi Neil, the photos look cool. Do you have an estimate about how much time it took you to set up the shot from scratch? I always feel that I’m extremely slow looking for location, trying to frame the shot in an intereseting way, etc etc. Also, how many pictures did you take?
Hello Neil!Great post from you, as usual! Question: How far was your key light to the BG? Because if it was close to the BG it would have affected the your BG color right?
Hi Neil,
Thanks for response re softboxes, appreciated.
Cheers,
Trev