On-camera bounce flash for natural looking light
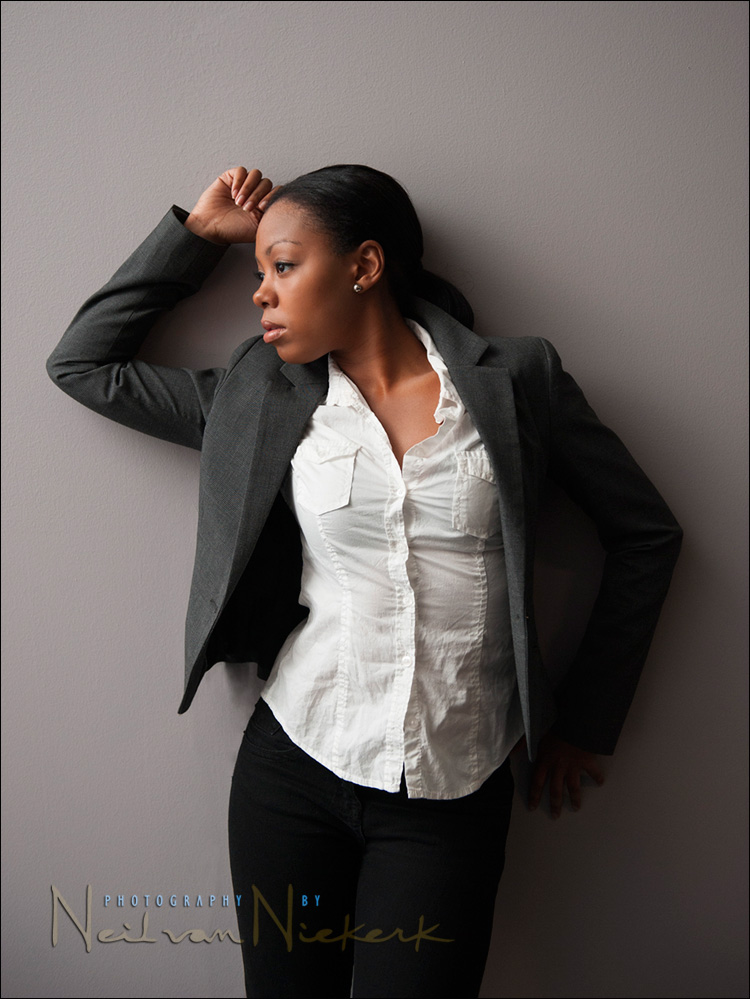
This photo of Precious, a model at a photography workshop, was taken during part of the practical session where emphasis was placed on getting soft directional light from an on-camera speedlight. The trick here is to absolutely have no hint of light coming from the camera’s view-point. To do this, I once again used the Black Foamie Thing to control the light from my on-camera speedlight, shielding the light from the flash. I pointed my speedlight 90′ to my left, so that the light reflected back towards our model from that direction, to give this striking portrait.
In other words, to get that kind of directional quality to the light from my on-camera flash, I bounce my flash into the direction that I want the light to come from.
Camera settings & photo gear used (and equivalents)
- 1/250 @ f3.2 @ 800 ISO … on-camera bounce flash, FEC -0.7
- Nikon 24-70mm f2.8G AF-S / Canon 24-70mm f/2.8L II
- Nikon SB-910 Speedlight / Canon 600EX-RT Speedlite
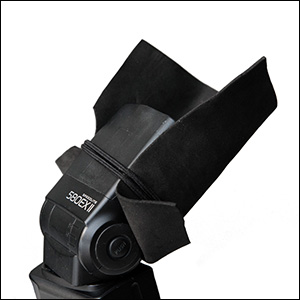
- a BFT (black foamie thing)
While the camera settings are: 1/250th @ f3.2 @ 800 ISO, and lens was zoomed to 45mm, these specific settings are largely irrelevant. Since I shot this with TTL flash, the camera and flash will follow whatever I set my camera to.
I used a wide aperture, since I normally work at a wide-ish aperture when shooting a portrait. The shutter speed there is very high, because I specifically wanted to show the attendees at the photography workshop that what they see on my camera’s LCD, is all flash. No available light. So that was purposely set so high. Normally I would have my shutter speed a little lower to allow some available light in.
I chose a relatively high ISO – 800 ISO – because I was bouncing flash into a fairly big area – an unused business office space. But this isn’t that high an ISO any more on modern digital cameras.
My FEC was dialed a little down, because in my experience, the D3 with the SB-900 has a tendency to over-expose TTL flash. So -0.7EV is my usual starting point for a photo when the flash is a dominant light source.
For any other camera make and model, the FEC would’ve been slightly different. For most cameras, it would be around 0EV or +0.3 EV. Whatever it is, it is something you need to determine for your own camera by playing around with it and picking up experience with how your own camera and speedlight interact.
Regarding whether the zoom head would affect your TTL flash exposure .. it shouldn’t. TTL flash exposure is measured via a pre-flash that the speedlight emits before the main exposure … and the camera meters this pre-flash and makes the exposure decision.
There was no specific surface that I bounced the light off. I just pointed my speedlight into the rest of the area, and enough light bounced back from the walls, windows, pillars and part of the ceiling. The surfaces were fairly neutral. No color casts. The pillars were painted grey.
My distance to my subject? Not that far .. the focal length was 44mm on a full-frame camera, and the image is un-cropped.
There’s a big difference in approach in using that piece of black foam to FLAG the light, as opposed to using something white to bounce the flash off.
With the flag, the area that I am bouncing my flash off, becomes my light source. Which in effect means my light is off-camera. With that bounce device attached to the flash, the light is coming from the camera’s point of view again, giving entirely different results.
On-camera flash modifier – the black foamie thing
The BFT is held in position by two hair bands (Amazon), and the BFT is usually placed on the under-side of the flash-head.
The linked articles will give clearer instruction, especially the video clip on using the black foamie thing.

Hi there Neil,
The light in this shot is perfect. I just wondered if you could share with us blog readers what your camera settings were (aperture, shutter speed, ISO, focal length, lens type, FEC, white balance setting and how far the wall was on which you bounced the flash to your left.
Also, I’m using a Sigma EF-530 DG ST EO-ETTL 2 flash at the moment for bounce. I noticed on the back of the flash it gives the focal lengths on the back: 28-105. Above the numbers are lights that light up when in TTL. When the flash is pointed straight on, it reads the correct focal length, but when I swivel the flash head to do bouce, the focal length indicator changes to 50mm no matter where I am pointing the flash head towards. My question is this…..
Will this affect the TTL reading through the camera’s communication with the flash or how does it normally work on flashes that have TTL capability? I know you probably don’t know the Sigma flashes, but you have worked with Canon and Nikon. Also the guide number for this flash is – 53 (ISO 100/m, 105mm head position). Also the flash duration is 1/700 sec (full power firing)
Thanks so much for such great articles and help.
Blessings,
Rory
Neil,
Thank YOU so much for the workshop – it was awesome and exactly what I needed to take my work to the next level. I had an E-Shoot on the 23rd, 5 days after the workshop – and I can’t tell you how much of your techniques I was able to utilize.
Thanks so much.
-Kelly
Hi,
I have been a fan of yours for some time now, and this image pretty much seals my admiration.
I am keen on your writings because you do a LOT of stuff on on-camera flash. I like the fact that you don’t brow beat us with the conventional “you need a 400W mono light and softbox” line.
I have learnt most of what I know about flash from you and one or two other sites, and am still learning and finding stuff difficult.
I understand you are coming over to the UK next month. I realy do hope you come again VERY SOON because I won’t be able to make the June seminar due to finances.
Anyway, to end my preamble, I would like to ask a few questions.
Firstly, you always shoot raw right?
I noticed that you set the White Balance to Cloudy. So how would you have played it if you were shooting JPEG? Or is the word JPEG like swearing to you? :~)
And what sort of distance from camera position to bounced surface were you bouncing off of? And was the surface conveniently white?
And your distance from/to the subject model, approximately?
And one last question, do you intentionally make me jealous with your beatifully lit shots using a mere speedlite??? :~)
You mention your patent pending :~) Black Foamie Thing ™. I already have a light modifier that is kinda similar, and I am wondering whether you think I could acheive a similar result with it?
The product in question is this: The Lumiquest Pocket Bouncer
Thanks in advance.
Thank you VERY much for your generous answer to my questions.
plevyadophy
Hi Neil, I’m so glad that I was finally able to attend your workshop! Thank you for the workbook & the ‘black foamie thing’ that you gave each of us. I just (pre) ordered your book, so that I can continue to build on what I learned.
-Lisa
Hi Neil,
I am very glad I made the trip to your workshop! It was worth it in so many ways. I’ve definitely improved my flash techniques, purchased some additional gear (PocketWizards are on the way), and learned to light in a very simple and intuitive way. I ordered your book, so I can’t wait to receive my signed copy! See you again in the future, and THANK YOU.
-Norman Allen