Using flash with incandescent / tungsten light
I have used this photograph several times in the past to illustrate various aspects of flash photography in low light, so it might be time to discuss this image more thoroughly.
We’ll also pull together a few other topics and see how it all comes together at this one point:
- Dragging the shutter
- Gelling your flash
- Bounce flash technique
- Direction of light
- The advantage of using TTL flash
- Working alongside a videographer

Direction & Quality of Light
I wanted to distill the essence of what we, as photographers, work with – light! Before we can truly grasp on-camera flash and off-camera flash, and really, any kind of photography, we have to be aware of the direction and quality of light. We need to observe the light that we have, and then decide how best to use it, or enhance it.
With this book, I try my best to share those “aha!” moments with you, and I do believe this book can make a difference to your photography.
The book is available on Amazon USA and Amazon UK, or can be ordered through Barnes & Nobles and other bookstores. The book is also available on the Apple iBook Store, as well as Amazon Kindle.
Camera settings
While I often insist that scrutinizing the specific camera settings afterwards don’t necessarily hold much value, they are pertinent in this instance.
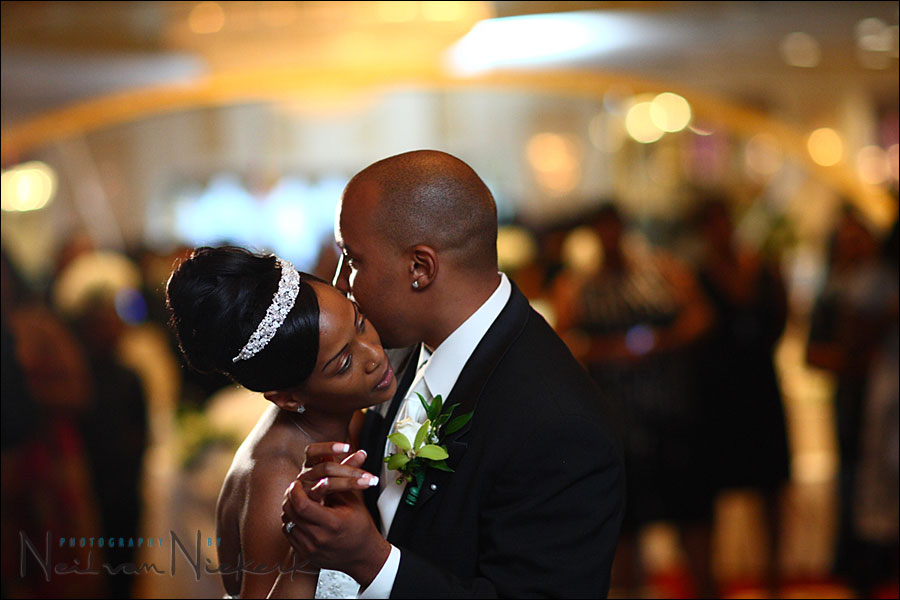
1/200th @ f1.6 @ 1600 ISO … TTL flash, gelled for tungsten with 1/2 CTS
As an aside, the lens used was the magnificent Canon EF 85mm f/1.2L II (affiliate), and the camera was the Canon 1D mkIII along with the Canon 580 EXII speedlight.
I think what is interesting about my choice of settings here, is that the tendency for most photographers would be to take their shutter speed lower to bring available light in. That’s the method behind “dragging the shutter“, where you bring in more available light by taking the shutter speed lower and lower. I often go another route to bring in more available light when I use flash – I raise my ISO and shoot with wide apertures. This allows the available light in and give my photographs some context, since the background didn’t go black.
Since I am shooting in TTL mode, my flash follows my settings to give me correct exposure. Or close enough that I can nudge it with Flash Exposure Compensation. This way I can ride my ISO higher and go with wider apertures. I can change these settings at will, without having to adjust my flash output like I would’ve had to do with manual flash.
The reason then why I choose shutter speeds that are higher than normal for indoors … I personally don’t much like ambient smear or subject blur. And that’s a real risk with a videographer at the wedding. The video light adds enough light that the flash would not freeze movement like we are used to when working in darker environments. So the higher shutter speed gives me sharper images since it minimizes camera shake and subject movement. This would’ve been quite prevalent working alongside a videographer.
Also, the gel will mean that I am working in the same range of color temperatures as the videographer and every other light source in that environment. I usually gel my flash for Incandescent light when working indoors.
In this photo, you can see the video light giving a rim-light on the groom’s face.
Note that I worked at a 90 degree angle to the videographer, specifically to use his light as a rim-light or back-light. It is important though, that we don’t appear in each other’s footage. So I will never shoot directly across from the videographer. As vendors at a wedding, we don’t want to appear in our clients’ images or video footage. It is advice that I give my 2nd shooters as well – not to work directly across from me.
Note though, that the videographer’s light is a neutral color and doesn’t appear as that orange grunge that you get when you mix un-gelled flash with tungsten.
My white balance at the time was 3700K, since I was gelling my flash. But I do adjust this in post-processing of the RAW file. Because the bounced light picks up different colors from the surfaces that the light is reflected from, it is necessary to finesse this when editing the RAW file. (It really isn’t an option to shoot in JPG format here.)
On-camera flash modifier – the black foamie thing

The BFT is held in position by two hair bands (Amazon), and the BFT is usually placed on the under-side of the flash-head.
The linked articles will give clearer instruction, especially the video clip on using the black foamie thing.
With the image at the top, I wanted the light from my flash to spill onto the bride’s face. So I wanted the light to come in from my right-hand side. That’s what would make the most sense … to lift detail there. So I bounced the light to my right-hand side, flagging it with the piece of black foam.
Bouncing my flash to my left wouldn’t have made sense, since I don’t want to light her hair in more detail and leave her face in shade. Also, bouncing behind me would’ve given a more flat look to the light. Therefore, bouncing flash to my right made the most sense in terms of placing my light source in relation to my subject.
I bounced the light into the large reception room. There was no wall. The light bounced back from part of the ceiling, part of the furnishings and table, and even the back wall. Just off stuff there. No specific area. But I did create a softbox effect, and controlled it with my camera
The shallow depth-of-field that the f1.6 aperture gives me, doesn’t concern me here. I really just need one point in focus here – the bride’s eye(s). Your attention is immediately drawn to her expression anyway. The rest is just context.
To overcome the chances of mis-focusing or the couple moving out of the plane of focus, it is necessary to shoot a number of frames. Then, the decisive moment is chosen in editing the sequence of images. Often, it all comes together in the post-production workflow.
Summary
With this photograph, I wanted to give an overview of several on-camera flash photography techniques. These techniques all play a part in creating an image which really captures a moment, without the technique being ‘intrusive’. It is always about the moment.
Gelling your flash
Since I frequently gel my flashguns to turn the WB of my flash much warmer (usually for Incandescent light), I use these gels that I cut up and tape to the top of my speedlight’s head. One of these sheets (which aren’t expensive), will give you a lifetime supply of these filters. For me, these gels are an invaluable part of flash photography.
Tape the gels down on your lens hood when not using the gels.

I just wanted to say to anyone who’s ever read Neils blog, this is where I learned how to shoot weddings. By reading his blog and tutorials, I learned about speedlights and bouncing flashes of the walls and ceilings, how to use a gel on a strobe and how to make beautiful images of happy days.
I’ve found more information, practical information on Neils blog than in most wedding photography books. I now use his techniques in my boudoir photography sessions.
Thanks Neil!!!
Larry
I never used this “route”, but certainly I will. Everything you say it’s so logical, it makes perfect sense. Your blog is pure gold, thank you!
Hi Neil
I stumbled onto your site yesterday and could not stop reading, so much valuable info to be found and learnt for me just starting out in photography.
I recently bought a Nikon D7000 and am looking at getting a speelight. What would you recommend? I love taking photo’s of children and have recently had some wedding requestes.
Thanks for sharing your valuable insight
Gillian .. There are specific reasons why I would always recommend the larger speedlights.
In a situation like this, would you be in AI Servo focus mode or one shot? The former is better for moving subjects, but can have a difficult time locking focus in low light situations.
Alan .. for this I would typically be in One Shot / Single / AF-S mode so that I have specific focus. But it needs a camera that can focus fast and accurately.
Neil,
in addition to you comment on AlanB, I’m more a believer of using continuous focus, especially when shooting consecutive frames.
My main reason is that the subject is never still, always slightly moving towards or away from the camera. With only single focus, I experienced more than once that as of the second frame the focus is (slightly) off, especially when working with large apertures / long lenses.
The only solution would be to refocus before each shot. Is that what you do?
On the side: you probably can rely on the D3’s advantage of speed with… I’m only slightly behind with a D300. ;-)
Best,
Roel
N,
When you are gelling for Tungsten, is the white balance setting on the camera changed as well? After following your site for some time now, this is the technique I grapple with the most….When to gel, WB settings when gelling, and expected results with the gel. Can you elaborate? Perhaps this has been covered and you can drop a link or maybe post a tangent about it. Color temperatures would be great too…
Best,
K
Kevin .. you set your camera’s WB to your dominant light source. In this case – as mentioned in the article – my white balance at the time was 3700K, since I was gelling my flash. But I do adjust this in post-processing of the RAW file.
There is a link right at the top to another article about using gels with flash.
If you think about it .. at a wedding reception, the light sources are all from the warm side of the spectrum – the room lights, the videographer’s light, candle light, and so on. We’re the only fools there adding blue flash to this. So if we want our flash to blend more naturally with the existing light .. gel your flash!
Hi Neil,
I read and re-read your posts and always seem to learn something new or suddenly things click, not sure which! Anyway, your blog is one of the most interesting and informative I have yet found so thank you for so generously sharing your knowledge!
Helen
Neil… I’m always awed by how sharp you are at such wide open apertures! Amazingly beautiful! If I was at 1.6, she may be in focus but he would be soft. Is it your distance from the subject that allows you to get both of them sharp?
Amanda .. the photo has been reduced in size here for display on the webpage, so the out of focus areas look sharper than they would appear as a larger print. So that does change the apparent DoF here. As mentioned in the article, I really only need her eyes (or eye closest to the camera), in focus.
The distance to them also does help with DoF, compared to taking the photo closer-up at the same aperture
I will be doing some photos later this month for a big Christmas ball. I will add a tungsten warming gel on the flash, but the question is: Is the best thing to do on the faces with all the warm ambient surrounding them, to color correct so they end up much cooler (being neutral)?
I don’t want to correct the ambient environment because i like the warm tungsten.
If you don’t want to completely neutralize the warm incandescent light, then try a 1/2 CTS flash. It’s my default.
Thanks Neil. i only have one available right now and will use it on my softbox for the closeups because it would be more noticed on them than more distant group shots.
I realize also now, that even when your come close to neutralizing the skin under tungsten lighting, it’s the light SOURCES and more reflective things around and in background that maintain that very nice warm look. So it still works with neutral skin in those circumstances.
Another question. I will not have a whole lot around me to bounce my flash off of. Tables, chairs (but a lot of white probably, which is good). I was thinking of using my 24 x 24 inch soft box as a kind of “kicker” to help bounce that light (when i’m not using it as a primary directional light source for closeups).
The problem is that if I tried that, I’d have to THINK too much about not having it bounce the majority of the light instead of the rest of background, because it might cause too hard of light being a small surface to reflect off of.
It’s one of those things that isn’t going to really make a big difference one way or other, but still a good idea! I’ll probably be able to get by with bouncing off the surrounding tables and stuff if i jack the flash up all the way. Besides, it’s dim light … so it should be plenty.
Focusing in low light. Usually my AF works, but sometimes i end up with out of focus shots, even though the green indicator says it was in focus (Canon Mark ii). I don’t know why it does that, but read it happens.
Manual focus? In low light, it would be hard to see in the view finder if critical focus is needed. I don’t have a fresnel screen (regular focus screen). Live view? To much time involved…this is a party.
Read this before, but don’t remember…………..is it true you can manual focus and still get a confirmation green light?
Patrick, I suspect what you are seeing is camera shake as opposed to mis-focussing.
Check your shutter speed.
Or you could raise your ISO, if you’re comfortable with that.
– Photographing the wedding reception with one flash.
– High ISO bounce flash.
About the AF problems you’re having – are you using Single Focus, or Continuous / Servo focusing? With Servo, the infra-red AF assist is disabled … and with that focusing mode being “Release Priority”, you’re more likely to get focusing errors during the wedding reception.
Check this tutorial – Your camera’s AF modes.
Neil, I’m using the single focus mode. I only realized what you’re telling me about how it ENABLES the infra red assist recently.
And it still does it, not always though. It’s not camera shake. I can see that when I enlarge the image to 100 per cent. I think more than anything, it’s not getting a contrast area to focus well on. But I’m always focusing on the eyes, so you’d think it would be enough.
I do see that when i choose to use manual focus, the green confirmation light is activated. But again, that might also be an erroneous reading as the AF focus does too.
Is it even possible! that if the green light appears, that it would NOT be in focus still? I doubt it. It confirms focus on “something”. So, it must me slight movement forward or backward in combination with a too low of aperture.
It does sound like you’re struggling then with a low contrast subject in dim light. That’s always a challenge.
One more question – what is the max aperture of the lens you’re using?
For example, an f/5.6 zoom will be at the lower limits of what your camera might be able to accurately focus.
Dear Sirs:
I am from Sri Lanka, and engaged in gem trade, and would like to know whether there is a camera that can take pictures under Incandescent light.
This is useful to take pictures of the colour changes of gem stone specially Alexandriite under incandescent light
Regards,
Nihal
Hi there .. all cameras have the ability to set the WB to Incandescent.
For extra flexibility, shoot in RAW file format.