Flash photography tutorial: Balancing flash & ambient exposure
This topic – balancing flash and ambient exposure – seems to one that many newer photographers struggle with. The big hurdle seems to be the basic starting point – how do you decide on the exposure for each?
I’d like to explore this topic a bit with this post. The trigger for this was a question that someone emailed me regarding an image in one of my books on flash photography. Instead of answering the question directly, I thought that a wider answer might be more illuminating. We’re still on that perpetual quest for more aha! moments. So let’s see where we head with this. (I’ll come back to the specific question and answer at the end of this.)
Why do we even want to add flash to our subject? The answer is that with flash we can control the direction and quality of light, and create a more dynamic image.
We don’t necessarily just use flash to avoid camera shake and / or poor exposure in low light. We use flash to create better light on our subject. We can ‘clean up’ the light that falls on our subject. Or to create more dynamic and interesting light. It’s about control. We decide. So where do we start?

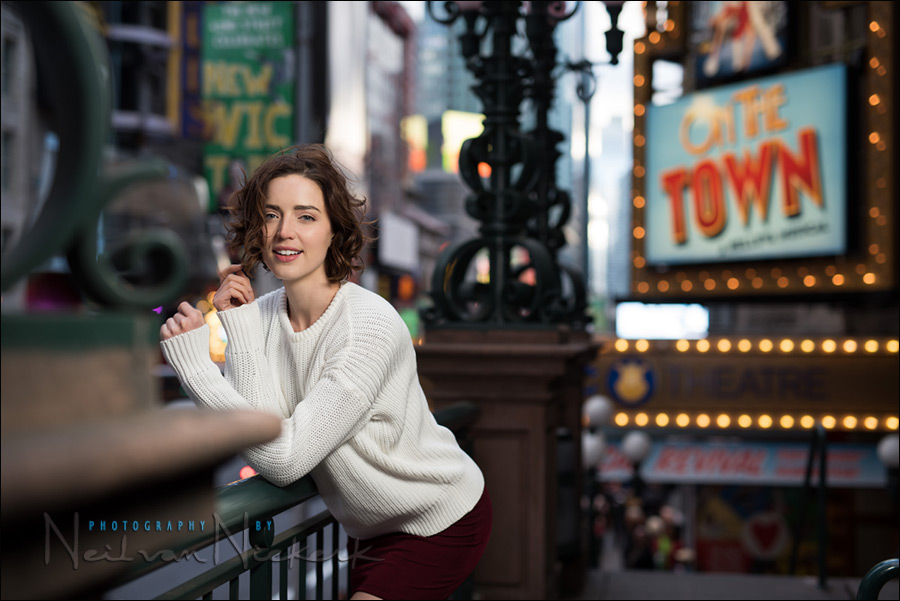
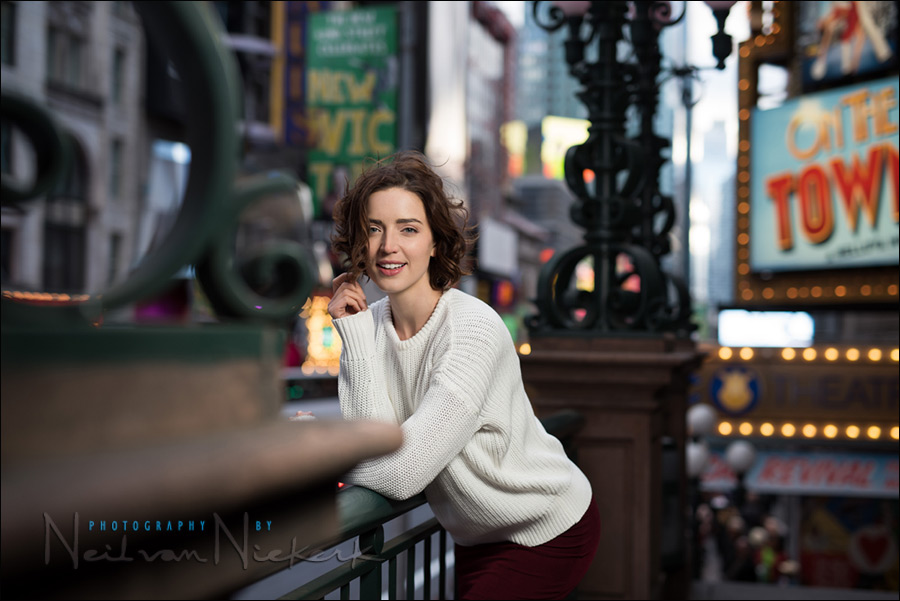
The simplest approach for me, as shown in this image, is when I work in fairly flat and even ambient light, is to under-expose the ambient light by a certain amount. Then we add flash for correct exposure. So how much do we under-expose the ambient light by? Well, it depends. Usually a stop is good. Two stops can also work. If you’ve seen some of the images in fashion and music magazines where the subject is in a pool of light .. yet, the sunlit cityscape is darker, then that is because the photographer under-exposed the ambient light by 2-3 stops. Even in bright sunlight. So we have some leeway. That should ease some of the anxiety.
- Off-camera flash for that extra bit of drama (model: Olena)
- Flash photography tip – Adding flash to ambient light (model: Elizabeth)
Under-exposing the ambient light by a stop, and then adding flash … is but one scenario, and one recipe. This approach won’t apply to every possible situation you might encounter .. but it’s a good starting point in grasping that Big Question – where do we even start in balancing flash and ambient light.

Direction & Quality of Light
I wanted to distill the essence of what we, as photographers, work with – light! Before we can truly grasp on-camera flash and off-camera flash, and really, any kind of photography, we have to be aware of the direction and quality of light. We need to observe the light that we have, and then decide how best to use it, or enhance it.
With this book, I try my best to share those “aha!” moments with you, and I do believe this book can make a difference to your photography.
The book is available on Amazon USA and Amazon UK, or can be ordered through Barnes & Nobles and other bookstores. The book is also available on the Apple iBook Store, as well as Amazon Kindle.
Now let us look at an example where the previous method wouldn’t work:
- 1/160 @ f/2 @ 100 ISO
- Off-camera flash – manual output speedlight in a softbox
- Lastolite EZYBOX 24×24″ softbox
- Nikon SB-910 Speedlight controlled by PocketWizard FlexTT5 Transceiver & AC3 Controller
or alternately, the Canon 600EX-RT Speedlite controlled by Canon ST-E3 Transmitter
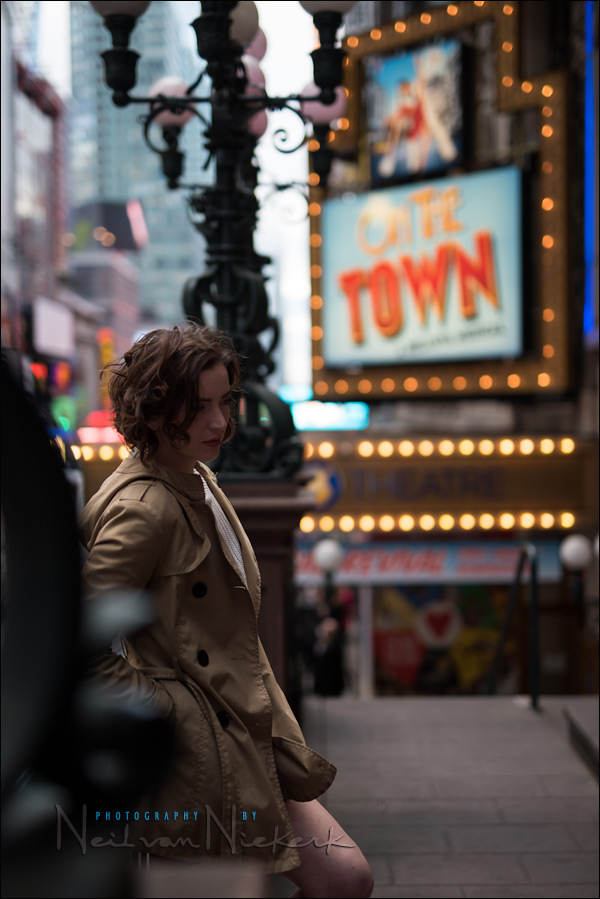
Here’s a reference image without flash at the same camera settings:
Then we add off-camera flash – a speedlight in the Lastolite EZYBOX 24×24″ softbox (affiliate).
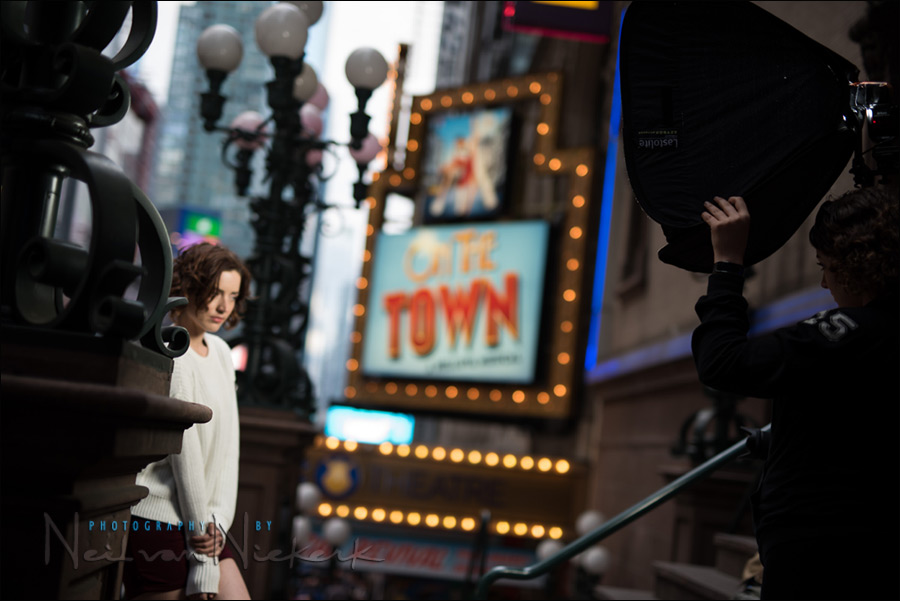
As we can clearly see here, without flash providing light on our model, she would be completely under-exposed … for the settings we chose.
With this image shown at the top, I positioned Anelisa so that she would be in the dark relative to the brighter background. This is purposely done, so that I can use flash without much concern for the ambient light giving weird color casts. In deciding on my basic exposure, I simply needed the background to appear bright enough.
I don’t know how you’d use a handheld meter for that. The simplest would be to check your camera’s built-in meter against a portion of the background that doesn’t contain too many dark areas or overly bright areas. We just want a general idea of our settings. Then we take a few test shots (without flash), and check our camera’s preview until we’re happy with the way the background appears. It’s an iterative process with the starting point given to us by our approximate camera readings.
Then we add flash. We needed f/2 @ 100 ISO amount of flash.
(The lights around the Times Square area are quite bright at night.)
We have two options here:
- manual flash, and then we’d use a handheld meter as the best way to meter the flash exposure. From experience though, I had a reasonable idea already what the exposure would be for that speedlight & flash combo, for that distance. This is explained in this tutorial: Two speedlight setup for back-lighting.
- TTL flash, where we allow the technology to get us close to correct exposure, and then we nudge the exposure up or down, according to what we see on our camera previews. It might be less consistent than using manual flash and a flashmeter, but it works and gets us to correct exposure fairly fast. It might also be a more flexible way of shooting than using manual flash, if we want to change position and angles often.
Simplicity itself.
There is a range of settings for which we’d get images that work. If 1/160 @ f/2 @ 100 ISO worked in this instance, we would’ve had success with images where the background is perhaps one stop brighter, or perhaps a stop darker. We really have a wide margin here as to what would work … because our model is in the dark / shade compared to the background. And we have a wide latitude as to what would be great exposure for the background.
You decide what you want to do and want to achieve. You have options here.
In all these examples, our starting point was the available light, and how we decided to expose for it.
Camera settings & photo gear (or equivalents) used for the main photo
- 1/160 @ f/2 @ 100 ISO
- Nikon D810
- Sigma 50mm f/1.4 DG (for Nikon) / Sigma 50mm F1.4 DG (for Canon)
- Lastolite EZYBOX 24×24″ softbox
- Nikon SB-910 Speedlight controlled by PocketWizard FlexTT5 Transceiver & AC3 Controller
or alternately, the Canon 600EX-RT Speedlite controlled by Canon ST-E3 Transmitter
Back to the question which triggered this article.
Angelo in Australia wrote:
Greetings Neil
I must first say what a well written and technical book you have released regarding on-Camera Flash. Like many of your readers, I have read the book twice. On each and every occasion I have learned something new about flash. My question points down the technical side of “how did you do it”. Step by step process!
I understand the theory in what you are trying to achieve, however become lost when trying it out practically. By this I mean, how did you meter for the background light (ambient light), as far as its correct position on the meter scale. Under/over by 1.7 stops (canon)
Lets use the example of being in a church for a wedding or christening. The church has various colored plate glass windows (ie: yellow, red, orange etc), which allows both colored and natural ambient light. Add some tungsten bulbs also. When you indicate you meter for the ambient light, how is this done. Are you underexposing by 1-2 stops and then bouncing flash from a wall etc. I know this seems vague, but let me further pick your mind.
In your book, page 42, plate 7-3 and was to use this as my example location. Do I now …
* meter for the brides dress, face, wall, brightest relevant area ?
* dial in 1-2 stops under in exposure ?
* adjust FEC ?
* test shot and chimp ?
* re-adjust FEC and chimp ?
ok, I think we’ve thoroughly covered the first part of Angelo’s question.
Now, about the specific image in the book that he refers to:
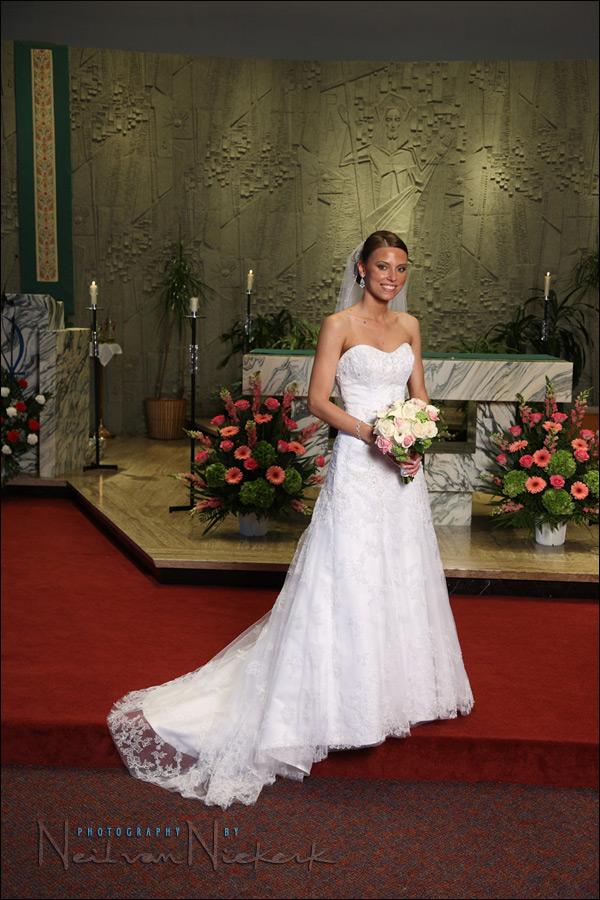
This was to illustrate the how the shutter curtains affects your choice of possible shutter speeds to sync your flash at. It’s partially discussed in this article on understanding the effect of maximum sync speed.
Angelo, the reason for the round-about way of getting to your question, is that you asked about the image as if it was shot using TTL flash, and possibly using bounce flash techniques.
When I photograph the wedding formals, the flash is always in manual. In this example – a simple lighting setup for photographing the wedding formals – I used two flashes in manual mode.
So I had to answer your question explaining how I would normally go about balancing flash and ambient light .. but it doesn’t directly relate to that image.
With a set-up like that image – using manual flash with the formal photos at a wedding – I would mostly rely on my choice of shutter speed to allow the available light in. With manual flash, shutter speed becomes your only independent control for ambient light.
So with that, your questions should be thoroughly answered, even though a few dots might still need to be connected. See if it all makes more sense now.
Related articles
- Off-camera flash for that extra bit of drama (model: Olena)
- Available light portraits – composition, light and style (model: Christy)
- Effective on-location portraits (model: Anelisa)
- Flash photography tip – Adding flash to ambient light (model: Elizabeth)
- Off-camera flash – Two speedlight setup for back-lighting (model: Anelisa)
- Flash photography tutorial – balancing flash and ambient (model: Camille)
Neil,
Spot on in your answer, which is what I was hoping to read.
Very well written and easily understood, and also in achieved in practice.
The dots are now joined.
thankyouo very much :-)
Angelo
Hi Neil.
In the case of the above church/ bride photo, TTL with camera on manual would have worked as well I think, leaving you the shutter to control the ambient (to a certain degree) and flash EV for the subject. Sometimes when I’m in a hurry I switch an SB80 on Auto mode, set it to the aperture/ISO I need and away I go. Mind you it would not work with a shoot thru umbrella…
If you don’t mind me asking what is the name of this sharing widget? It’s pretty cool.
Cheers!
Bogdan
Bogdan … TTL would’ve worked as well, but isn’t as consistent as manual flash. So for a static setup like that, manual flash really is the way to work. It makes your post-production workflow faster as well since you don’t spend time editing individual images for exposure.
Just a quick note for clarity … when you use TTL flash, you could as easily adjust aperture and ISO to affect your ambient exposure.
The social bookmarking widget is called ‘Sexy Bookmarks’. If you decide to use it, throw the developer a few $$ for beer money. : )
Neil,
My question is, sometimes when I underexpose by 1-2stops and then add flash, my subjects skin starts to look like their “a deer in headlights look.”. Very bright skin, but on the histogram their skin is still in the zone 8-9 area.
If I crank the flash down in power, I loose the “pop” to the subject vs the background. I usually end up shooting it and doing some pp to it later.
How do you balance the power of flash vs distance of flash. Is there a power that you reccomend starting with on flash, like 1/16 pwr and go up and down from there.
CMARX … would this be direct flash, or diffused off-camera flash?
Also, how are you metering for it?
Really, the most practical way to find the distance / power relationship (for a specific ISO and aperture combination), is with a flashmeter. It is fast to use, and takes the guess work out of it.
I purchased you book (after hearing about it on this website). It’s great to see you answering follow up questions from readers. Interactive resources are always the best. Looking forward to any trips you make up to the Toronto area.
Hi Neil,
You know the art of teaching. Very easy to understand. You are handling the letters like a poet does. Limited words but beautifuly created words with millions of hidden knowlege. Each and every read will open new world like your number of ‘Other Links’ existing in your all articles.
Neil, please try to write other departments of photography books too. Please try to spare at least an hour from a day to write books. Your contribution to the photography journal is a must. If you write a basic book like Mr Bryan Peterson, ie, Understanding Exposure, it will be a big success than your expectation.
I would like to make a copy or print immediately this article other wise you may call back this article because some of your friends will advise you to do the same. You know why? It cannot be given free.
All the best Neil.
Neil, and others…
I’m sure Neil knows this, but it’s worth pointing out here.
If you do some tests with your speedlights in ADVANCE of shooting, then you can quickly get “in the zone” with proper exposure.
Take your speedlight, and do a test at about six feet (arm span) from a model. Set the speedlight to 1/8 power. Do a test pop with a light meter (assuming 100 ISO, you Nikon folks will probably bottom out at 200). For me, this setup might give you f/8 with your speedlight.
Now, it’s easy to extrapolate up and down:
– half the distance (three feet) increases +1 stop
– double the distance (12 feet) decreases 1 stop
– using a modifier (shoot through umbrella, reflective umbrella) -1 stop
– changing power on speedlight goes up or down 1 stop
As long as you keep the speedlight the same distance from the subject, its power will be the same. Then just dial your ambient up and down by using your shutter speed.
So, if you’re shooting at 3 feet with a shoot through umbrella (+1 stop because of distance, -1 stop because of umbrella) and you want to shoot at f/5.6 (one stop up from f/8), then reduce the power on your speedlight to 1/16 (in this example).
If you can add 1+1, then you can do this math – once you’ve established the baseline distance / ISO / resulting f/stop relationship.
Great insight into mixing ambient light to flash for photography. How about an article in teaching how to color balance the flash with the ambient background for consistency?
Thanks for sharing!
Curtis Copeland
Curtis, there’s an article here about gelling your flash for tungsten lighting.
Neil,
This is a very informative article. I kept wondering when you mentioned “meter for the ambient light” and this blog entry explains how the process generally works. This particular content should be in your next edition of your flash photography book.
This also reinforces https://neilvn.com/tangents/exposure-metering-and-flash/ and clarifies past blog posts where you talked about putting your subject in the shade relative to a bright background. Thanks!
Neil, If I got this right, on these images you did not use gels? Let say for the first one. Or you did? If you did, how do you use gels with softbox? You just put gel on your flash and shoot through softbox ?
Thanks for your reply.
Saso.
Nope, no gels. I didn’t shoot in an environment lit with incandescent lighting.
If I had, I would use gels on the flash inside the softbox.
Neil,
Something I have not seen addressed. If you underexpose the background by 2 stops, and use flash to light your subject – especially if you are using a loop lighting pattern – the shadow side of the subjects face is pretty dark, because of the underexposed ambient light settings. How can you underexpose the background, use the flash as subject lighting, but still have a soft transition between the light ans shadow sides of the subjects face?
Randy .. by using a relatively large softbox. I use the medium-sized softbox, and I use it at a distance that there is still a little bit of wrap-around light.
And when I don’t have that, then I just call the dramatic light intentional.
Neil, Enjoyed your visit to Cape Cod Art Association Camera Club and your talk/demo on “On Camera Flash” and bought your book. I would like to know where I can purchase small pieces of gel material such as you recommend tapeing over flash units?
You use the orange and straw colors but don’t see those mentioned.
Thanks,
Milt Williamson
Upper Cape Camera Club
Hi there Milt … here is the link to the gels that I use.
Neil, about under-expose the ambient light by 2 – 3 stops. Sometimes i’m little confuse about a word “under-expose the ambient light”.
1) Ambient light is background?
2) Like a second image when you take reference image without flash, do you metered her background and see in your camera meter to make sure the ambient light under expose about a stop or more?
Ivan .. the ambient light could be just the background, if your subject is in shade, compared to the background. Or, in the example in this article on balancing flash with ambient light, the light on my subject is about the same as I have in the background.
So the “ambient light” exposure is then whichever part of the scene you want to expose for. In the jumping shot of the model here, we under-exposed the scene (and model) by a stop or two.
But in the photograph at the top, the model is already under-exposed for how we decided to expose for the background.
This is actually a tricky thing to consider here … since it really depends so much on where we are, and what we want to do. As such, there often isn’t just one correct way of doing it.
Regarding your second question, yes, I take a meter reading, and then chimp to confirm that I have what I need.
Hi Neil,
I grew up in NJ (Metuchen) and went to FDU in Teaneck. I sent one of my photog friends who still lives in North Jersey to one
of your classes at Unique Photo. He enjoyed it.
My question is about balancing manual flash with ambient. In my mind this is what I got from your blogs on the topic.
When needing to darken the background get your aperture at 1/60. Set your flash power manually to give that aperture on the subject.
Then use shutter speeds between 1/60 and 1/250 to set the darkness of the background.
When needing to lighting the backround get your aperture at 1/250. Set your flash power manually to give that aperture on the subject.
Then use shutter speeds between 1/250 and say 1/60 to set the lightness of the background.
Did I get that correctly? It just wasn’t clear to me from the blog posts what shutter speed you used to grab the aperture for ambient.
Thanks!
Scott
Hi there Scott ..
In another article, the model was just as brightly lit as the background, and since the light on her was fairly even, I just needed a touch of fill-flash.
But with a more general example as on this page, the model wasn’t as well lit as the background, or alternately, I could under-expose both her and the background and use flash to expose correctly for her.
Now, looking at the two methods you have there.
You could do it that way, and there is a definite logic to doing so .. but to my mind this is a round-about way of doing it.
But your way would give you some leeway with the shutter speed, for brightening or darkening the background. (As long as we don’t bring our shutter speed so low that we inadvertently over-expose our model with the ambient light.)
But personally, I would rather find the overall exposure, and then under-expose intentionally by around a stop, and take up the slack with flash. It just seems a simpler method for me.
Of course, in this discussion, we’re working in fairly bright conditions. A different approach is needed in working in lower light where the flash dominates anyway.
Hi Neil,
On several occasions I have tried to balance ambient light with flash, underexposing a stop and added a manual flash, but then the histogram always shows underexposure. Is this normal or I’m doing something wrong?
The conditions and settings are: Sunny Day, 1 / 250, ISO 200, manual flash 1/2 power.
Thanks again,
Alfredo
Alfredo .. at that point you will most likely not be able to use your histogram to check exposure.
To get correct manual flash exposure, you either need to:
1. check your histogram very specifically for a specific tone (white) , and how it is placed on the histogram, to the exclusion of any other brighter areas.
2. use a flashmeter. This is the simplest method.
Neil, thanks for this brilliant article! I have a comment: it would be so nice to also have the focal lengths beside other camera settings…
Tom, I usually add the focal length where it is important or relevant. But I only sometimes add the focal length when it isn’t of real consequence to the discussion … and then only when I remember. But I’ll make an effort. Thanks.
I read all of Niel’s information on Tangents and purchased the On Camera Flash – Techniques for Digital Wedding & Portrait Photography. I recently shot my first wedding and the ceremony was outdoors. I underexposed my ambient about 1 stop and compensated with the flash. You just have to trust that histogram, chimp and adjust as required when in TTL. The colors were very rich. I was within 1/2 stop of exposure adjustments during PP.
This site and the book really helped me a lot. I thought the technical part was going to be hard but actually coordinating and posing people was far harder.
There are several months and many hours i spend searching for this kind of information
Neil I want you to know that i am very happy. thanks thanks a lot. I am a little very little photographer
I think this article is clearer after reading Neil’s more recent article first.
Flash Photography tutorial
Thank you for your books ( I already have the second one) and website. I have been slowly digesting your principles and it’s been a great help! Looking forward to one of your tutoring sessions.
My question is this. I remember reading the SAAF concept. Shutter speed affects ambient light and aperture the flash. I understand why shutter speed doesn’t influence flash (at least below max sync speed) but doesn’t aperture affect ambient light? I’m sure it does some but not directly as much as shutter speed does? In other words as far as ambient light goes if you shot f/4 at 1/250 will you get just as much ambient light shooting f/2.8 at 1/500? And if not why since you are allowing the same amount of light hit the sensor.
Thanks
Aperture most certainly does affect the ambient exposure.
And it affects ambient light as directly as a change in shutter speed would.
Where the ‘SAAF’ concept comes in, is with manual flash where there would be a methodical approach to setting the correct flash exposure. Then changing the aperture means juggling the other variables – ISO, distance, power – and hence it is easier to just change the shutter speed to affect the ambient exposure. (Shutter speed is your only independent variable here which doesn’t in turn affect flash exposure.
Yes … f4 @ 1/250 will give you the same ambient exposure as f2.8 @ 1/500
Here’s a related article which will hopefully clear things up a bit … when aperture does not control flash exposure.
Hi Neil! First I want to thank you for all your wonderful articles. As a beginner in flash photography your websites has given me useful information in improving my skills. I have TTL flash on a Nikon body. In terms of ISO, can I just set it to AUTO ISO while in Manual mode and let the camera choose it for me while I manually set the aperture and shutter speed? What are the pros and cons of this?
Once you change a setting to be ‘Auto’ anything, the camera is no longer in ‘full manual’ mode.
Your Shutter and Aperture may be the same, but when you zoom in/out, change perspective, black background, light background, you shots will vary in exposure, as the camera is still doing the ‘thinking’ for you by changing the ISO.
There could be reasons to do that of course like moving quickly from sun to shade a lot to grab different scenes but only if needed, like a wedding when guests mingle outside after the ceremony in sun/shade.
I too think it would bring in just one more variable. One too many in this case. With TTL being an automatic metering mode, your ISO can now change depending on whatever algorithms the camera has … and now you have no idea where you are again in terms of balancing flash and ambient.
We need f/2 @ 100 ISO amount of flash.
What does it mean ?
So we have camera settings of: 1/160 @ f/2 @ 100 ISO (as given in the article), which gave us a decently exposed background, with enough interesting color and detail. The test shots confirmed this.
thanks for the different examples and explanation how to balance ambient with flash
I notice that Anelisa is wearing a white sweater. This makes a perfect exposure very easy. Just apply enough flash to get the blinkies activated and then turn the flash down until the blinks stop. If desired, decrease the flash by one third of a stop more to ensure you do not blow out the whites. Since you are in manual mode, you can replace Anelisa with anyone wearing any colour clothing or skin tone and they will also be automatically perfectly exposed also. Why? Because if you expose correctly for one tone then all other tones are also correctly exposed. As long as you remain on manual flash mode with the same original settings.
This will not work on TTL because the tonalities are changing and the flash exposure will also change as the meter adjusts for the average gray exposure each time.
I have your books Neil and always enjoy looking at you work. You have taught me a lot and even though I am just an amateur who does not often take portraits, I feel I am proficient enough to work my way through most lighting situations because I now understand my camera and lighting thanks to your blog. Thank you so much Neil.
Great update to the article.
Hi Neil,
My question to you concerns white balance, (WB), when using flash. If I compare a photo taken with no flash with the camera WB set to auto WB, and then with flash, the one with flash has been “warmed up” and has a higher kelvin temperature. But if I set the camera WB to say cloudy for both photos then they will both look the same, probably rather warmish, which I don’t like. I know this can later be corrected in post production but I would really like to try and set the cameras WB as close as possible to the ambient WB from the start.
Could you go into a bit more detail on how you decide what WB you set on your camera with different lighting conditions, say outside, indoors, etc?
Many thanks,
Bernard.
The way your WB jumps when you use flash, compared to when you don’t use flash – that’s typical of Auto WB. When the camera senses the flash in the hot-shoe, it changes the WB to Flash WB.
If you don’t like Cloudy WB, then use Daylight.
On the Nikon cameras, I keep the preset WB settings on the cameras to:
Daylight +1 (making it a touch warmer)
Cloudy -1 (making the WB a touch cooler)
If doing something like that still doesn’t satisfy the soul, then use a Kelvin setting.
I don’t stress about this much – I nudge the WB as necessary as part of my regular RAW workflow.
Many thanks Neil for this and for putting together and sharing such wonderful blogs!
Hi Neil,
Thanks for this excellent article. I’ve learned from a recent shoot the importance of one thing you said, that you deliberately placed the subject in the shade. I took a shot recently where the subject was in the sun sat on grass, with fairly bright sunlight coming from left of shot. Behind was a some greenery that I didn’t want *too* dark, to keep some detail in it. I wanted to shoot from near to the ground at f/2.8 for a narrow DoF. I also didn’t want to overexpose the blurred grass in front of the model.
The model and the grass they were sat on were well exposed just by the ambient light. I ended up only applying a touch of fill flash, so I didn’t get that really nice flash lit focus on the subject.
As I was unable to move the model into the shade, I wonder how best I should have approached it? Perhaps it would been better underexposing the foreground and background – the latter almost to black – applying more flash on the model, then bringing up the background exposure a little in post?
Jon – as you have figured out, there is no balance to be found in that scenario where the tonality of the background and foreground will fall how you want it. If you under-expose your subject, you also under-expose your background – resulting in a background that is too dark.
I think you found the best intersect there ion terms of in-camera results.
You could always bring up the background in post – but this adds an extra step to your workflow.
Hi Neil,
Thanks for your wonderful, most educative and informative tutorials. I have been following and reading your articles regularly which have benefited me a lot especially your black foamie technique. However, please forgive me for asking this question “How do you set your white balance when shooting indoors with different types of ambient lighting and still while using your on camera speedlight? Do you set it according to the ambient light or for speedlight?
Thanks a lot.
You set your WB according to your dominant light source … but you still shoot in RAW so you can adjust this. If you shoot with a gel on your flash, then your camera is set to the Kelvin setting of the gel. But, again, you shoot in RAW so you can easily fine-tune this.
You can read more here: Bounce flash and WB settings.
Thanks a lot Neil