Video tutorial – Using the ‘black foamie thing’
The piece of foam can be ordered via this affiliate link. I cut the sheet into smaller pieces. The BFT is held in position by two hair bands, and the BFT is usually placed on the under-side of the flash-head.
The linked articles will give clearer instruction, especially this video clip on how to use the black foamie thing.


Regarding the photographs shown in the video clip:
camera settings: 1/250 @ f3.5 @ 400 ISO
I used maximum sync speed since I wanted to eliminate as much of the ambient light I could for this demonstration so that pretty much only the flash registers in the final image. (Clicking through to the linked image will show the same photo without flash – just to give you an idea of the total effect of the on-camera flash.)
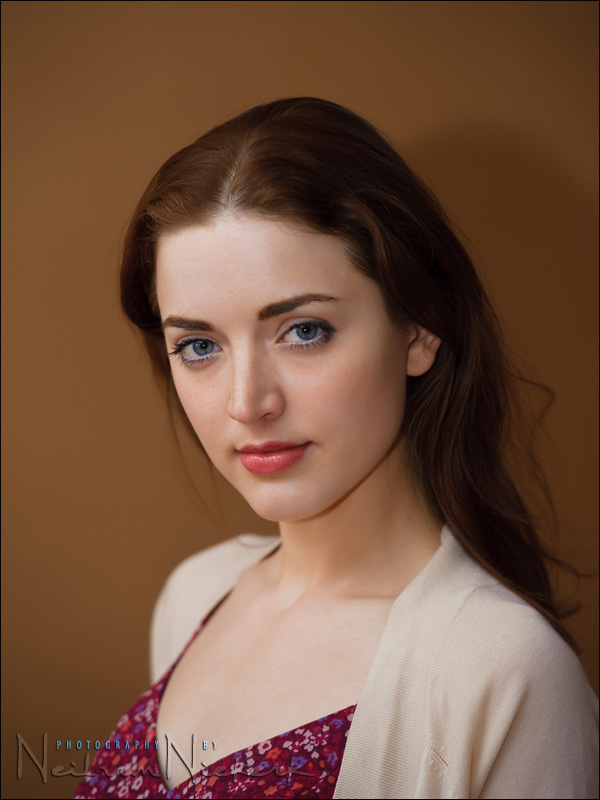
This next image is the one where I peeled back the BFT and used it in that half-bounce position … still aiming for the same spot on the ceiling as before, but without the BFT blocking the direct light on Anelisa. You can clearly see that there is direct flash falling on her, even with the flash pointing upwards and slightly towards her. You definitely need to flag your flash in this case to get that quality of light that we’re seeking.
Related articles
- How to bounce flash
- The black foamie thing
- Throw away the tupperware!
- Bounce flash technique – mimicking soft window light
- Bounce flash & short lighting (workshop in Cork, Ireland)
- An example of bounce flash technique (cute baby)
- Bounce flash & catchlights
- Why I use a light modifier that is black
- Bridal portrait with bounce flash
- Directional light from your on-camera flash
- For more videos, follow me on Vimeo / YouTube

Techie details about the video clip itself
The sound recorded via Sennheiser G2 wireless microphone system.
Video clip edited in iMovie ’11
Music for the video clip provided by Triple Scoop Music
Equipment used for the HD video:
Canon 5D mk II
Canon 24-105mm f4L IS
Equipment used for the stills photography:
Nikon D3; Nikon 70-200mm f2.8 AF-S VR II
Nikon SB-910 Speedlight
Thank you, Neil. I must admit that I have fiddled with my BFT when shooting vertical and, despite the wealth of blog entries here (and even your mention of the BFT in your B&H video), I was never confident that I was positioning it correctly. This clip clears it up, especially seeing how the BFT is often rotated to keep flagging the flash.
Well done!
Glenn
Awesome, thanks Neil! I gotta start using 2 hair bands, details, details :-)
Do you have a pull back of the room? I’d love to see how big the space was, and what/where your light sources were.
Thanks for the helpful tips on the foamie thing!
Hey Neil,
I totally love the video blogging. It’s a great step in the right direction. it really helps us to connect with you.
I’ve been using the black foamie thing forever and just love it. It’s so versatile and helpful. Thanks so much for writing about it so many years ago.
Luke
Good to finally see how to use this technique. I think I’m going to try the felt option, it looks so easy. Thanks guys.
Interesting. I found a great alternative about a year and a half ago. I started using a beer koozie but the round snoot it created still threw light forward. The back side of the snoot would light up and be enough to cause a strange catch light. I decided to cut the “back” side of the koozie out so the part of it that stuck past the flash looked like the BFT. Since it has it’s own built in band it rotates upon the flash head easily and doesn’t come apart like the hair band and the BFT does if you are not careful.
I use the thin black neoprene koozies you can find at any trade show or gift shop. I acutally ordered 100 for dirt cheep with my logo. I’ll never need 100 but I can give out the rest to clients.
First-rate video, Neil — thanks so much. The difference between the images is obvious, but it might be cool to A/B the shots to really show the contrast.
Martin
Thank you for the video blog. Seeing how you use the BFT in action helps me understand how to use it more effectively. I especially like the comparison image, so we can see how much difference the flag makes compared to the direct/bounce flash.
This video is excellent in demonstrating the use of the BFT and showing what an image looks like without the BFT. A picture is worth 1000 words, so the saying goes.
I love the outtake video. You need to add the “beep” between outtakes. :-)
Finally! I know what your accent sounds like now! I can rest easy now… ;o)
Thanks again, Neil, for sharing the love and paying it forward. I always wondered if I was doing the BFT thing right, and apparently I am! Woo-hoo!
Neil,
I’ve read about this on your blog many times but the video helped me understand it more than I have in the past. Thank you for taking the time to share this.
That video was fantastic. I find watching video more helpful many times than the written word because it’s just so much clearer to see a technique in action than to read and imagine what it’s like.
An outstanding video of a most important item. The black foamie thing has a cult following and this should add to that legend.
Thank you for this Neil.
I laughed so hard at the outtakes video I might have woken up the neighbours. I like your post processing, it almost looks like a painting but not quite. Nice model btw :)
Great video Neil, keep them coming.
Loved the video Neil and agree with the others that say you should make more. I read this blog daily and really enjoy it. I have learned so much from you. Thank you
Thanks for the video Neil. I was wondering if you have a shot with no flash. It looks to me like the lighting from the live video is close to lighting from the still shots with flash.
Thanks again
Thank you so much for your reply, Neil! Appreciate the extra info!!
Very nice, Neil. Similar to the guy in the other video, I use velcro strips on my black foam. That lets me also use the foam as a regular flat flag for the times I use a speedlight as an accent light.
Hi Neil…what’s creating the distinct catchlight in her eyes in the image in which you used the BFT to flag direct flash hitting her face?
Thanks for the video Neil!
BH Photo has a video presentation titled “Just Gimme the F Stop” by Neil Vn, for some great information on using on-camera flash w/ the black foamie thing.
Look for it in the video section of the website.
Great article. Finally some footage to look at the black foamie usage.
Enjoyed the video and hope to see more on your blog. I was wondering what were your camera settings – aperture, shutter speed, ISO, white balance setting and were you shooting in JPEG or Raw?
Neil, All I am going to say is THANK YOU!!!, You Rock Bro!!!
Neil, I like video clips. It is more than a blog of thousand words! I have just ordered your second book from Amazon. I must still wait 20 days until it gets in Belgium!
I have learned a lot from your site and used the BFT a few years.
I already knew how it works but for a lot of us they will understand it better when they see it.
I hope you keep on making this video’s so whey can learn more
Thanks thanks thanks!!!
Evert
Thanks for the video!! Nicely done!
Karla
Hi Neil, here is how i adapt your foam to me.
Hope you enjoy it
Neil – I thought at one point you noted why you chose to NOT use a (very) short snoot to accomplish the same thing that the BFT does. I couldn’t find it. Could you add it to this entry or the original ‘text’ entry? I think that completes the article. When I read this entry, I thought, ‘If all we’re trying to do is to prevent direct flash falling on the subject, couldn’t we also use a short snoot? That way we don’t have the problem of having to adjust the BFT position…’ Thank you for all you do :D
Hi Neil
This is excellent !
You should do more videos..it certainly worth more than 1,000 words.
I am waiting eagerly for your books…still in transit.
Thanks
Hi Neil,
Great video! A few questions…
What tickled Anelisa at around 2:05 so that she almost laughed? :-) She has a beautiful smile! Can understand why she is one of your favorite models.
The next question is meant in a constructive way. That means, buckle up your seat belt first, before reading on! Kidding :-D
I noticed the stills in the video, appear a little less saturated, than when shown on your blog, is this due to the video software not liking an embedded adobe colour profile? if so, for future videos, would it help to produce sRGB versions of the stills, for video use?
Definitly keep the blooper reels! thank you for really made me smile, (as mentioned above) bleeping the words could be a good idea? suitable for all.
I think Jim’s “Felt” idea is good, wonder how it would hold in windy conditions?
Lastly…
Can Anelisa feature in future videos, is there a petition I can sign? :-D
Once again, great video!
PS: Unless I’ve missed it, are your UK dates finalised yet?
Thank you,
David
Hi there David …
I don’t recall what made Anelisa laugh at that point. The entire session with her was for three hours, during which we shot this video clip, as well as two other sequences I photographed (stills only) for blog postings here later on. And we’ve worked together often … so there’s an easy and casual way how she and I work together. Lots of laughs.
Why the video should be so much desaturated, I don’t know. It probably has to do with compression that Vimeo applies to the clip to bring it down in size so that it can be streamed. The images shown here are in sRGB and my workflow is in sRGB, so that won’t explain the desaturated appearance of the video.
Neil vN
Thankyou Neil ! Awesome (as usual) ! :)
Which focal length are you using on the flashgun ? (a long one, like 100 mm I suspect ?) Or you leave it in auto mode ?
Is there a lot of difference with respect to a full snoot (provided your bouncing spot is far enough from the subject) ?
Thanks
Simone
Neil, not sure how you can use TTL flash and then also say you can force the zoom on the flash to be at 100 or 200mm. I was under the impression that in ettl flash mode the flash also sets the zoom setting which will match your current lens set focal length so….. I’m confused
Or is your Nikon flash able to independently set the flash zoom even in ettl mode?
I’m a Canon shooter and have the 430 EX II and the Phottix Mitros+ speedlites.
I realize you need to zoom the flash out to the longest setting to get the most power out of it.
Do you always have your flash set top the longest zoomed setting, or do you ever zoom it back in to a medium setting like 50mm/35mm??
I just watched the “gimme the f stop” video. What an amazing class. I also love your video tutorials. Hope you can do more of those to expand on other topics.
Thanks
Keep up the great spell.
U rock neil! Love the video idea.
What an awesome video Neil, thanks for sharing such an articulate and clear video! It definitely works better than just words. Your articles and tutorials in this website have helped me tremendously in my work, be it shooting fashion or weddings or just events. Once again, huge thanks.
Hi Neil,
Thanks for sharing this video with us – just makes everything so much easier to follow – love the bloopers.
Cheers, P:)
GREAT stuff Neil! Super glad that you took the time to do this and I hope it’s the first of many. A picture tells a thousand words, imagine how the message comes across as a video :)
Nice
…and the Oscar goes to “OMG” Neil van Neikerk for the Black Formie Thing (BFT)the movie. Great video. Blessings, Gregory
Hi Neil
You rock man. Your tutorials are so great and they are helping me so much with flash photography. Yhe bft works amazing. Could you start giving us some more video tutorials pls.
Thanks
Neil….Your short clip on the Black Foamie Thing was really great….Please do more of these short videos….Thanks for all you do in helping us amature photographers becoming better….
Hi Neil
Fantastic. This short clip is better in everyway than 95% of the “educational” stuff out there. This should be a chapter in a full lighting dvd (hint hint).
You’re the full package: – book – tangents – forum – video – feedback. When combined, in my opinion, provide the most complete learning experience on the web.
Again, Thankyou.
For those new to tangents, remember to read through the comments after each tangent. The amount of valuable information and knowledge that can be found there is priceless.
Outtake video – Is it “it is” or “I am” (followed by a long period of contemplation). Gold!
Regards
Chris
Hi Neil, I noticed that when I tried using the black foamie thing because there’s not direct light from the flash hitting the subject there is also a lack of catchlights, yet when I see your examples there is always a catchlight in the eyes. Am I missing something?
Cheers,
Bernard
Great video keep them coming. Wondering what equipment was used for the shhot. Was it a video recorder or the now popular digital camera that is able to take video ??
When I attended your workshop 2 years ago in Hoboken I was introduced to the black foamy thing. I recall that it was attached to the TOP of the flash head yet in the video it is attached to the bottom. Is that a change in technique ?? Have you thought of using the felt material as featured in the second video ?
I received your second book, OFF CAMERA FLASH. A portion of the book is taken from your PLANET NEIL blog that I read every week with a passion. You have put together a great book and I am approaching that AH-HA climax !
To bad that you could not have covered the new Pocket Wizard Nikon units that are now finally shipping. I am awaiting for your review on these units that add to the Nikon experience. I am also awaiting your Pocket Wizard video shoot from Vegas.
This is amazing, thank you for this idea! Excelent! It’s very funny the last video, superb post! You are the best!
Thanks for this! Look forward to more video tuts as well. Great job! Anelisa looks great in video too. :)
On the black felt recommendation: Due to my inability to navigate a craft store, I had actually picked up black stiffened felt on my first search for the BFT. But still attach it with black hair bands. Stiffened felt is very easy to slide around on an SB unit, as opposed to felt, and in practice has been even quicker than velcro. (For me, anyway.)
Appreciate the outtakes too. Hilarity.
I’ve been using the BFT for the last couple of years and love it. I was intrigued by the suggestion to use felt, so I went to the local Michael’s store and picked up some regulr felt as well as the stiffened felt I discovered there. However, I found that both of these alternatives were not completely opaque, i.e., there is still some light coming through, whereas the foam is completely opaque. Would love to hear from anyone whose using it what type of felt they are using if they’ve managed to find a completely opaque version.
Hi Neil! You just made helped me narrow down on which light to buy as a starter (among speedlight and strobe). Considering the severe cash crunch and desire to do varied experiments, i was really struggling on which one to go for which can solve lighting problems in every situation at least to a bare minimum level. Thankyou so much for this wonderful post. Keep up! :)
Hi Neil,
How about a White Foamie Thing (WFT)? Would the color of the “thing” make a difference?
There’s a specific reason why I don’t use a white bounce card or white piece of foam.
You also have to keep in mind that the black foamie thing isn’t a diffuser. It’s a light modifier, but only in the sense that you block the light / flag the light. Nothing more to it.
But where the black foamie thing is different from the generic / plastic light modifiers and diffusers, is that it isn’t a cure-all for flash problems. You absolutely have to consider your direction of light, and what exactly you want to achieve with your flash.
It’s a super-simple device, but it isn’t simple in its application. You *have* to think about direction and quality of light. And that is where it shows its real value, in my opinion.
Hi Neil .. I have been checking out your tangents for sometime now, and all i wanna say is that the photographs you have taken are just magnificent, maaaagnificent, your shots just stands out. Love your work
I have a question though.. Im an amateur in photography but i know the basics .. how do you take your photos so clear and sharp?
and im kind of upset since upon editing my photos it looks different in some monitors. is there any technique of saving the images?
Thanks
Hi! I just wanted to thank you, yet again, for wonderful demonstration and for being so candid!! I just love that you’re not only willing to share the good, but the bad…which is really funny and endearing! Please don’t ever change!
Thanks!
Hi Neil
Thx for the video – it was good seeing you demonstrate. I know you have shown in photographs, but the video just gave an added dimension.
An aside: Living in Australia, never having the opportunity to meet you, and following your blog for years it was also good hearing the accent that went with the face. Also knowing how to pronounce your name – silly I know.
Thanks for your generous advice. Look forward to getting your new book
Neil,
I’m surprised that you have such nice catch lights in the eyes using the BFT. Did only the bounce flash create them? Very nice work and thank you for sharing. Rock on.
Hello Neil,
I am already using a white foam reflector to bounce off of walls and ceilings and still throw some light directly toward my subject. Could this white foam also be used in the same manner in which you use the black foamie thing?
Neil,
Great video (and the rest of your blog– I’ve learned tons from it over the last two years or so.)
Every time I think about the black foamie thing, I consider using a short snoot or one of the honl Velcro grids instead. I haven’t experimented with them yet, but could you comment on how the black foamie thing would compare to either? I suspect with the snoot/grid, you would get less spill behind you, but that shouldn’t matter too much and with either the grid or short snoot, you wouldnt have to reorient the flag as you moved around. Thoughts?
Thanks!
-Ben
I see there is another (and way bigger) problem when you have your light bouncing the wall AND leaking from on camera flash directly to the subject. It’s different temperatures. And no matter if you gel your flash or not – it is there. Because the wall always has non-neutral grey color – a gel over the flash will make your light warmer or cooler (depending on specific gel used) but will never give you the same color cast as the wall has. So, the wall has it’s own color cast (correctable in RAW workflow in most cases) but when walls’ color cast is mixed with direct flash (having no color cast it is basically corrected for warmth) we have a wild mixture impossible to be corrected in normal RAW post.
Effectively, we have two light sources of different colour. That’s the biggest problem.
Just made my first BFT! excited to be using at my wedding today! thanks for all of the awesome awesome blog postings!!!
HH
Nice outtakes ;) I’ve been meaning to experiment with a BFT with a white (or partially white) inside. I invented the “Chickenflash” (a.k.a. FUF, a.k.a. FU Fong) not too long ago. It’s a latex glove with a balloon inside. Downfall is that, after it’s attached, there’s three layers of latex that I feel block too much light, wasting power and slowing recycle time, and it’s difficult to keep attached (it likes to fly off around the room, like a chicken that can fly). I’m a big fan of $2 solutions though.
Hi Neil,
I have been following your blog and purchased your book as well. Your teachings have had a large effect on my photography. One question . . . when using the black foamy thing for a wedding or event, my cameras hot shoe becomes loose from all the twisting and turning. I do tighten up the screws but it seem like a matter of time before permanent damage is done. Is there any special way that you reinforce the hot shoe? Larger screws? super glue? all of the above? . . .
Thanks
Dave
Neil,
I notice you do not use a flash bracket on your camera. i just got my first ttl flash and purchased a bracket with a sync cord as well. Using the bracket when I turn the camera vertical I can adjust the flash to still be over top of the camera as opposed to the side. Is this even necessary or is attaching it to the hot shoe directly and using the black foamie thing all that needs to be done. Also does this make any difference for outdoor vs. indoor.
Daniel
Hi Neil,
I finally sourced a local supplier which stocked ‘black foamie thing’ material……with a minute or two of trial and error it’s working 110%.
For followers of the Neil’s blog who live in Australia, I found Clark Rubber had the goods, 3mm black Closed Cell Polyethylene Foam. I bought a sheet of 1×2 feet for 5 dollars.
Thanks Neil for all your help.
Peter
Can I just say…. COOL POST!! Not only because you posted the detailed video for the black foamie thing AND it’s uses but also because you posted the additional video for velcro and felt. YOU ROCK Neil!!
You might be surprised to know I am writing to you from Bangladesh, a small south-Asian country! Do you know about us? Neil your BFT idea is like, I would say, a revolution to me. Lots of thanks for the tip. I have one simple question and that might also occur in minds of many who read this article. The Bft, should it be a real foam (the ones found in the market in usually 10-15mm thickness, not completely solid and should be able to pass light) or should it be a solid sheet of rubber, something what a tyre is made of?
Neil, I’ve got two of your books, and found them educational. Thank you and congratulations!
Tried doing a BFT but don’t know where to get the foam. Thus, used a thin, black mouse pad, cut it, super glued the velcro with the rough side on the outer part so as not to scratch the flash. Since the smooth part is inside, it is easy to twist around. Here’s a shot of my version of BFT ==> https://twitter.com/Gina_Alcera/status/148056957935288320
And my test shots ==> http://twitpic.com/7v17g1
Again, thanks so much for sharing!!!
Hi Neil. Excellent and instructive. Is there any reason why one should not line the BFT with some white foam or some foil to push a little more light onto walls etc?
This is great, but what do you do if there isn’t a conveniently placed and correctly coloured wall to bounce the light off?
Then you will just have to find your way around that limitation / challenge.
Hello Tell from what it stelana – black foamie thing?
Great video. Thanks for sharing
Holly crap, after watching the video I get it, I really get it. Love it. I have had your book in my wish list for a while, time to order.
Can you please state the size of the foam you use ? I’m not native english speaking and I just can’t understand what you say in the video about inches (I have to calculate to cm / 1 inch = 2.54 centimeters). Thanks in advance.
PS: I using FoamRubber/CreaSoft from wwww.KnorrPrandell.com (1 sheet ~1.20€):
Hi Motombo;
I have the piece around 19cm [7.5 inches] x 14cm [5.5 inches] which fits an SB900 flash, giving around 5cm [2 inches] hanging out from under front lip of flash but there is still plenty left to bring it out further still.
The width of 19cm fits perfectly around bottom of flash and covers the sides of the flash with a just a very small amount going onto the top of the flash, around 8mm each side.
Trev.
those images are stunning, i learned a lot form your website Neil, so this kills the practical purpose of LumiQuest 80-20 Flash Bouncer which provide fill light directly (20%), i wonder how she got this catch light by using black foamie thing
bounce flash & catchlights
I’m a BFT beginner and I love it. This is one of the best flash tips ever (saw it in one of your B+H videos). Easy, light, cheap, robust and always with me know. And the results are amazing :-). Thanks you so much.
I think I’m going to try to felt-line my black foamy thing for a hybrid.
Hi Neil first off I bought two off your books and love the way they written and simple to understand. My question here is I am going to buy the rogue flashbender which I believe does the exact same thing as the BFT right? My question is if you are in a large hall and can’t bounce the flash with rogue flashbender up close and curved on top forward would angle the flash slightly away from the subject (right or left) to create shadow or straight on?
Hi there Sean
You need to be very sure what the BFT does. And what it doesn’t do.
It isn’t a diffuser. It’s a modifier, because it is used to flag the light from your flash.
So the Rogue FlashBender might do what the BFT does … or it might not.
It depends entirely on what it is you are doing with the FlashBender.
I suspect you aren’t entirely clear what the BFT does, when you say: “if you are in a large hall and can’t bounce the flash with rogue flashbender up close” … because this is not what the BFT does. It’s not a diffuser that throws the light forward, like you are describing here with the FlashBender.
With that, I am not entirely sure what you mean (or intend) by angling the flash away from the subject?
Sorry what I meant was actually two things. The small flash bender seems to do what the BFT does as a flag. Because it is easier for me to attach I was asking they should accomplish the same thing right? They look similar.
On the hall what I meant was if you are in an area that is large and you can’t bounce light what would be the best option to use as an on camera diffuser in your opinion. Lightsphere or flashbender?
Thanks
Sean, I wouldn’t recommend the Lightsphere. There are other light modifiers that are more versatile, and do a better job. The Lightsphere scatters light all around. The FlashBender allows you to direct the light forward.
How would you orient that flash if you were doing this in landscape orientation? Thanks
I think I got it….you’d point it to the same place, whether portrait or landscape. Is that correct?
Exactly. You’d still point your flash towards the direction you want your light to come from. And you’d shift the BFT accordingly.
I think I have spent a lot of time going over your tagnets a 1000 times or more. One thing I really like is the black foamie thing but I don’t think I have ever seen the spots you have bounced your flash off of. I know every place will be different but it would be nice to see samples of the whole set up from walls, ceilings, size of space or even the color of the walls or ceilings you are bouncing the flash off of. Is there any chance you can show us everything and if you do bounce it off walls or ceilings of different color how do you correct it in post. Thank you for sharing everything that you do with us as you help us more than anyone I have seen on the internet and make it easy to understand. Wish I lived close to where you hold your workshops but living in Canada it is just a little to far to travel to them….lol
Thank you for sharing all your knowledge with us it means a lot………
Try and ask a photographer here were I live nd it is like I asked for their spouse and kids……….lol
Where it is relevant, and I was able to take an appropriate pull-back photo of the scene, I do include this as relevant info. So what you have here at the moment, in all the articles, is what I have to show.
That said, you really went through all the related posts on bounce flash photography, and found no examples? Nothing?
So much has been said already – all I can say is thanks very much and now I have a packet of 20 hair bands and I can now think of growing my hair long before it all disappears to ensure I get full value. Great work Neil!
I don’t know why I have never come across this before. Interesting, and I will try it. I have a question though. Given that this is to flag off any light towards the subject, if the flash is being used to bounce off a side wall, would a honeycomb grid fitted to the flash do the same thing?
It would give a very similar result, but may eat too much of the light. Definitely worth experimenting with.