
Lighting for on-location photo sessions – pick your battles
When doing a photo session with a couple on location, I mix up the lighting as needed. Some sequences are shot with shoot available light only; for other sequences I may use off-camera flash with a softbox. Sometimes I use on-camera TTL fill-flash if that helps working faster.
Even in varying the way I may use the available light and flash, I still aim to have a consistent look to it all. My specific style has to be apparent. Or perhaps, in the way that I work, my style becomes apparent. The one way that I help make things easier for myself, and remain consistent, is that in working with the available light; or working with the available light and flash (both on-camera and off-camera) … I pick my battles. I don’t try and make *everything* work. Rather, I specifically choose where I pose a couple, or what I have as the background. All of this in relation to the existing light and my flash.
- camera settings for the image above: 1/250 @ f/4.5 @ 100 ISO … TTL flash, off-camera
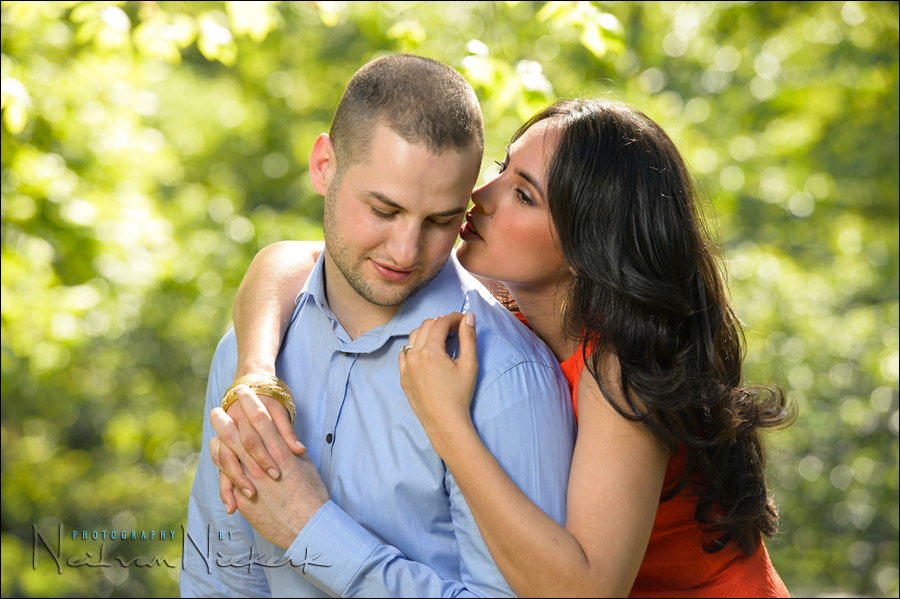
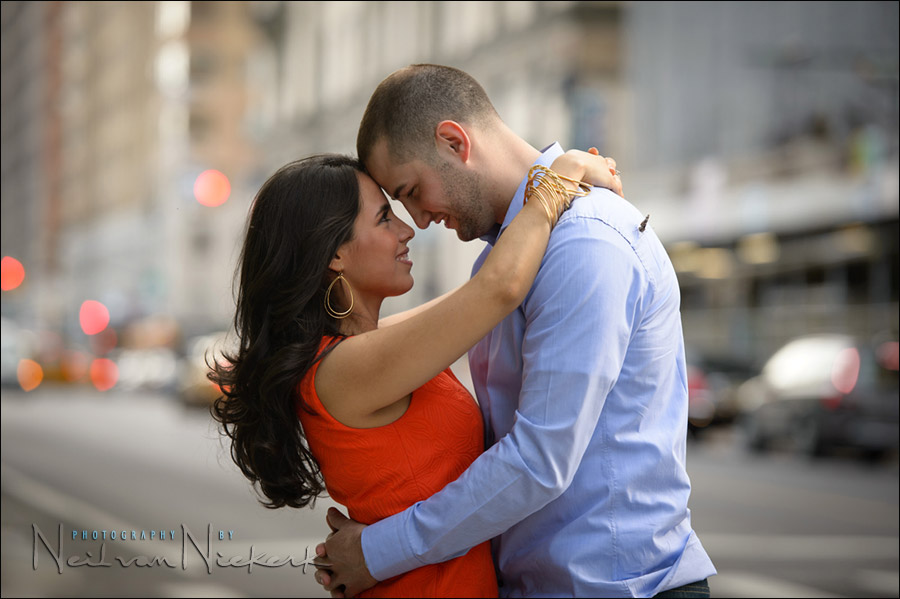
With these photos of Licet and Daniel, taken at different spots in Central Park in New York, my approach was the same – shoot against a background that is back-lit, with parts of it blowing out. Then I use off-camera flash with a softbox to bring the expose of the image up to the correct level. The softbox helps give me studio quality lighting on location, pretty much every where I place the couple.
- camera settings for this image: 1/250 @ f/5.6 @ 400 ISO … TTL flash, off-camera
By turning them against the light from the sun, I get some rim-lighting, and I let the TTL flash pick up the exposure. In this photo, parts of her arm is over-exposed, but this doesn’t bother me. It is more important for me to capture their expressions and how they interact with each other. At some level it is even more important for me to keep the flow of the photo session going, rather than micro-adjusting my settings and how they are positioned.
Photo gear (or equivalents) used during this photo session
- Nikon D4
- Nikon 70-200mm f2.8 AF-S VR II / Canon EF 70-200mm f/2.8L IS II
- Lastolite EZYBOX 24×24″ softbox
- Nikon SB-910 Speedlight controlled by PocketWizard FlexTT5 Transceiver & AC3 Controller
or alternately, the Canon 600EX-RT Speedlite controlled by Canon ST-E3 Transmitter
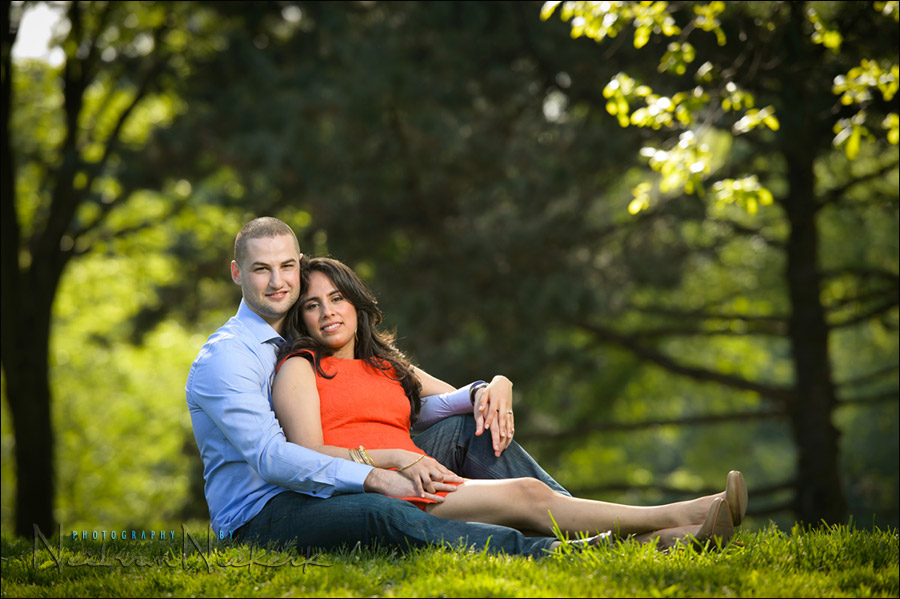
With this image, the compression of the 70-200mm lens at the longest focal length, helped. There were also groups of people in this part of Central Park, but by laying down on the ground and shooting up, and using the long lens, I was able to eliminate distractions and simplify the composition. This way, it looks like they were the only people there.
The long lens and off-camera flash help to give the photographs some snap.
- camera settings for this image: 1/250 @ f/4.0 @ 200 ISO … TTL flash, off-camera
For all three preceding images, the exposure metering for the background weren’t too specific. There’s about a 2 stop leeway in terms of what would’ve looked good. So if a test shot looks good, I’m happy. I don’t drive myself nuts trying to meter for a background that has large bright areas. They can blow out.
Then I let the TTL flash take care of the exposure for the couple. TTL flash really helps in making a photo session in various locations move faster.
While looking for interesting backgrounds and good spots for the images, I am very aware of what the available light is like … and if it works, and I don’t need additional light from my flash, then even better.
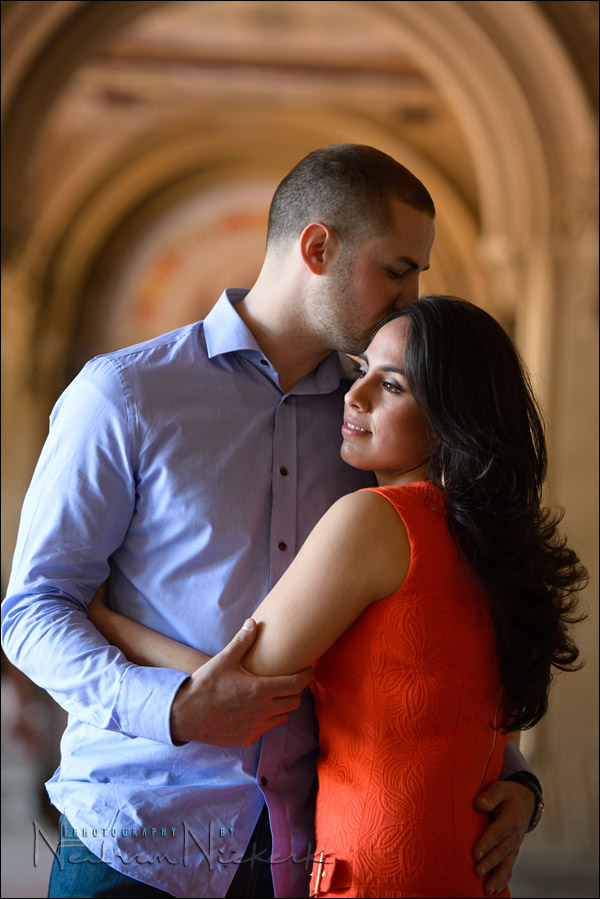
Here I had Licet and Daniel under the arches at Bethesda Fountain. The available light is coming in from a perfect angle. No need to do anything to the light.
- camera settings for this image: 1/250 @ f/4.0 @ 400 ISO … available light only.
Deeper in under the arches, the light is very even. But the light levels are much lower.
- camera settings for this image: 1/125 @ f/3.5 @ 1000 ISO … available light only
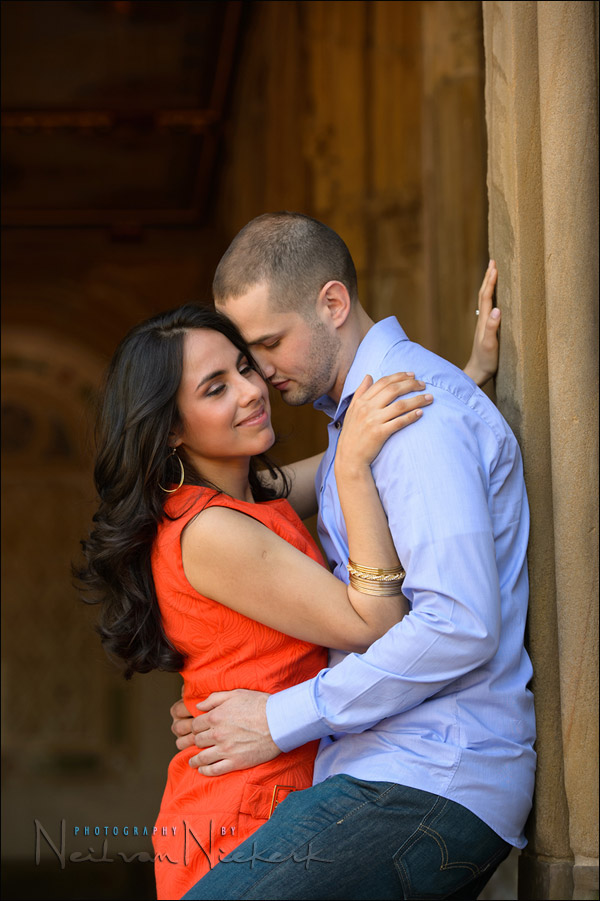
Posing Licet and Daniel at a 90 degree angle to the direction of the available light, gave more dramatic light. But it did need subtle posing to make the most of it.
The photo above is one of the two images I selected from this sequence. The image below is one of the steps working towards this. I liked the light, but Daniel’s shoulder was blocking the light on Licet’s face. So with that pose, I quietly asked them not to move … don’t change a thing … then I told him to pull his shoulder back by an inch or two. That subtle movement opened the light on her face. Perfect.

- camera settings for these images: 1/100 @ f/2.8 @ 1000 ISO … available light only
- Nikon D4
- Nikon 70-200mm f2.8 AF-S VR II / Canon EF 70-200mm f/2.8L IS II

Direction & Quality of Light
I wanted to distill the essence of what we, as photographers, work with – light! Before we can truly grasp on-camera flash and off-camera flash, and really, any kind of photography, we have to be aware of the direction and quality of light. We need to observe the light that we have, and then decide how best to use it, or enhance it.
With this book, I try my best to share those “aha!” moments with you, and I do believe this book can make a difference to your photography.
The book is available on Amazon USA and Amazon UK, or can be ordered through Barnes & Nobles and other bookstores. The book is also available on the Apple iBook Store, as well as Amazon Kindle.
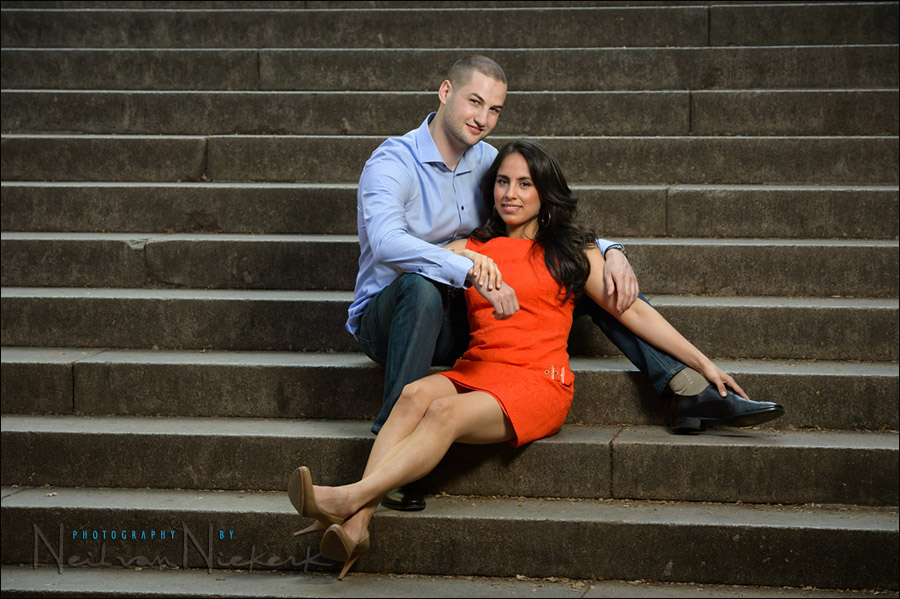
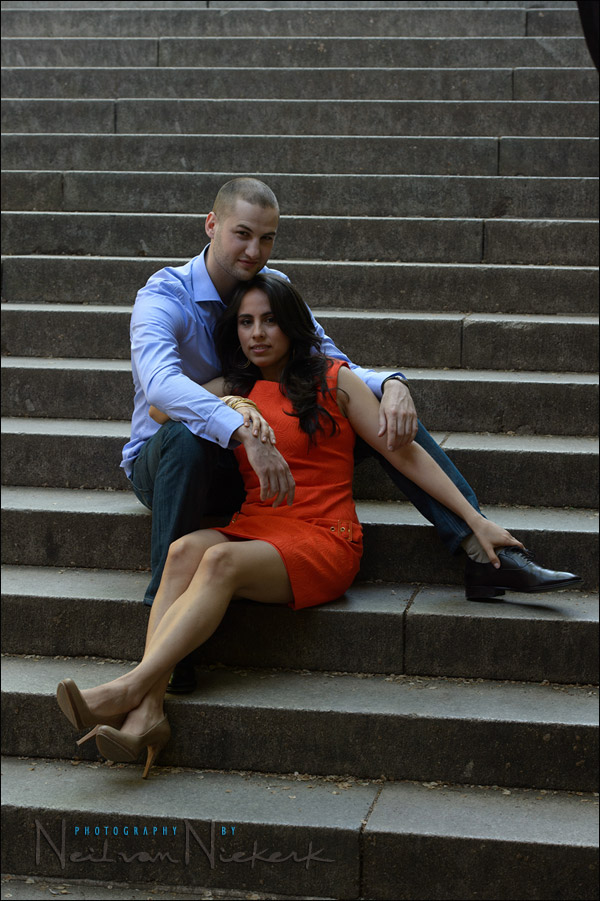
Again, with this image on the steps, I used the longer focal length to eliminate clutter, and simplify my composition.
In posing them, I started by positioning Daniel … and then adding Licet, by having her lean against his leg. I usually start with only one person first, when I pose a couple. Then I add the second person.
In terms of lighting – simplicity again. It’s a Lastolite softbox and a speedlight. I used TTL flash.
- camera settings for this image: 1/200 @ f/6.3 @ 800 ISO … TTL flash, off-camera
- Nikon D4
- Nikon 70-200mm f2.8 AF-S VR II / Canon EF 70-200mm f/2.8L IS II
- Lastolite EZYBOX 24×24″ softbox
- Nikon SB-910 Speedlight controlled by PocketWizard FlexTT5 Transceiver & AC3 Controller
or alternately, the Canon 600EX-RT Speedlite controlled by Canon ST-E3 Transmitter
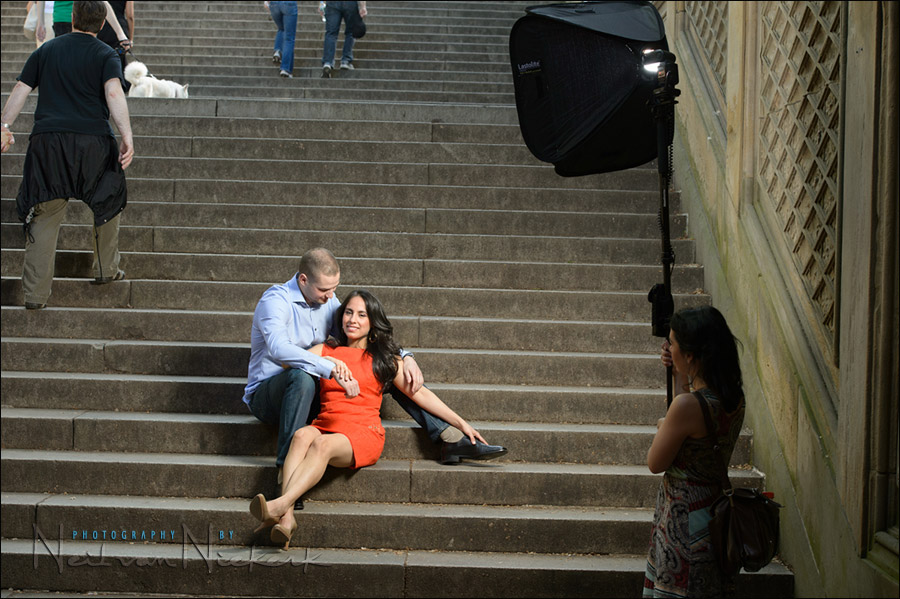
Here is the pull-back shot, and the photo without flash, just for comparison.
From Central Park, we explored a little bit of the Upper West Side, visiting the areas they know, as a backdrop to their photos.
The main idea here in this article is that, while I look for variety in the images I give a couple, it works in my favor if I keep it fairly simple and consistent in terms of my lighting. The simplicity helps me in working faster. The consistency helps in maintaining my style.
I’m able to keep it all quite consistent, by specifically “choosing my battles”. I don’t try to make everything work. I just make about a dozen setups work, with different angles and poses … and then move forward.
Photo gear (or equivalents) used during this photo session
- Nikon D4
- Nikon 70-200mm f2.8 AF-S VR II / Canon EF 70-200mm f/2.8L IS II
- Lastolite EZYBOX 24×24″ softbox
- Nikon SB-910 Speedlight controlled by PocketWizard FlexTT5 Transceiver & AC3 Controller
or alternately, the Canon 600EX-RT Speedlite controlled by Canon ST-E3 Transmitter
Related articles
- Top 5 tips on shooting engagement photo sessions
- Posing normal, everyday people for portraits
- The next step – going beyond just posing people
- The flow of a photo session
- Making your images pop – through choice of lens
- Technique – using lens flare for effect
- On-camera TTL fill-flash
Thanks Neil . Great articles . I want to ask about the other softbox. The Impact quickbox, looks just like the ezybox and costs less. Are you familiar with it ?
I actually recently received the Impact 24×24 Quickbox for review purposes, and it looks good. I’ll post a proper review in the next few days.
Awesome and Stunning photographs! Your photographs have a 3-D effect about them.
All this does is make me even more excited about my shoot with you in October!
Great work Neil, as always.
Wow, Neil. These are great. I find reading your blogs on the actual shoot and how you did these shots including your thought process very informative.
One question about using on camera flash outdoors for fill, do you use any type of diffuser, or do you use bare flash dialled back so it doesn’t over-power?
Many thanks,
Gary
Hi Neil,
Would a shoot-thru umbrella give you the same effect as the softbox? I’m torn between umbrella and softbox and not sure when you would have a preference for an umbrella over the softbox.
Thanks so much.
Lovely, especially the last one. The shallow depth of field and bright background give the impression that they are alone in a city of millions.
I have been thinking about soft box vs umbrella also. In reading reviews of the ezybox, seems many people are unhappy with how the whole thing is difficult to secure on a stand. Any suggestions?
Another question: ISO choice on natural light makes perfect sense to me, but I still get confused about the effect with flash. Can you walk me through your ISO choices with the off camera flash?
Hi Neil,
Many thanks for your reply. I know that I read it in your book but just needed it confirming in case I misunderstood. I was thinking of getting the soft box for the on camera flash but as my wedding photography has me indoors one moment and outdoors the next changing from the soft box to the “black foamy thingie” would be time consuming. And I hope you would never consider replacing the black foamy thingie as it is so great and has made my on camera lighting a joy (unless you have to hold the camera upside-down to do a portrait and bounce the flash to your right.)
As always many thanks for your knowledge and sharing.
Regards,
Gary
How much does a permit cost to shoot in CP ?
Neil, I love your softbox-flash technique. Could you tell me what monopod you are using with your setup? I have a heavy Manfroto that is rather unwieldy for this kind of use.
I use the Manfrotto 680B monopod, but there are other monopods which might be slightly lighter.
Great images as usual Neil.
In the top three photos, it seems you have placed your subjects in such a way that they are being hit in their backs by either dappled or full-on sunlight. Am I correct about this? Do you find this gives better results than framing the shot similarly, but with the subjects positioned so that they are shaded from a direct blast of sunlight to the backside? I ask because I’ve found it difficult to avoid having a rim of blown highlights around subjects’ head and hair (and, depending on how the subjects are positioned, additional parts of the face) when I allow direct sunlight to hit my their backside. If I try to prevent said problem by bringing ambient exposure down (by stopping down a little and applying more flash power to get correct subject exposure), I end up with a background that is too dark. Your thoughts? Thanks for any insight you may offer on your approach to this…
Dave
Hi Neal,
Thanks for a great article. I’m a bit puzzled on the photo with the couple on the stair, why was it shot at ISO 800, f/6.3? Why you didn’t choose to go with bigger aperture and lower ISO. Could you walk me through your thought process?
Jan
This is very useful information. I am just starting to learn more about off camera flash and I will put some of these tips to use! Thanks again!
Dear Neil,
This is a question about depth of field with the pictures in this shoot. How far back are that you are getting both parties in focus at f-stops of 3.5. I see you are using the 70-200 when I’m at 200mm I perhaps an inch of play, are you shooting at a shorter focal length? Are you further than I imagine?
I was just wondering how at longer focal lengths you still seem to get everything so sharp at wider apertures, like the ones you posted in this post, while I seem to be limited to very shallow depth of fields when racked out to 200mm, even when I open to f11.
How far back are you? where do do you place you focus points?
Please help I’m running into serious issues when shooting more than one person at 200mm.
Thanks.
Neil,
How often you work with assistant on this kinder of sessions?
Most times. They obviously help with off-camera lighting. Also, an assistant frees me up to shoot, because they will carry gear.
Neil,
With photographing red dresses, do you ever have issues with the red channel blowing out? I experience this a lot, and I’ve seen similar complaints elsewhere.
If you have the problem, how do you address it (in camera or in PP)?
With the RAW converter I have, I can only try and fix it by reducing overall exposure, or by adjusting the red channel and messing up the colours. Neither is ideal.
I don’t have Lightroom to do local adjustments.
Red does blow out quickly.
Best way to control it – use Adobe RGB as your color space.
Also, I use the local correction brush to do a minor sweep over the red to bring down the exposure a touch in post-processing. But for this you’d need Lightroom, or Bridge (the browser used by Photoshop.)