my choice of on-camera flash modifiers
There is a fundamental principle in lighting : the larger your light source, the softer your light.
Using any of the myriad of flash modifiers that are on offer, helps in achieving that – spreading the light from the on-camera Speedlight much wider, thereby creating softer light that direct flash would’ve given. However, (and this is a big however), these flash modifiers also throw light forward. Ultimately all flash modifiers do the same thing – they disperse a lot of light around the room, while throwing some measure of light directly forward to lift shadows under the eyes and bring a sparkle to the eyes.
That is a huge step up from using direct flash – (or poorly bounced flash.. ie, flash at 45′ or 60′ forward) – but won’t be as good as directional light. Directional light falls onto your subject from a specific angle. This direction can very often be carefully chosen even when you use an on-camera flash indoors.
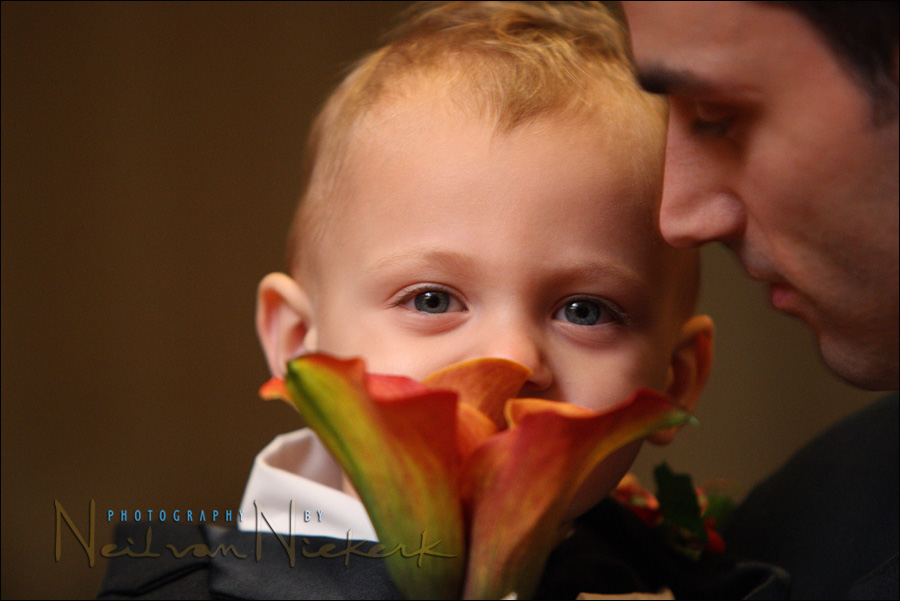
For this candid portrait of the ring-bearer, I touched up the WB in RAW, and that’s that. Simple, and it looks just great. The light is soft, and the little guy wasn’t bothered by any direct flash … since there was NO direct flash at all.
The way I achieve directional light from my flash is by adding what is in effect, a half-snoot on my on-camera flash. The half-snoot (or flag) will partially block the light, and also direct it.
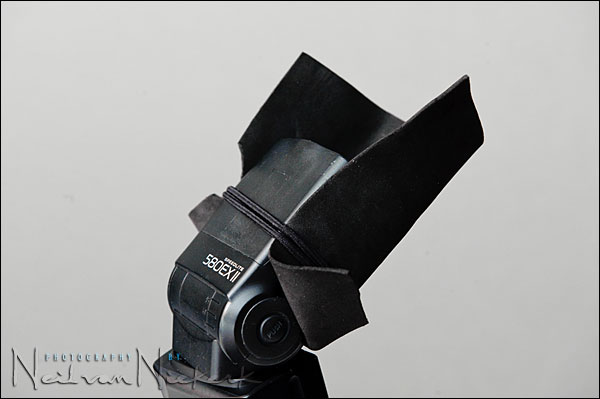
This piece of black foam around my Speedlight has two advantages:
1. Directional light. I can now much more precisely direct where I want my light to come from.
2. Less annoying to others. In turning my flash to the side or to point behind me, I would risk blasting other people directly in the face with flash. This piece of black foam keeps that from happening. I now direct my flash over people’s heads, and I don’t blitz people in their faces with direct flash when they stand next to me or behind me.
To further explain this, here’s a video clip where I demonstrate how to use the black foamie thing to flag the light from your on-camera flash.
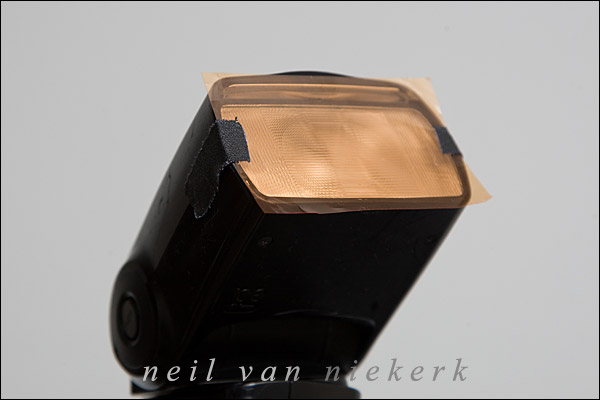
I also very often when shooting in tungsten light, use a filter on my flash to bring the cold light of the flash closer to the warmer tones of tungsten light. I simply stick a piece of gel over the head of my Speedlight with some gaffer’s tape. It is low-tech, but it works.
By gelling my flash for tungsten I change the grungy orange backgrounds to a more pleasing warm tone.
The gel used in the image of the baby above, was full CTS. I keep my camera’s WB to Tungsten. And in post-production I fine-tune the WB, since by bouncing my flash, it picks up an additional color from the walls and ceiling. The gel shown in the illustration here is 1/2 CTS. I then keep my WB of my camera to 3800 K, which is still much closer to Tungsten, than the 5400K of flash.
The black half-snoot / flag that I add to my Speedlight is just as simple. It’s a piece of thin black foam bought from an arts store, and then cut smaller. I keep the piece of black foam tied to my Speedlight with a hair band that I stole from my daughter. Yup, low-tech and simple … and it works!
It can also be manipulated and shaped. Also check out this follow-up article on why I chose a piece of black foam to flag my flash, rather than using something white. And that is the flash modifier I most often use. Total cost is less than $2.00
And there they are – the only light modifiers that I use when I use on-camera Speedlights. In my work as an wedding photographer in New Jersey / New York, I often do use off-camera lighting, whether Speedlights or Q-flashes. But with on-camera strobes, these are the only light modifiers I use. And they are all I really need when working indoors.
gelling your flash
Since I frequently gel my flashguns to turn the WB of my flash much warmer (usually for Incandescent light), I use these gels that I cut up and tape to the top of my speedlight’s head. One of these sheets (which aren’t expensive), will give you a lifetime supply of these filters. For me, these gels are an invaluable part of flash photography.
Tape the gels down on your lens hood when not in use.

Related articles
- review: Best light modifiers for on-camera flash
- Black foamie thing
- Directional light from your on-camera flash
Pure brilliance. Such simplicity. I am a 100% convert to this blog.
Keep it coming.
like it! Nice look and great effect. Do you find that the foam “blocker’ allows enough light to hit the subject in front of you?
By narrowing the flash output you can regain some power änd save your battery.
Wonderful Information! What is the difference between the gel material and the amber stophen and when would you use one over the other?
Hi Neil,
Very impressive !!! Peter Gregg said to check you out, and he was right … you have the touch. I too use a Stofen, and reside in Santa Cruz where Stofen is located. If you ever plan on heading out this way, let me know. Dinner is on me!
best regards,
Craig
Hi, your blog is awesome. It’s truly very informative and helps people like me steal a few paces up the learning curve of flash photography. Thanks. And can’t wait for your next post!
Just echoing what Rishi said. This is a great blog. Thank you for being so generous and sharing your knowledge with us learners.
Neil,
You stated that the for the picture of the baby you used a full CTO gel. Was that to match a different temperature? Personal preference? If you were matching a different temperature how did you come to the conclusion of using the 2900K gel?
Great blog as always..
Brian
Hi Neil, Thanks for your insight.
I shoot a lot of community events (not sporting) in a large gymnasium – pretty high ceiling. Next time, I’ll give the Neil-ized Stofen a try. I have a few questions, though.
-Due to the size of the room, I believe using any stofen would waste all the light being thrown behind the camera. I was thinking of putting black gaffers on the back of the stofen to prevent some light loss. Have you ever tried this? Would this throw too much light directly forward?
Thanks and Happy New Year.
Hey Neil, great article. When you shoot with your black modifer are you using any other room lights? Also, can you give me an idea of what ISO and f stops your using? I’m guessing your maybe shooting at around f4 ISO 1600 or so. I love the effect and can’t wait to try it.
Lance
Hi, Neil,
Thank you for sharing your insights. They are very helpful.
I found a product of LumiQuest ) that shares the fundamental concept of your 40-dollar black half-snoot, although its price tag is no less than yours.
The bonus of its entire system allows you to redirect the flash forward with a (coloured) metallic card attached to the opening end of the hallf-snoot, when the flashgun is directed upward or to the side without too much tilt. It also allows you to further difuse the redirected lights with another screen attached to the opening side of the half-snoot.
I am wondering if such concept is useful when a direct flash is not ideal, when bouncing is not possible, or when shooting outdoors, as well as if this would result in a better light quality than Sto-fen as far as on-flashgun diffusion is needed.
How do you see that the inside of the half-snoot is somehow reflectible?
I used white half-snoot (more reflectible) with a wider opening (less directional) but I love so much you ninja style. I believe your design or adjustment is based upon some experience and renders better light quality. Would you care to share with us the reason?
Many thanks and Happy New Year !
Regarding this:
This piece of black foam around my speedlight has two advantages:
1. Directional light. I can now much more precisely direct where I want my light to come from.
Does this also in effect mean that the required power of the flash could be dialled down slightly as you are not losing as much light ‘around the sides’, or negligible effect?
Hi Neil, Do you use the H setting of the Canon 580EX? I believe it lowers the output level, but it seems to simplify things. To me, it doesn’t appear to mentioned much, for something that appears to be a useful idea.
Thanks for sharing so many of your techniques with us on your blog! You’ve helped me learn so much about using my Speedlight effectively and making flash not look like “flash”. Perhaps I will see you in August when you come to Toronto.
I love the half-snoot idea of not blinding people! I’ll have to add one to my arsenal.
I still had a question about the situation of a venue having high ceilings or the walls/ceilings being strong colours. You’ve shown us that you’re using a Stofen with the gel; would you actually shoot the flash head straight forward in these situations? That brings us back to the direct straight-on flash that we all despise, but how do you still keep your classic Neil-styled captured light and shape?
Thanks again for your willingness to help and all your advice over the years.
Hi Neil, I just bought a D300 and set my in-camera flash settings to 30 and 320 but now when I put the SB800 on, it always indicates that it is in FP mode. I thought that it would only go in FP mode when you set your shutter to 250 or higher. What am I doing wrong or is there something wrong with either the flash or the camera?
Thank you for all the info—-I have hit sooo many ahaaaaa moments reading your blog!!
Fran
Neil,
I really like your sharing of flash techniques. Thanks so much. I love your tips.
Cheers,
Godfrey
Just found this blog via a flickr group. I love it. The info. you share is so helpful. Thank you so very much!
FANTASTIC blog!! I Have leart so much will definatly be coming back again and again! Thank you so much for sharing all the tips!
Hi Neil,
Just a quick question, what are the approximate dimensions of your half-snoot modifier. Also, any idea about the thickness of foam?
Neil,
This answered my other question but on the foam, doesn’t the black foam actually absorb some light. Shouldn’t the flash side of the foam be shiny or reflective?
Thanks
Harry
Hey Neil, great tips…amazing tips actually. Rarely I find someone giving so much like you.
I have a little question. I tried you half snoot and now i get some pop when the flash triggers…I just want to make sure that this is ok and I will not get issues related to this
thank you
Neil,
I’m thinking the same as Harry Simpson above –
If we want to block the light in one direction only, why not have a white or silver coating on the inner side of the foam to minimize loss?
If we want to block the light in all directions except that in which the snoot is pointed, why note close the half-snoot into a full snoot?
Thanks,
Brian
Brian, check out this follow-up article on why I chose a piece of black foam to flag my flash, rather than using something white.
Thanks for the clarification, Neil.
If I understand it correctly, a full snoot if too narrowly focused whereas a silver/white lined half-snoot acts like a reflector card bouncing light too widely. The half snoot allows you direct the light, but still allows a small amount of light to raise the ambient level.
Anyway, your results speak for themselves. This is one modifier I’ll definitely be trying.
Brian
Hi NEIL!
This is India calling. Been sharing your info with my friends in professional photography.
Been going through your blog. One thing that is striking is you are darn Good photographer and more importantly an honest one at that.Rare QUALITY these days.
I would like to know what technique you use when shooting
in halls with extremely high cielings-40′-50′. Ex: Church,Temples etc.
When shootings outdoors at night- EX :parties. We don’t get any walls to bounce off.
Doesn’t the half snoot eat into the flash output?
Is that why you have a quantum 2×2.
Eagerly awaiting your response.
Indranil.INDIA.
this is how light should look in an image…
its amazing how $10 techniques can look almost like shot-in-a-studio….
one thing though
what is a 1/2 cts filter ?
if i go to a shop and tell them that will they understand me ?
they can be a bit numb over here
woz
manchester
uk
I love your lighting mods, but more importantly, I am blown away by your stunning images.
Right now though, I’m inspired to make myself a half-snoot. I’ve got a bounce card / flag, grids, and gel holder already, but I hadn’t thought of using a flag that was black on both sides. I was going to ask you why you didn’t use a white or reflective material on one side, but I found the answer in the comments.
Thanks for all the info you share!
neil,I love everything I see on yr website…thanks
now u have a fan in thailand.
Hi Neil,
I have been using your black foam half snoot for some time now it produce the best looking pics! Thank you very much. However, I have one problem. The flash is always pointed to my left or right shoulder and it’s good for landscape orientation but if I shoot portraits, there will be a huge shadow cast by the snoot. What’s the best way to position the flash so that I can change to portrait orientation on the fly and still get good diffused light?
TIA!
I just wanted to thank you for this post. At the wedding I shot this weekend, using the half-snoot vs. the traditional diffuser made my lighting directional and believable vs. flat and artificial.
I want to emphasize your point of using an external power source for the flash when using this method. I used a Quantum Turbo pack with my flash and am pretty sure that it saved me at least 5 battery swaps during the course of the evening!
Hi Neil,
So let’s say the Flashgun did say FP mode is enabled how do you actually know that it did not go into high speed sync mode when you took the shot?
Why not use a white foam snoot?
It will absorb less light than black foam.
Frank.
Frank … here is a follow-up article on why I chose a piece of black foam to flag my flash.
Hi Neil from the UK.
Is it difficult to cut the hardplastic of the ‘Stofen’?
Thanks for a brill blog.
When using the foamie, should the flash be set to a long or wide zoom range? One would expect to set it manually to longest zoom, but the flash just uses the zoom as if you pointed it forwards.
Hi Neil
One question about your black foam. Do you think it will do a better job if the inner part is white in color (probably a white card)? something like the ultimate bounce card.
Or you prefer it black as you do not want too much light to be reflected?
Neil…I would like to know what size is the black foam sheet you use . Thanks…for your answer and for all the great information on photography you have given us all.
CHUCK, Neil commented in an earlier post the size of his black foam was cut to 7″ x 6″. Neil said;
Ralph,
The piece of black foam is about 7? x 6?.
But I am also hesitant in even saying that, because this article is not about the piece of black foam per se .. but much more about the idea that we need to direct our light. This is about technique, not ‘equipment’.
Neil vN
Neil,
The series of three wedding shots you posted in this thread on September 8th, 2008 are amazing. I am blown away by the 3rd image. Wow.
With the 3rd image, can you share with us;
1.) where you pointed the black foam thingie. As the couple are on the dance floor, I am assuming there wasn’t a nearby wall to bounce off. Would you have pointed it straight up…or behind you?
2.) out of curiosity, could you tell us the lens and aperture you used. Faster than a 2.8?
Many thanks.
Ernst
Can I ask what lens you used and camera settings you used?
Ernst, here is a thorough discussion of this image, describing how to use flash in low light to get great results.
Hello Neil,
Thanks so much for the thoughtful, detailed response.
I have to say I also appreciate the two photographers who have kindly allowed me to tag along as a second shooter. One lives in Chicago (about two hours away) and the other splits his time between Pittsburgh and Florida. Yes, I am driving 800 miles to be a second shooter at a wedding in Pittsburgh! He is an award-winning photographer who apparently has taken pity on me so I might as well grab the once-in-a-lifetime opportunity.
I actually shot my first wedding (as a second photographer) last weekend in a very dimly lit ballroom. Initially, I felt like a duck out of water. And then a duck drowning. The Blank Foamie Thing was my life preserver!
And yes, as you guessed, I was trying to use as low a shutter speed/ISO combination as I could to keep noise down and still let in ambient light. I have another wedding coming up this weekend so I will try bumping ISO to 1600 (if need be) and shoot with a higher shutter speed.
One last quick question for Neil, or others; I am using a Nikon D300 with an SB600 flash. Is the flash powerful enough to bounce light off far away walls, tables, chairs etc. Or is the more powerful SB800 or SB900 desired/required?
Thanks again.
Ernst
Neil,
Been re-reading lots of stuff on your blog today. I read it all when I was starting out, then later when I knew a little more, and now, when I know a little more yet. Each time, as I bring more basic understanding, I get more to take back to the field with me. Hoping to make it to one of your workshops in the fall (my family is still up in NJ).
I do have one question, in the picture of the baby in this post, you have a flash catchlight in the eyes. Is that just from a “hotspot” on the 1/2 snoot or can the baby “see” the tube at an askance angle as it’s pointed away over your sholder? Haven’t played with the half snoot (as I do mostly outdoors work with blanced ambient and off camera flash) but have a family event coming up in a few weeks where I am going to use the snoot. One issue I’ve had using bounced flash (which I learned from you) is that there is often a lack of catchlight in the eyes of my subject. When I have the luxury of posing my subject, I make sure to get a catchlight from a lamp in the room, but during an event when I don’t have control, I’d like to get a catchlight.
Appreciate any advice.
Brian
Neil, first of all those images of the African American wedding are so beautiful-I trust the couple was happy!
Secondly, thanks for your generosity and sharing your thought processes. I shoot theatrical and music events and seldom am allowed to use flash-but, I have been studying, and shots like those above are really inspiring. I love how the stained glass retains its richness. You have a great sense of angles-how’s your pool playing? Thanks again.
Just looked at Amazon about your comming book. How much new information is there in this book with only 128 pages?
i would pay 50-60$ for a *really* good flashbook which covers from newbie to forced user of flash*g*.
nearly all the secrects from flashmaster neil.
i hope that it is a very fine tuning about this blog, not only a rough copy.
so the expectation is very high.
i´ve ordered my version months ago.
i think i have to convert a lot to the olympus system*hear you laughing*, so i did it with planet neil also.
so keep us (not so long) waiting for all surprises.
wish you good luck for your book, a very good start and a lot of fall off money!!
grts
peter
Neil…..Please don’t get me wrong, I already intended purchasing the book for two reasons…One because I enjoy reading your concise flash photography information when I am away and not on my computer and I also would have purchased the book even if it had 128 pages of blank paper just to support your wonderful non-selfish blog. Your blog is the most thorough and informative education for me on flash photography. Thanks for all!!
Hi Neil. I don’t know how you do everything you do, but I was wondering, with the black foam flash angle modifier/director….have you tried, instead, to manually adjust the flash’s zoom lens to the most tele position, so that it will cover a more central area? The difference is pretty noticeable with my Canon 580EX, I have found.
Thank you for your generosity in sharing your knowledge around, Neil.
Regards
Nigel davis
Hi Neil. First of all thanks for the amazing site – it’s both hugely informative and inspiring.
Many people have asked about the material and color used for your snoot, and you’ve patiently answered each essentially saying that it can’t be white because despite the extra efficiency the diffuse reflection sends too much light back into the room in all directions.
When I made my snoot I decided to use some very thin black plastic, the kind that thin wallets for A4 paper are made from. The plastic was very smooth, shiny, and black, which means very little diffuse reflection but still lots of direct reflection. Once scored and folded it fitted the flash nicely.
The idea was that with only direct reflection from the black plastic you can, in theory, get the same control over the direction of the light as the black foam, but with greater efficiency as well.
I still need to find some foam to do a direct comparison, but I was interested to get your opinion on this in the mean time.
Cheers,
James.
Hi Neil,
I bought my first external flash (a 430EX II) recently and have found the learning curve steep when it comes to creating subtle effects. Your site has clarified lots of things for me, and I already have your book-to-be in my Amazon shopping cart. Thanks so much for the good work. Quick flash-newbie question: when you refer to aiming the light “behind” you, do you mean with the flash head in the upright position, angled back slightly? Or something else . . .
Cheers, Josh
Hi Neil,
I was taking pictures in a church the other day and usually when the lights that are on, they are lke a soft flouresent. On this day they were off but the stained glass windows were a light amber color and so the light shining through them cast a “warm” glow in the church. I took some tests shots with my TTl flash. I was trying to experiment/practice with white balance and flash and decided to gel the flash with the 1/2 CTS and change my cam WB to tungston and found that it did not look orange or warm but “normal” they actually looked good…I was thinking that they would be really warm because of the gel and amber light..
Sorry..really new to flash photogrphy and I have read your posts on gelling over and over and i just want to understand how my pictures turned out this way.
Thanks,
Joy
Sorry another question
and also,,just to make sure, you only gel if you know that the lights are going to be tungsten right? Or is there another time that you would?
I really appreciate your help:)
Thanks,
joy
Hello Neil, This is my first post on this fabulous forum. To add to Joy Oxenrider’s post, do you when gelling, automatically set your WB to tungsten or do you do a custom WB? Also, how do you determine when to use 1/4, 1/2 or full cto?
Thanks Neil,
So is it safe for me to say that you can gel 1/2 CTS or CTS if say you were taking pictures at sunset and the light is predominately warm/amber and you want to retain some warmth but not want your flash to be noticeable and set your WB on your cam accordingly?
Joy
In Elizabeth’s picture, I noticed that she has device attached to her flash, as well as to the side of her camera. What are those, and why does she use them?
Hi Neil,
about the black foam half-snoot / flag. I just built one for myself using the modification suggested by Randall Todd.
I tried at home, and i found out it does take a LOT of power more than the same setting without it.
I own a 430 EX flash, so power can become a problem. I was test shooting in a 3×4 meters room, with 2.8 meters ceiling at F4 1/250 ISO 100 (EOS 40D) and bouncing at 45 degrees in different directions: I had problems reaching EV +1 to match my white walls.
However with the 430 I can still manual zoom the flash while bouncing (can you do that with the 580?) and found that if I zoom it to 105mm, even when bouncing forward at 45 degrees I get no direct light in front of me at eye level (I just pointed the camera to a framed picture with glass in front of me to be sure), but I retain all of the flash power. Directionality of light is still acceptable, even if it is less defined than with the half-snoot.
I have still to try it in real world conditions, but looks to me like an useful workaround when flash power is a problem.
Hi Neil;
Many thanks for the tutorials-I’ve printed a number of them and i am rereading them over and over. Now that your book is available it will save me having to patch various info together.
I’m using a DIY mitt shaped modifier 8″ high by 6″ wide with a white foam front, flash in upright position either hand held or at some events on a RRS rotating bracket, ETTL with the Canon Speedlight. Custom WB with Colorright filters made in the environment and with the flash. I’ve just begun experimenting with gels to warm the light in low ambient light conditions, i.e. where the flash is the main source. I’ve placed the gel between the wide angle diffuser and the flash head. besides for not being able to set the lens focal length (it just flashes 14mm wide angle) am I doing anything to mess up the ETTL communication?
Do you have any caveats or suggestions re my set up
Thanks in advance,
Fred
Hi Neil,
I just bought your book and looking forward to read it!
Sometime ago I asked you the question what you’re doing when you are in a room where there isn’t any ceiling or wall or anyting else to bounce your flash. You answered that in this situation when you’re forced to put your flash straigt forward you use the Stofen Omni-bounce (without the whole). I wonder why you choose to use the omnibounce with the flash in straight forward position and with nothing in the room to bounce the flashlight? I made some testpictures in a room like this with the flash straight forward and with the omnibounce and a Lumiquest Pocket bouncer. I realy liked the pictures form the Lumiquest better. Also the pocketbouncer is made for this situation and the omnibounce is made to bounce…
I wonder what’s your opinion about this. Also I would like to thank you again for sharing all your knowledge!! Are you planning any workshops in the Netherlands?
Regartds,
Alwin
Very nice! I like how you modified your sto fen and also the tape is genius.
Hi Neil, I just received your book and it looks great! I will ask you a question I asked before but never got a clear answer: what are you doing when you’re in a situation like a big dark church where there is absoluty nothing to bounce your flash of. You just have to use direct flashlight, straight forward to your subject. Do you use the omnibounce without the whole in this situation? And do you use it then straight forward or in 45 degrees? I realy like to know…. Thank you!
Thank you Neil, now I understand how you work in this situations. I am going to try it out for myself.
Hi Neil
Firstly can I just thank you for such an informative site. My own photography has improved so much with your guidance.
As for flash modifiers, I have just come across the Gary Fong Website. I was wondering what your thoughts were on the lightsphere?
Kind regards
Ian
Neil, thanks for sharing your lighting knowledge – I am sure I speak for all of your readers when I say it is photographers like you that add a high level of professionalism and enthusiasm to the subject…. I do have one question… I was curious as to your preferred flash settings i.e. Manual vs iTTL… and how any modifier interacts with the iTTl system.. thanks!
Neil, I’ve been bouncing flashes for 25 years and I don’t think I ever thought of blocking the light going forward on my onboard flash. I think I’ve done every scrim imaginable with studio lights but this simple idea never crossed my mind. Thank you. Once again, less is more.
I shot an event a couple weeks ago in a very dark room and my technique was to use the onboard flash direct with the Nikon diffuser and then add a backlight with two SB-800s on opposite sides of the room. The idea was for the 800s to give me backlight in either direction I was shooting. I made more than a couple mistakes with the remote lights and in the end the job went fine, but after reading these questions, and one response about Quantums lighting the room, I was wondering if you could share a little on how you place and use these ‘room’ lights in conjunction with the onboard flash? IE, direct or bounced? snooted? TTL or manual? Would you occasionally use them as the key light?
Thanks again, great information and absolutely fantastic photography. I’m in Westchester, if you ever need an extra hand, give me a holler.
Very nice tutorial on flash. I am also using something similar from your half black dome from Chuck Garner ) basically it cost me a dollar more for the white sheet. I can use it without the ceiling too. This may be the answer for someone commented above about not having enough power however he should test these bounce at ISO 100 however a minimum of ISO800 for wedding reception up to ISO1600 is required most of the time.
I meant he shouldn’t test the half dome at ISO100 and 1/250 he just defeat the purpose of fill flash
I’m with you for the directional bounce flash and feel confident with it, and using simple modifiers, as well as off-camera with a softbox. However, I’m really struggling with moving quickly to vertical and back during fast sequences (like the end of a wedding ceremony when events are moving very quickly). You don’t use a flash bracket as one of your accessories, I see, yet I feel I really need one so I can leave the flash as it is once I find a good bounce surface and angle, and just flip the camera. I often try a composition, move the flash head, and decide it’s not working and have to go back, then move again and do it all over. I often get so caught up in the photos that I forget to reposition the flash head, and get side shadows on vertical, or have the flash pointing the wrong way for a few shots before I remember to move it back for horizontal.
How do you overcome the constant repositioning w/o a bracket? If you do use a bracket, what features do you recommend?
Hi I´m from Argentina so pleaase apologize my mistakes in writting… one question I saw in the photo of your assistant that she has a PW attached to the flash so i think this means that she did not use only on camera flash for her shots is that correct ? and in this case how this affect the ¨look¨of your pictures … in other way i would like to thanks very much for show us your technique it´s very useful and i become a fanatic of this blog
thanks alot again
Hi Neil,
After no-one picked your book from my Amazon wish-list for me for Christmas, I had to splash out on it myself last week, and I’m so glad that I did. I feel as if suddenly I actually “get it”, when it comes to ambient light and what a flash can and should be used for, when off-camera flash isn’t an option. Thank you SO much!
I had one quick question, if you have the time to answer it. I know you use the D3 a lot now, and previously a 1D Mk3, but I’m using a 40D and I worry about the noise I get at higher ISOs compared to those cameras. It’s noticeable even at 400, and by the time I get up to 1600, it can make the images pretty soft and noisy. I do have a fully paid-up copy of Noise Ninja for my Photoshop CS3, but it’s still a big extra workflow step.
My question is … do you still think that the results you can achieve with the higher ISOs (aperture/shutter-speed) make it worth the extra noise that can creep into the images, and how much is that noise a problem in the real world, when it comes to supplying cropped, processed images and/or prints for clients?
Thanks again for this wonderful site and your insanely well-written book!
Martin
Oxfordshire, UK
Hi there Martin,
Thank you for the kind words about the book! Now about how high-ISO noise impacts you, or doesn’t …
Check out this article I wrote on the topic – dealing with high-ISO noise. Admittedly there I used the Nikon D3, which has incredibly good high-ISO noise response.
The key comment there however, is:
” if you consider how the image might be used, it is usually less noticeable than you may think from the 100% view on your screen. High-ISO noise appears to print differently than it usually looks on the computer screen. On top of that, the image size when you print it, also has an influence.”
You have to consider your end use of the image, and how it will be viewed. For me, that is more important than looking at ‘absolutes’ in how the high-ISO noise appears in comparison to other cameras, or looks on the screen.
With that in mind, you have to find our own maximum high ISO that you are comfortable with.
Despite your lighting style and approach, why specifically you wouldn’t use Gary Fong diffuser/modifier? Taking to the consideration that fact that even with your foam flag you do get undirectional light but do loose most of your power. On top of that, from my experience I can see often not enough reflecting surfaces (except ceilings). WB might cause another issue from brightly colored walls.
Thanks you!
Maks
Neil, do you ever use a flash bracket with your black foamie thing, or do you find you don’t need it. Also, what are the most common situations where you find you had rather not use it, if any. I appreciate your knowledge and willingness to share. Thank you much. Larry.
Hey Neil,
Fantastic info you have here. I’m going to buy your book in the next few weeks, and I have a request/suggestion :)
I live in Hong Kong and here it is often hard to source anything without spending days trawling the streets and internet forums. Have you thought about selling autographed black foamy thinigies packaged with your book? I reckon you’d have a huge(r) fan following and it would be great promotion for your book too :D
Mick
Hi Neil just ran on to your black foamie thing and I am going out tomarrow to get some to try I have been taking Photos for a year now and it is usually nature things but I have a cousin that want’s me to take pics of her 9 month old and this may just be what I need. I have the xsi and the 430 ex and a off camera cord and bracket any suggestions would be greatful you can email me if you would prefer because I could use the tips on portraits…I am on flickr if you have a time take a look and my stream and please give me some tips for I have a great passion to learn I love photography….my flickr name is pens2009…Thanks again and I’ll let you know how I do with your art work!!!!
Carol
Yes I would LOVE some when ever you have time!! And thanks so much! :)
I’m a recent follower. I’m bummed I did not discover your site sooner. I spent a hell of a lot of money on Gary Fong because the pro’s I interact with convinced me they were the best diffusers for wedding photography.
I have rubberbands, I shop at Michael’s and have extra diffusers I could cut out. I don’t have gaffer’s tape which is on my shopping list.
I appreciate your humble ways of making things work.
Hey Carol!
Since I know Neil is incredibly busy – here is a link to some of the portrait articles on his website. This should be a good start for you. https://neilvn.com/tangents/category/portraits/
Also, You have over 4000 images on your Flickr page. That’s a lot to go through and it is unreasonable to expect a professional to comb through all of that. If you want a critique of your work, the best thing for you to do is select 10 to 20 of your favorite photos that you feel best represent your work and put them in a separate gallery for review.
When I review people’s portfolios I expect them to take the time to organize and properly present their work. I don’t want to see a set of quickly printed 4x6s in an envelope. Why should I spend my valuable time on something someone doesn’t care enough about to present properly? I always feel a review of my portfolio is a gift, and it needs to be treated with a great deal of care, respect and appreciation.
I hope this is helpful. I hope your shoot is successful and that you continue to learn and educate yourself about photography.
Stephanie
Should you use CTO gels for fill flash outdoors? Would that have the same effect as using a gold reflector?
Thanks so much Neil! I’m sorry that I asked a redundant question. I’ve read all of your articles, multiple times, but I didn’t realize how much information there is in the “comments” portion of each post! Thanks again, it’s really, really great that you take the time to answer so many questions!
Hi Neil,
I still can’t figure out the use of the omnibounce, It doesn’t enlarge
the light source, so how can it soften the light/decrease shadows? I noticed that even when there is nothing to bounce the light from it still seems to soften the light. It’s just spreading the light good enough to make the light softer?
Neil, in a situation like that (nothing to bounce flash off) it seems to me that it’s better than to use something like the betterboucecard (the big one) instead of the omnibounce. The bouncecard will provide softer light than the omnibounce does when there is nothing to bounce. Am I right about this?
Neil, I just came accross your web site by accident and very glad I did. I have been trying to achive the same goal as you by having my flash look as a natural blend into scene and not take over image. I have foam on hand and going to make diffuser tonight. Was wondering though what is your ceiling height limit using the black diffuser? and your gel is that a CTO 1/2 or 1/4 gel looks pretty light. Do you also use the same gels for outdoor work. I have been going through all different types of trial and error situations but after I read this so simple to see now. Thanks, Chris Mann
Neil, Made my own black foam diffuser last night and tryed it out. I really like the look of my shots much better bouncing the flash accross different surfaces. Looks much more natural then system I was using. I do already have a full sheet of the rosco 3441 full gel and have a sheet of 3442 1/2 gel on the way. So if im understanding this correctly you use the full CTS for inside work and the 1/2 CTS for out door work and do set custom white balences for each situation. I have been expermenting using kelvin settings but cant seem to hit it just right. would also like to set white balance with flash also. So much great info here on your site. Would also like to know the name of your book. Thank you for sharing all this great info. Chris Mann.
Neil, Now that I know what book im looking for going to purchace it. Cant wait to see what information I will learn from it will do for my flash work. thanks Chris Mann.
HI Neil I noticed on your second shooters camera she had on camera flash and a pocket wizard. Was she using the pocket wizard to trip remote lighting at the same time she was using on camera flash. Was the pocket wizard hooked up to the pc port on the camera. Interesting set up.
Hi Neil, Bought your book yesterday and cant put it down I love the simple approach to lighting.
Also like how to expose for different tonal values in images by just using camers exposure and folling up with flash.Also forming me through your book about reading historgrams to help reduce digital noise. I also think I understand your use of the CTS gels now. Just using one to make light alittle warmer compaired to the other. Wish I would have found your book along time ago. Have been banging my head aginst the wall all this time for nothing.
Was wondering though when you underexpose for a darker subject where do you start 1/3 2/3? Just curious.
Noticed you have the Demb flip it and peter greggs bounce card pictured in your book I own both and do you ever use them. I have the same bounce card picturd in book with black center black strip and like it alot.
Thanks, Chris Mann.
Neil, Im about 3/4 the way through your book now and was curious about one more thing. You talked about trying to bounce your flash outside also with the help of an assistant if needed off a refelctor or other surface if possible but what if you dont have access to any of this at the time? Will you shoot straight on flash with gel in place or use white bounce card? Have been using your bounce flash inside now and all different directions and what a world of difference this makes. Shooting a 50th wedding ansv. party this weekend and cant wait to try this tech. there. That little piece of black foam is majic. Also when I read about setting flash what does that equate to +0.7? Thanks again neil, and do you ever travel around to other states and give seminars about your ideas on lighting?
Your right, and thank you did not see these sections. The umbrella bracket idea is very creative but I dont think I would be lugging that around looks heavy and kind of silly. Liked the wedding shots with flash bounced off of store fronts. Havent tryed bouncing off of glass yet. Thought light would be lost. Seems like almost anything wiil work though. I am creating a larger bounce card for outdoor flash with black strip in center. Taking peters idea of bounce card with black strip in center and just made larger verision of it 8×7 inches should give enough fill I hope. I will let you know. Not shooting with straight white cards any more if I dont have to. Chris Mann.
Neil, just finished finished your book yesterday and I’m impressed. Have incorprated a few things into my shooting style now. I have but a few more questions though. when you have a white or lighter color wall and a darker subject what is your preference for tonal value in scene are you pulling exposure down and using flash for or taking exposure up for white wall? Also have been trying flash exposure comp to overtake the ambent light from windows. Are you doing this with black foam diffuser in place. I am not having much luck. Do you have a book out yet for off camera flash? Thank you for your help. Chris Mann.
Neil, Have worked with to many diffusers. My mistake. I have also been working on other styles when there is nothing to bounce flash off of, but I will have to tell you that I have been getting good with the flaged flash style and loving it. Has changed my flash work for the better. Fun to create a different approach of light into scene and different effects than can be done,and I am using max sync speed when the light allows it. Have learned much from your book. Thanks, Chris Mann.
good tutorial/explanation on how to use flash lights.
Neil, in shooting the reception, I was thinking of putting my 580ex on a stand and using one of those small portable softboxes and roll my stand around as needed, but after reading through a great deal of posts here, would a shoot through umbrella be better? Another delima I have is I only have one 580ex II and my other flash is a 430ex which is limited. I do have a pair of pocket wizzards and could setup the 430ex on the stand and switch between them or use both as needed
I don’t want to get too much going on for my first wedding. The couple, although on a budget and we’ve worked a deal in order for me to build my portfolio are comfortable with what they are receiving at the price and I have a good contract in place as well.
I love reading your blog, too many times I go out to Photograpy-on-the.net and egos get in the way of giving help advise for us that are up and coming *stars*
thanks
mike
Neil, I have been primarily a landscape and wildlife photographer, but after finding your blog I’ve been totally immersed in learning your flash photography techniques for portrait work and perhaps weddings.
I made a couple of your Black Foamie Things, but when I use them on my two Canon 580 EX II Speedlites the flash units make a very distinct POP sound when they fire. It happens every time when the 1/2 snoots are in place, but they fire normally (quiet) without them.
Have you experienced this loud popping sound from your 580EX IIs with the flags attached? I’m concerned about the extra noise for quiet settings like a wedding, but also concerned about possible damage to my speedlites. Any guidance?
Thanks for considering this question. I’ve learned so much from your site that I can’t even begin to thank you enough. I bought your book, and am eagerly awaiting your Off-Camera flash book next spring.
John S.
Thanks again, Neil. I had missed the updated post — sorry for asking an unnecessary question. When I adjusted the amount of foam extending from the flash head, it works fine.
John S.
Hi, first of all, excuse my nglish, im Spanish, from Madrid (Spain)
Thanks Neil for all really usefull information about lighting and other more
I have been looking for a piece of foam here in Spain, and i found it, but this piece
of material here are call “Foam” or more known as “Goma EVA”
Hee hee, what do you know? You can find your blog by googling black foam thingy. :)
Good workshop today. Thanks!
Hello Neil, I just found this site and has already tought me so much. I am a housewife which photography has been a hobby I enjoy, but have never had any training or professional equipment. I recently purchased a Nikon D40 and I am being encouraged by friends and family to shoot for pro. So I made a free site to show old pictures I took with a small camera I had before the Nikon. I have so much to learn. I find it sooo interesting all that you teach on lighting, and I loved the black foamy thing, =-). I have not purchased a speedlight flash, I will have to do a bit of saving for that one, lol. I would like to ask how it is that you make the background on the picture above, all blurry but still keep the bride and groom so clear?
Thank you for this site. Your are very helpful and inspiring.
Blessings,
Sarah
Hi there Sarah … I assume you’re referring to this photo?
(If not the same idea applies to the other images as well.)
The separation from the background is because of the long focal length I used here. I used a 70-200mm zoom lens. And by using a fast aperture (around f2.8 or maybe f3.5), the depth of field appears really narrow. And there is the separation you’re seeing from the background, with the background all blurry.
Here is more details on how to get a blurred background in your photos.
Thanks for that info Neil. Would the Nikon 55-200mm LENS do the trick? =-)
Or the Sigma 75-300 4.5-5.6 for Nikon?
thx
Neil … its amazing that after being at one of your seminars and reading you book at least two times, I seemed to have missed the orientation of the BFT.
From the pictures on your web site and in your book, I had it reversed. I had the Black Foam on the top side of the camera. In other words, on a 580EXIi, I put the BFT on the side that has 580EXII stamped on it. Your photo’s show it just the opposite.
Nevertheless, I seem to get a similar effect – sometimes striking.
In your opinion, does it “really” matter.
OK, things I learned. The BFT pretty much requires an external battery pack. (I have an Al Jacobs Black box with a strap). And not the BFT can’t be a WFT.
Now my questions:
1) Are you able to use TTL with the BFT or are you using manual?
2) What do I ask for when I walk into Michaels/MJ Designs/AC Moore besides a sheet of Black foam like Niel Van Niekerk uses? (and blank stares abound!) I read where stiffened felt doesn’t really do the job. Can I get some dummy type specifics here?
Thanks, Lee
Fantastic blog with some great ideas. Thanks for sharing.
Dear Neil, I am a photograph beginner in Taiwan.Thanks for your kindly sharing so much information about flashlight.
And there is a question:Could the black foaming thing be used for a wedding photograph and some kind scenes like that? Or it can only be used for indoor photograph?
Thanks for a lot!
Thanx Neil
This great post realy help to us
Hi Neil,
Not sure how I stumbled onto your website but I wish I had known about your site long before now.
What would be your equivalent of trying to get the same results with a Quantum Trio or Q-Flash on-camera as you get with the Black Foamie Thing on your Canon or Nikon Speedlites. Would the Bare Bulb Enhancer or the standard reflector give a similar effect if the enhancer was positioned in front of the flash tube, especially for wedding processionals.
Back on the question of the Bare Bulb Enhancer, would it make sense to put the enhancer on the front side of the flash tube (facing the subject)so that all the flash is directed upward and behind? Possibly pointing the tube straight upward and blocking any light flashing forward. Shouldn’t that work?
You could merely swivel the flash head to suit Bill, I have the Trio [for Canon] but since switching to Nikon I use it on a stand as off camera flash, but I have used the bare bulb enhancer [silver] and merely swiveled head around a bit.
In hind sight I would spray inside black so it acts just like the black foamy thing but that’s a moot point now that I use my speedlites and have Quantums as OCF.
Swivel in conjunction with you mounting it backwards or any way you like, though it may have to be just inside the head and tighten up without the little slots being pushed right down, if you choose anything other than correct or totally backwards as the slots line up to fit into the head.
Speaking of tightening anything with the Trio, be aware of how much you tighten, I am afraid it’s not very robust, in fact I would go so far as to say it’s pretty darn ordinary.
I’ve treated mine carefully, but where you tighten in the diffuser, it’s cracked and eventually a damn piece of it broke out, so I now have a black garden zip tie right around the edge of the head to keep it all together.
Also the foot where you tighten it down, it’s come loose and just won’t tighten any more and although I have it mounted on a stand, with a cold shoe to clamp around the edges of the foot, the foot part that goes into the base of the Trio is loose and floppy, very poorly made. I’ve never been rough, dropped it or carried by the head. I would never buy another that’s for sure.
Its a shame for the Trio’s build quality. Up until now I’ve been using a converted X3D-R on a camera bracket. That 200 WS really bounces some light around. Just wish those great electronics could be put into a more refined housing.
Was trying to decide between a new Qflash T5d-r or the new Canon 600EX-RT for on-camera.
Would you be concerned about the new Canon 600EX-RT overheating on a typical wedding shoot? We keep hearing about not shooting any more than 20 consecutive shots due to overheating and the unit shutting down. Guess it scares me a little. Was thinking about running the Canon off of the Quantum Turbo 3 which I have for my Trio. Can’t make up my mind.
I know this sounds like a broken record but I’ve learned more from your site in the past few weeks than all the years I hung around Monte and Ziser seminars. Been shooting weddings over 25 years and am still hooked, especially since the new technology is making life a whole lot easier.
Can’t wait to try this. Looking forward to reading your book.
Thanks for the tips! It was a life saver, I had an assignment where I needed to shoot flash under Tungsten light.
Your gel tip is very useful.